|
|
Post by doublechevron on Apr 21, 2015 15:31:51 GMT 10
It's had 2 owners from new according to the seller. The first owner traded it 4years ago, and it was taken down to port fairy. The 2nd owner just traded it back in on a new boat. I'd say it spent the first 20year of it's life sitting in a hay shed on a farm. There is no evidence of it doing any milage ... or being left in the weather. Slight fading of the paint. marginal water staining that would take a lot of finding. I imagine those shockers will be stuffed from lack of use ( given it still has it's seemingly original unworn cross plies on it). It's rare to find a 'van of this vintage that hasn't had a hard annexe screwed to it's side and isnt' full of water damage.
Oh well... Many months of scraping off old sealer ahead for me. I'll need to re-do all the Jmolds, both 4seasons hatches and the windows. The sealer in them will be 25year old mastic.... that'll have turned to concrete. I'll also need ot wire brush and paint the chassis given it spend the last few years sitting at hte beach.
seeya,
Shane L.
|
|
|
|
Post by doublechevron on Apr 21, 2015 14:19:24 GMT 10
Well the old Chesney has spent 6months down at the beach in the last year. It's survived some incredible gale forced winds (that tore all the anexe tie-downs from the side of the caravan and bent the anexe poles and torrential downpours   The way I sealed up sure did work a rippa. ditzygypsy.proboards.com/thread/2647/old-chesneySadly it'll now have to be sold, The ideal caravan with bunks in it appeared for sale... so I bought it right away. It's an old Windsor. The old Chesney is no doubt a much better built caravan having that aluminium frame ... but hey, bigger is better right. 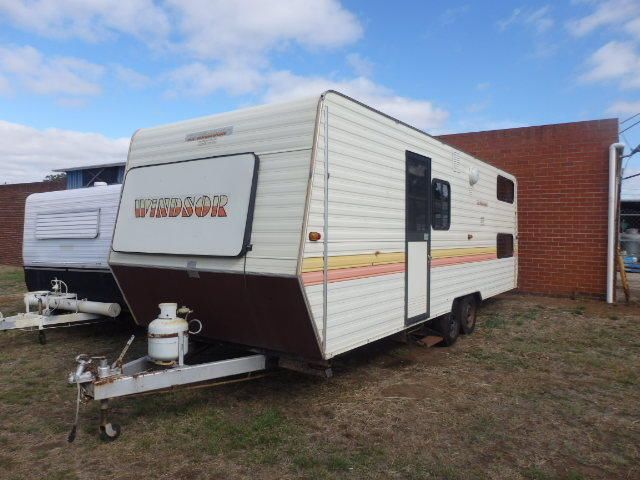 I've never seen this layout in a large caravan before (it's almost always in a 17foot single axle 'van from the mid 80's). 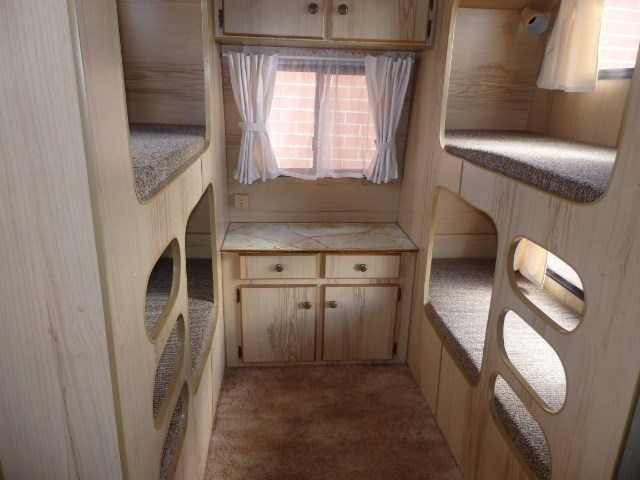 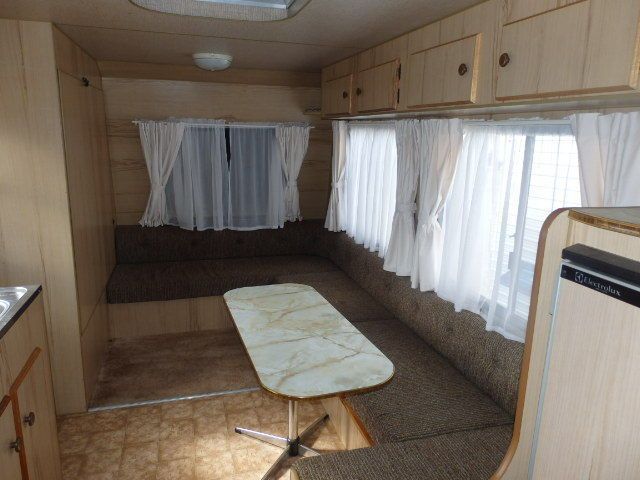 Yeah that would be seating for about 10people! 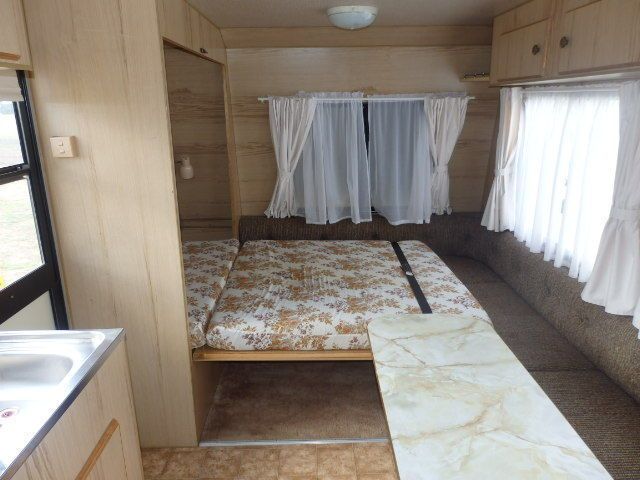 Resealing this old thing is going to be an enormous job (due to the sheer size of the bloody thing!) to reseal. It has weird coil spring independant suspension and still has it's original (unworn) cross ply tires on it. The cracks in the tyres are amazing (the guy selling it happy to tow it back to my place for me when I said "No way am I towing that unless all the tires are replaced"). I'm expecting it to arrive either on a truck with shredded tires or with 4 newies  seeya, Shane L. |
|
|
|
Post by doublechevron on Oct 20, 2014 12:22:20 GMT 10
You'd have thought someone towed it home 30years ago .... brand new, parked it in a sealed dark shed covered in blanket and covers. It looked brand new!
I should have saved the piccies!
seeya,
Shane L.
|
|
|
|
Post by doublechevron on Oct 17, 2014 10:36:13 GMT 10
|
|
|
|
Post by doublechevron on Oct 8, 2014 9:42:40 GMT 10
Hi ya Shane - you can get new OEM springs for it still... Good to see you didn't follow the herd and bung aftermarket springs in it. Mine will have club reg on it early next week. I have to find a replacement boge leveller for mine, or someone to repair it, as it finally gave up the ghost after 369,000 KM. Nothing lasts these days...  I'll pop up one day and take a look at those nice looking Citroens you have.  Nah... Mine is almost 100% original... Trav purchased it from the original owner but never got it back on the road. He did a staggering amount of work to the old Rangie... New water pump, all new fluids/oils... all the floors out to fix up the grub screw in the transfer box (it was stuck in high range as the grab screw had come a loose). He removed all the A/C and fitted a new alternator up where the compressor was (the A/C had melted down all it's wiring and was stuffed). It still had it's original springs that were flat as pancakes... so he fitted new heavy duty king springs. It sits waaayyy to high. I think the leveller still works though. It never seem to drop below a certain point, even when towing a loaded car trailer. I think the old bushes and rubbers under it have given up the ghost now it's back on the road. I'm going to replace all the bushes with original rubber and original super soft springs......................................... As soon as I have the $$$$ (yeah so probably 2025). Anyway ... that annex ... The caravan park rang to say the wall where the stitching had pull has come away (I was going to go down on the weekend and fix that). I'd tried google to find some needle and thread that might work on canvas and stumbled across this .... www.ebay.com.au/itm/SPEEDY-STITCHER-Sewing-Awl-Repair-Tool-three-piece-Kit-made-in-the-US-/151405740688?pt=AU_Sport_Camping_Hiking_Tools&hash=item23407c4290 I googled it ... and found this: www.youtube.com/watch?v=k40kKKCGyacMade unchanged since 1903 ... and looks dead simple to use. So I hit "buy it now" on ebay on Sunday, and I"ll be damned if it wasn't here Yesterday morning in the letterbox. So I jump in the old ID19 and headed down to the beach last night. Pull the annex down and broke the needle on the 3rd stitch .... sigh ... Lesson learnt, push evenly so the needle doesn't bend if your going through 6layers of canvas. It took about and hour ... But I reckon the repair is easily as strong as a machine stitched one... What an absolutely amazing tool!! I can't think of anything you could stick togother so long as your physically strong enough to push the needle through whatever is to be sewn. seeya, Shane L. |
|
|
|
Post by doublechevron on Oct 3, 2014 9:37:43 GMT 10
Funny after reading your initial post I went looking for old rangies on carsales, but in my dream world I wanted a manual. There is only one on the market that I could find at the moment, a nice original looking country car that needs a polish. If only I had some spare coin around and a farm to keep all my wish list vehciles. Good find with the old girl! There's was one locally here advertised for quite a while that I was itching to go look at .... R380 5spd manual, no lift kits, not accessories, but was running a fuel injected 4.4 (the old P76 motor).... Only $1800 bucks ... it look really tidy too. You put them onto a club permit, 'cos there really only going to be a toy and you'll find you never drive it 90days a year. I couldn't afford to drive one daily ... 20L/100km from the wheezy little V8 would bankrupt you in no time   But gee's you'd have some fun. you'll struggle to find one wihout heavy duty lift springs. People fit them to try and lift the tail back up rather than just getting the Boge load leveler repaired. Lifting them stuffs up the caster angle so they don't track very well, and you loose the ride quality due too the stiffer springs. you also loose axle articulation offroad if you lift it up so it's all tipsy. I reckon the 99% of poeple that lift 4wds do it to copy everyone else 'cos it's the latest "fashion". I'd love to chase up and original set of springs for mine (and a full rubber bush set) ..... Oneday.... Anything worth doing takes time  seeya, Shane L. |
|
|
|
Post by doublechevron on Oct 1, 2014 16:06:54 GMT 10
Looks good mate. I hear what you are saying about how lightweight everything is. I was amazed at how little timber there was holding up my two single beds when I removed them. Makes me feel the double bed I am currently designing is well and truly over engineered (and I am mainly using 42x42 posts and 42x18 timber for everything else! Its a fine line between it being too lightweight and too heavy...you dont want it to be flimsy but you dont want to be towing a lead weight around either. In the scenario you mention about setups in the caravan park, mine wont be much of an improvement over yours...a '89 Paj and '74 van...still, give me our setups any day! Good luck with the annexe! Hee,hee. It took me a while to find the old Rangie... trying to find a 4 door with a manual gearbox and twin carbs that wasn't buggered up with "enhancements" isn't as easy as you'd imagine. I wanted the suspension standard without crappy lift kits or anything. And a working boge leveller under it (the rear axles under them have a centrally mounted boge leveller, so if you load the sh!t out of the towbar and drive around the block, it lifts the back up and levels it) ... The old heap of junk sure is a capable tow vehicle/offroad vehicle. The annex? I went down last night. The wind was so strong it had split the wooden part of one of the annex ropes in half (the wooden bit with the two holes drilled in it that holds the tension on). The two halves were laying on the ground. The remaining six poles/ropes couldn't hold up against the wind. 5 of the poles were very bent, two were bent into "L" shapes allowing the ropes to come off them at the top. The little clips that hold the side wall to the caravan were ripped out of the cladding. One of the poles managed to stay up and only slightly bend... the force of that one not bending over pulled the stitching along the top of one of the side walls. Basically if I take down some new wall anchors for the caravan, some straight poles and a needle and some strong thread it should be good as new. The new annex on one of those "A" frame caravans infront of us looks ... well... stuffed. seeya, Shane L. |
|
|
|
Post by doublechevron on Sept 30, 2014 16:34:25 GMT 10
Woops... Yeah I didn't realise you were talking about a different caravan  I was wondering why you didn't do the window in the same way as the 4seasons hatch! seeya, Shane L. |
|
|
|
Post by doublechevron on Sept 30, 2014 16:06:42 GMT 10
If the window is still leaking, try the same "dam" method from sealing it. Have a look the "Tidying up the old Chesney" ... You can see where the sealent forced it's way right through to the insides of the windows. I can't see how they could possibly leak when done like this ?
I still need to do the 4seasons hatch and roof seems ........... I'm not looking forward too it and tend to think I should leave them well alone while there not leaking.
seeya,
Shane L.
|
|
|
|
Post by doublechevron on Sept 30, 2014 15:10:20 GMT 10
Well that lasted a long time .... The caravan park rang my wife to tell me the annexe is down ..... Sigh .... So I rang them back to find out how and why (so I could take tools as required).... "Which site are you" ... "You rang my wife, our annexe is down" .... "yeah which one" .....    So it managed a whole 4days without us being there. They have trees down and everything. The bit that's got me is I used massive "stakes" that look like railway ties to peg down the annexe (not tent pegs).  Good grief .... 48knots on the south channel   That's 90km/h .... I'm figuring were going to be needing a new anexe.... this one is going to be blown to sorento in a dozen pieces.... That's a shame, it was a nice clean period TEBS annex  seeya, Shane L. |
|
|
|
Post by doublechevron on Sept 29, 2014 16:04:29 GMT 10
This sure was fun .... Nothing like trying to rush to get something done  I refitted the corner strips without sealant and ran some wide tape down beside them to make cleanup easier.  Then added plenty of sealer ( white roof and gutter silicon ...urrrghh... I hate silicon after trying to clean it off in a few places) ... anyway...  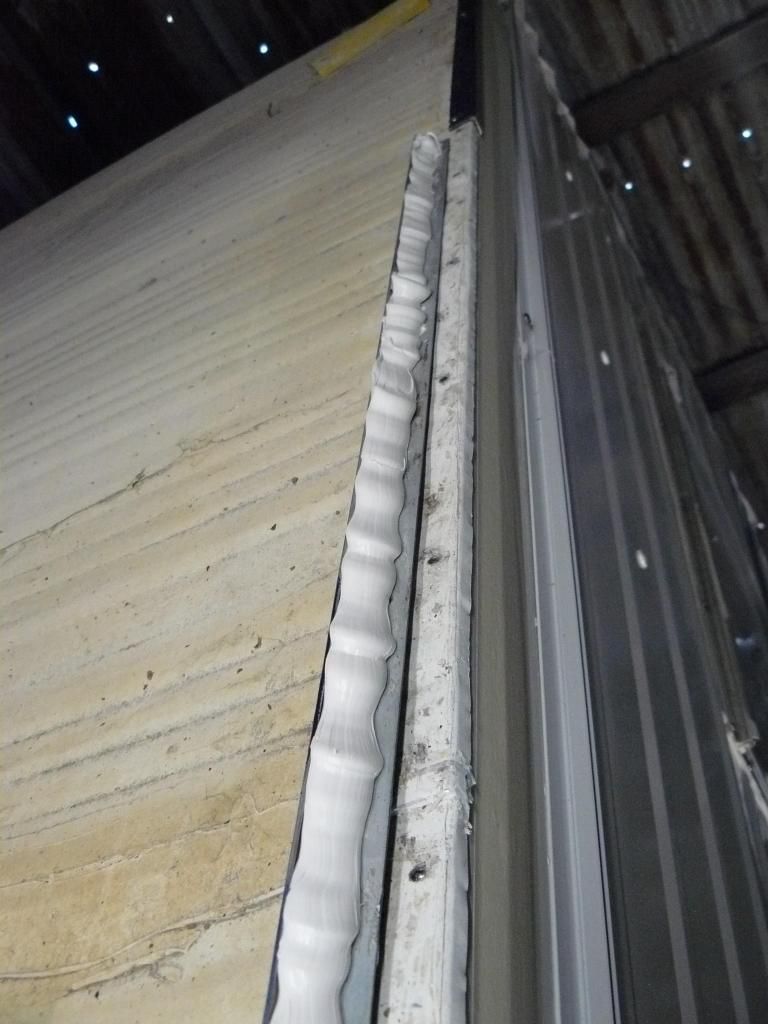   Its sure does squeeze out when you screw the edge strips down .... What a mess !  Then you spend ages and many rags trying to wipe all the excess away and peal the tape off. It took me about 2.5 hours per side ... and that's on a little 17foot caravan .... After everything was already clean (that cleaning and scaping off of old sealant took an incredible amount of time).  Isn't it amazing how lightly built everything is. Look at the frail little bed legs. I unbolted these and lifted out the base (those "spring type" bases are bloody horrible things). I had intended to fit a lift up bed (and probably still will at some point), but have no time or $$$ to do that at the moment.   Those springs were amazingly high tensile. I strugged to remove even a couple with vice grips. The 9" grinder made short work of it all. I lopped the frame in half and added several inches so it's now a standard double bed mattress in size.  Some crappy lightweight pine that has been getting filthy and dirty in the shed was layed down as a base ..... It looked ugly so I quickly hid that from my wife by putting the mattress over the top with a new matress cover on it LOL. I just screw the spats on with tek screw through the spring holes in the frame. The best bit was this gave a LOT of room under the bed without all the spring frames and crap beneath it. You can slide big plastic boxes under there for storage. We then spent a couple of long nights loading everything up .....  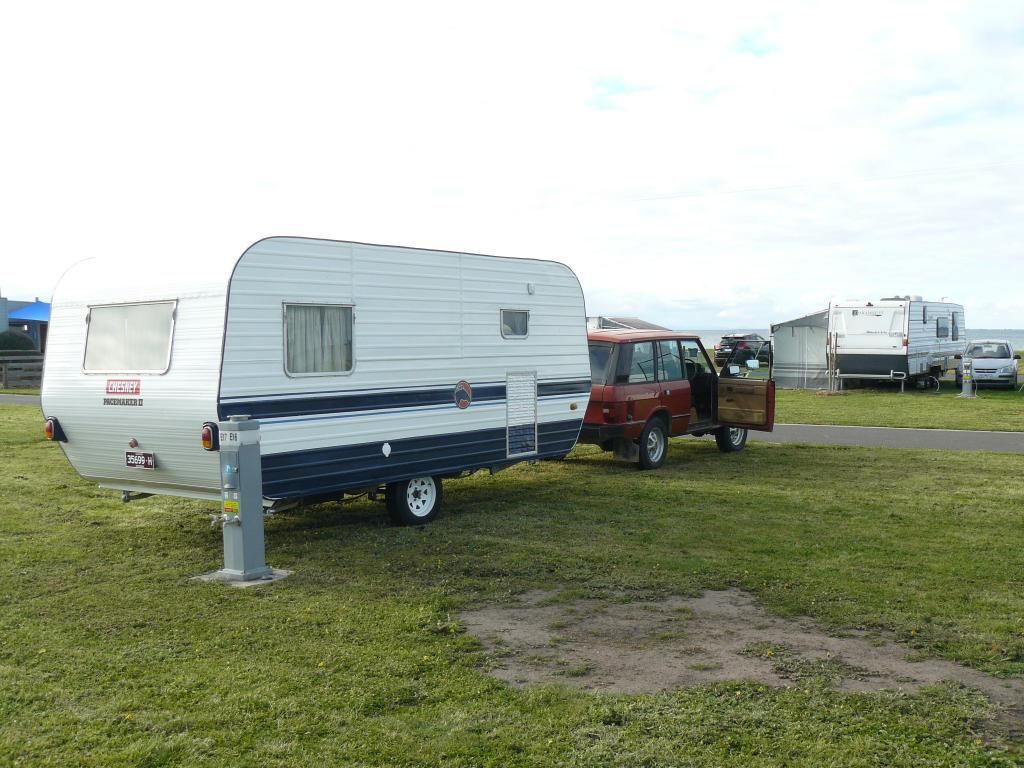 It's down at the beach now for 3months. We stayed there for a week last week, and I'll be damned if it's not the most comfortable caravan bed I've ever slept in. We had a torrential downpour ... and the caravan didn't leak a drip anywhere that I can tell. I hope the poor old caravan doesn't feel inferior down there. As it sits there it's a $1250 tow barge attached to a $2500 caravan .... Surrounded by $70,000+ caravans attached to $50,000+ tow cars   seeya, Shane L. |
|
|
|
Post by doublechevron on Sept 19, 2014 15:17:52 GMT 10
Hey Ted, I notice you have a rear bumper as well. Cheers, Des Des Hi. Yes I do have a rear bumper but it is at an angle and I would like to change it. that's why im interested how yours look without wheels on it. No rush - I'm months away from changing mine.
Some old photos. 
I tried bolting a wheel bracket onto the bumper. 
This is the 1989 Jayco I had. 
I hope this is what you wanted Ted
I wonder if you could use a spare tire winch from a local car ... and just mount the spares under the floor as close to the axles as possible. That way there out of the elements, aren't putting huge weight at the very rear of the caravan (the worst thing you could possibly do from stability viewpoint). The negatives of course are they'd suck to get too and check/top up with air. seeya, Shane L. |
|
|
|
Post by doublechevron on Sept 19, 2014 10:33:50 GMT 10
Hi Shane Its a real pain ,you think that having them insured we wont have a problem but they always find ways around it Yes i have just paid to get her car fixed, you should ring your insurance company and ask them what would happen if your wife was in one car and you hit her in your drive way and see what they say Then you will get an understanding of what i was saying, very confusing Regards Peter I'm pretty sure I'd be fine. All my cars are insured through shannons. I'm hate claiming for my own stupidity too... eg: a few weeks ago I put the bonnet over the roof of my old 1963 Citroen ID19  .... I'd moved it out of the shed and had it on the battery charger and just lowered, but not clipped the bonnet down. The following morning I thought "bugger it, I'm going to drive it too work now it's out of the shed ..............................................". Guess who jumped right in and hurtled down the road without giving a thought to the fact the bonnet was just sitting down but not clipped down in anyway  Now I need to fix and paint another bonnet for it.... No doubt I could claim it on insurance, but I'm to p!$$ed off with myself to do that. seeya, Shane L. |
|
|
|
Post by doublechevron on Sept 16, 2014 11:25:08 GMT 10
Gee's I like these old eggs.... I'd never seen a twin axle "egg" shaped franklin until yours started appearing all over the forum  I don't like the wheel carrier.... I hate the idea of all that weight hanging off the very back edge of the 'van. I'd try to carry one spare as close to the axle group as possible. You will find one of those big twin wheel carriers in the middle of QLD (or was it NT). When I was a kid we spent 6months going around Australia... My grandparents followed us for the 1st half of the trip... There caravan kept swaying all the time.... The fix was to remove that huge twin spare carrier off the back and leave it on the side of the road with one spare still attached... keeping the other spare under the bed inside. It stopped swaying as soon as it was removed. seeya, Shane L. |
|
|
|
Post by doublechevron on Sept 12, 2014 13:23:10 GMT 10
Geez Shane, you're making me look very slack... I'll have to pull my finger out and get mine sorted - maybe for a meet up at Wombat when it warms up a bit?  That's what happens when your given a deadline. It's supposed to be heading down to the beach for 3months in a couple of weeks  I still have to modify the bed inside so a standard mattress will fit on it too. My wife wants to do one of those "mini-seasons" so she could just go down with the kids in the school holidays etc... and the 'van and everything would already be there setup ready to use. If they like the mini-season deal... I make chase up a much bigger caravan at some point to tidy up. I wouldn't travel distances with a huge 'van, but the old Rangie could tow a huge b@stard down to the coast easily enough ( it'd be slow though ). You'd just do it early in the morning when no-one is around so you don't hold up any trucks/etc on the ballarat->geelong road. 80km/h is a nice speed for towing with old cars and caravans IMO. Yeah, I'm sure you'd have a huge number of people turn up if you mentioned heading back to wombat in slightly warmer weather seeya Shane L. |
|
|
|
Post by doublechevron on Sept 11, 2014 15:14:43 GMT 10
Out of interest... Just look how all the small amounts you spend tidying something up accumulates. $215 wheels & tires x 2 delivered to my doorstep. stores.ebay.com.au/SS-Tyres-and-Parts?_trksid=p2047675.l2563 **Highly recommended. $80 Stainless steel screws. Both self drilling metal and wood. stores.ebay.com.au/Fasteners-Galore?_trksid=p2047675.l2563 **Highly Recomended. -10g x 22mm x 200quantity wafer head square drive self drilling G410 stainless $40 -8g x 3/4" x 100quantity 19mm metal self cutting G316 stainless steel $20 -8g x 3/4" x 100quantity 19mm self tapping wood G316 stainless steel $20 $30 10amp power outlet (weather proof two pole) stores.ebay.com.au/Electrician-Wholesale-Direct?_trksid=p2047675.l2563 ##Recommded $35 New clipsal 15amp power inlet stores.ebay.com.au/ChristmasLightShop?_trksid=p2047675.l2563 **recommended $45 Annexe rail and water filler inlet www.ballaratcaravans.com.au/ ##Local pickup, very helpful people. Highly recommended. $150 8litres of supercheap white enamal. 2litres of enamel reducer, 1litre of prepwash. $35 killrust expoxy enamal for drawbar/chassis bunnings $40 sandpaper/stoneguard paint. J&D auto paints ballarat ( as always highly recommended) $55 8 x Sika Roof and gutter white -- bunnings $20 aluminium pop rivets -- bunnings $50 new jockey wheel, 7pin round plug, 5meters of 7core wire -- sunday market $38 4 x foam weatherseal for windows $35 foam tape caravansplus.com.au/ (highly recommended) $35 4 x ezy caulk (rubber butyl sealant) caravansplus.com.au/ **highly recommended. $45 new annex wall clips and door roller caravansplus.com.au/$60 pressure pack paints ... bunnings... for side stripes etc. $355 used Tebbs period annexe won on ebay. So our "cheap" $2500 caravan has already had $1325 minimum spent on it before it's even turned a wheel. Hopefully we will have a tidy leak free caravan for a considerable time into the future though! I guess we'd easily get the $3800 that it owes us if we ever tried to sell it  |
|
|
|
Post by doublechevron on Sept 11, 2014 14:05:51 GMT 10
 I guess I should chase up some "Pacemaker II" stickers for the side of it too. There's quite a few ebay shops that sell vinyl letter stickers. Has anyone tried using them before ? seeya, Shane L. |
|
|
|
Post by doublechevron on Sept 11, 2014 13:58:31 GMT 10
 You can generate so much pressure pushing the sealing through as you gently touch down the screws, that you can blow the foam seal out! I'll just let it cure a bit, clean it up (if possible) and push the foam seal back in to protect the butyl mastic from the sun/weather.   I'm slowly getting there. All of the windows are now back in, so are the rear light housings.   The edging strips are quite battered and took a hell of a lot of cleaning. I gave them a quick coat of paint to make them look a little presentable. The rear light housings are incredibly fragile/aged plastic. I've painted them to protect them from the elements a little. I really only need to refit the side edging and setup the annex so I can pop rivet the new wall clips to the wall in the correct positions. I'm every so slowly getting there. seeya Shane L. |
|
|
|
Post by doublechevron on Sept 11, 2014 13:47:12 GMT 10
|
|
|
|
Post by doublechevron on Sept 11, 2014 13:28:46 GMT 10
There's was quite a bit of work in this side too... there was several larger dents I slapped some bog over in the doors. I removed all the old broken annexe wall clips and filled the holes. The old marconni type annexe rail was removed too.   I struggled to get the supercheap white to apply reasonably again. You would either have it not anatomizing and splattering .... or you'd apply more and have runs. I did figure it out. The stuff always runs.... What you need to do is dust/splatter a first coat on .... once this is there, you can then spray it on so it applies correctly (I ended up hosing it on with a 2mm tip in the gun). It doesn't run if you have the first patchy/light coat on. And leaves you with a nice wet edge so you can see what's going on.  the sail track is about $35 bucks from the local caravan joint. They said I need to fit it with a bead of silicon on the back. I left thinking "what sort of fool would plaster bloody awful silicon over the side of there caravan that's impossible to clean off for no reason"..... Yes I realised why by the time I got home. If you don't run a bead of silicone behind it, it'll leak water down the caravan wall if it rains!   If you check the rivets that hold the cladding on ... Running a straight edge up the side of these will give you the fixing points on the sail rail... so your attaching the the wall frame uprights. Not just the soft, fragile cladding. |
|
|
|
Post by doublechevron on Sept 11, 2014 11:56:43 GMT 10
I've been doing some tinkering on the old caravan over the last few weeks. The lights didn't really work when I towed this home. I've wired the old tug in the past with both flat and 7pin round. All of my trailers are 7pin round. So first step is to change the caravan to match, that way any of the cars can tow it in a pinch if required.  The wiring into the plug was pretty suss.... I snipped the wiring harness itself back to the drawbar and still found traces of black rot when the wires were stripped.... So I taped some fresh 7pin wiring cable to the existing wiring and pulled it back through the drawbar.......  Look what was in the wiring that I pulled out of the drawbar... bloody crappy rotten old wiring joiner .... urgh.... with traces of black rot in the wiring both sides (wow, just as well I decided to replace the wiring the lenght of the drawbar, I'd never have found this otherwise and had endless issues with the caravans lights.  Fortunately I found the original factory wiring was perfect back at the caravan body itself. The replacement crappy chinese 7pin cable has about 50% of the wiring thickness of the nice old wiring used 30+years ago when this was made  Oh well, at least it's new and not rotten! I just soldered the wiring in and covered everything with heatshrink. Those crappy old screw type wirring joiners have no place under a caravan! seeya, Shane L. |
|
|
|
Post by doublechevron on Sept 8, 2014 10:47:47 GMT 10
You not seriously considering towing the caravan on those ancient cross ply tires are you :EEK: :EEK: That sucker wouldn't leave my yard with those tires on it! There only fit for holding the stationary 'van up off the ground  seeya Shane L. |
|
|
|
Post by doublechevron on Sept 8, 2014 10:32:44 GMT 10
How does that work. What if I backed one of my own cars ... Into another one of my own cars :confused: ... Will I make the claim against my insurance company .... or against my insurance company (there all insured through the same mob).
BTW: Won't her insurance company now send YOU the bill for her repairs? It may have been cheaper just to get it fixed out of your own pocket than be billed by her insurance company!
seeya,
Shane L.
|
|
|
|
Post by doublechevron on Sept 2, 2014 17:00:02 GMT 10
|
|
|
|
Post by doublechevron on Sept 2, 2014 16:37:02 GMT 10
plating is generally quite cheap if you have a local barrel plater. Alloy will dissolve in there cleaning chemical no doubt. I think you would probably need to get them anodized.
seeya,
Shane L.
|
|