Deleted
Deleted Member
Posts: 0
|
Post by Deleted on Jun 19, 2014 16:15:57 GMT 10
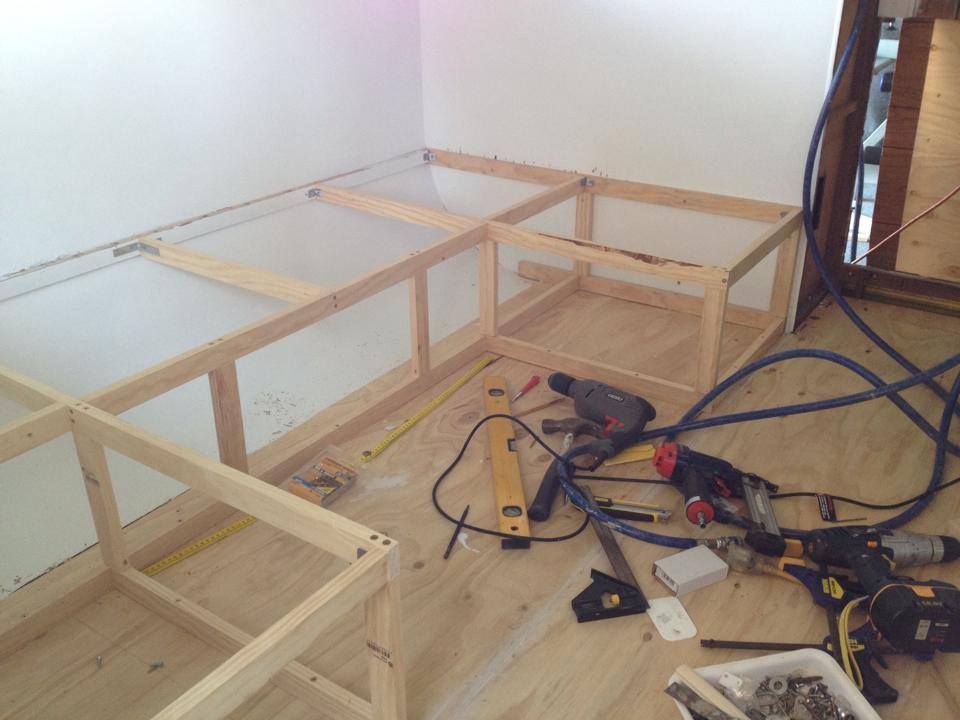
 It is solid and strong and I'm pretty confident I've built it stronger than what was there originally. The only original piece I left was the board along the front of the van (seen painted white in these pics). I've never built anything like this before so it hurt my brain and took me three days but I'm proud of my efforts. I want to put lift up lids in the seat (rather than pull down cupboard fronts, because they will get in the way of my telescopic table leg when I install it). I'm trying to think what my next move is, in terms of how best to support the lids which I want to be cut-outs of the seat, if that makes sense. Any suggestions gratefully accepted! |
|
|
|
Post by ForumMod on Jun 19, 2014 17:41:56 GMT 10
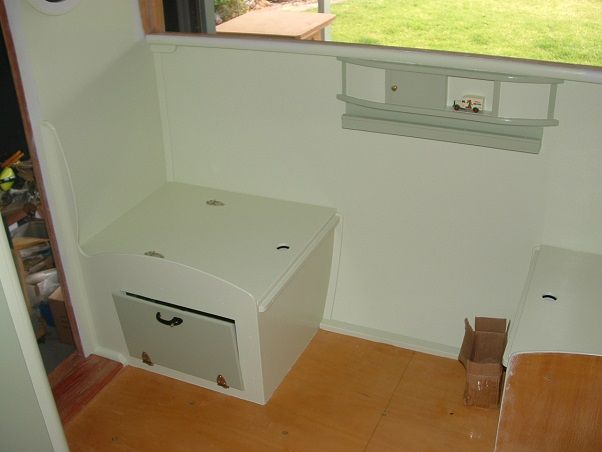
And so you should be!  Absolutely top-notch job you've done there!!  Ahhh, there'll be no stopping you now...confidence has been boosted ten-fold... "pass me a hammer and screwdriver NOW!!"   I think I understand what you're hoping to do with the lift-up lids in the seats. In the Millard poptop I restored, the seat boxes had the flip-up lids on the seats. If you click on this link, it will take you to the post in that old thread, and show you how the seat boxes looked. Is that the sort of thing you were thinking about? One other suggestion I would make is for the end of the seat just inside the doorway. Have a think about making a door for that end of the seat box, similar to what I did in the vintage caravan I'm working on at the moment...  It means you can pull up into the camping site, and easily reach the really necessary items required for set-up, such as the power cord, the winder handle for the chassis jacks, etc. Good on you for having a go... and isn't it great to surprise yourself with what you can achieve, having previously thought there's no way you'd ever do something like that!  Fantastic!!! Three cheers from Al.    |
|
Deleted
Deleted Member
Posts: 0
|
Post by Deleted on Jun 19, 2014 18:19:30 GMT 10
Thank you Al you've made my week with your kind comments    Thanks for that link, that is exactly what I was thinking about doing for the seats. I think what I will do, is cut out a piece of 12mm plywood to cover the entire 'U' shape of the framing, then cut my doors out of this big shaped piece using a jigsaw, then attach some of the same timber I've used for framing all around the underside of my door holes, overhanging the hole slightly to form a lip for the doors to rest on. I love the idea of a little easy access cupboard in the side nearest the door, I will definitely add that into the plan! I see you've still got the lift up lid on yours too, did you find you used both or was the lift up one unnecessary? I added to my power tool collection this week, which was quite exciting, I got myself a table saw which I am sure is going to come in very handy with this project, and more. In the last little while I've also bought a router (haven't used it yet, but plan on edging my to be built new cupboard doors with it) and a sliding compound mitre saw, which I absolutely love and have pretty much used daily since I bought it. Don't know how I ever did without it to be honest  |
|
Deleted
Deleted Member
Posts: 0
|
Post by Deleted on Jun 19, 2014 18:22:30 GMT 10
The other thing I bought today for my van which I'm quite excited about, is a piece of pressed tin panelling which I am going to use as a kitchen splashback. I can't get any locally and no-one will freight one piece so we are going to pop down to Newcastle and pick it up in a week or so. Probably stay a night and make a weekend of it  It's all coming together nicely and although I've got a long way to go, I'm really enjoying my project  |
|
|
|
Post by ForumMod on Jun 19, 2014 21:38:54 GMT 10
Yep, what you're describing with the seats sounds like the way to go.  Your special medallion for joining the "I-need-another-tool" Club is in the mail. So many of us have realised that a whizz-bang gizmo is what we REALLY need to be able to get this job done properly.   With regards to the lift-up seats, I've found they are good for storing stuff in that you are unlikely to want on a regular basis. Lifting seat cushions out of the way to be able to lift the lid to get what you want becomes a bit of a pain after a while if you're doing it on a regular basis. Try to design the size of the lid so the back cushion can stay where it is and still allow the lid to be lifted up, and tilted back a little to rest on the back cushion. If you have to remove both the back cushion and the seat cushion each time you want to access the seat box, you will quickly tire of that whole idea. One of the advantages of the caravan bed design, that lifts up on gas lifters, is that both the base AND the mattress get lifted up in one go. I've often wished the seats could be designed to do the same thing, but I haven't thought of a way of doing it. cheers, Al. |
|
|
|
Post by ForumMod on Jun 19, 2014 22:45:07 GMT 10
Just thinking a bit more about the seat boxes...
For the longer length across the width of the van where the opening is for the table to sit, perhaps an option is to put sliding doors in that section on the front of the seat box, rather than have a lift-up seat lid. Plenty of vans from the '70s have glass sliding doors in a cabinet above the kitchen, so the same principle could be applied to that section of the seat box. That might make it a little easier to get access to under that section of the seat? I reckon I'd only store stuff that I needed once in a blue moon in that section anyway.
cheers,
Al.
|
|
|
|
Post by ForumMod on Jun 20, 2014 9:59:54 GMT 10
G'day again, Karen... It dawned on me this morning that there were actually two threads started on the forum, relating to your van. With the magical powers I'm given as a Moderator, I've combined all the posts into this one thread and done a little bit of editing in some of the earlier posts. Now the complete story about your van is in this one thread.  cheers, Al. |
|
Deleted
Deleted Member
Posts: 0
|
Post by Deleted on Jun 20, 2014 18:27:30 GMT 10
Oh were there Al? I thought that had been fixed previously but thanks if you had to sort it out...and sorry! To start with I was asking questions in their own thread but realise now that I should just ask any questions in this thread and some nice person such as yourself will come and answer them  |
|
Deleted
Deleted Member
Posts: 0
|
Post by Deleted on Jun 20, 2014 18:31:20 GMT 10
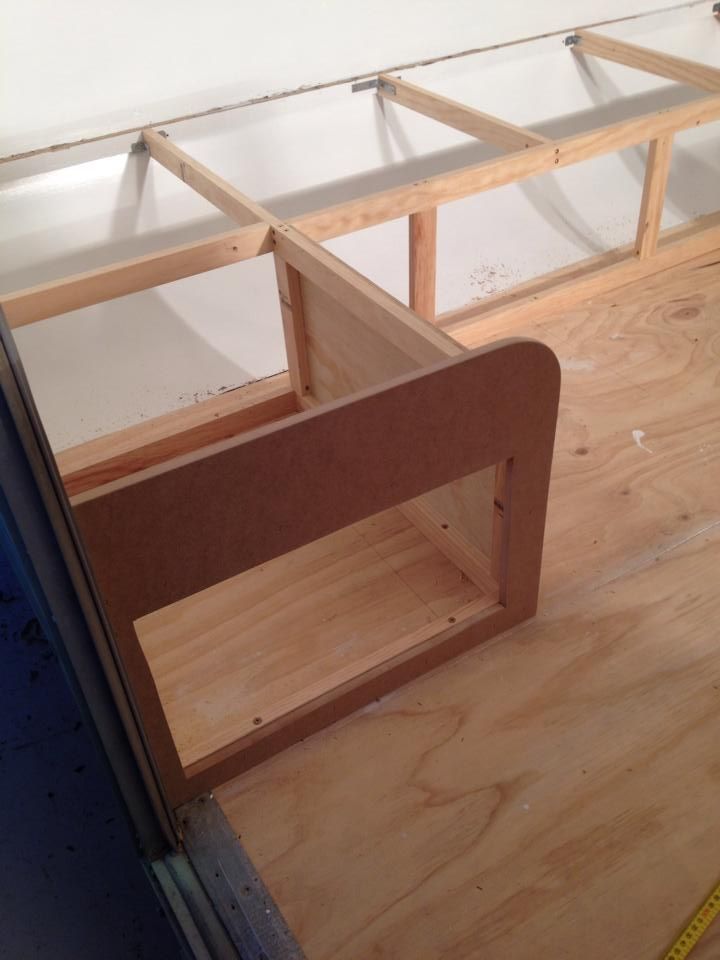
Thanks Al I only saw your other posts after I had replied to your most recent post. You raise some very good points there, it would have never occurred to me to keep the lids out of the way of the back cushions but that is a very good idea. I also like your sliding cupboards idea although I think the execution of such a thing would be beyond my capabilites. I had enough trouble cutting a cupboard door hole in the end piece of my seating lining today...I had three attempts and it's still not perfect but good enough. Will upload some photos shortly.
cheers
Karen
|
|
Deleted
Deleted Member
Posts: 0
|
Post by Deleted on Jun 20, 2014 18:49:21 GMT 10
|
|
Deleted
Deleted Member
Posts: 0
|
Post by Deleted on Jun 20, 2014 18:50:03 GMT 10
|
|
Deleted
Deleted Member
Posts: 0
|
Post by Deleted on Jun 20, 2014 18:52:48 GMT 10
 I found it alot harder to cut the hole out in this piece than I thought it would be...it's hard to cut a straight line with a jigsaw! In hindsight I should have clamped a straight edge to my work to run the jigsaw against but even that might have been tricky on such a small piece. Can't think of any other way but have to get better at it soon as I have more to cut out! |
|
Deleted
Deleted Member
Posts: 0
|
Post by Deleted on Jun 20, 2014 18:57:43 GMT 10
I went with MDF for the end panels because I was worried about cutting plywood nicely enough and I didn't know if I would get a smooth enough sanded raw edge on it, or if I would have to find some end capping/trim to cover it, like the original end pieces had on them. With MDF I can sand it nice and smooth then paint it up and it will look great. I'm also going to use MDF for my new cupboard doors, instead of ply, for the same reason. Back earlier in this thread I showed off the telescopic table leg I had (upside down, no less, lol!) and a couple of helpful forum members put me right. Now I am wondering what would be a good material to use as my table top. I like the formica look with the aluminium edging...I'm wondering if I should buy one of those $99 benchtop panels from Bunnings and cut it to suit. What have others done, I'm open to ideas and suggestions....thanks  |
|
|
|
Post by ForumMod on Jun 20, 2014 22:42:50 GMT 10
Yeah, well, who's a clever girl then?!!  Not as difficult as you think. The hard part is to actually find the plastic tracks from a supplier in Australia. See what they look like here. Also known by other names such as "plastic sliding door channel" You'd have to cut those two little timber uprights back out of the frame, and probably have to put a little bit more framework in for the dimensions of the tracks, but once you've got that sorted then you cut the doors and pop them into the tracks - easy peasy. The tracks are not showing up in a Bunnings search, but surely they must be available somewhere here. Yep, jigsawing accurately takes a bit of time to become natural at it. A metal cutting blade (finer teeth) makes for a smoother cut through plywood and MDF, and a slower speed on the jigsaw helps with keeping the blade on the line. Other things like 'only cutting for as far as you can comfortably reach' help with accuracy. Always best to stop cutting and take up a new standing/kneeling position to allow the cut to be made further along the line. You'll get the hang of it as you work through the project, and your worst cut won't be noticeable from 5 metres away anyway.  You've done a heck of a job so far, so pat yourself on the back and keep going.  cheers, Al. |
|
Deleted
Deleted Member
Posts: 0
|
Post by Deleted on Jun 21, 2014 8:30:48 GMT 10
That would be me, I'm a clever girl!  I'm also a determined and stubborn girl that doesn't like to let things beat me and I like to do it myself rather than pay someone else. I also hope that by tackling this project I am instilling in my daughter that girls really can do anything (actually my son too). Yes I understand now what you mean about finding the right tracks, when you initially suggested sliding doors I had in my head I'd need to build the tracks and freaked out a bit, haha. I will have a hunt around and see what I can find locally in terms of sliding tracks. Or I might be able to get something in Newcastle next weekend when we go down to pick up the pressed tin for my splashback. Thanks also for the jigsaw tips, I bought a new blade for cutting the wall panelling and got the 'right' one according to the packet but I was surprised to see how chunky the teeth were, and it chewed the wall panelling a bit, especially where it hit a groove in the pattern. Good to know that I can ignore that and use a blade designed for metal. Do you have any tips for me for cutting out the holes for the seat cupboards but at the same time not making a mess of the piece I am cutting out so I can use it as the cupboard lid or is that impossible? Thanks again Al,you are helping me more than you realise, so thanks again! cheers Karen |
|
|
|
Post by ForumMod on Jun 21, 2014 10:13:48 GMT 10
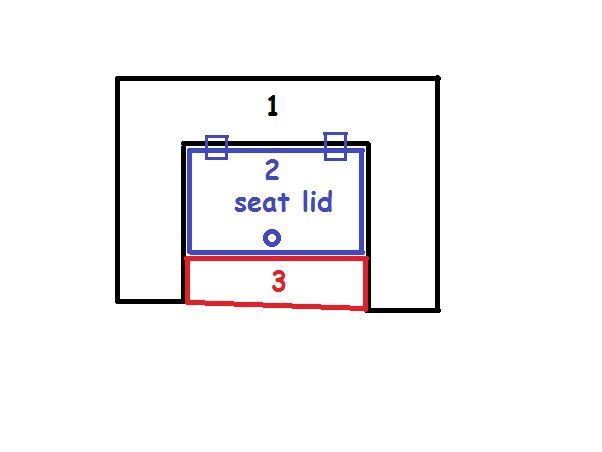
And that's exactly what you need to be like, when doing these restorations.  Tough & ruthless when negotiating prices for any bits you need. Stingy when handing money over. Determined when deciding how YOU want it to be!   There are a couple of ways of cutting the seat cut-out so you can use both pieces. Both methods require a steady hand, and decent hand-eye co-ordination to get it perfect (which is not necessarily the aim of every restorer - if it looks good from a few metres away, then it's a good job  ). Method 1 requires an angle grinder with a 1mm metal cutting blade in it. Mark out the rectangle you want to cut. Place the angle grinder blade about half-way along each of the side-lines. Plunge the grinder blade into the timber and cut the timber until the grinder blade goes through the bottom (and this is where you need that steady hand and good co-ordination). Pull the grinder back out of the slot and turn it off. Get the jigsaw and cut the rest of the line to the corners on that side. A typical metal jigsaw blade will leave a cut about 1.5mm wide, so the angle grinder cut "should" be narrower than the jigsaw blade cut. Practice with the grinder on scrap timber so you can see how it all works. The grinder wheel will burn the timber a bit, but keep going and you'll get through to the bottom. Method 2 requires the smallest drill bit - either a 1/16" or a 1.5mm diameter bit (you can buy both types at Bunnings. Just choose one of them). Mark out the sides of the seat rectangle. In two diagonally opposite corners, drill a series of holes along the line and around the corner (an L-shaped run of holes). Put the holes as close together as you can drill them (remember that hand-eye co-ordination bit?). You'll need about six holes on each side of the corner. Get a sharp retractable box-cutting knife, and cut any timber away that's still between the drill holes, so you end up with a slot instead of six holes. Get the jigsaw and force the blade down into the slot, and then slowly start it and cut along the lines to the other corner on each side. The angle grinder method is the easier of the two, but is more scarier. If you're not confident using an angle grinder for such "precise" work, try the drill-bit method first. The cheats way of doing this job is to cut the timber for the seat box cover so that it's not actually a hole cut out of it, but rather is three pieces of timber - a U-shaped piece covering the bulk of the surface; the seat lid piece; and a third piece that turns the U-shape cover into a square or rectangle. That third piece is fixed to the front of the seat, and the lid is immediately behind it. Another option to consider is having rounded corners on the lid of the seat. The smallest radius my jigsaw metal cutting blade can cut around is 40mm, so if you had a cardboard circle template that's 80mm diameter, you could place that in each corner of the rectangle and trace around it to make the 40mm curve. That'd mean you only had to make one cut on one side of the rectangle with your angle grinder or drill bit method, and you could then jigsaw all the way around the rest of the line (being REALLY careful as you go around the curved corners). A seat lid with curved corners wouldn't look out of place, and it'll be covered by the cushions anyway. Some things to think about there?  cheers, Al. |
|
Deleted
Deleted Member
Posts: 0
|
Post by Deleted on Jun 21, 2014 17:54:47 GMT 10
Thanks for that Al, I knew I'd have to start with drill holes but yesterday when I cut out the hole in my seat end panel I used a large drill bit so I could get the jigsaw blade in, which ruined the cut out. Your way is much more sensible and I will do that next time, thanks! I don't have an angle grinder but may just have to add it to the 'tools I mugs have' list  I'm intrigued by the cheats way but I can't quite picture what you mean, can you point me to some pictures of one done this way? Making the cutout corners curved is a brilliant suggestion and one I would have never thought of. Seems simple now you've suggested it  I did actually make the seat top today but I'm having trouble uploading photos to photobucket tonight (courtesy of my 7 yr old son using all our wifi data allowance, we've been slowed to dial up speed thankfully only till the 23rd). I kind of chickened out a bit and went with what was a simpler way for me to achieve but very functional nonetheless and I'm very happy with the result. I have cut it all out but not attached it yet because I'm painting it first, but basically what I did was use my 12mm ply to make a solid 80mm wide board right along the front wall of the van which I will fix to the framework then attach my hinges to, and then I have two large lift up lids also in the same ply that are the same size as the seat frame. Then on the sides of my U Shape I have two smaller lids, the one with end/side access will have a fixed lid and the one next to the fridge side of van will work in the same manner as the front seat, but just smaller. Will keep trying to upload a photo which will make much more sense. One thing I haven't done yet but will do is drill some large finger holes in the seat lids so they can be lifted up easily. |
|
Deleted
Deleted Member
Posts: 0
|
Post by Deleted on Jun 21, 2014 19:46:45 GMT 10
|
|
Deleted
Deleted Member
Posts: 0
|
Post by Deleted on Jun 21, 2014 19:47:50 GMT 10
|
|
Deleted
Deleted Member
Posts: 0
|
Post by Deleted on Jun 21, 2014 19:49:46 GMT 10
In order to give more support to the lids seen in the above photo, I added two more pieces of framing timber on a 45 degree angle where the top corner of the lids meets the fixed board along the back. Will take another photo tomorrow which explains this better.
|
|
Deleted
Deleted Member
Posts: 0
|
Post by Deleted on Jun 21, 2014 19:50:35 GMT 10
|
|
Deleted
Deleted Member
Posts: 0
|
Post by Deleted on Jun 21, 2014 19:51:21 GMT 10
Lid in the above photo will be fixed as we can access the storage via the hole I cut in the end panel.
|
|
Deleted
Deleted Member
Posts: 0
|
Post by Deleted on Jun 21, 2014 19:52:42 GMT 10
|
|
Deleted
Deleted Member
Posts: 0
|
Post by Deleted on Jun 21, 2014 19:55:13 GMT 10
|
|
|
|
Post by ForumMod on Jun 21, 2014 20:00:04 GMT 10
Here's a diagram showing what I meant for the cheat's way of doing it...  The different colours represent the different pieces of plywood. You cut from the front to the end of the seat flap (red to blue) on both sides, and then you'd have to drill a few holes close together at one end of the hinge line at the back of the blue piece, so you can cut along the hinge line from one end to the other. If you have a few finger holes to cut, a useful tool is a cheap set of hole saws (like this one ). They fit in your drill, and you cut the hole halfway down on one side, and then turn the timber over and cut the rest of the hole from the other side. Makes for a neat hole with no big splinters of timber on either surface. Sandpaper a bevelled edge around the top and bottom of the hole opening and it'll be nice and smooth to stick your finger into.  cheers, Al. |
|