|
|
Post by ForumMod on May 13, 2014 11:34:55 GMT 10
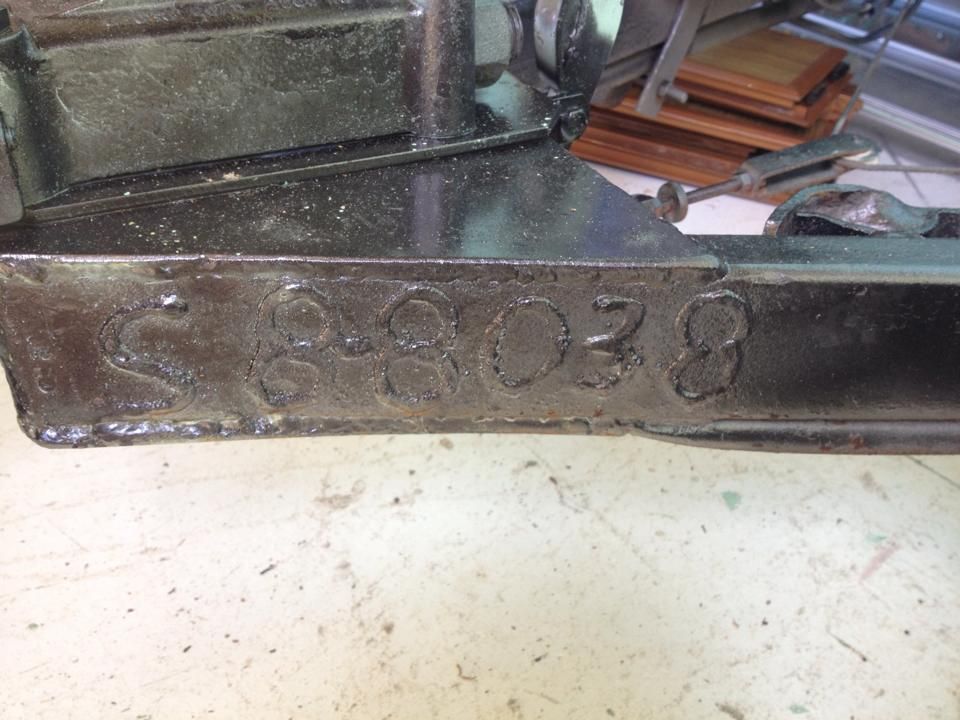
G'day restyledvintage, Just catching up with your thread after being away for 3 weeks. Welcome to the forum, and welcome to that elite group of people who find out that the caravan they've bought is not quite as good as it was when advertised.  Most of us can relate to buying a van and discovering all the hidden demons that weren't readily apparent at the start. The only consolation is that you will be a heck of a lot wiser and smarter if you ever decide to buy another caravan in the future.  Like many of us here, you too can become a caravan consultant to other people who have not yet taken the plunge and are looking to buy a van. Every seller thinks their van is in great condition - every buyer discovers that is not the case.  So, what to do about your van?? Well, once you've pulled it apart to any degree, you've kind of made the decision that you are gonna have to do something with it, because it's of no use to anybody in its current state. You are sort of stuck in the position where you can't use it the way it is, and you can't sell it because it's a "heap of junk". Going the whole hog and gutting a van is going to mean quite a long journey back to getting the van completed. It can typically be a 2-year job, depending on how much time you can allocate to the work. On the other hand, just doing cosmetic repairs in the worst-affected areas can still take time, but will obviously be less than a full-on job. Flip a coin and decide which way you'd rather go.  Fortunately, the majority of these old vans are fixable, and you will amaze yourself with the things you can achieve in the process of sorting all the problems out. If you have a small budget to work with, you learn how to fix things using the cheapest methods/materials available. If you've never used a hammer before, you learn how to not only do that, but also how to use saws, screwdrivers, pop-rivet guns, sealant guns, paintbrushes, and a whole host of other tools. And guess what? Sometime down the track you will stand back and see a van that is a WHOLE HEAP BETTER than it was when you first bought it, and you will stand there and say, "YESSSS!!! I DID THIS!!"   Good luck with starting on the van, and keep posting progress reports as you go. We all love to see how other people are suffering the same way we've suffered.   ps. I need some information from you please, so I can change the heading of this thread and then shift it over to our Hall Of Fame section where you can keep adding to the story as you work on the van... 1. What is the chassis number welded on the outside of the drawbar just forward of the jockey wheel clamp position? 2. What is the serial number stamped on the RVMAA badge that's forward of the door, below the front side windows? cheers, Al. |
|
Deleted
Deleted Member
Posts: 0
|
Post by Deleted on May 13, 2014 12:01:06 GMT 10
Hello Al and thanks for your kind welcome  If I'd read it a week ago I would have cried but today I'm in a better place and can laugh about it and nod my head in agreement! Firstly thanks for tidying up my threads and combining them, it is much better having my own thread for my project, and just one to post all my updates/journey in. I'm a Kiwi who moved to Aus in 2011 and had one caravan reno under my belt (done in 2009 in NZ) but that one was purely cosmetic. I'm sure NZ caravans leak too but they don't seem to have as many opening windows (too cold for it lol) so whether that has anything to do with it, I don't know. Anyway I was lucky with that van. I'm quite handy with practical jobs, and tools and the older I get the keener (and less scared) I am to learn more. I bought a router the other day and next on my wish list is a router table, and table saw, I know both of those will come in very handy for this project I've thrown myself into. I'm very lucky to work from home (I refinish furniture, will put my website here if allowed?) so I do have quite a bit of time available to me to work on the van (although I have been getting so engrossed in it and forgetting to feed the kids haha)...joking...sort of  Righto so the numbers you are after, the chassis number is S88038 and the number on the RVMAA badge is 30943. Will uplaod some pics to confirm  thanks again for your kind welcome, this forum has already saved my sanity and given me the strength to tackle this  cheers Karen |
|
Deleted
Deleted Member
Posts: 0
|
Post by Deleted on May 13, 2014 12:04:26 GMT 10
|
|
Deleted
Deleted Member
Posts: 0
|
Post by Deleted on May 13, 2014 12:05:23 GMT 10
|
|
|
|
Post by ForumMod on May 13, 2014 12:50:00 GMT 10
Thanks for sending the number details through, restyledvintage. It was only after I posted my reply above that I discovered the other thread about your van. Combining all the posts into the one thread can sometimes make the flow of information go out of whack a bit, but I think it's much better to have the story of your van in the one thread. With regards to the cupboard where the rangehood was, it's a fairly simple matter of boxing that cupboard framework so that it ties in with the existing framework, and the whole overhead cupboards sort of support each other. Microwave ovens can weigh a bit, so you'd need to ensure the cupboard is anchored fairly well to the partition wall on the right hand side of that cupboard. That might mean putting slightly larger framework than is there at the moment, and then using an off-cut of your 7mm flooring for the floor of the cupboard to sit the microwave on, rather than the 3mm ply that's on the floor of the adjoining cupboards. Tell me if you don't understand what I'm saying and I'll try to explain it better. Overall, I reckon you are going great guns in the short time you've had the van. Gotta love the old "rip, tear, bust" type of restoration, ay?! Gets rid of all that pent-up aggro!   cheers, Al. |
|
Deleted
Deleted Member
Posts: 0
|
Post by Deleted on May 13, 2014 13:38:46 GMT 10
Thank you Al that does make sense. I've also got some 12mm ply that I plan on using to rebuild the dinette seating and bed. I keep cracking myself up when I think how far I have come (or where I have ended up!) after two weeks of caravan ownership. I am writing sentences that I wouldn't have even dreamt of having to write two weeks ago...lol! I was worried at the start, mainly about having wasted good money but my husband isn't stressed, he says it's only wood (he's not a real handyman type but he will try if I encourage (force) him). We'll get there. You are right about the rip tear and bust resto/reno, that's quite fun! Funny thing is, I looked at another van this old guy had (he is a bit of a wheeler dealer) and it was almost stripped inside, I immediately discounted it because it was 'too much work' and 'beyond my skill level' but look what I've done now...oops  |
|
|
|
Post by bobt on May 25, 2014 10:59:52 GMT 10
Gidday Restyledvintage.
I like the new project. Looks like someone else is happy too. The dinette you have in your van is a standard layout. In theory the table will drop down, the cushions that form the back rest will fill the gap to make a double bed. Personnaly I like the U shape seats it gives you more seat space around the table. And they still do it in new vans, both types.
bobt
|
|
Deleted
Deleted Member
Posts: 0
|
Post by Deleted on May 27, 2014 21:36:07 GMT 10
Hi bobt, thanks for your reply  I think one of the forum mods set me up with a new thread on here, there are certainly more pictures and posts than this one, which I had forgotten about! A few more weeks down the track with my project I now agree with you about the dinette layout and am keeping it like that. It had all turned to mush though so I have ripped it out and will attempt to rebuild it. The table wasn't original and didn't drop down however I bought a telescopic table leg off the guy I bought the van off, I haven't worked it out 100% yet how to install it but I think I need to build the dinette seats a bit higher to make it work (ie so the table top will drop down low enough to become the bed base). cheers Karen |
|
Deleted
Deleted Member
Posts: 0
|
Post by Deleted on May 29, 2014 16:44:17 GMT 10
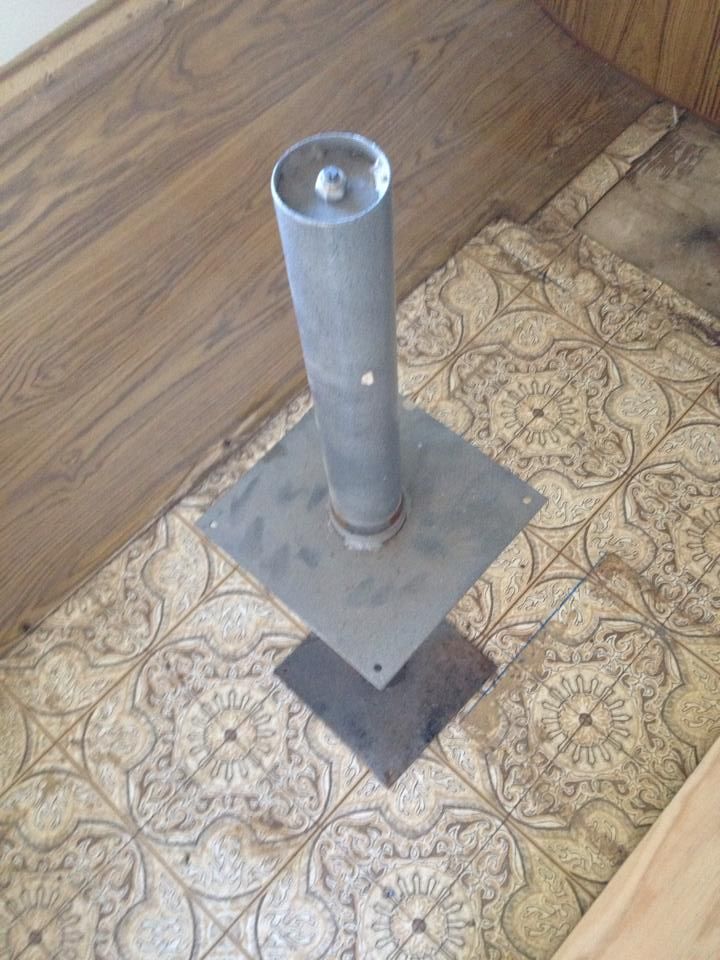
Hi everyone, I bought this telescopic table leg off the same guy I bought the van off, and I'm hoping to install it around the club seating dinette area at the front of my van. I have to rebuild all the seating because 1. it had turned to Weetbix and 2. it needs to be a bit higher than it was to make use of the telescopic leg, which when fully closed sat higher than the existing seating. I want to be able to use the new table top as a bed base. 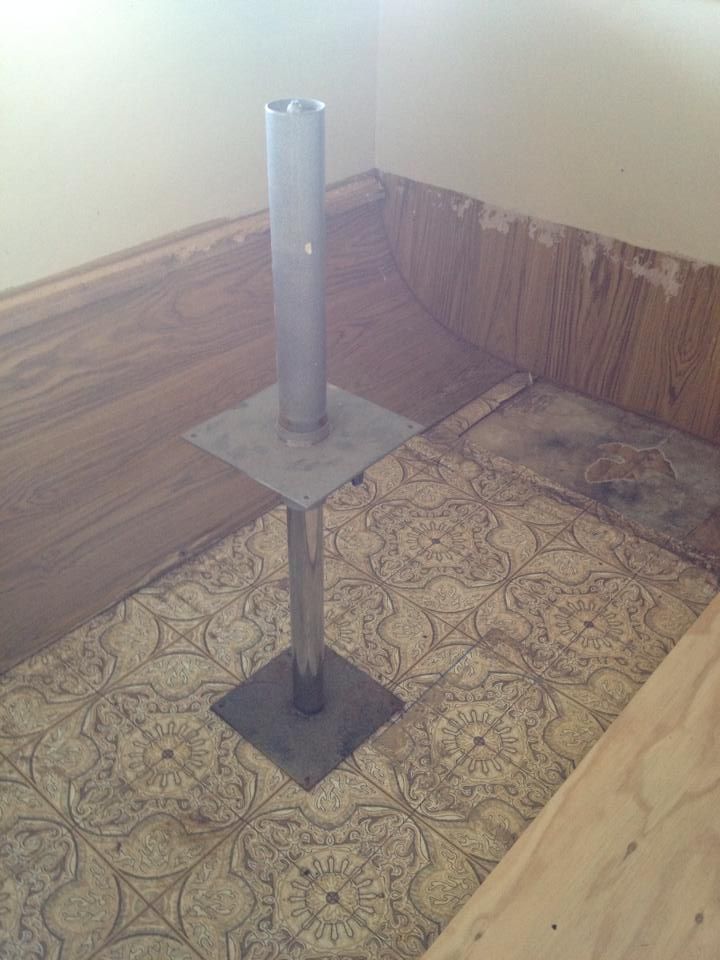 |
|
Deleted
Deleted Member
Posts: 0
|
Post by Deleted on May 29, 2014 16:46:34 GMT 10
So, my questions are:
1. have I got it up the right way (lol I think I have, but not 100% sure!)
2. how would I attach a table top to the base?
3. the square plate in the middle, what is that for, besides sticking your foot on to push it table leg down? I'm wondering why it has screw holes around the edges, the same as the plate at the bottom of my pic, that assuming I have it sitting the right way up, would screw/bolt into the floor?
|
|
Deleted
Deleted Member
Posts: 0
|
Post by Deleted on May 29, 2014 16:47:17 GMT 10
|
|
Deleted
Deleted Member
Posts: 0
|
Post by Deleted on May 29, 2014 16:48:24 GMT 10
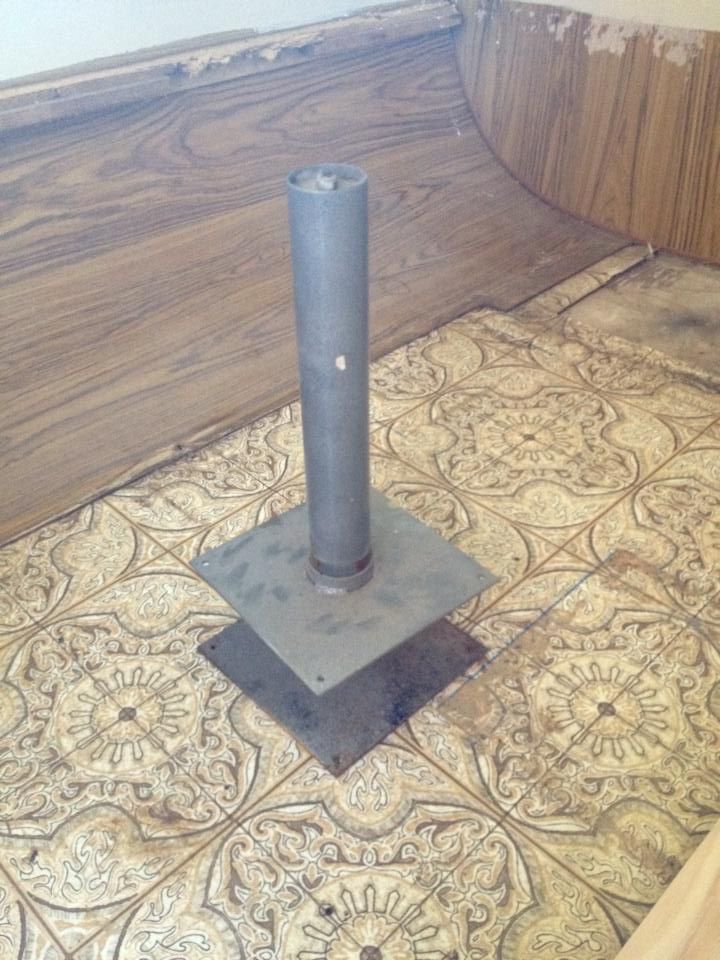 I'm kind of worried that the square plate around the middle (when table is up) will be a bit of a knee slicer... |
|
|
|
Post by ForumMod on May 29, 2014 17:44:27 GMT 10
Hmmm...I'm thinking it should go the other way up, ie. turn it upside down, and the part showing as the top half in your photo actually goes through a hole in the floor, and the middle square plate is screwed to the floor. If I'm correct, it would mean you've got a foot length of pipe poking down below your floor level. Great for putting gouges into the road surface, if you like doing that sort of thing.  cheers, Al. |
|
|
|
Post by murray on May 29, 2014 17:48:21 GMT 10
restyledvintage Here are some photos of my viscount table 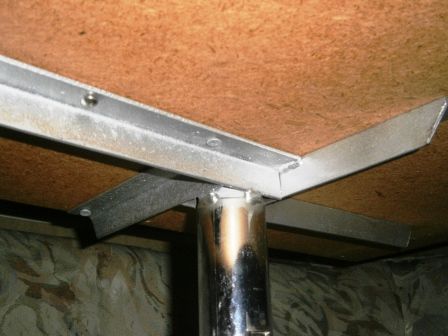 the upper has been strengthened - may originally have been a square base 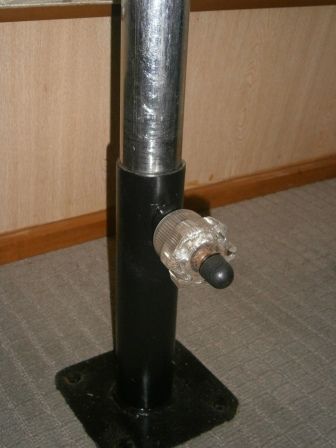 Adjusting "tap" - this pulls out to table can be lowered. Presume your table base is on around the wrong way !! Or it could be another table base stuck on top. Does it remove? Is there an adjusting attachment? Cheers Murray |
|
Deleted
Deleted Member
Posts: 0
|
Post by Deleted on May 29, 2014 17:51:01 GMT 10
Sorry not seen in my photos, there is a screw knob underneath the middle plate that you loosen and tighten to control the gas strut. You can just see a glimpse of it in the first photo.
|
|
|
|
Post by murray on May 29, 2014 17:53:40 GMT 10
Mine contains a spring of some kind that needs some minor prompting  to come back up to table height . Does the foot rest plate(?) move - does it slide up ? It may be around the wrong way ? Or welds may have broken ? |
|
Deleted
Deleted Member
Posts: 0
|
Post by Deleted on May 29, 2014 17:55:15 GMT 10
Hi Al and Murray, thanks for your replies. It would make more sense if it did go the other way up, then I would have a plate to attach the table top and another plate to attach to the floor but then the highest the table would ever extend would be to 'bed' height (ie. the distance between the two square plates as seen in my photos of it fully extended...it is approx 40cm)
I'm a bit confused...
cheers
Karen
|
|
Deleted
Deleted Member
Posts: 0
|
Post by Deleted on May 29, 2014 17:56:07 GMT 10
lol Murray, mine is like a loaded rocket, got to keep your face out of the way as soon as I release the knob even a little!
|
|
Deleted
Deleted Member
Posts: 0
|
Post by Deleted on May 29, 2014 17:59:10 GMT 10
Thinking out loud now which is always dangerous lol, but what if I was to build some sort of box thing on the floor to mount the pipe inside so only a little bit of it went through the floor, and I would make it the same square size as the plates, and bolt one plate to it. Does that make any sense whatsoever or have I gone mad? haha
|
|
|
|
Post by murray on May 29, 2014 18:02:35 GMT 10
Now Al has explained it I can see the light !!!!  I did take mine out a few years ago to replace the carpet and had to think a bit when I replaced it- otherwise mine would have be like yours !! Another mystery solved !!  me thinks |
|
Deleted
Deleted Member
Posts: 0
|
Post by Deleted on May 29, 2014 18:06:32 GMT 10
Murray the foot rest plate doesn't move, just the telescopic part of the leg does (the shiny part seen in pics)
|
|
|
|
Post by murray on May 29, 2014 18:20:10 GMT 10
It's just upside down ....or downside up .
Have you a hole in the floor ?
4 bolts through the "foot rest" and bobs your uncle ...I have actually an uncle Bob. I'm sure he doesn't mine being spread around
|
|
Deleted
Deleted Member
Posts: 0
|
Post by Deleted on May 29, 2014 18:23:35 GMT 10
Murray yes there is a hole in the floor, but I relined the floor to cover the old asbestos lino today and didn't re-cut the hole out...yet lol. Wouldn't too much of the pipe stick through the floor and drag on the road as Al said? And I'd have the problem I explained further up the thread about the telescopic part not extending enough to get to table height (it's fully extended in first photo)
|
|
Deleted
Deleted Member
Posts: 0
|
Post by Deleted on May 29, 2014 18:25:25 GMT 10
I have to say though, that is typical of me to have it upside down...if there is a half and half chance of getting it right or wrong, you know which way I'll do it...haha!
|
|
|
|
Post by murray on May 29, 2014 18:37:52 GMT 10
You will need to experiment . You may need some extension on top of table support or a "box thing" on the floor. Contemplate over a glass or two of red  Ours sticks through a fair length and hasn't gouged any furrows so far. Al's just trying to scare ya !! Cheers Murray |
|
 Most of us can relate to buying a van and discovering all the hidden demons that weren't readily apparent at the start. The only consolation is that you will be a heck of a lot wiser and smarter if you ever decide to buy another caravan in the future.
  Like many of us here, you too can become a caravan consultant to other people who have not yet taken the plunge and are looking to buy a van. Every seller thinks their van is in great condition - every buyer discovers that is not the case.


 Most of us can relate to buying a van and discovering all the hidden demons that weren't readily apparent at the start. The only consolation is that you will be a heck of a lot wiser and smarter if you ever decide to buy another caravan in the future.
  Like many of us here, you too can become a caravan consultant to other people who have not yet taken the plunge and are looking to buy a van. Every seller thinks their van is in great condition - every buyer discovers that is not the case.


 If I'd read it a week ago I would have cried but today I'm in a better place and can laugh about it and nod my head in agreement! Firstly thanks for tidying up my threads and combining them, it is much better having my own thread for my project, and just one to post all my updates/journey in.
