|
|
Post by atefooterz on Oct 6, 2016 20:44:03 GMT 10
I hope the ThermalBreak works well, seems silly if a solution so old, like styro, can not be improved upon by years of progress.  |
|
|
|
Post by 78466noM on Oct 7, 2016 9:09:42 GMT 10
 This took me 5 hours yesterday didn't want to rush it and make a mistake it cost too much to throw out and replace. So with that didn't get the insulation done again but did get most of the prep work for walls to go back in all the stems from drilled out rivets cleaned up all the missing rivets in frame put in they had a lot of rivets go though ply walls then into frame joints and a few joints missed out all together have now been replaced or had rivets put in. Now it is nearly ready I am off again Sunday so will have to get stuck into it early. I was going to put LED's as side clearance lights I spent a lot of time trying to work out how I was going to do it first thought I would use bits of left over aluminum RHS from rear bar but that leaves sharp protruding edges either a knock back on blue slip or a defect down the track I couldn't put them strait onto sides as that would leave joins inside van walls so after I binned the original base plates I have now ordered new original style side lights not too bad just under $50 when I could have got replacement lenses I think it was under $20 delivered. I will place LED globes in them fixes all my problems joins are outside and no sharp edges . have fun if all goes to plan I will have insulation in and walls and windows in Sunday have fun and stay safe Bruce  |
|
|
|
Post by tasmillard on Oct 8, 2016 6:51:08 GMT 10
Sounds like you have a lot on. Hope you get it done. Funny you mention rivets and cleanup, i had to do the same for the rood and rear walls where i removed the ply and the had to remove the rivet body. I found using an angle grinder with a flapper disk to flush the rivet against the frame, then punch out the rivet with a hammer/punch works well.
|
|
|
|
Post by 78466noM on Oct 9, 2016 20:31:15 GMT 10
|
|
|
|
Post by tasmillard on Oct 10, 2016 7:25:37 GMT 10
Good work Bruce, thanks for the tip about the scissors, ill use a knife then Just a question, isnt the role of the mcbrcb to cut out power in the event of an earth leak? I assume that if there was a leak to the chassis, its no different if there was a leak to the insulation as that would in contact with the frame/cladding, so is there any need to be concerned as such? I know any additional safety is good and I am considering conduit also for the 240 v wires that I will be placing insulation next to. |
|
|
|
Post by 78466noM on Oct 10, 2016 8:40:33 GMT 10
Good work Bruce, thanks for the tip about the scissors, ill use a knife then Just a question, isnt the role of the mcbrcb to cut out power in the event of an earth leak? I assume that if there was a leak to the chassis, its no different if there was a leak to the insulation as that would in contact with the frame/cladding, so is there any need to be concerned as such? I know any additional safety is good and I am considering conduit also for the 240 v wires that I will be placing insulation next to. I am now putting the electrical sealed boxes on wall for the inlet and outlet the top with lid will be inside and the inlets will go in the bottom just had to work out how to cut hole in interior ply wall to go over them I have worked out I will put them on wall then place aluminum flat bar around it that give me somewhere to place aluminum flat bar to interior ply wall around it to make it tidy. Not so bad on passenger side the outlet will be in a cupboard but the outlet on the drivers side is in the open so I would like it to be neat. The mcbrcb only works from safety switch to the inside so unless the inlet has a safety switch which I assume caravan parks are equipped with we can only hope . But it will now be totally sealed away from insulation with the boxes so I will now be able to insulate around the boxes .Also have to do above fridge vents it has a hole in side of van big enough to install fridge from outside. So I will remodel inside so I can insulate the top half in summer leave the vents open so compressor fridge can breath in winter close it off with a small canvas tarp attached with sail track at top and Ute bungy cords to clip onto chassis. So still lots a lot of jobs to do the further I go the more I seem to add to the list .  Someone posted about a safety style switch that works with the the RCD I am going to look at as it works with the inverter or generator and will cut power in case of a fault . |
|
|
|
Post by Mustang on Oct 10, 2016 16:55:37 GMT 10
Just had a look at your PB site, man you have done some detail.
Great Job.
|
|
|
|
Post by atefooterz on Oct 10, 2016 22:26:49 GMT 10
Good work Bruce, thanks for the tip about the scissors, ill use a knife then Just a question, isnt the role of the mcbrcb to cut out power in the event of an earth leak? I assume that if there was a leak to the chassis, its no different if there was a leak to the insulation as that would in contact with the frame/cladding, so is there any need to be concerned as such? I know any additional safety is good and I am considering conduit also for the 240 v wires that I will be placing insulation next to. I am now putting the electrical sealed boxes on wall for the inlet and outlet the top with lid will be inside and the inlets will go in the bottom just had to work out how to cut hole in interior ply wall to go over them I have worked out I will put them on wall then place aluminum flat bar around it that give me somewhere to place aluminum flat bar to interior ply wall around it to make it tidy. Not so bad on passenger side the outlet will be in a cupboard but the outlet on the drivers side is in the open so I would like it to be neat. The mcbrcb only works from safety switch to the inside so unless the inlet has a safety switch which I assume caravan parks are equipped with we can only hope . But it will now be totally sealed away from insulation with the boxes so I will now be able to insulate around the boxes .Also have to do above fridge vents it has a hole in side of van big enough to install fridge from outside. So I will remodel inside so I can insulate the top half in summer leave the vents open so compressor fridge can breath in winter close it off with a small canvas tarp attached with sail track at top and Ute bungy cords to clip onto chassis. So still lots a lot of jobs to do the further I go the more I seem to add to the list . Someone posted about a safety style switch that works with the the RCD I am going to look at as it works with the inverter or generator and will cut power in case of a fault . In my limited caravan park stays they have all had both a 16amp trip switch at the hub and also a breaker back in the distribution board. Main concerns are keeping controllers etc water tight. I have now seen 2 vans have issues, both modern with gear in he front boot zone. One was water leak from seam above the other had a water bottle leak and blankets & groundsheet seemed to wick the moisture enough to short contacts behind where the wet gear was stored.. |
|
|
|
Post by 78466noM on Oct 11, 2016 9:32:06 GMT 10
Just had a look at your PB site, man you have done some detail. Great Job. Thanks for the compliment but it is no where near the quality of yours. It is being done on a tight budget first it has to be safe and second comfortable and usable I have two grandchildren 5 and 3 so also has to be set up to accommodate them . Also when finished this van will only cost maintenance and rego not a large chunk of cash each month to pay for it also I believe when I get it finished it will be just as comfortable as a new one to us and will have the modern essentials hot water and solar etc . Another thing is while we are sitting back enjoying it with our family like most people here we know there won't be any hidden problems they will have all been sorted out . This is an excellent site thinking back to the eighties limited info at best I was just thinking how many times I may have done quite a few jobs more than once but because people here either know or have been there and done that then shared their knowledge and experience most jobs have been a once only and I think other than some led side lights I have found out won't work on side was a standard 240volt bar fridge now changed to a 12volt compressor bar style fridge. Found out here that the 240volt bar fridge doesn't like traveling motor bounces too much and can break lines also to run while traveling it is not a good idea to have inverter on as if there is a short a person becomes the ground. Plus a whole lot of easier ways to do things all found here. I am even going to recheck how you sealed your windows and door so I do it correctly and do mine the same way. so I can't say can't say thank you enough to people here all have helped in someway Bruce |
|
|
|
Post by 78466noM on Oct 12, 2016 21:45:27 GMT 10
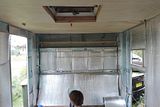 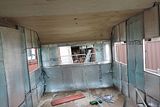 . Got the last of the insulation done today I now have a safe place to go when the aliens come only joking I hope  . Also got the end top board up at rear of van so it will shape i can glue and screw in into position Sunday should have enough shape for it to be easier to put back after gluing so another job off the list. Will set up boxes inside for 240volt inlet and outlets on Sunday and the lock I have have for the door it is a slide lock made by lockwood the ideal thing with it is it can be locked open and closed so can't be slid to lock door when people are inside. so have fun and stay safe Bruce  |
|
|
|
Post by Mustang on Oct 14, 2016 7:48:17 GMT 10
I read you are suggesting using a "list" . At your stage a physical list is a great idea ie; so you don't forget that extra wire before the panel is in place (like me!!).  Sure & easy gets the job done. DO NOT publish a finish date, just keep it to yourself.  |
|
|
|
Post by tasmillard on Oct 14, 2016 9:12:13 GMT 10
Lol, enough tin foil to avert the aliens. Good work, its amazing how much progress one makes with larger items.
|
|
|
|
Post by 78466noM on Oct 15, 2016 0:01:25 GMT 10
I read you are suggesting using a "list" . At your stage a physical list is a great idea ie; so you don't forget that extra wire before the panel is in place (like me!!). Sure & easy gets the job done. DO NOT publish a finish date, just keep it to yourself. I can't even give myself a finish date most weeks I only get one day if the lawn doesn't need mowing house doesn't need maintenance or family commitments picked it up 04/10/15 so only a year so far. The chesney kamper took eight months and it was an easier job even being stripped to the bare chassis once the ends were designed and built the rest came along fairly quickly. I haven't got a physical list I would continually lose it but I finish one part then sit back for about half an hour with a coffee and think of what I have to do next this has saved me so far from doing things the hard way. I can only hope this keeps up as I hate doing things the hard way . It will get finished how long I won't even have a guess. have fun Bruce. |
|
|
|
Post by tasmillard on Oct 15, 2016 7:56:58 GMT 10
Im pretty much the same Bruce, no physical list but only mental milestones. I am doing jobs that are dictated by the weather, so if nice ill do outside reseal work, if raining ill do inside. Down side is that I have lots going on at the same time so can be difficult to manage at times. Im sure youll get there, making good progress.
As for time, i put end of year as my target, so got about 10 weeks.
|
|
|
|
Post by 78466noM on Oct 16, 2016 20:38:20 GMT 10
|
|
|
|
Post by Mustang on Oct 17, 2016 8:35:35 GMT 10
Should be cosy with the insulation & lining.
TIP: Before you attach your lining mark on the floor & ceiling the position of the wall frames & use plenty of rivets. I was able to buy colour, practically unseen.
The quantity of factory rivets was a bare minimum, by using plenty it tightens everything right up.
A sheet of ply can have amazing strength in this manner.
good Work, keep posting.
|
|
|
|
Post by tasmillard on Oct 17, 2016 10:26:50 GMT 10
Bruce - you are making me look tardy and slack with my project. Good progress, I am taking in tips/tricks and learning from you as you go along.
Mustang - great advice re the marking, must remember to do that myself.
|
|
|
|
Post by 78466noM on Oct 18, 2016 11:27:25 GMT 10
Thanks Mustang about the marking if I use chalk I can draw lines up wall as well will be easier than using a stud finder I can use that for the cross braces.
tasmillard Your van is getting right up with the show quality vans. Mine has patches, chassis is patched stronger than standard but not pretty and setting up for free camping is going to have some things showing not to mention the 12volt lights on side ugly but safer than 240volt and able to be used if pulled up in a rest bay.I learnt a lot with the kampa and a ton by reading what other people have done and some things are what I wanted to happen and working out a way to do it doesn't always work but doe's most of the time.My wife came up with an idea for the table by using a ironing board that is adjustable easy to pack away and can be set at any height you need at seat for eating one height outside for prepping food or just socializing at full height and we have an old oak desk top about 17mm thick to go on top it has only been kicking around the house and garage for nine years at least.
|
|
|
|
Post by tasmillard on Oct 18, 2016 15:20:40 GMT 10
You know how things always look better in photos... lol
Having a usefully setup van is more important than a show van (if the purpose is to use it for camping, not shows). So I am also looking at options that may not be entirely true to the original design, but heck, we want to enjoy the outings as a family and be comfortable so thats priority over cosmetics in our case. So all good, I like the ironing board idea too, very practical and basically ready to use with minor mods.
I am keeping the 240v as we will do lots of travelling during the colder Tassie months, so keeping the option of going to caravan parks for 240v heating until we can grab a diesel heater in the future.
|
|
|
|
Post by Mustang on Oct 18, 2016 17:39:21 GMT 10
I am keeping the 240v as we will do lots of travelling during the colder Tassie months, so keeping the option of going to caravan parks for 240v heating until we can grab a diesel heater in the future. Have a look at the Coleman gas heater that runs on disposable cylinders. ($130.00) We had one in our previous camper (canvas walls) worked a treat, we gave it away when we bought the modern, then Vincent came along.  |
|
Deleted
Deleted Member
Posts: 0
|
Post by Deleted on Oct 18, 2016 18:17:00 GMT 10
I am keeping the 240v as we will do lots of travelling during the colder Tassie months, so keeping the option of going to caravan parks for 240v heating until we can grab a diesel heater in the future. Have a look at the Coleman gas heater that runs on disposable cylinders. ($130.00) We had one in our previous camper (canvas walls) worked a treat, we gave it away when we bought the modern, then Vincent came along. I think you will find they are no longer available they were banned and are illegal to use They NEVER were meant to be used indoors anyway and were always branded as an outdoor only heater , too many died burning butane in a enclosed space diesel heaters are safer but the noise and stench of the burning diesel is bad thats why we fitted a Truma LPG unit quiet instant and no smell small extra cost because of the need for a gas fitter to do the final hook up but well worth it in the long run |
|
|
|
Post by 78466noM on Oct 19, 2016 3:44:14 GMT 10
We are keeping the 240volt but as well as the 240volt internal lights and power points. We will have 12volt down lights as well and a large 12 to 240volt inverter that is big enough to run the small air-con it only cools.If we had kept the 240volt bar fridge for the van the aircon would have been out of the question we would have had too big a draw on the power but as it is now with all the lights aircon and usual phone charges etc it will be under 70% of it rated power of continuous 1700watt power. The two 240volt plugs on drivers side of van is one 15amp inlet and one 15amp outlet so when free camping all that has to be done is plug the caravan cord from one to the other and the van powers itself and with the right rcd's also safe.Also quick and uncomplicated to set up.
tasmillard what I was trying to say as I know yours is for family fun my van was in very bad condition when I brought it but the plan was made before purchase as to what was going to be done. Since then I have come across dozens of vans around the same price I payed in much better condition but that is life I am happy with the millard and it suits us for what we want. I have made a few short cuts cosmetic ones but they will show. I am time poor so one short cut is the bitumen tape on roof I tried to remove it but in the end just removed it from where I had to put extra aluminum strips to cover staple holes the rest now will be painted over as to use anything like petrol up there now will wash out the mastic.So what I was trying to say is that your workmanship is A-1 and it will last.My thoughts on show vehicles are that my vote would probably go to ones that are used regularly other than the ones that have had a gazillion dollars spent on it and locked away only coming out to be trailered to shows.
I hope you make your date for finish or at least have it at a usable stage only with only very minor things that need doing.
|
|
Deleted
Deleted Member
Posts: 0
|
Post by Deleted on Oct 19, 2016 6:51:39 GMT 10
Wow thats a serious draw what batteries do you have Lithium or AGM ? we run a 2500w inverter for the coffee machine and I know how it sucks power from our 240ah's of AGM batteries which btw are fed by 500w of solar which take up lots of roof space  even when SWMBO uses her hairdryer it knocks the stuffing out of them , this is in our motorhome not our V/Van , I have considered swapping the 200ah Li from the boat into the motorhome or van for trips away but it would mean many changes so have not bothered |
|
|
|
Post by 78466noM on Oct 19, 2016 10:49:58 GMT 10
So far have one 130ah agm battery one 200w solar panel to be used as rear window shade if I am going to have the weight on there it may as well do more than one job. the little air-con is 850w only cools to go to reverse cycle and have one that heats as well would be too big for inverter and a bigger inverter I would need at least 3 batteries to maybe run it . Hair dryers have a element in them that draws a ton of power same as the heating element in your coffee machine and with the insulation once the temp is down it should stay down for quite a while saving power. and for those energy hungry days I am making up a 12v generator electric start so the wife can start it when I am not there.I am thinking of a heater for free camping based on a car heater just a few hurdles to think though before I even attempt to put one together and the van has to be finished before that happens. when it is set up I am going to test the van with one battery to start as I have read a few threads on here where people started with two or more batteries then found out one was plenty for them so if it works with one it will be at least 30kg lighter but I am going to make the battery box big enough for two batteries just in-case as I have to vent it at bottom and top side to the exterior of van lucky no-one will see it as it will be my ugly fiberglass job.
|
|
|
|
Post by Mustang on Oct 19, 2016 16:33:22 GMT 10
Wow thats a serious draw what batteries do you have Lithium or AGM ? we run a 2500w inverter for the coffee machine and I know how it sucks power from our 240ah's of AGM batteries which btw are fed by 500w of solar which take up lots of roof space even when SWMBO uses her hairdryer it knocks the stuffing out of them , this is in our motorhome not our V/Van , I have considered swapping the 200ah Li from the boat into the motorhome or van for trips away but it would mean many changes so have not bothered I believe to run Lithium batteries you need cabling to suit?? |
|


 Someone posted about a safety style switch that works with the the RCD I am going to look at as it works with the inverter or generator and will cut power in case of a fault .


 . Also got the end top board up at rear of van so it will shape i can glue and screw in into position Sunday should have enough shape for it to be easier to put back after gluing so another job off the list. Will set up boxes inside for 240volt inlet and outlets on Sunday and the lock I have have for the door it is a slide lock made by lockwood the ideal thing with it is it can be locked open and closed so can't be slid to lock door when people are inside.


 even when SWMBO uses her hairdryer it knocks the stuffing out of them , this is in our motorhome not our V/Van , I have considered swapping the 200ah Li from the boat into the motorhome or van for trips away but it would mean many changes so have not bothered