|
|
Post by Mustang on Dec 26, 2014 20:25:54 GMT 10
Christmas Day we bought a 1975 Viscount Supreme. Been looking for a Royal with round corner windows, for a long time, so when this neglected soul asked for a new home I had to have a bid. Broke every rule in the book by not looking first  (house full at Xmas) a few emails to the owner decided on a max price & won the auction. "Vincent the Viscount has not been loved much in past but its previous owner was bringing him back to life nicely before he dropped him for a modern poptop. Now he seems fairly dry, comes with two? annexes(wooden poles) has a aluminium frame, has a new ceiling, two new walls & not much else, although all but two of the windows unwind, both hatches operate, a couple of significant dents, chassis needs treating, needs paint, no gas, no water tank, has mains, electric brakes don't seem to do much, but I will love & nurse him back to health. When Vincent is again going strong he hopes to join our extended family in Tasmania. (Our Daughter) PS The photos flatter, as they do on ebay, but we are happy with the purchase as the bones are strong, but there is much to do.  i look forward to the forums help.  EDIT: The original images of this thread were cancelled by Photobucket, they are in the process of being reloaded EDIT: The original images of this thread were cancelled by Photobucket, they are in the process of being reloaded
from another source, sizes & position may vary from the original text.![]() 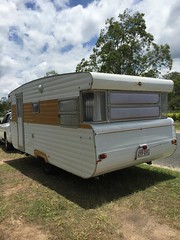 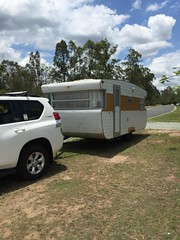 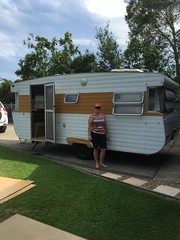 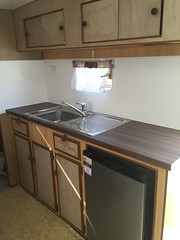 |
|
|
|
Post by atefooterz on Dec 26, 2014 23:17:40 GMT 10
Vincent looks a treat! pics are great as they help inspire you to make it look that way in real life. Hope it all goes well and good times are had.
|
|
|
|
Post by Mustang on Dec 27, 2014 20:26:53 GMT 10
Raining today so a strip out of rear damage was performed: Questions to those members who have faced this rot? 1) The wall paneling (both sides) is to be removed, which will involve trying to remove the drawer set which has been stapled from the outside, that should be ok, as the ply is buggered anyway.(drawer set is good) 2) With all the support of the windows removed (crumpled rot) can I remove the windows, as well for renovation? 3) the remaining cross member support under the folded cladding is rotten both ends & really should be removed for renewal, what then holds the rear end together, if I take the windows out? I really don't know if I have put the cart before the horse  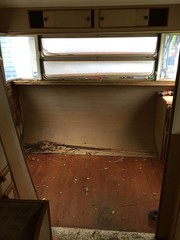 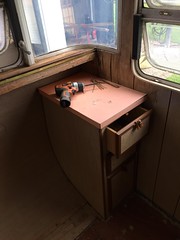 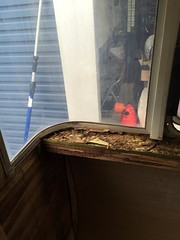 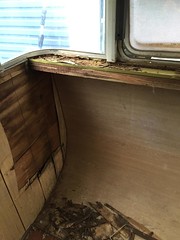  |
|
Deleted
Deleted Member
Posts: 0
|
Post by Deleted on Dec 28, 2014 8:27:29 GMT 10
Hi Mustang,
Just to let you know before you start tearing your hair out and wasting money,the windows on your van are not the normal wind outs.
Parts are not available any more ,and you will have to devise a locking method to keep them closed while travelling.
Sorry to be the bearer of bad tidings,but it might save you a lot of angst in the future!
Cheers
hughdeani
|
|
Deleted
Deleted Member
Posts: 0
|
Post by Deleted on Dec 31, 2014 11:00:07 GMT 10
Raining today so a strip out of rear damage was performed: Questions to those members who have faced this rot? 1) The wall paneling (both sides) is to be removed, which will involve trying to remove the drawer set which has been stapled from the outside, that should be ok, as the ply is buggered anyway.(drawer set is good) 2) With all the support of the windows removed (crumpled rot) can I remove the windows, as well for renovation? 3) the remaining cross member support under the folded cladding is rotten both ends & really should be removed for renewal, what then holds the rear end together, if I take the windows out? I really don't know if I have put the cart before the horse  Hi
I have started the repair on a Millard and here is what I have learnt, the side cladding is the last thing they put on when they build my van, so the ply inside is either under part of the frame or is in between the side and end of the frame etc It would be a good idea to totally remove the window and check all the timber/fame around it, to make sure there isn't a leak, there would be nothing worst then spending hours repairing walls inside to find out after the next storm there is a wet spot on your new wall because the window/frame is leaking. The cladding will stop the rear of your van opening up as it will be screwed or riveted on the edges under the side trim.
Cheers
|
|
|
|
Post by Mustang on Dec 31, 2014 16:38:37 GMT 10
Hi Lockyer,
You are correct, I think I'm one step from de-cladding the area, as I know there is no easy fix, nor am I looking for one.
I'm in a bit deep here? but I guess its not rocket science, I'm just looking to head in the "right " direction.
|
|
|
|
Post by Mustang on Dec 31, 2014 17:25:08 GMT 10
Just read the 6 pages of a 1960s reno, recommended by Lockyer, struth, I didnt plan on this many problems!!!!  Are well in to it now. Please feel free to comment on what I can do, not cant do, its got to be done!! 43 year old resto Mustangs seem to be a cinch?  |
|
|
|
Post by tedalley on Dec 31, 2014 20:40:46 GMT 10
Hey Mustang,
What is the wall framing? -- alloy or timber?
If its timber then I would use some props to hold up the roof just in-case there might be wood rot in the framing.
|
|
|
|
Post by Mustang on Jan 1, 2015 8:03:42 GMT 10
Thank you Tedalley,
With more research from this site it appears my 75 is actually a 77. The previous owner who re-newed the roof assured me it is aluminium.
I'm yet to remove the wall panels, which I will do before the windows come out.
From info here I,m going to prop the top cupboards anyway, as they have been attached to the roof, and I guess the windows are the main strength in that area.
I have accepted my fate now heading into such a project, initially it was overwhelming, felt I was going the wrong way.
Cheers
brent
|
|
Deleted
Deleted Member
Posts: 0
|
Post by Deleted on Jan 1, 2015 9:57:21 GMT 10
Brent
Don't panic, but remember a lot of things are no longer available to match in your van so before "destroying" internal panels of any of your cladding if you want to keep it looking original don't rush at pulling stuff off/out. My van is for use not for it's looks or because it's a classic so we will be painting the inside in modern pastel colours once finished and fitting newer connections etc. The inside of ours is to be re designed to suit us so I'm not worried about removing sheets of ply.
Pop rivets are a good sign if you have an alloy frame, if you have all screw's then it is most likely a timber framed van.
And photo's we LOVE photo's
Cheers |
|
Deleted
Deleted Member
Posts: 0
|
Post by Deleted on Jan 2, 2015 13:31:32 GMT 10
Thank you Tedalley, With more research from this site it appears my 75 is actually a 77. The previous owner who re-newed the roof assured me it is aluminium. I'm yet to remove the wall panels, which I will do before the windows come out. From info here I,m going to prop the top cupboards anyway, as they have been attached to the roof, and I guess the windows are the main strength in that area. I have accepted my fate now heading into such a project, initially it was overwhelming, felt I was going the wrong way. Cheers brent Hey Brent, Sort of a intro here as well as some advise. At the end of the day if you have restored the mustang this should be a walk in the park. While yes different in approach your outcome will be brillant if you set about it in a methodical way. My "apprenticeship" was a Eh holden sedan. My caravan apprentiseship was a 1974 Capricorn tandum axle 21ft van whihc I am still working on  only purchased in August 2014. My van is timber framed and had some rot HAHAHAHAHAHAHAHAHA, so far I have completely rebuilt the front 3 ft and replaced 5 panels. First bit of advise. You interior is irreplaceable. I have spent a number of months trying to get the original 70's ply. Australia does not have this anymore. I used to be part of the timber industry and have contacted a number of my personal suppliers and been meet with laugher. There is a number of ways to go about this but I will get back to this soon. Second bit of advise. - As the cladding was the last items placed on the van then it needs to be the first off. (something I could not de due to my environmental constraints (I have a goat who likes fibreglass)) place under cover and number the panels as they come off so that you can put them back. Being aluminium frame you will probably find that it is riveted together not screwed and stapled. You will need a rivet gun and appropriate drill bit. Third bit of advice - try and keep as much as you can for templating, this is invaluable and remember measure twice cut once. if unsure spend more time measuring. right now for more general stuff stanley knife works well at cutting access holes and new panelling if taken slowly. For finishing I use a router with a laminate bit. The orangy brown panelling in your kitchen ont he wall is Apple tangerine. It is still readily available but I know this is being discountined according to gunnersons soon. So I would stock up for future. The old way of joining was due to the panelling being cut and thus joining strips were not required. If you like the original style look and do not want to use joining strips then you will need to create the original panel look. This can be done with some creativity. two options. Look at a plain non paper lined paneling whihc will be raw timber, you can then stain this to match the original ply (not the apple stuff) and then cut lines into it to give the same effect. second option is buy the apple tangerine ply (paper lined) which will match the kitchen and the cut lines into this. both of these methods will result in a timber colour line on the panel. from there you will need to either paint it brown or black dependent on what your original panelling looked like. To do your cuts. you will need a big table or two tables with a massive timber sheet to be flat and a good timber straight edge (this is the hardest bit I have a good straight edge cut from dry red gum) a standard saw blade is 2.5mm and most of the panlling is between 5 - 6mm in the original cuts. remeber the edges are hlaf cuts and the centre ones will require two. Prepare for frustration for the first couple of cuts it will take you some time for practise and technic. again measure more than once. You cannot rip these you must cut them. if you have some verniers measure your saw blade depth to .5mm this will usually result in a 0.8mm cut roughly the same as the original panel.have fun I did  I would cut a hole int he panel on the left (as per the pics, to verify the construction. even with the van being aluminium I would add some timber batters for you to screw cupboards etc to later when re-assembling) while yes it will add weight selectively you will not notice this addition really. To get your windows out I would suggest they will be sealed with the old linseed window putty, which while works very well, over many years (read 20+) does become hard and thus prone to failure. use a plastering spatulaer from the outside and run it all the way around the window after removing the 15+ screws that hold it in (or rivets) This should then allow you to remove the windows cleanly without breakage. Your corner windows will be perspex while the other flat ones glass. a good glazier will be able to fix/replace any damaged glass (leadlighting places will be better with this as the rounded corners can cause some "normal glazers" to have a kinipsion.) Perspex suppliers will be able to bend the window to the same as the original if required. The roof is not held up by the windows infact the windows are a semi sloppy fit. to reseal windows use z-bond ezycaulk it comes in white and will present as per the original putty. while cladding is off think about the future, are you lookign at puting radio into the van, solar panels or 12v independant system, these are all good things to plan into your fix whiel the "covers" are off as you have access to run extra wiring or seal panels. Above all you will need to find the leak to make sure you seal it and fix the problem otherwise you will have the same issue occur again. Generally water will flow down and water leaves a trail. Some of my damage was from poor design when the water got splashed up in the wheel well where the interior ply was the "water proofing used  " I have since used some bitumen paint to both protect my frame and also the paneling is areas whihc were not properly thought through. Above all have fun. if you get upset walk away, you can damage so much stuff just by frustration and anger when a drink and a 5 minute break can help wonders |
|
|
|
Post by Mustang on Jan 2, 2015 19:45:16 GMT 10
Hi Oldnmad, Thank you for such a detailed response, I can see on this forum where members have been spurred along by forum community spirit. Last night with storms approaching, I changed the sleeping arrangements of the Nautilus & "Vincent", the love & kisses is not amused!! Locked the keys inside the van while moving (you idiot) so this morning had to attack my first window removal, pathetic thing, almost fell to pieces, but it will be recoverable. Found "Caravans Plus" seem to have the seals & parts. At this stage I'm baulking at taking off the cladding, although a little voice is saying "you have been told" do it! but I have found a nice aluminium frame, phew!!. I think I can fit the new ply (2 1/2 sheets supplied with sale) without removing the cladding, but now its under cover I might feel more confident. We will have grooved ply & plain ply, (due to some restoration by the previous owner) I appreciate your advice Oldnmad but grooving the plain ply is beyond my woodwork abilities, so I can see us painting as the original salvaged ply is soiled, but solid. I love your end quote, the wife says you must know me??? QUOTE "Above all have fun. if you get upset walk away, you can damage so much stuff just by frustration and anger when a drink and a 5 minute break can help wonders" Have done this several times already. Cheers & Thanks Brent 1st Image Alternate sleeping arrangements 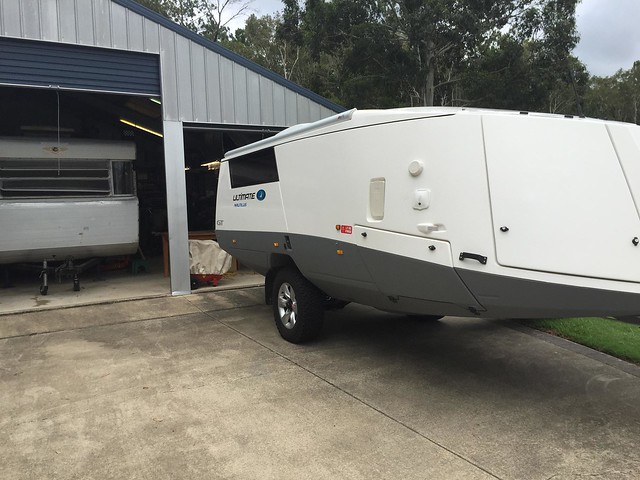 While this side panel was rotted the drawer set was quite good, so I decided to salvage.  See next post for images. |
|
|
|
Post by Mustang on Jan 2, 2015 19:55:02 GMT 10
Now with the drawers out & part of the panel removed...a lovely aluminium frame..Thank you God.  Note the 1977 Insulation? 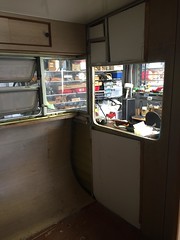 By locking the van keys inside while moving, my first window removal was ahead of schedule!! 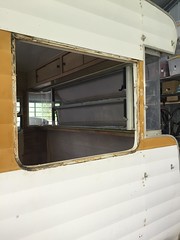 Gunk, Gunk everywhere   |
|
Deleted
Deleted Member
Posts: 0
|
Post by Deleted on Jan 3, 2015 9:15:49 GMT 10
Wow what the heck is that "Nautilus" I think I saw an Alien space ship the other night lol
Good news with the Alloy frame, and if you can keep the van under cover removing some of the outside cladding rivets without removing the whole sheet you should be able to get to the inside of the ply to remove staples etc
Cheers
|
|
|
|
Post by Rattles on Jan 3, 2015 9:58:39 GMT 10
While the internal linings are off and If the Tail , numberplate and Clearance lights do not have two wires running to each light then add the -ve return wire and not rely on the Skin/Frame for the return path.
Rattles
|
|
Deleted
Deleted Member
Posts: 0
|
Post by Deleted on Jan 3, 2015 11:07:36 GMT 10
Ok here goes another longish reply..  sorry! Hmmm keys, that is something I should look for and a brillant reminder Thanks!! While the van is not locked and I know they are not in the van I might have to start searching around to find them :S..... trimatic lock replacement anyone  . I have had to walk away a number of times, doing roof panelling in wind by yourself is not a walk in the park. I am however a little jealous of your van there Brent as I was originally looking for this sytle, but the lovely lady found our capricorn and wanted a big van....in some respects I am glad we have a tandem and 21ft but seriously a 16-18 ft would have worked. Grooving is not difficult just labour intensive. Heck I am an electrical engineer not a panel beater or builder/carpenter, only way to learn and gain skills is get in there  will do writeup when get time. I so wish I could steal  you oster light as it would match mine and give me the three the same instead of the one odd one out so jealous....  glad it is working for you though. The nautilus seems to suggest you go off road alot. what adventures have yuo had in the past??? Well this is going to make things a little easier for you. No frame rott, thus just cosmetic and sealing issues.... Jealous!!! My 1974 van has fiberglass insulation. From what I have found it was a privileged to have insulation back then. most vans these days are insulated with polystyrene. Personally having slept in both a millard (fiberglass insulation) and a golf (poly insulation) the millard was far better. You windows definately were sealed with linseed oil putty. Before it goes completely hard clean it off. otherwise it will be very difficult... experience here is a key :S This is one very sound brilliant piece of advice. in a timber frame they use the outside cladding as the frame return for ground  aluminum is not the best conductor of electricity, as such it can be real hit and miss, for the sake of a little more wiring you will reduce your headaches 20 fold. while your there speaker wire and solar panels...  Slightly off topic for your Brent, if you do 4x4 what maps do you use? I have purchased a 4 wheel for towing said Caravan but am looking at map software currently, no huge decisions yet but just looking around. Dad runs a dedicated Hema and i have looked at running Hema on android but there seems to be mixed responses and reviews.  Cheers Tim |
|
|
|
Post by Mustang on Jan 4, 2015 9:20:38 GMT 10
Thank you Lockyer, Rattles & Tim. Its good to share the journey. Lockyer here is a link to the Nautilus, which is "hers" we started with the Explore model which we towed to Cape York through the Old Telegraph. Great Trip Tim, we use a GPS called Hema Navigator. It has "street, 4wd, & walking" hellava unit but too complicated for me, we use just the basics, on Fraser Island it was a great asset. Now my wife uses an I Pad quite well, we may download a Hema package onto it. The package is about $200.00, but I suspect the ipad is subject to phone reception. ARB handle the Hema Navigator, if you would like to see it in action. Good tip about the wiring, I had thought of it then forgot, so its in the "Vincent" book to be done. I'am logging the resto, I find the book is good to jot ideas down as you think of it, especially with "old timers" coming on. Image: Cupboard set removed from rear LHS, I'll try & save it. Soooo many staples, I wonder how they would have made them without staple guns, perhaps I need one? 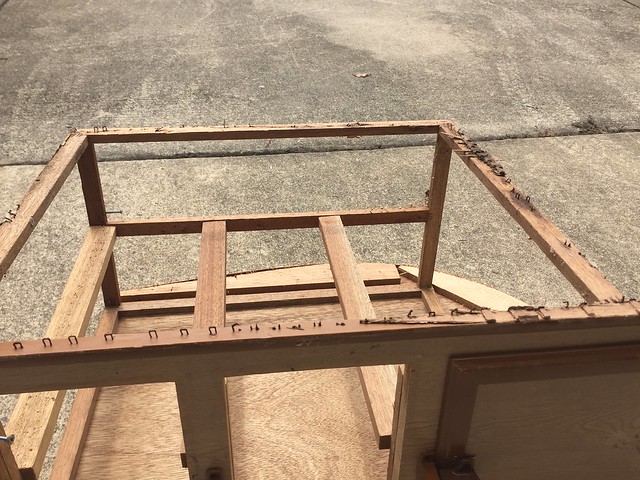 |
|
|
|
Post by Mustang on Jan 4, 2015 20:00:06 GMT 10
Its taken me a day & half to polish one double frame. I tried several polishes, power buffing wheel, nylon brush in the drill, best solution I found is: Course , medium then fine steel wool saturated with inox, then metal polish. not perfect but the weathered surface is shiny. Image 1: Before & after, (I did use an aluminium wash that was suppose to perform miracles)  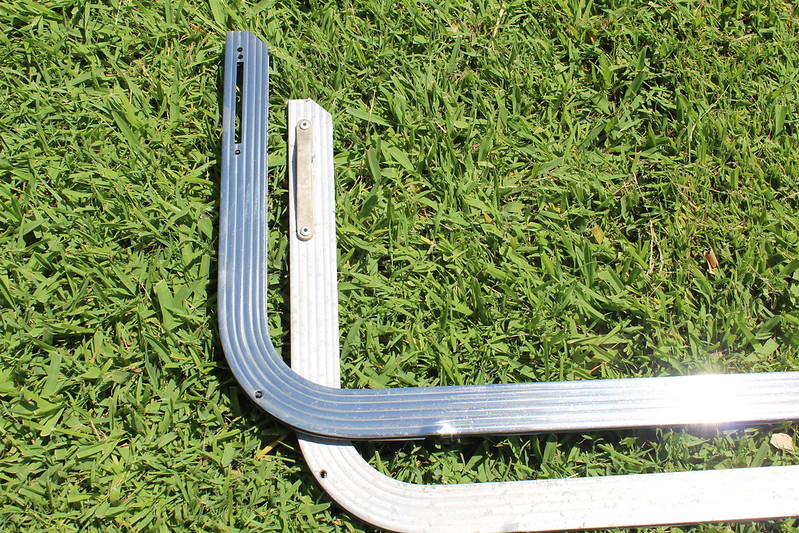 |
|
|
|
Post by Mustang on Jan 4, 2015 20:01:53 GMT 10
|
|
|
|
Post by atefooterz on Jan 4, 2015 21:45:24 GMT 10
Even in this day & age it still comes back to elbow grease & being stubbon i reckon!  |
|
Deleted
Deleted Member
Posts: 0
|
Post by Deleted on Jan 5, 2015 23:07:26 GMT 10
Thank you Lockyer, Rattles & Tim. Its good to share the journey. Lockyer here is a link to the Nautilus, which is "hers" we started with the Explore model which we towed to Cape York through the Old Telegraph. Great Trip Tim, we use a GPS called Hema Navigator. It has "street, 4wd, & walking" hellava unit but too complicated for me, we use just the basics, on Fraser Island it was a great asset. Now my wife uses an I Pad quite well, we may download a Hema package onto it. The package is about $200.00, but I suspect the ipad is subject to phone reception. ARB handle the Hema Navigator, if you would like to see it in action. Good tip about the wiring, I had thought of it then forgot, so its in the "Vincent" book to be done. I'am logging the resto, I find the book is good to jot ideas down as you think of it, especially with "old timers" coming on. Image: Cupboard set removed from rear LHS, I'll try & save it. Soooo many staples, I wonder how they would have made them without staple guns, perhaps I need one? wow wow and wow, you move with progress Brent  you have done very well. I am not all that old (40)  but I do have seniors moments more often than not these days. I suspect it is the high stress job and the fact that dayus for me are usually 12 hours minimum in length, seriously looking at something else in a career just so I can unwind...  I a supposed to be going away this Sunday and currently mine looks like this....   Well not strickly true the roof you see on the left is actually installed now, but you get the point. Working full days and then getting 3 hours before the sun goes done and then however long you can stand being mawled by mosquitoes while wireing tends not to get too much done. But i do like you progress keep going. I have found too that steels takes a little effort to bring up but when it comes to aluminum its oxide it harder than the knobs of hell and thus you need to cut it, hence why the steelwool works a treat. I do like your window frames though, i get the feeling I will be doing mine when I get back......yum! more cut fingers and blood  Yes dad has a Hema Navigator too. I have bit the bullet and purchased the android version. You can download offline so that you do not need the internet to get maps but it takes space. I know this can be a sore point in the apple world...  The android device i plan to run it on is a 32Gb version with a 64Gb upgrade slot  whihc will put all maps I could every need on it. Best thing is only cost me $25.00 (special currently) and I have the installers so I can load it on any anroid device i own  so yes I am wrapped. Currently I have it running on my windows pc in my Android developers kit connected to the gps dongle I use in the race car and it works well. So yes very much sold on the Hema idea. If you plan to run on the ipad I would suggest that you offline only what you might need that way you will not need to be connected for when the reception is not so good. But if you got the navigator you should not need to worry too much about the ipad  Your book is exactly what I am running with currently though the list seems to not be diminishing at any great result. Yes you are right about the stable gun. I prefer to use screws and glue were possible as i want it to be able to come apart if need be at some stage and not come apart when I dont  I have not found nails opr staples that are of the same size as what was used in our van, those little stables you have shown are pains if you need to put them back through the tin. I found that a little non weighted hammer was best as to getting them back into the caravan than my good estwing. but yes i did buy a stable gun to help (from aldi) back in sept. only $20 and good enough. If you are luck your local one might even still have some (comes with a stable remover too which is brilliant, and a box of nails as well, which has been great at temporary pining stuff together. very pleased. One other thing to keep in the back of you mind though as I remembered tonight which i had forgotten since rebuilding my tiger, aluminum work hardens and thus after some manipulating will fracture if you are not careful. I have panel beaten my front panel back to what it should be but when I was refitting the out skin tonight on the front right corner the sheet fractured, nothing the tig and a but of paint wont fix BUT just one more thing to do, and something you might save yourself needing to do, presuming you ave access to a tig. Mig can do aluminum BUT you need to be a professional to pull it off. tig far better  Cheers Tim PS: I have also found a great use for some of my old paint thinners and gun thinnners, they take the tar and smoke stain crap off alot of things in the van, just be aware of the light switches though, it can eat the plastic if too much thinners and too much rubbing occurs. Cannot wait for the door to be white again instead of brown... YUK! how do people still smoke and not get the whole the stuff on the walls stained is in your body the same way  |
|
|
|
Post by Mustang on Jan 6, 2015 6:22:25 GMT 10
Thanks for the update Tim. Why don't you start a thread on your van so we can also follow the progress?
Yes I'm 63 & work from home, so have the luxury of time while I,m fit enough to do it. Knowledge is my problem, hence airing my washing on this site.
Yesterday I had a peak at the electric brakes (not bad) & decided to have a roadworthy done & changed the rego into my name.
We were going to let it run out, but I need to tow the van to another nearby town to have the chassis treated (not sandblasted) for priming.
I want this done before I reno the brakes properly.
|
|
|
|
Post by viscount6116 on Jan 6, 2015 14:02:19 GMT 10
Howdy Mustang Your Viscount resto is coming along nicely ,looks good  , however I particularly like the look of the Nautilus   ...any chance of another couple of pics as they look like a nice unit !! Cheers Andy  |
|
|
|
Post by Mustang on Jan 6, 2015 17:29:51 GMT 10
Hi Andy, The Nautilus is certainly an amazing piece of kit, we waited two years for our order, but they are up to speed now. Check out this link
|
|
Deleted
Deleted Member
Posts: 0
|
Post by Deleted on Jan 7, 2015 7:41:44 GMT 10
Thanks for the update Tim. Why don't you start a thread on your van so we can also follow the progress? Yep I will but currently it is just go go go go to try and get this ready for going away.  I am so stressed at present I am looking forward to just sitting and doing nothing. Might even create the thread when away  (next week) Please please please get back together and roadworthy!!!!  Cheers |
|