|
|
Post by 78466noM on Sept 2, 2016 1:34:21 GMT 10
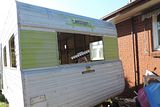
gooday ateooterz At the time and still is money is tight I would have loved to do all the beams in aluminum so much easier. The original beams were timber as well as on top of wall frames I did change out the length way beams with aluminum and added aluminum angle to attach the timber to. The timber is pine so not very heavy. those tek screws that are in view I will change out for something less visible the ones inside cupboards can stay. :-) ceiling is glued up but needed the big heads to hold it as I was on my own and I was holding it up while trying to use a stud finder hold screws and drill with screw bit in it all at the same time at one stage I thought I could win funniest home videos. but it is amazing what you can do when you have to. I am happy it is coming along there is a lot of compromise but over time things will evolve little things will get changed as use lets us know what works and what doesn't work so well. The body of the old girl is a long way from perfect but it isn't going to annoy me if the wife is backing it and puts a small dent in it whereas if I spent a lot of money and time with new cladding I may well be a little annoyed. It should be comfortable I think when I get it to a usable stage have fun and stay safe Bruce  |
|
|
|
Post by atefooterz on Sept 2, 2016 7:07:30 GMT 10
Thanks Bruce, i can understand all that well, being a no pension nor income dude. I will never forget a new house mate moving in, back when i could afford share accom, he had a strange device for holding up gyprock or whatever 2.5 - 5m long sheeting, to allow one man fittouts. The only down side was the cost and how much space even packed up it used.  *I am still waiting to see a roof frame that triangulates around the hatch area, unless one wants to walk on the roof or build a second story much of what i see is overkill plus not addresing any flex- twist issues, that our old girls get at times, like jumping a cara park kerb to get on site or many towns where the ditch drain rules. I had cladding on mine as a wish list item but now glad i did not as amazing how many ways to scratch or be scratched- dented as mine is my first caravan. *The modern open look 18-20+footer interior would be more flexible and less reliant on those cupboards providing the stiffness. Cheers Ate. |
|
|
|
Post by 78466noM on Sept 2, 2016 11:22:55 GMT 10
Thanks ate my wife wanted a 18-20footer and the bloke I brought this one off had one at a reasonable price it had the same cladding as tasmillard's new viscount. She wanted a shower inside and still sleep six if needed inside.( she now has a pop up shower for annex it has a rubber floor and a tube I can hook a pump to to pump water into waste tank ) But two major things stop that room at home the extra five to six feet on this one would make it nearly impossible to get cars out without having to move the other one ( I work nights and she goes to Tafe in the morning )plus her car would be the only one able to tow it mine as an auto has the same towing capacity as her territory but ford in the strange wisdom gave my manual a 1500kg capacity same car exactly as an auto just with a manual box :-( those squares you see in photo's all ended there by accident I had to put two in so I had solid timber to screw light fittings to they tightened up that section that is one single beam with the ply cut to a long triangle to peak the roof could be pulled downward by hand about 4mm now with it all joined pulling down on one moves very little.There is still some movement. But it shouldn't be as reliant on the cupboards for strength then again if I had done it in aluminum I may have made it to rigid and over a very short time had major issues I have seen picks of the aluminum viscount ceiling beams but not up close they knew what they were doing I can recreate what was there and as I did change little things but just thinking about it now if I had done it in aluminum 30mm square as is easy to get. I think the viscount roof is done with channel hard to get in needed size but would give a small amount of flex when needed the square would have had no flex. To sum it up not having the cash may have saved me a lot of heartache in the long run. have fun and stay safe Bruce  |
|
|
|
Post by atefooterz on Sept 2, 2016 17:04:52 GMT 10
The hardest part is to just re create what was/ is there or start from scratch about function then how to achieve it. We see it here & the VV board with the third and fourth timers! Not having cash makes things better and worse, as if unlimited spend then a few goes at it is only time. I am just lucky in previous jobs, hobbies etc i have a handle in some areas. Not being mechanical i get amused, frustrated as so many proven good ways to engineer things, get poo poohed by nuts and bolts etc. The stupid bit is those who do not go the hard yards with new tech, like the fall apart using the wrong miracle glue manufacturer etc, so anything remotely that way will be dismissed with a cautional "remember those...!" haha |
|
|
|
Post by 78466noM on Sept 3, 2016 10:23:24 GMT 10
I am not bad at the mechanical parts and metal work is fair I can weld self taught but left the draw-bar to be welded on by a professional good thing too because I learnt not to weld right round just the two north south surfaces as this lets the join flex ever so slightly but if it is welded right around the weld will fail as no room for flex and the weld has weakened the steel so money spent in the right places goes along way if I had done this myself it would have been a very unsafe van. I did the sealing in butyle mastic. Sikaflex is a good product works well on truck and trailer pans usually get a minimum of about five years out of it before it starts to fail but we are talking very harsh conditions and a ton of flexing as a lot of pans rely on sides and floor for strength with wheels and axle on a short chassis at rear.But other than price the fact I was on my own I could do the long runs needed with out a worry of it skinning before I got the j rails in place. I have been looking at the modern glues and fixings have used some to fill holes under patches worked a treat much better than silicon. I have spent a lot of time looking at different things other people have done to help me along the way. On here is a big source of info so every one here and those who have been here need a big thank you have fun and stay safe Bruce |
|
|
|
Post by atefooterz on Sept 6, 2016 10:39:32 GMT 10
Sound advice about the welding on critical areas! That may just save someone down the line, reading past threads. It would be awesome if some of the early thread reno posters, did updates a few years later. So many things run true for decades and longer, regardless of fancy talk or new products, while others make old ways seem doing it hard. The skill being sorting the wins from the hype! If a semi pan flexed to scale as much as the average 18foot caravan it would never survive!! :)Modern insulated boxes of 50- 100mm thick bonded sections surrounded by rigid right angled supports, do an amazing job. I do suggest making a model of a caravan shape, just out of cereal box cardboard, using aquadhere tab joins. fit some to scale cupboards & see the difference. Same with the roof supports, put in a ladder of 90degree balsa supports then wiggle, replace those with a simple x shape intercecting around where one hatch would be or an XX based on 2 hatches for a longer van with one 90degress cross where the 2 X join & wriggle. The need for lower in cabin longer cabinetry to help for & aft support is gone. Not however the floor to ceiling issue! |
|
|
|
Post by Mustang on Sept 6, 2016 16:54:16 GMT 10
I found this when I replaced the ply to the rear quarters of Vincent. Inserted a rivet every where I could.
Stiffened the whole rear end up.
|
|
|
|
Post by atefooterz on Sept 7, 2016 8:56:29 GMT 10
I found this when I replaced the ply to the rear quarters of Vincent. Inserted a rivet every where I could. Stiffened the whole rear end up. That included a curved area as well? Curves = strong. |
|
|
|
Post by Mustang on Sept 7, 2016 17:01:06 GMT 10
I found this when I replaced the ply to the rear quarters of Vincent. Inserted a rivet every where I could. Stiffened the whole rear end up. That included a curved area as well? Curves = strong. Yes I cut the ply on the sides into the curves. Before the ply was re-instated I would travel a short distance to get a job done and the rear windows would "pop" the mastic. After all the ply was pop riveted back where it should have been , problem solved. |
|
|
|
Post by 78466noM on Sept 8, 2016 10:50:55 GMT 10
I wasn't putting down Sikaflex quite the opposite a freezer pan with thick walls is mostly the foam used in surfboards glassed over these trailers mostly have full length I-beam chassis but to keep weight down in a lot of pans they only have quarter chassis floor is made up under usually 4mm aluminum plate small I-beams running across connected to c-channel running length ways so these trailers have a lot of flex and twist. To be fair after five years these trailers have mostly done well over a million km's and the fail of the Sikaflex i was referring to was very small leaks usually only one very small leak in a side close to the middle between axles and king pin and with 25 plus tone a load on a tri-axle over our roads I would say that is extremely good going and most of these pans never leak.It is only the odd few and not confined to one brand ( you also have to take into account the chemicals they use to clean them are fairly harsh you wouldn't use them any where near your car ) sorry that the first part was only a half explanation that could be taken not the way I intended it. Other than price and the fact I am usually on my own and would find it very hard to get the j rails back together in time before the Sikaflex started to go off if I had had a hand or two I may have used Sikaflex under the j rails if i had the money to buy it. have fun and stay safe Bruce 
|
|
|
|
Post by tasmillard on Sept 8, 2016 15:58:51 GMT 10
Hi Bruce, I know what you mean, I used sika on the Millard jrails and this this on my own. The sika was almost skinning by the time I had a chance to fasten the j-rail back down, so I had to work quite fast! Of course when doing this it leads to mistakes but so far so good for the Millard.
For the viscount I am using butyl so not so much a problem in doing, more a potential problem in how long it lasts...
|
|
|
|
Post by 78466noM on Sept 9, 2016 0:57:45 GMT 10
Mine is a 1978 model it live close to the ocean and am assuming has never been registered due to the fact that there are no holes in back for the plate the number plate was attached to and the non existent chassis rail on drivers side ( very hungry tin worms ) i am confident it wasn't leaking for too long maybe a year or so as the inside walls and cupboards weren't in too bad a condition but had chipboard flaking and a musky smell also the floor is in excellent condition not perfect but not soft. So say it started leaking in 2014 that is 35 years just in-case van was made at the end of 1978 and the staples not all had been under j rail quite a few had been out side of j rail and a few dents probably from tree branches falling on it wouldn't have helped at all. So I am thinking if i get more than 15 years before I have to do them again all is good on a positive note the j rails were the only leaks at seal the windows and hatch seal are still water tight with original mastic tape have fun and stay safe Bruce |
|
|
|
Post by 78466noM on Sept 11, 2016 21:27:25 GMT 10
Got one more sheet in in ceiling today all insulated and it does work well got quite warm inside then cooled down outside it was still much warmer inside than outside. Now I just have two fiddly ends to do. The bunk end is going to get a shelf made for the top bunk will save me trying to bend the ply at a very tight bend and somewhere for top bunk occupant to place personal items in reach. This was a good days work all holes matched up with conduit rest should be much easier then the sides not looking forward but should work out well I hope have fun and stay safe Bruce |
|
|
|
Post by atefooterz on Sept 12, 2016 21:11:09 GMT 10
Got one more sheet in in ceiling today all insulated and it does work well got quite warm inside then cooled down outside it was still much warmer inside than outside. Now I just have two fiddly ends to do. The bunk end is going to get a shelf made for the top bunk will save me trying to bend the ply at a very tight bend and somewhere for top bunk occupant to place personal items in reach. This was a good days work all holes matched up with conduit rest should be much easier then the sides not looking forward but should work out well I hope have fun and stay safe Bruce Mine will slowly drop to about 8-10c inside, starting from 17c in winter. step outside & the full 0-3c hits! Only downside is how slowly it warms up again.. (only in winter) |
|
|
|
Post by 78466noM on Sept 14, 2016 12:32:08 GMT 10
My plan is insulate walls as well still looking for a suitable product in a reasonable price range will use Styrofoam if I can't find any thing else but would prefer something that will have a little resistance to fire not fuel it.
so in winter only a small oil column heater ( I don't like the ceramic heaters I have lucky to be in the room when at different times two have burst into a cloud of smoke quickly ripping the cable out of the socket stopped a fire from happening. (When they inadvertently buy the ceramic heaters for home the heaters seem to find themselves hidden in the garbage bin I don't think I would be third time lucky)
and summer I have a cooling only portable air-con only small but can keep cool a very large lounge room it would eventually bring down the temp but took a while broken air-con in lounge room replaced so the little one can holiday around in the van now.
Bruce
|
|
|
|
Post by 78466noM on Sept 20, 2016 0:49:12 GMT 10
Didn't get much done Sunday except cut one sheet for curve at rear of van. Did find a easy way to measure for the curve is use a piece of conduit about a meter or so long bend it to fit the curve then after you have it to the right position mark it then straiten it out and measure it. I found this much easier then all the other things I have tried but a wire coat hanger would do just as good same principle. have fun stay safe Bruce  |
|
|
|
Post by 78466noM on Sept 26, 2016 9:52:27 GMT 10
I have a plan for this week end depending on weather hopefully up early enough Sunday to sand remove windows and door and tape outside of van for first coat of paint by 3pm this is because the paint can take 2 hours to dry properly and at about 6pm the temp has been dropping quickly then get the door and windows back on and sealed so the second coat on Tuesday again weather permitting I can put the second coat on this is so some paint covers the mastic hoping to keep the air out.Then I can concentrate on the roof I have a sealant paint PlastiCote is its name it is a100% acrylic latex polymer paint. Water based for thinning and cleaning while still wet and resists ultra violet rays so with luck it seals the air from the mastic and should cover the mess made from the bitumen tape. Due to time I am not going to touch the four seasons hatch as it only leaks out of the top corner and the amount of water it lets in is very minimal. I put a bucket under it at 3am one morning it rained until about 7am checked bucket at 11am and the water had dried up and I know that hatch is going to kill a whole day to remove clean then reseal and replace on top of van so more urgent jobs to be done before that it should be registered before that.
have fun and stay safe Bruce
|
|
|
|
Post by tasmillard on Oct 2, 2016 8:15:10 GMT 10
Bruce, you are doing a fantastic job in my eyes. You are certainly persistent and getting it done. I only have a fraction of the work you have and i think i got a load on! Looking forward to seeing the final result.
Cheers,
|
|
|
|
Post by 78466noM on Oct 2, 2016 11:54:56 GMT 10
Thanks tasmillard Yours is probably close to the amount of work as mine. Mine being empty not having to work around things as you have to sort of speeds things up a little for me. This was hoping to be about a six month build now twelve months into it I have seen where the time has gone and it is well spent making sure it doesn't leak any more having a full strong chassis no more missing bits that the hungry tin worms got is going to let us enjoy it for years to come with just the normal maintenance kept up. You have done a ton of work in a very short time and all to a high standard.I have enjoyed watching your vans progress. The millard is an absolute gem the person buys it will have a real bargain.
Finished work late this morning and daylight savings stole an hour so it looks like I will get windows door and fridge vent out empty it of tools etc and maybe get a light sanding in then work again Monday off Tuesday to Thursday so if weather is no good for painting time to insulate walls and do interior walls. I want the windows door and vent out to cut holes in ply wall lining when sheets are up that way the holes will in the right spot if I cut them beforehand and am out a little as the original sheets I used for templates weren't in very good condition and a few bits missing made it a guess as to where to cut.
so now out the door and stuck into it.
Bruce
|
|
|
|
Post by 78466noM on Oct 2, 2016 21:07:48 GMT 10
     Had a good day today considering a late start and a couple of very small helpers. I got the windows door and grills off inside cleaned out also got the mastic scraped off I have also put some goo off under some glad wrap to see if it will soften up the stickers. I have been looking at insulation for the sides front and back every thing I have looked at has had draw backs too thick to fit in space , too floppy will just end up insulating bottom half of van so have decided to bite the bullet and use a foil covered fire retardant foam that is also water resistant but the price is nearly $300 for 30m2 lucky for me I need 30m2 the cutouts for the door windows and vents will be used to double up at the top ends that curve as the insulation I used in the middle of the roof is too thick to be used there this stuff Ametalin 8.0 x 1350mm x 22.25m ThermalBreak 8™ Insulation looks like it should work well nice and firm 8mm thick so leaves a gap of 12mm for air circulation though it says in the description that it works well even when compressed. have fun Bruce |
|
|
|
Post by tasmillard on Oct 5, 2016 17:11:30 GMT 10
Bruce, I noticed a few other option from bunnings, like Green Insulation. Kinda getting confusing now, what are the differences between them. The ThermalBreak looks good too, let me know how you go with it.
Edit: just noticed that the Ametalin has MUCH more coverage.
|
|
|
|
Post by atefooterz on Oct 5, 2016 22:27:33 GMT 10
Bruce, I noticed a few other option from bunnings, like Green Insulation. Kinda getting confusing now, what are the differences between them. The ThermalBreak looks good too, let me know how you go with it. Edit: just noticed that the Ametalin has MUCH more coverage. It would be interesting and handy to get a thread about insulation options. For all the toxic fire issues the original styro is amazing for cost , hot and cold protection, if fitted correctly and just as importantly noise! Anyone stuck inside during a few hours of heavy rain will know the value of being able to talk & not shout or if tv/ music hearing it over the pitter patter of rain drops, not the ear shattering druming against the metal roof noise. A rebuild locally used just the foil film & air space that seemed ok for cold protection but recently i had a knock on the door during rain and he was amazed at how quiet my original roof set up is. I saw some plastic bubble foil stuff shed foam linked here in 2014 but the seller seems to have stopped importing it, so unable to try it out (was $120 for 30m x 5mm or 12mm thick.) |
|
|
|
Post by 78466noM on Oct 5, 2016 22:37:06 GMT 10
Got the Thermal Break 8 the green insulation is a special order so couldn't see what it was like this one seems to be reasonably stiff so if I cut it to fit tight I shouldn't have any problems.Didn't get it in today but have gotten a long way in getting the prep done. have put all wires for 12volt running lights in and all color coded except the earth as when I brought the wire i forgot the earth was white. This has been set up so there are no joins inside the van and every where it passes though the frame it has heat shrink and grommets. this will have a sealed box under van with a fuse box that has male pins so as the lead forward that has the connector for the car if for some reason it gets pulled it is a much easier fix then trying to find the break inside the wall. I also bolted up nylon cutting boards for the 240volt inlet and outlets to screw to the timber ones all seem to rot and the cutting boards will hold the screws tight. I got the angle up for the top bunk and the one on the rear for the upper cupboard and somewhere to hold the top ceiling sheet. I also got the two 12volt LED lights bolted up. the stickers are off I tried soaking them with the glad wrap over the top a day and a half it was no good I ended up hitting them with a wire brush on the cordless drill that worked I also gave it a light sand and went over it with grease and wax remover cleaned the little bit of silastic of the side and all the mastic off the windows vents and door holes so a lot done and starting to see a lot of noticeable work getting done. I was going to paint but it was too windy and lucky I didn't because it rained last night. 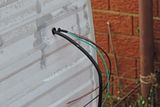 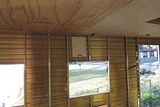 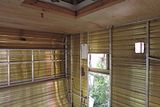 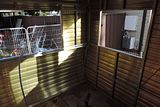 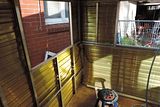  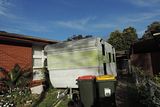  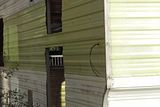  Bruce |
|
|
|
Post by tasmillard on Oct 6, 2016 6:44:02 GMT 10
Nice work, I like that you placed the rubber grommets for the wiring, something that the factory should of done! As for the insulation, I think ill look at the ThermalBreak also and if not the go back to good quality styro as atefooterz mentions. Please let me know how you go with the install in terms of easy to cut and apply.
|
|
|
|
Post by 78466noM on Oct 6, 2016 8:21:08 GMT 10
Nice work, I like that you placed the rubber grommets for the wiring, something that the factory should of done! As for the insulation, I think ill look at the ThermalBreak also and if not the go back to good quality styro as atefooterz mentions. Please let me know how you go with the install in terms of easy to cut and apply. should get it done today I hope so will post it up |
|


 *I am still waiting to see a roof frame that triangulates around the hatch area, unless one wants to walk on the roof or build a second story much of what i see is overkill plus not addresing any flex- twist issues, that our old girls get at times, like jumping a cara park kerb to get on site or many towns where the ditch drain rules.


