Deleted
Deleted Member
Posts: 0
|
Post by Deleted on Feb 23, 2015 21:44:27 GMT 10
Hi Mustang,
The vent in the floor is a gas escape vent.
Most vans of that era had these in the floor in case of a gas leak.
Modern vans now have a vent in the lowest part of the door to allow gas escape.
Chesney vans had a plastic grill usually under the table,while Viscount and others had them under the frig or via vents in the furniture as per your's.
Hope this helps.
Cheers
hughdeani
|
|
|
|
Post by Mustang on Feb 24, 2015 7:10:47 GMT 10
Vent for wet cell batteries? I have finally seen a Nautilus close up at the Adelaide show & went on board, inspired much.  When we were told another year before ours would be in production, we went looking, but nothing had the room Vs the tare. There are three off road caravan makers in Caloundra  , but they are either too heavy or look home made to us, we just don't know how they all survive. Ultimate have a workforce of 90, as does Aussie off road campers in Caloundra. Imagine facing that wage cheque each week?? Ultimate have a waiting list, so that would be some comfort. My nephew just ordered his second Jayco & he has too wait a few months??? go figure, he flicks them every 3 years. |
|
|
|
Post by atefooterz on Feb 24, 2015 15:28:42 GMT 10
Vent for wet cell batteries? I have finally seen a Nautilus close up at the Adelaide show & went on board, inspired much.  When we were told another year before ours would be in production, we went looking, but nothing had the room Vs the tare. There are three off road caravan makers in Caloundra  , but they are either too heavy or look home made to us, we just don't know how they all survive. Ultimate have a workforce of 90, as does Aussie off road campers in Caloundra. Imagine facing that wage cheque each week?? Ultimate have a waiting list, so that would be some comfort. My nephew just ordered his second Jayco & he has too wait a few months??? go figure, he flicks them every 3 years. I have not been impressed with what i saw new, had a chat with the Ultimate folks about an on road version however the bucks are all favouring the 4WD scene. Even more inspired to do a custom now, we worked out a production version 18 (49er)`would start at $60,000 then hit the fully optioned scene around a half mill! BUT would be around 800KG in base form & 1200KG for the home away from home scene, lolz. Interesting to read that is a gas vent, i was wondering why it would vent in the cabin as well for batteries. Live & learn = why we all love this site! |
|
|
|
Post by Mustang on Feb 24, 2015 17:13:08 GMT 10
The "Hatch" lined the inside today with fiberglass, the outside was covered yesterday, there were 20 holes I could see. Three hours with paint stripper & a rough paper on the angle grinder, could only achieve a reasonable surface. So now it should be encased in time, still has strength & while there was plenty of surface rust I didn't strike any "rotten" areas, the holes are are bit of a mystery?. I'll pack the center with insulation & line with ply. 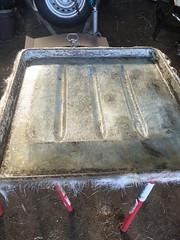 |
|
Deleted
Deleted Member
Posts: 0
|
Post by Deleted on Feb 25, 2015 8:32:25 GMT 10
Hey Brent,
You look like you know what your doing with that fibreglass...?
Cheers
|
|
|
|
Post by Mustang on Feb 26, 2015 8:15:04 GMT 10
Hey Brent, You look like you know what your doing with that fibreglass...? Cheers When I lived in Tassy we made our own kayaks, from a mould, not like this. (we use to break them regularly) Its just a matter of working the resin through the matting with a roller & taking out all the air, what I've done should seal the steel from the air & retard further deterioration & of course fill all those holes by glassing both sides. As we have discussed other vans that have been over-modernised don't seem to re-sell easily. Keeping originality like the old hatch may appeal to the next owner? After looking at a lot of ads I have decided to keep some of the 37yo scars & try to reproduce a "happy" van, rather than a shiny stainless look. |
|
|
|
Post by Mustang on Mar 2, 2015 16:35:19 GMT 10
The glass has cured, now for the etch primer, then two coats of Global coat & two top coats. This product is suppose to give a rubberised surface with waterproofing & insulation properties. That will make 7 x coats, should be watertight for my time  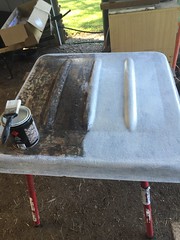 Started cleaning up 6 hinges, then....well you know what happens,  Hard to start after a weekend of drinking & pillaging, so did a few small jobs, the bedroom dresser set was a bit rickety so I glued blocks everywhere I could. 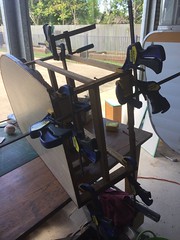 |
|
|
|
Post by pisces51 on Mar 2, 2015 18:06:46 GMT 10
G'day mustang, Good progress being made, considering your heart wasn't really in it after a bit of "relaxation".  Crikey, if 7 coats over the metal doesn't last your lifetime, what chance have we got, hey?!!  Even on a 'down day', a bit of pottering can knock a few jobs of the list. Keep plodding along, and the light at the end of the tunnel suddenly starts to come into view.  cheers, Al. |
|
|
|
Post by Mustang on Mar 3, 2015 17:48:38 GMT 10
Humidity in SE Qld this year is at an all time high. As I can't paint the roof or work in the van due to the heat, I decided to remove the front windows...as you do!!!! 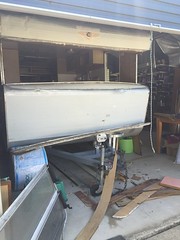 Kept going, sure I can preserve the work of the previous owner, ......... sure I can, ............ I'm positive I don't have to strip out the front, ............... I know I can keep it ...... ....... ...... ...... no I can't, its gone. 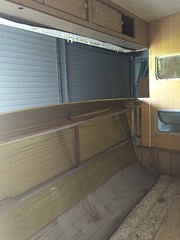 No real surprises, floor is good, just need new frames top & bottom for the windows to screw back to. Also have to incorporate a header for the fold "up" bunk bed to attach to, doesn't sound much but there are a heap of hours here to copy the back    Think I may be 1/100th the way through? |
|
Deleted
Deleted Member
Posts: 0
|
Post by Deleted on Mar 7, 2015 21:20:17 GMT 10
Looking good just read all your posts your corner windows where did you get them mine are all smoky white need new ones :-).  |
|
|
|
Post by Mustang on Mar 8, 2015 7:44:35 GMT 10
Hi Michael,
A Caloundra Plastics shop, made them for $50.00 each. Not sure if he will re-quote that as I spent $500.00 at the time.
They actually have a mould. They started bending by hand & then realised they had a mould, apparently real easy after that. They are a smidgen blurry in the centre of the bend but 100% on the originals.
Call Paul at ASAP Plastics
Address: 61 William Street, Moffat Beach QLD 4551
Phone:(07) 5491 357
They would be economical to send, if you want I can co-ordinate for you, but will need, measurements, even a sample window.
Mine are clear, there is tinted, I didn't want a modern look.
Call me for any info: 0409 484 609
Cheers
Brent
|
|
|
|
Post by awbeattie381 on Mar 11, 2015 12:04:40 GMT 10
Good work as usual. I agree with Al, even those small jobs add up to progress in the end...or I am hoping they will as thats all I am managing at the moment (removing the paint/polishing the aluminium benchtop slide, and giving the stove a good clean and polish!)
|
|
|
|
Post by Mustang on Mar 12, 2015 6:07:59 GMT 10
I'm in Tassy for a while on family help. So will be off the tools for a couple of weeks. That should sharpen the enthusiasm?  ? |
|
Deleted
Deleted Member
Posts: 0
|
Post by Deleted on Mar 14, 2015 5:28:54 GMT 10
I'm in Tassy for a while on family help. So will be off the tools for a couple of weeks. That should sharpen the enthusiasm?  ? I hope your not burnt out yet Brent  
cheers
|
|
|
|
Post by Mustang on Mar 26, 2015 17:00:57 GMT 10
Started back today, the front was so cocked up I really was flying blind with what to do with the bunk bed, it was detached when I bought the van. Not much point having a 17 footer with 3 beds?? Every image I researched seem to have the extra bunk " folding up", this would cover the beautiful bay window panorama, so I have designed the bunk to fold down when not in use & become the back of the day settee, (I think)  There was an original large beam, by Viscount standards, (covered in plywood & rusty staples) so I decided to recycle this, it had matching screw holes, that matched the loose bunk hinges, so I guess it was this size to support the bunk originally. The first image is with the front stripped out:  ![]() The beam in place with as many brackets as I could fit, I also added a pine 2x1 to the back to support the curved ply when replaced.(recycled again) Center strapping support: 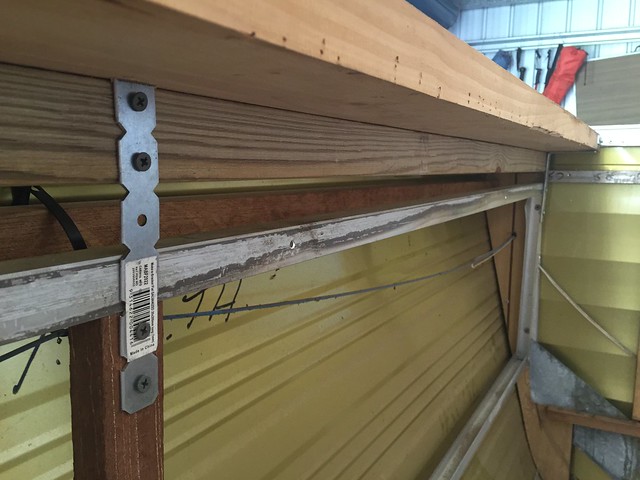 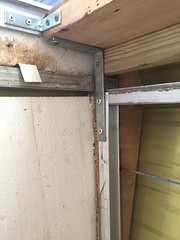 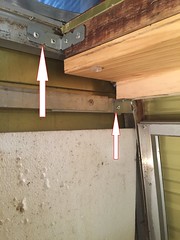 What a relief to get to this position (hope it works) Cladding sealed & stapled. (using up black mastic  ) 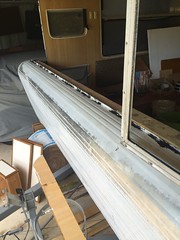 Now to make new window frames. |
|
|
|
Post by Mustang on Mar 30, 2015 16:42:44 GMT 10
I'm a licensed shooter & have been around firearms all my life. After today, the most potent dangerous weapon I have had experience with is a "caulking gun" They should be licenced & kept out of the hands of MADMEN    |
|
|
|
Post by tedalley on Mar 30, 2015 20:47:43 GMT 10
They should be licenced & kept out of the hands of MADMEN    I'm guessing that you ended up having trouble finding more things that needed silicon shot into it!!!!!!!!! |
|
|
|
Post by Mustang on Mar 31, 2015 17:10:44 GMT 10
They should be licenced & kept out of the hands of MADMEN    I'm guessing that you ended up having trouble finding more things that needed silicon shot into it!!!!!!!!! How could anyone be such a bl**dy idiot. Any one contemplating restoring a caravan with Silastic/silicone will only pass greif to the next owner, if they want to dis-mantle something!!! (in my opinion) And the fact that we have classic vans that are not considered vintage yet, they will be one day. So the next owner may want to improve on what you have done, make it easy on them, use Mastic. |
|
|
|
Post by tasmillard on Mar 31, 2015 18:51:42 GMT 10
wow, fantastic work mustang!
|
|
|
|
Post by Mustang on Apr 8, 2015 16:46:30 GMT 10
Turned another corner today, test fitting the front frame & windows, all just sitting there with tent poles.
Image lost
This time I would like to build the frame with the top & bottom plates together, for a stronger & neater job. ? ? I,m waiting on my last bay window as they cut one of the plastics too short. ![]() Man the work to this stage has been so time consuming. Man the work to this stage has been so time consuming.
The front & rear window rebuild has & I expect will be, the biggest job out of the way, along with the chassis blasting & painting.
By the time I seal the front frame, fit & seal the windows another week will pass. I don't know how any dealer could quote to restore a van?
|
|
|
|
Post by atefooterz on Apr 9, 2015 13:11:10 GMT 10
Great work and progress Brent! You can now see why any pros will build a replica rather than muck around with the variables of past design and or workmanship plus wear and tear issues, much in the same way one can build five three bed project homes for the cost of restoring one *heritage one. * Note the aversion to any of the words vintage, veteran or classic LoLz!!  |
|
|
|
Post by Mustang on Apr 10, 2015 19:10:57 GMT 10
Great work and progress Brent! You can now see why any pros will build a replica rather than muck around with the variables of past design and or workmanship plus wear and tear issues, much in the same way one can build five three bed project homes for the cost of restoring one *heritage one. * Note the aversion to any of the words vintage, veteran or classic LoLz!!  A replica to suit the Stang is well on the cards, when Vincent is charming some family.
Vintage, veteran or classic, never crossed my mind    
|
|
|
|
Post by Mustang on Apr 13, 2015 17:43:15 GMT 10
|
|
|
|
Post by pisces51 on Apr 13, 2015 18:36:36 GMT 10
Looks great, mustang!  Well done!! Is that butyl mastic tape you've used, or is it foam tape? Looks like butyl mastic judging by the finger impressions marks in it? If so, how well does it mould to fill the gap between the window frame and the cladding? I've always wondered how easy that mastic tape "spreads" when pressure is applied as the screws are driven home. cheers, Al. Oops, I just realised after posting my reply that you'd posted over in the Sealant thread about what you used. Caulking tape, huh? Interesting!! 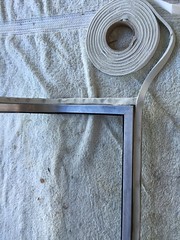 |
|
|
|
Post by Mustang on Apr 14, 2015 17:35:36 GMT 10
Looks great, mustang!  Well done!! Is that butyl mastic tape you've used, or is it foam tape? Looks like butyl mastic judging by the finger impressions marks in it? If so, how well does it mould to fill the gap between the window frame and the cladding? I've always wondered how easy that mastic tape "spreads" when pressure is applied as the screws are driven home. cheers, Al. Oops, I just realised after posting my reply that you'd posted over in the Sealant thread about what you used. Caulking tape, huh? Interesting!! Well caulking tape its called but its actually mastic. (from Caravans Plus) I have the clutch on my screw driver set, so all the screws are driven to the same depth & the mastic just cozzes nicely to the outside of the frame. I use a plastic ruler (cut in two) to cut off proud bits . If there are some valleys them I roll the off cuts into sausages & smooth them into the valleys with some soapy water spray. Bit of fiddling but at least all the windows can be taken back out without drama as opposed to using silicone 
The mastic will eventually turn black with dirt stain but I would sooner this method than that sticky S**t, Every thing I've done can easily be reversed, no glues, no silicones, lots of screws & mastic.
|
|