|
|
Post by mike on Oct 28, 2008 1:46:19 GMT 10
Greetings Keelz and Al, ;D ;D This whole conversation is absolutely fascinating: how to fix a problem that at first glance should be just a piece of cake, ... until you get into it. So I'll put in my 2 cents worth just to complicate it further.  If you want to get into some free camping, there has to be something else in the switching and circuitry. Somewhere, you'll need a charger... which does not need 240v as its power source, to re-charge the battery under that seat. In 2001, I installed a 40watt (3.3 amp) solar panel on the roof hatch because the hatch was large enough and strong enough, and I can angle it towards the sun sometimes. In the line to the battery is a voltage regulator to stop the 17v max charge from the panel boiling the battery but allow it to be fully charged to its capacity. The panel has a 25year effective life warranty.  The circuit to the battery then runs through two on/off switches which allow me to isolate the panel, regulator and charging battery from the rest of the van/tow car wiring so that it can still be charging the battery from the panel, as we drive having the rest of the van wiring hooked up to the tow car. One of the switches can be turned on to run the 12v electrics off the van battery without having the solar panel connected (that switch is still off), to protect the system from being connected together accidentally such as when we drive off after being stopped for a break.  We use four lights (not all together) including an annex light, pump water from the tank, run TV which is about 60watts, a 5 watt mozzie zapper all night, charge all sorts of batteries (phone, 12v drill, laptop), a 12v electric pump shower ($30) for a hot shower from a bucket, and occasionally a 12v vacuum cleaner. (We haven't gone to a 12v hair drier YET!) Usually the battery is fully re-charged by 11.30am next day if its a clear day. Al, is your fridge two-way or three way?  We have beefed up the 12v 'hot-wire' from the car battery to the rear plug. Its a 5mm wire with a 40amp? resetting fuse under the bonnet, near the battery. It runs to a 'rocker'switch ($3) we installed thru punching out a rectangular 'blank' on the console near the gear lever, to turn the 12v power on or off to the van (but not stop,electric brakes, tail, or indicator lights). The van plug wire carries this power to a 12v DC --> 240v AC Inverter in the van near the two-way fridge, and allows us to plug in 240v AC power to the fridge while traveling. The power has to be switched off in the car when the car motor stops because the inverter squeals due to voltage drop being marginal at the inverter end of the wire. It has saved us the cost of a 3way fridge as our 2way fridge only runs on LPG (illegal while traveling) or 240v AC! When we stop for any length of time, we switch it to LPG! ;D  By the way, we plug the TV, 12vdrill charger, and Laptop charger into the Inverter, which is rated at 150 300 watts. (The fridge draws 125watts when travelling: about two headlights of current). Hope this helps your re-wiring plans. Cheers Mike ;D ;D ;D |
|
|
|
Post by atouchofglass on Oct 28, 2008 6:19:40 GMT 10
Greetings All Let me start by saying thanks to all that have contributed to this conversation on 12v issues/information Being on the verge of starting some 12V work..... eeerr withing a few months  This information is invaluable for me and anyone else in a similar situation It'll take me some time to come back and absorb the were's and why fors .... but thanks again for sharing Cheers Atog. |
|
|
|
Post by mike on Oct 28, 2008 17:16:43 GMT 10
Hey Atog, The 12v/240v system we've installed has worked flawlessly since 2001 and more than paid for itself, and will continue to do so for many years to come, we hope.   Only too willing to clarify anything above and by then may even have the piccies available for the forum!! You just never can tell!!! Cheers Mike. ;D   |
|
|
|
Post by millard1399 on Oct 28, 2008 17:36:53 GMT 10
Crikey Mike, my brain's starting to hurt with all the good information you guys are giving me! ;D Luckily, as a retiree, I've got plenty of time to sit down and read through all the stuff you guys have posted, and work out where to go with it all ;D ;D What I've done so far is to just pass a loop of the 12v wires back through the original hole at the bottom and into the seat box. I've labelled the sets of wire to show which two are incoming and which are outgoing. There's plenty of wire there for something to be done with later. I've also rewired the front light fitting... 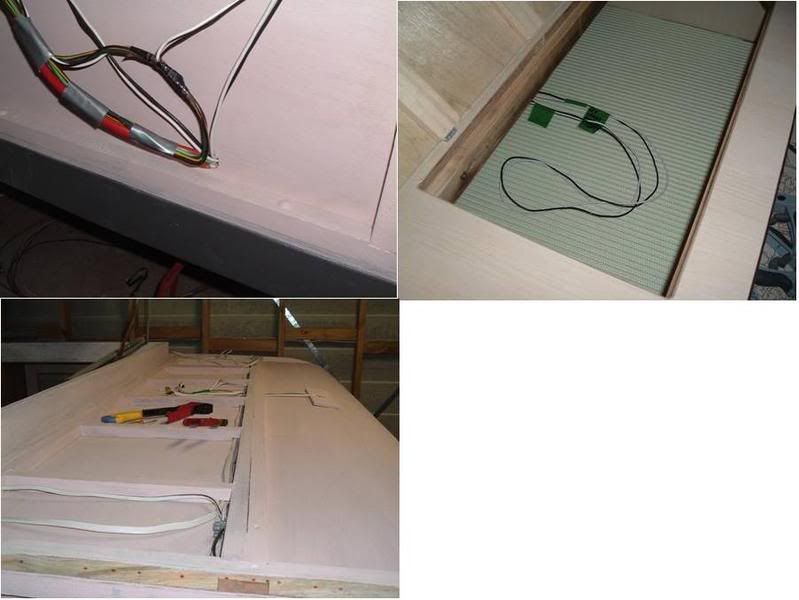 I spent yesterday morning working on fitting the new kitchen light after laying the new 12v/240v cables to the switch locations. After a few hours of sorting everything out and wiring it all up, I was putting the screws into the base of the light fitting to finish off, and my brain says, "Umm...the back screws look like they're pretty close to where the cables are on top...". And so I says, "Whaddya mean?! They'll miss 'em by a mile!" But, just to keep my brain happy, I checked the cables... and found the two back screws had gone clean through the 240v cable on one side, and the 12v cable on the other!   So while my brain is running around the floor with its index fingers extended and yelling, "YES!! Am I good or WHAT?!!", the rest of me is sheepishly undoing the whole job and starting again from scratch..     I had to put short pieces of dowell into the framework to provide some timber for the screws to go into, and drill new holes further over for the cable. After a few hours of fun and games redoing it all, I tested the 12v light using a 6v battery at the other end of the wires... 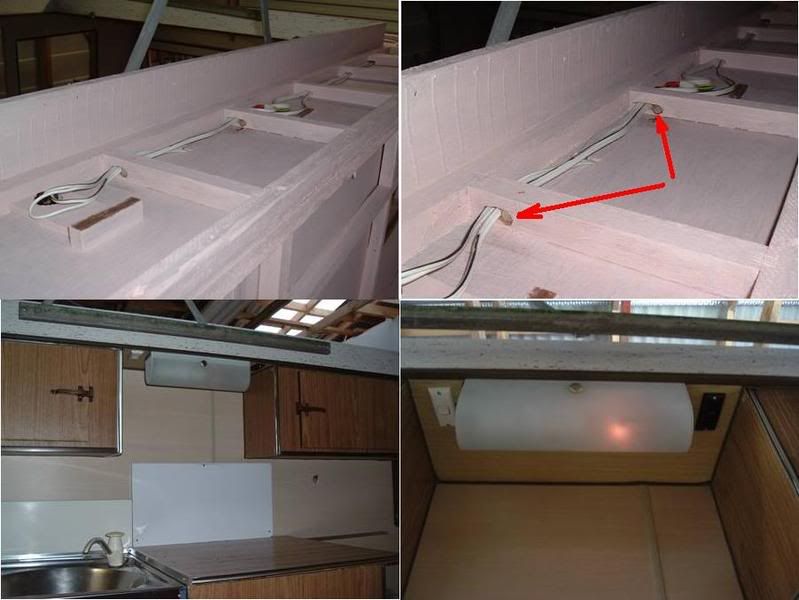 The brain was still running around the floor being a "Mister-I-Know-Everything", so I gave it a boot up the backside for not telling me sooner   Keelz, I found my kit of downlights, but have a problem with the thickness of the transformer. The ceiling cavity is 23mm and the tranny is 33mm. The light housings will just fit into the cavity gap, with only a whisker to spare. I'm not desperate to use them, so I might stick with the fittings that are in the van already, at this stage... 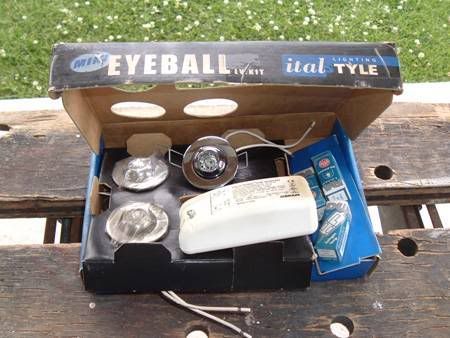 Thanks again for all the information you guys have provided. cheers, Al. Oops, sorry Mike, I meant to answer your question about the fridge...no, it's only gas/240v, so your information about the inverter is going to come in handy! |
|
|
|
Post by keelz on Oct 28, 2008 19:32:32 GMT 10
Al - you can still utilise those lights don't chuck em back in the shed yet, just need to get a different transformer. You don't want to use one of those old coil type transformers anyhow. Read on......
Get yourself an 'electronic' downlight transformer. They sell them at electrical wholesalers or lighting shops. You can have individual transformers for each fitting or one larger unit driving multiple fittings. They aren't too expensive these days and are much more reliable than traditional wound coil transformers.
The advantage of the electronic types is they are really really small. You can get some which are the size of a cigarette lighter. They generate less heat and are less prone to 'clapping out' in confined un-ventilated spaces - eg ceiling cavities, bulkheads, etc where there is little air movement due to insulation, etc. The old style transformers generally overheat and cut-out.
re: fridge -
If you fridge is an older Dometic/Electrolux you can often add a 12v heating element and some wiring to convert it to run on 12v while travelling. I have recently done this when getting my fridge cooling unit rebuilt earlier this year. My fridge was previously 240/gas only. Check the back of the fridge near where the existing 240v element inserts into the heater tube, there may be a second notch in the metal shroud which may indicate your fridge has this option. If so you could DIY it and buy the 12v element and install yourself.
However as Mike has pointed out, running it on 240v is also an option while travelling if you have an inverter in the van. It is better than a 12v element, because a 240v element is generally a slightly higher wattage output and will produce a better amount of heat for the cooling unit. A 12v element will just keep things ticking over maybe at the same temperature or a few degrees warmer for a few hours while driving but won't get the fridge down to the right temperature if you start with a warm fridge before departing (if that makes sense).
Cheers
Keelz
|
|
|
|
Post by millard1399 on Oct 29, 2008 16:39:29 GMT 10
Big day today! I fixed the bottom front panelling into position. Another tricky time with curving the plywood panelling around the bottom curve. I used the same technique as the top curve, clamping the panelling to the frame with a long bit of timber and a couple of clamps. This photo group shows the front cover being made in the shed and then fitting to the van... 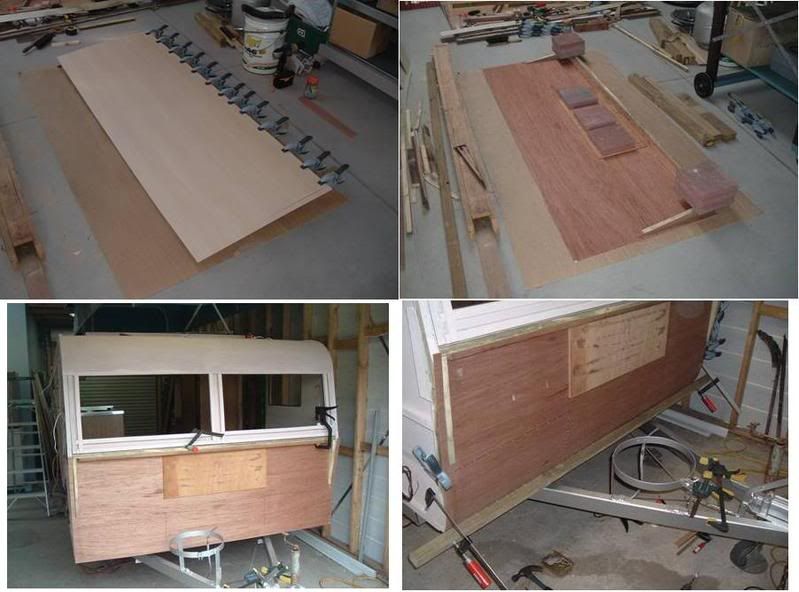 And now the inside looks like this... 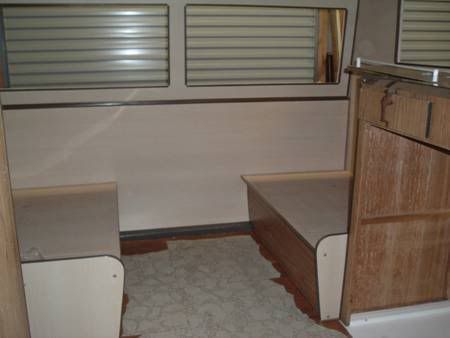 I compared this photo with some others I found on the internet, and it looks pretty similar to the inside of a caravan, so I'm happy I've achieved that...  ;D ;D (... Well, it could have ended up looking like a dog-house on wheels...   ) Look out wildflowers...here I come!! cheers, Al. |
|
|
|
Post by mike on Oct 29, 2008 18:50:35 GMT 10
Greetings Al, ;D Yep, it does look like a caravan, for sure! Like a new van!   Very clever... and inspirational!    This is an excellent set of piccies showing precise practical methods for doing the impossible!  Someday, oneday, I'll probably now have a go myself at some framework repairs around the base of some of the walls BECAUSE I NOW KNOW how to do it! (Absolutely dead scared to have a go in the past in case I stretched or dented the aluminium sheets). Believe it or not, watching what you have done has made me more determined than ever to renovate and/or maintain ours, where in the past, our attitude was that it would get to a stage where it 'could not be repaired', until I came upon you guys and all this great info. It probably would have been relegated to the scrap heap. So thanks again for lots of great pictures.... Keep them coming!! Cheers Mike ;D   |
|
|
|
Post by bobt on Nov 3, 2008 21:10:08 GMT 10
Hi Al
I have been watching your antics on and off for awhile now. What you have done looks good.
If it is not too late I would like to suggest one little thing that is causing me great grief at the moment. Run some heavy 12 volt wire from your planned battery box to the roof of your van. There might come a time when you will want to fit a solar panel on the roof.
I have spent heaps of hours trying to run some wire up the inside of the wall of my van to connect to a solar panel, to date I have not been successful.
Bob
|
|
|
|
Post by millard1399 on Nov 4, 2008 20:40:34 GMT 10
Hi Bob, thanks for your thoughts about the wiring for solar panels. I was in Bunnings today getting some 240v power cable to upgrade the power wiring in the van, and I had a look at the other types of cable available. I ended up buying a few metres of cabling that is used for 12v garden lighting...figure-8 twin core stranded wire; each core 1.3mm dia. There was a larger dia option at 2.5mm, but I figured the 1.3mm stuff should be robust enough to cater for solar charging. (...hope I guessed right...  ) I can feed one end of this solar cable into the seat box and cap it off, but the crucial question is where do I run the other end to, so I can cap it off but be able to retrieve it later on? Is there some sort of special connector I can get to screw in somewhere on the top of the van and run the wire up to that? You (or anybody else) will have to explain to me in a bit more detail how I go about fitting this cable in position so it can be accessed at some later stage. cheers, Al. |
|
|
|
Post by millard1399 on Nov 6, 2008 19:32:10 GMT 10
Sometimes this project seems like it's one step forward and two steps back  I had previously put all the wiring back along the offside of the van. With all the recent work done on top of the van putting new cable in for the lights, etc, I decided I really should upgrade the power cable to the new 2.5mm dia spec. So I pulled all the cable back out of the side... 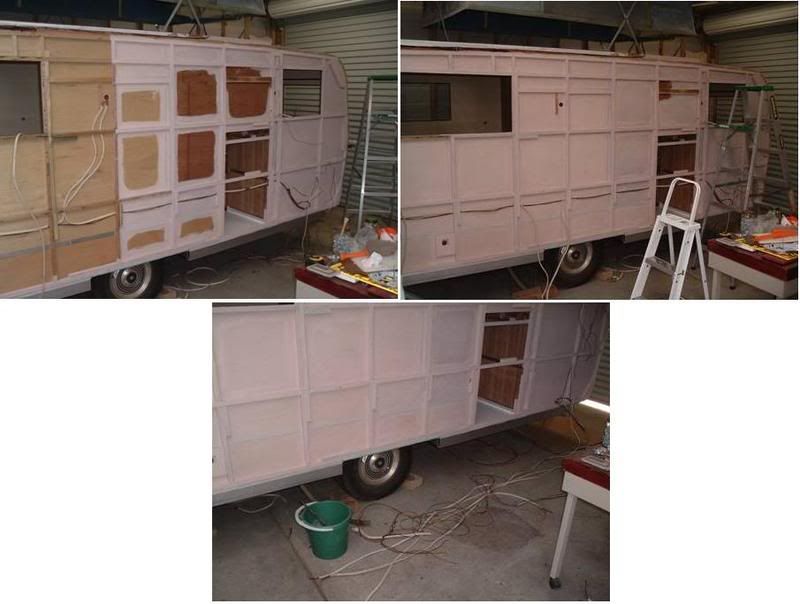 And now I'm in the process of doing it all over again  The other little hiccup is that when reading the instructions for the hard-wired smoke detector, they specify it shouldn't be wired into a rcd (residual current device) which is what I'm putting in the van soon. So that meant I had to run a separate cable from the mains up to the detector. More drilling holes in the frame, and more gluing plywood in position as a backing plate on the ceiling. I thought I was going to get away with a simple wiring job originally, but not so. Another project about to start is the making of a replacement light shade for one of the original light fittings. One still has the shade, but the other is missing. I found some acrylic/perspex/plastic (dunno what it actually is) at the Second Hand Yard yesterday, so I'm going to have a go at making a 'reproduction' version of the original shade. This photo group shows the shade I have, and the dirty piece of (whatever it is) that will hopefully turn into a beautiful swan (..."But I really want a light shade!" ...Shaddup!...) ... 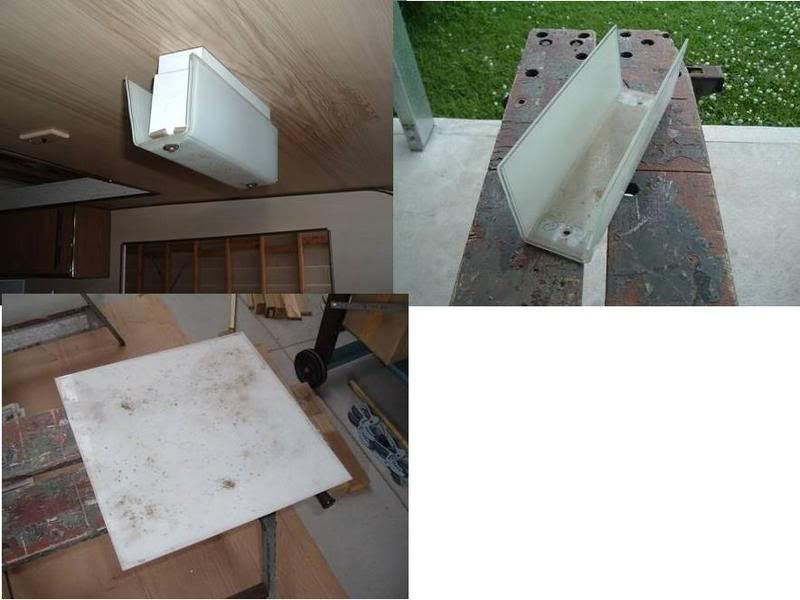 Another little electrical job I've been working on is to check and refurbish all the light switches. After finding arc burn on one of them that wasn't working, I decided to go round and pull all of them out and give them a good checkover. I found arc burn to some degree on all of them, so it was a worthwhile exercise to give them a good clean up. This photo group shows the contact points with arc burn, and then after filing to clean them up... 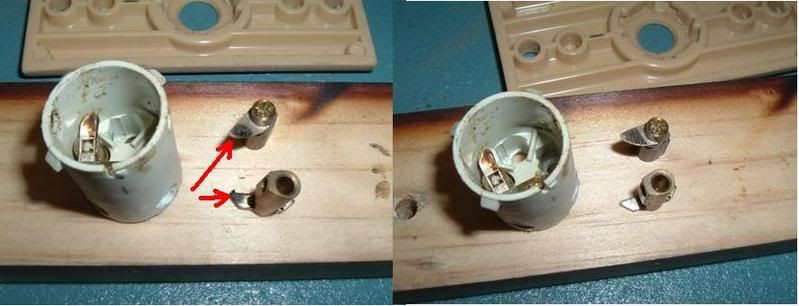 Apart from mucking around with all the above stuff, I've been slapping the pink primer around the roof of the van so I can finish off all the light wiring and light fittings. See you on the morrow... cheers, Al. Bobt, where are you?? I've got four metres of cable flapping in the breeze waiting for some info on how I tie it off up on top of the van... Hellllllp!   ;D |
|
|
|
Post by bobt on Nov 7, 2008 23:32:42 GMT 10
I here, down south, way down in mexico. Pity your in NSW, I have a heap of 2.5mm
I am glad you had a re think and went back to the heavier stuff.
I am no expert on this stuff, but I was told that the heavier the wire the less of a power loss you will experience over distances.
My suggestions, you could drill a hole through the roof, poke the wire through and use a sealant to keep the water out. This they do with new vans. Or you could conceal it in the roof space in a place where you can access it later if you decide to go the solar option. I would leave it so I could access it by removing one of the internal ceiling lights. You can always poke a hole through the roof at a later stage. It does not matter where on the roof you mount a panel just as long as you have something solid to secure it too, ie the ribs in the roof. For a solar set up you will need to add a regulator that prevents over charging of the battery and believe it on not but discharging too. Most of my friends add an amp gauge too, they have mounted theirs inside a cupboard, so you will need to have access to the wire between the panel and your battery(s). Most regulators display a light when they are connected to a battery, this use to keep my wife awake at night so be aware that it is relatively bright at night when you don't want it to be. as for terminating it, I would just tape it up to keep it tidy, make sure you have plenty of spare length at both ends.
I guess I should have spoken up earlier, so I apologize now for not doing it. If I had the opportunity with my current van that you have with yours I would be running 2.5mm for every 12 volt fitting I have and I would be adding a couple more. We do not have any 12 volt power out lets (cigarette plug sockets) I would kill to have a couple, miles too much effort to retro fit them. It would make life easier for the 12 volt Telly, the mobile phone charger and the other odd ball accessories that I charge using a 12 volt supply.
Make sure you run 2.5mm from your car battery to your trailer plug and I would do the same from at least the caravan trailer plug to a fuse box, if you have one. I upgraded some of mine last year and I find that my internal 12 volt lights are better. If you have a 12 volt fridge, light wire will not carry the current it will need to function properly.
Good luck with the work it is looking good, don't feel down when you feel as if your taking backward steps, we all suffer this problem with any sort of restoration be it a car or a caravan, I certainly re did work on most of the cars I did only because I did not know better until after. It easy for me to work out what I need in a caravan, my family and I spend between 3 to 4 months a year in our caravan and we have been doing it for 23 years, we still do not have the 'perfect' setup.
Bob
|
|
|
|
Post by bobt on Nov 7, 2008 23:38:57 GMT 10
Al
One other little thing.
Mount ya smoke detector on the wall, not on the ceiling. for some strange reason if it is on the wall the cooking of toast does not set it off. A firey from QLD made this suggestion to me.
I only hope it works if there is a fire in the van...
Bob
|
|
|
|
Post by keelz on Nov 8, 2008 8:47:42 GMT 10
Al, other option on the solar is if you want to do a serious amount of solar panel charging and free camping, you will probably find that you will often park the van in a park or campsite with trees/shade. So you don't get the full output from the solar panel up on the roof.
Some people go for a portable panel option on a angled stand that you simply have sitting away from the van out in the full sunlight so that you can keep chasing those rays as the sun moves during the day or if you are parked in shade. A heavy guage 12v extension cord back to the van to connect up to the Solar panel regulator and battery setup with say an Anderson plug or heavy duty 12v male/female connector for quick setup/packup. Or maybe cap a future provision inside the roof cavity as Bobt has suggested?
If you wanted to terminate up on the roof surface and not chop holes later - would suggest getting a decent waterproof junction box (uv resistant plastic), seal this onto the roof with a marine grade polyurethane sealant). Cap your wires inside the junction box for later connection of panel/s).
You could add the portable solar panel option also at any stage by bringing your connections in underneath the van up into your bunk/seat box avoiding the roof completely.
Cheers
Keelz
|
|
|
|
Post by millard1399 on Nov 8, 2008 18:09:38 GMT 10
Thanks bobt and Keelz for the information you've given. Seems like there is "more than one way to skin a cat" with the wiring of these vans, eh?! I'm still working on what to do with the downlights, Keelz. I'm thinking that a couple of reading lamps over the bed might make good use of them. The globes in the box are 21w, not like the house 50w type, so they should be a useful option, don't you think? Bobt, no apologies needed. Your thoughts on the wiring are much appreciated. You've certainly given me plenty to think about, trying to incorporate your ideas. Hopefully tomorrow I'll have more to say on what I've decided to do. In the meantime, just to catch up on the light shade, it worked out quite well I thought. I cleaned and cut up the sheet of (I'll call it) acrylic. I test bent a couple of the off-cuts to see whether my heat gun had enough grunt to soften the acrylic and to see how long I had to apply heat for. The tests looked promising, so I took the plunge and made a timber jig to bend the piece for the shade. It took 5 or so minutes of heating to get the full length of the bend soft enough. One side was done and then switch the jig to the other side. This photo group shows the test bends, and then the shade being made... 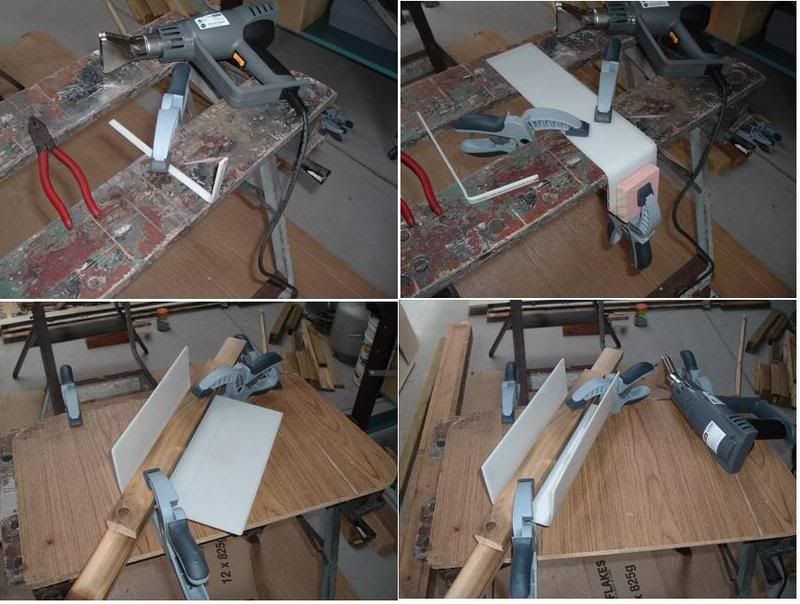 ...and this photo group shows the finished article fitted into position and the 12v light tested off a battery... 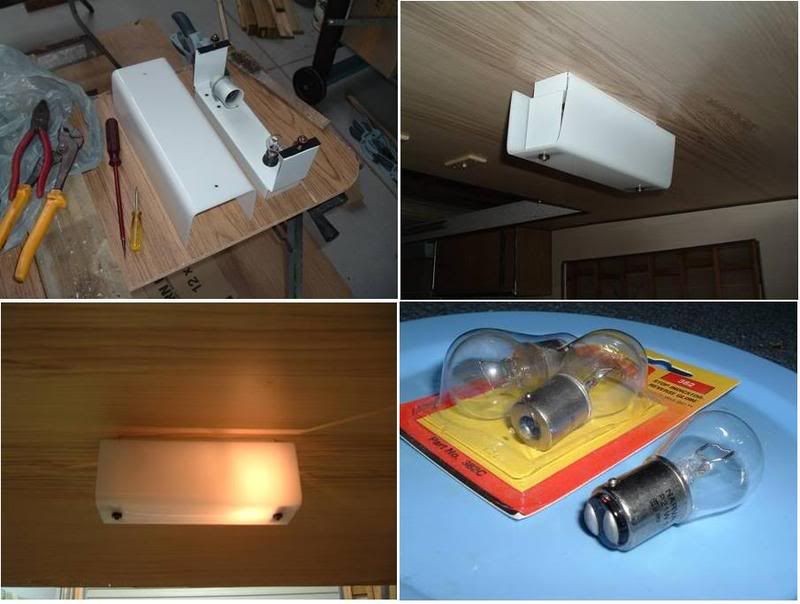 It'll be good enough until I can find a genuine Millard shade in a wrecking yard one day (...fat chance   ) 12 volt globes: The globes in the van are 12v 21w (or 21CP in one case), single filament, double contacts on the base. Attempts today to buy another one were fruitless until I came across some old stock in a small independent Auto Parts shop. The fella checked his stock manuals and apparently they don't make this double contact type any more. The single filament globes now have just a single base contact (see photo above showing the two types). He had three 'old stock' globes to match mine so I grabbed all three. Now I have a couple of spares for the future. Smoke detectors: I positioned the ionisation one above the dining table, closer to the door, and the photoelectric one above the rear bed closer to the nearside of the van... 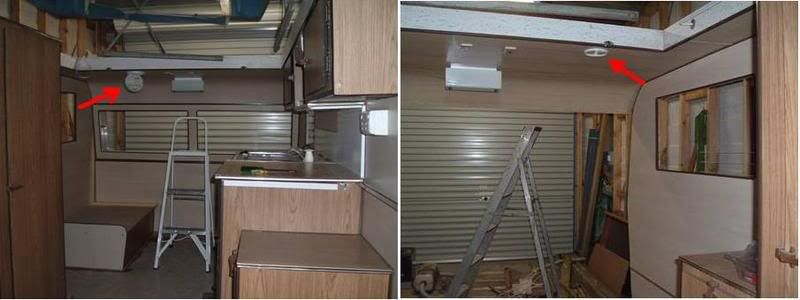 Hopefully these are far enough away from the kitchen area to minimise false alarms. Bobt talks above about putting them on the wall. The installation instructions give this option, but recommend they be at least 30cm below the ceiling to avoid the 'dead air' space. When I looked at the layout in the Millard, I figured that putting them on the wall would mean they were too far down towards the floor after allowing for the 30cm gap up top. I decided to put them flush on the ceiling, but I can't be absolutely sure that I've got them in the best possible spot. Tomorrow, some more hard thinking (thanks, fellas!!   ) about what to do with all the fancy wiring... cheers, Al. |
|
|
|
Post by bobt on Nov 8, 2008 20:43:53 GMT 10
Al
The light shade looks good, well done.
Have you got a caravan wrecking yard in your part of the world???
Bob
|
|
|
|
Post by millard1399 on Nov 9, 2008 18:06:59 GMT 10
Howdy again... Well, after digesting all the cable information I've been given, and measuring the angle of inclination of the sun, entering future tidal information into my computer, consulting an astrologist, and flipping a coin   ...this is what I've decided to do about wiring... Solar cable: I've run a length of 1.3mm twin-core garden lighting cable from the seat box up to the framework at the top of the van... 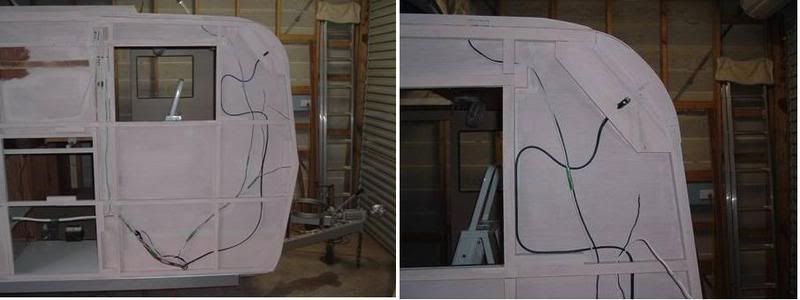 You can see the size of the piece of timber in the framework that hopefully would allow some sort of bracket/fixture/fitting to be screwed to it. The cable end has been secured into that timber and can be retrieved by drilling a half inch hole through the cladding. Future 12v cable needs: This is where it all became too complicated. As bobt says above, after 23 years he still hasn't got his van right, so I can't see me getting it right first time either. Consequently, I've decided to...do nothing. The existing 12v lights in the van are wired using the standard figure-8 electrical cable that is used for bed lamps/desk lamps in your home. This cable has 1.0mm dia wires, so I'm leaving that cable as it is. Any future 12v requirements will be fed from a new cable that can be started from the seat box and then routed through some conduit clamped underneath the chassis at the back of the A-frame drawbar to get to the other side of the van... 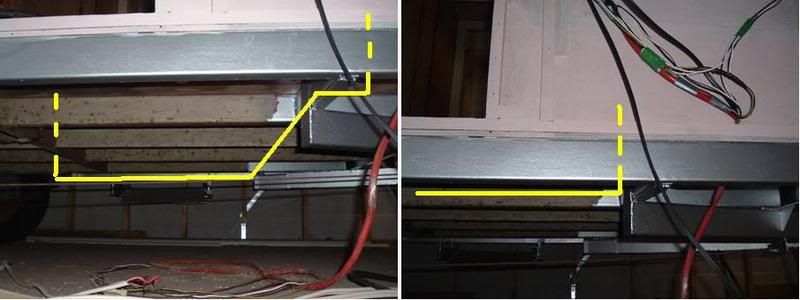 I can either go from the seat box straight back and up into the kitchen cupboards, or I can go across to the other side and go up into the wardrobe cupboard. The A-frame members should provide some protection to the conduit spanning the chassis. So that's where the wiring plan has ended up. I'm just a little concerned about putting various wiring around the van on a "just in case" basis, and making the framework look like a piece of Swiss cheese with all the holes weakening the structure. Thanks again to everybody for all the suggestions. It certainly gave my old brain a good workout to try and 'nut it out', and I think I can cover most future requirements with the plan/proposal I ended up with. cheers, Al. |
|
|
|
Post by millard1399 on Nov 11, 2008 20:59:37 GMT 10
Plodding continues... I have put some insulation into the framework on the roof... 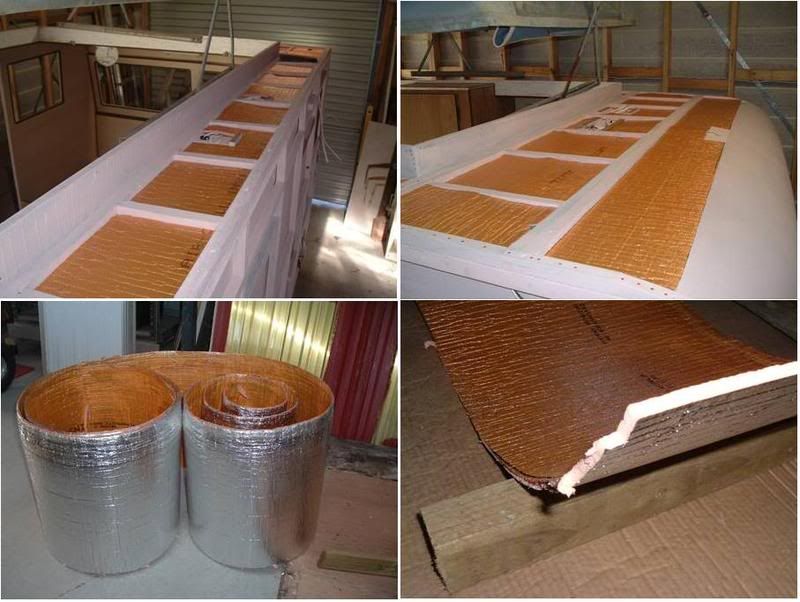 This insulation was left over from when my steel shed was built last year. I had to cut the insulation into pieces to fit inside the framework because the aluminium cladding sits directly on top of the frame. The insulation is from Air-cell and is one of their products, "Insulbreak 65". It has an insulation rating of approx 1.8, so it's not far below the standard fibreglass batts. Hopefully it'll at least take the edge off a chilly night...Brrrrr  The other job was to dismantle and refurbish the three powerpoints in the van. After dismantling, I cleaned all the plastic bits with soapy water to get rid of the dead insects, dust, and fluff. As per the light switches, a degree of arc burn was evident in all switches, as shown in the photo below... 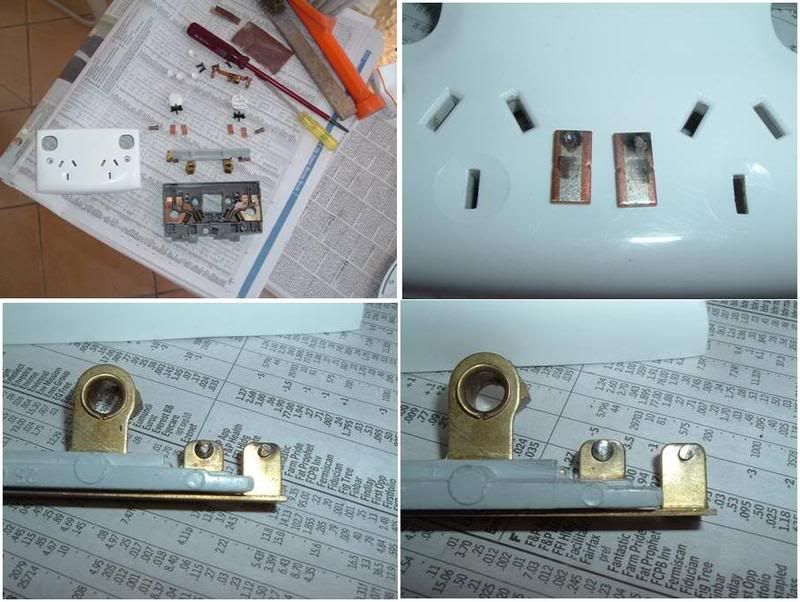 I cleaned all metal contact parts in the switches to give them a totally "as new" appearance. There were no pieces left over after reassembling them, so I was happy with that...   (...and I got to sit down for an hour or so while I did this job, so that was a bonus! ;D ;D) The 240v wiring is getting near the end, so I should be able to give the system a test very soon. Hope I don't cause a blackout at your place   See you soon, cheers, Al. |
|
|
|
Post by atouchofglass on Nov 13, 2008 5:48:56 GMT 10
Hey Al The insulbreak your putting in ... What is the white between the foils? Looks a lot like polystrene... The cost is ? per square metre and it is ? mm thick The reason I ask is I'm just looking for alternatives to insulbreak if it is cheaper and as good an insulating product Have no data on thermobreak (the one I'm using) to quantify how good a material it is. My lack of thought was "If it's used on Air handlers it must be good" Not very scientific but it works most times   ;D Cheers Atog |
|
|
|
Post by bobt on Nov 13, 2008 20:27:19 GMT 10
Al
Its Looking good, like to see people using and not wasting. That insulation should help quite a bit keeping the hot out when its hot.
Bob
|
|
|
|
Post by millard1399 on Nov 13, 2008 21:17:51 GMT 10
Hi Atog, my camera flash is giving a misleading picture. The insulation is a layer of high density flexible foam (pink) sandwiched between the aluminium foil on the bottom side, and the anti-glare coating (the orange colour) on the top side. Total thickness is 6.5mm for the Insulbreak65 product. Sold in rolls of 1350mm width x 22.25 metres length, to give 30 square metres coverage per roll. Cost (one year ago) was $330 per roll, which equates to $11 per square metre. That is a little more than double what it costs for the typical house fibreglass batts per square metre covered. So it's not cheap, but is significantly easier to work with than trying to put batts in the van. The product is designed for steel frame sheds/houses, which is why I used it when the shed was built. Now I've discovered that the leftover stuff is also designed for timber framed caravans!   Bobt, I'm a firm believer in recycling whatever I can in the restoration of this van. I can get old timber still in good condition from the local Second Hand Yard for a fraction of the price of new timber at a Hardware shop. The piece of acrylic for the replacement light shade was a couple of dollars. Plastic cover strips for the fittings in the van were cheap as chips. Refurbishing the light switches and power points in the van has meant not having to spend a couple of hundred dollars on replacements. So all in all, if I can get hold of old stuff and turn it into "good as new" stuff, then that's the way I prefer to go. I also have an 'obsessive compulsive disorder'  for buying stuff that's on "Clearance" at stores, so I've been able to buy quite a bit of useful stuff at various times. cheers, Al. |
|
|
|
Post by atouchofglass on Nov 14, 2008 6:46:25 GMT 10
Hey Al
Thanks for the info on the insulation...
Let us know how it goes
At $11 a square metre it isn't too bad
Considering the thermobreak in the Olympic is $23/mtre and will take about 20mtres to do the sides of the van....
The roof is sealed so can't replace the foam that is had put in originally.
Keep up the great work and she will soon be on the road making all those highway snobs jealous as they consider the cost of their mobile palaces... compared to your better looking and well refurbished vintage/classic palace. ;D ;D ;D ;D
"Oh I say Feeby why is that chap next to us always smiling so, when he looks over at our most luxurious mobile manor house?"
Cause he is seeing the same sights with as much comfort at a tenth of the price...
That would make anyone smile
Cheers
Atog
|
|
|
|
Post by millard1399 on Nov 14, 2008 17:11:27 GMT 10
Ladies and Gentlemen!!...Welcome to the opening of the Grand Ritz Ballroom!   ... 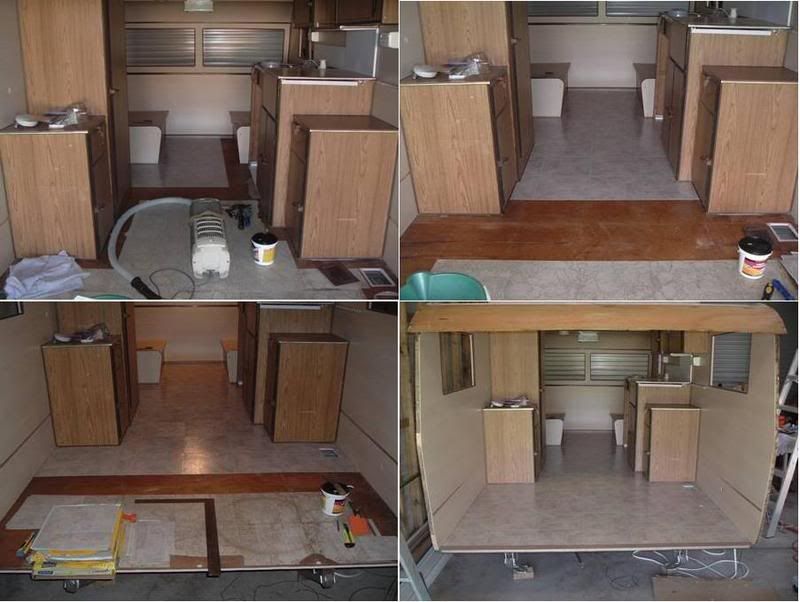 Bring your partner to the Classic Caravan Ball tomorrow night, and dance the night away to the Millard Quartet! Spend hours dancing the Millard Waltz, the Millard Fox-trot, and the Millard Jive. Seating available for hundreds, err many, err four... but don't let that discourage you, because we even have a small kitchenette to satisfy your hunger pangs. And what's more..!, the back opens out on to a spacious deck!! (err, the garage floor  ). Come on over and join the party!!! And look!!...we even have lights!!!! 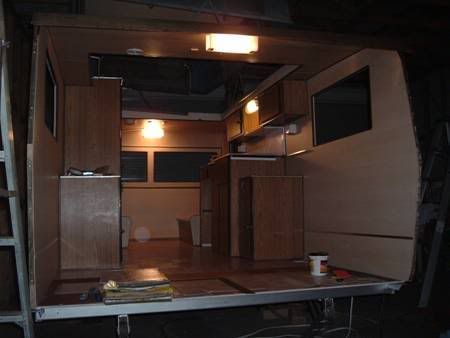 See you there!! cheers, Al. |
|
|
|
Post by atouchofglass on Nov 14, 2008 17:17:53 GMT 10
Can I bring an old duck?? OOh .... I see.... that would be a Mallard not a Millard  ;D ;D    Looking good mate It has that outdoorsy feel    Kinda like you could just reach out and touch the great outdoors Cheers Atog |
|
|
|
Post by keelz on Nov 14, 2008 17:44:09 GMT 10
ooooohh ahhhhhhh - Open plan living ;D or perhaps it's the new loading dock provision! ;D Don't forget to throw a working fridge back inside before putting that back wall back in!  Cheers Keelz |
|
|
|
Post by bobt on Nov 14, 2008 23:38:26 GMT 10
Hey Al An Absolutely excellent job you have done there.    Ever thought of hinging the rear wall at the top to make a rear veranda??  bobt |
|


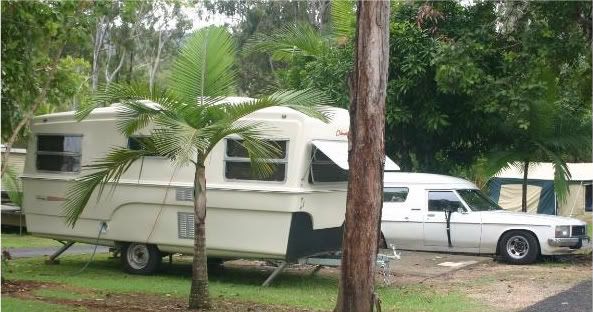


 ;D ;D (...Well, it could have ended up looking like a dog-house on wheels...