Deleted
Deleted Member
Posts: 0
|
Post by Deleted on Jul 12, 2008 22:40:42 GMT 10
Hi Wahroonga,
Gee You've certainly gone to work on that van, I had similar rot in my Franklin but did not have to remove roof and end wall skins for repair. Most of my leaks came from poor roof / wall seals so before I refitted the wall linings and new insulation (polypropylene wool and sisalation) I ran a foil flashing under the roof edge and down the side wall for a few inches to overlap the side wall sisal, worked very well as the van had to be outside again before I refitted the J trims and some rain got in but ran down the sarking and not onto the frame. Could be a thought for your project as it does not add much weight but really improves the weatherproofing of the van.
Cheers, Denis.
|
|
Deleted
Deleted Member
Posts: 0
|
Post by Deleted on Jul 13, 2008 7:57:24 GMT 10
Hi frankidownunder, It's Millard13999, not me doing the awesome rebuild  And thanks for the tip and welcome aboard. |
|
|
|
Post by millard1399 on Jul 13, 2008 21:09:22 GMT 10
Hi frankidownunder, Keep thinking that wahroonga is doing this 'resto', because if it doesn't work out we can all blame HIM!! ;D ;D That's good info you've given about the sarking and flashing. My van currently has a "token" amount of roof sarking at the front only (and it looks like it was a scrap piece from an end-of-roll  ) There's nothing at all at the bed end, so I might have a look at adding something there before I put the cladding back on. How does any water getting in to the walls of your van drain away at the bottom, now that you've put sarking on the side walls? (not that water probably gets in any more anyway...) Do you have some sort of drain holes along the bottom of the edge moulding? Does your van have a timber frame? You've certainly got my brain fired up again, thinking of possible modifications I can make to weatherproof the van more than it was! Thanks for your help... cheers, Al. |
|
Deleted
Deleted Member
Posts: 0
|
Post by Deleted on Jul 13, 2008 21:33:19 GMT 10
Hi Al, sorry about the mix up, too many years as a trade teacher,always got students names muddled.
My van has a meranti ( pacific maple ) frame and had rotted out along bottom rails, window sill rails & 2 of the peak former blocks also rotted. luckily I have a fairly good woodworking workshop (not my trade- hobby only) of my own so was able to make up all needed pieces.
Re draining any water from structure,. When I re - installed the J mold I did not seal the bottom of it to the structure so if any water does get between the skin and sisal it should find its way out underneath. you need to look at your vans construction and figure out best way of draining. Also I painted all new structure and all vunerable areas in weather shield paint (a left over from house), some areas that were showing beginnings of dry rot I liberally coated in wood preserving compound (oil based).
To ensure no water could pond at base of end skins I drilled 1/4 holes in two places at each bottom end then put a No2 phillips screwdriver into hole and pulled back wards to form a small cowl so that air moving past the hole would suck any water out, this technique was used on old aircraft for same purpose.
There is a lot of ways you can improve on the manufacturers build techniques as we do not have to watch bottom line as much or work to a fixed price.
Best of luck with the rebuild,
Denis.
|
|
|
|
Post by millard1399 on Jul 15, 2008 21:32:18 GMT 10
G'day All, Back again with another update... Have been sliding around the garage floor on my back while I wire brush and repaint parts of the chassis... First photos show the front section of the chassis being progressively completed... 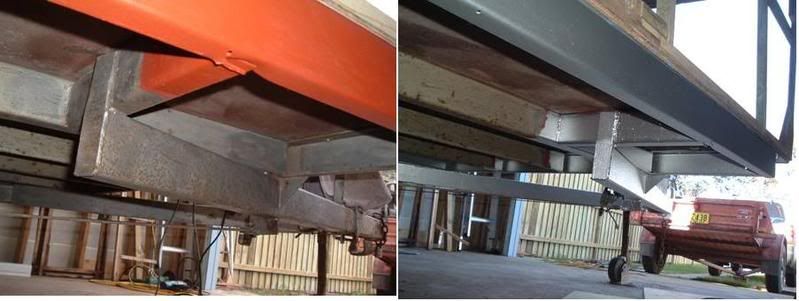 ...I'm only doing the perimeter of the chassis at this stage. Enough to allow me to put the ali cladding back onto the van. The rest of the chassis can be done at some later date. (Got better things to do with my life than lie in a confined space with a rotary wire brush!!  ) Second group of photos show the drawbar being progressively completed... 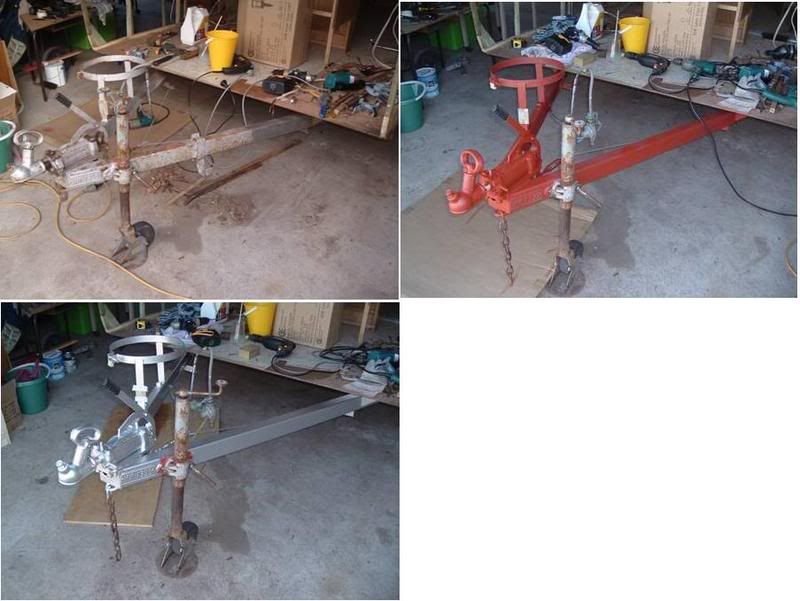 ...Amazing what a coat of paint can do to freshen up the look of the van, eh?! I'll complete the jockey wheel and clamp later on when I remove the jockey wheel for a complete overhaul. cheers, Al. |
|
|
|
Post by atouchofglass on Jul 15, 2008 21:49:50 GMT 10
Looking good Must admit I'm not looking forward to wirebrushing the chassis on mine either. keep the photos coming    I am envious of the shed and concrete floor to work on though ;D ;D  Atog |
|
|
|
Post by millard1399 on Jul 16, 2008 20:00:28 GMT 10
G'day All, I need some techo information from anyone who has done the following. I'm up to the point of remaking the front window frame and cladding it on one side with decorative ply. The original plastic strips that go around the edges were stapled into the original frame. I've salvaged the strips for the new frame but don't want to use staples again (...NEVER, NEVER do I want to see another staple again!!  ) What other methods have people used to re-fit their plastic strips without using staples? I'm wondering whether 'construction adhesive' (No More Nails, Zero Nails, etc) would be satisfactory, or if some other type of glue would be more suitable. I'm reluctant to use tacks or small nails because of future rusting. Eventually I'll be re-fixing the same sort of plastic strips around the inside of all the window openings, so I'm hoping to get 'the good oil' from you guys before I make my move. Any thoughts or suggestions? cheers, Al. |
|
Deleted
Deleted Member
Posts: 0
|
Post by Deleted on Jul 17, 2008 21:34:57 GMT 10
Hi Millard 1399,
I am using round headed brass nails that I got from my local hardware store, You could get similar ones from Whitworts marine & leisure, (www.whitworths.com.au). use this supplier for stainless steel hardware and other parts, marine parts seem better quality than some identical caravan ones. You could try no more nails, its supposed to adhere to some plastics, those trims are a PVC type plastic at a guess as they are readily bent so may stick quite well. Also can obtain new trims from Caravan Plus if needed. see what others think.
Denis
|
|
|
|
Post by millard1399 on Jul 18, 2008 19:55:32 GMT 10
Thanks for the info, Denis. Yesterday I discovered a local independent hardware store that stocks two sizes of brass escutcheon pins. I chose the 1mm dia x 7mm length, and have decided to have a go with the 'liquid nails' stuff and also put a few of the brass pins along each length as well. I figure the two methods combined should hold the plastic in place ok.
cheers,
Al.
|
|
|
|
Post by millard1399 on Jul 29, 2008 19:52:01 GMT 10
G'day All, Here's a "Pot Luck" story... During the planning for the restoration of the Millard, I realised I needed a sustitute nail for the staples that were used by the factory. I figured a 20mm length hot-dipped galvanised nail clout would be the most suitable to re-fix the aluminium cladding to the framework. I live in the third largest city region in NSW, and I couldn't find such a nail in any of the major and minor hardware stores in my local region. I could get 12mm length or I could get 25mm length, but nothing in between. Last week, I had to travel 850kms for family reasons to a little country region in northern NSW. During my time there, I happened to pop into the one-and-only little hardware store in the town, and blow me down if they didn't have exactly the nail I was looking for!!! Yep, 20mm hot-dipped...   So, the moral of this story is...don't forget that little hardware store in those country towns you travel through. You just never know what you might find there to help with the restoration of your van!   (ps. Shoulda bought a lottery ticket at the time...I could have been typing this from an island somewhere by now ;D ;D ) cheers, Al. |
|
|
|
Post by atouchofglass on Jul 29, 2008 19:58:25 GMT 10
Refixing the aluminium cover strips on the window
For me it is Matrix FC.... FC stands for fast cure
works well and comes in white and black
Atog
|
|
|
|
Post by millard1399 on Aug 1, 2008 21:04:43 GMT 10
G'day All, after a forced lay-off last week, this week it was head down and bum up and back into it... I've completed building the new front window frame... 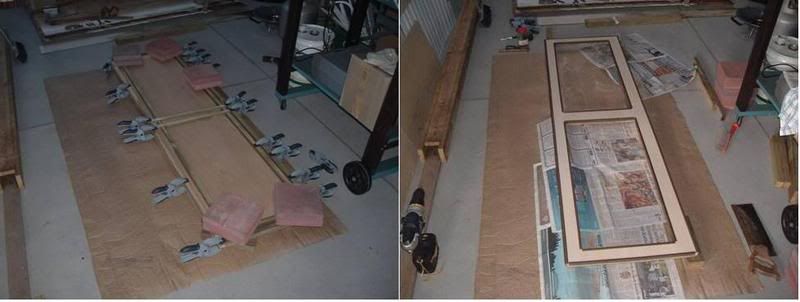 ...and I ended up using liquid nails and then brass pins on the plastic strips to ensure it all stuck together. After allowing a few days for the liquid nails to harden, it all seems to be pretty 'tight'. The window frame has now been put aside while I work on other things. I have taken all the internal ply cladding off the offside frame. When I previously took the aluminium cladding off the outside of the van, I noticed a number of uprights in the frame had split where the cable recesses had been cut far too longer than was necessary. I'm now glueing the split timbers back together and then putting some short pieces of timber in position to act as a 'splint' in the framework, and cutting a much smaller recess for the cable... 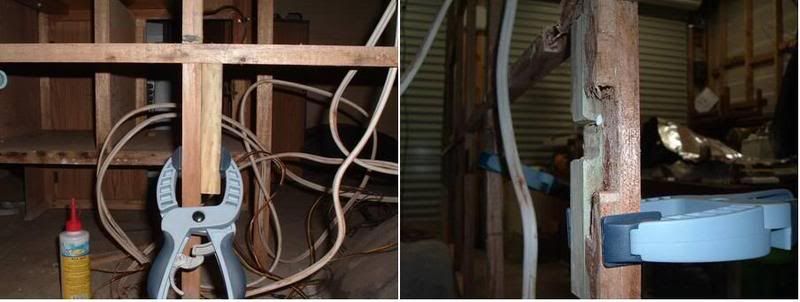 Earlier in this thread I talked about the floor ply beside the mudguards being affected with woodrot. Today I was able to get a clear look at this area and the news wasn't good. The plastic mudguard actually has a split in the top of it, and a second mudguard has been trimmed to fit up inside it with pop rivets to hold it. Only problem is that the split was never sealed properly, and consequently water has splashed up and seeped through the crack into the inside of the kitchen cupboard floor area. Quite apart from that flooring, the little strip of floor ply on the outside of the mudguard is shot to bits and will need replacing... 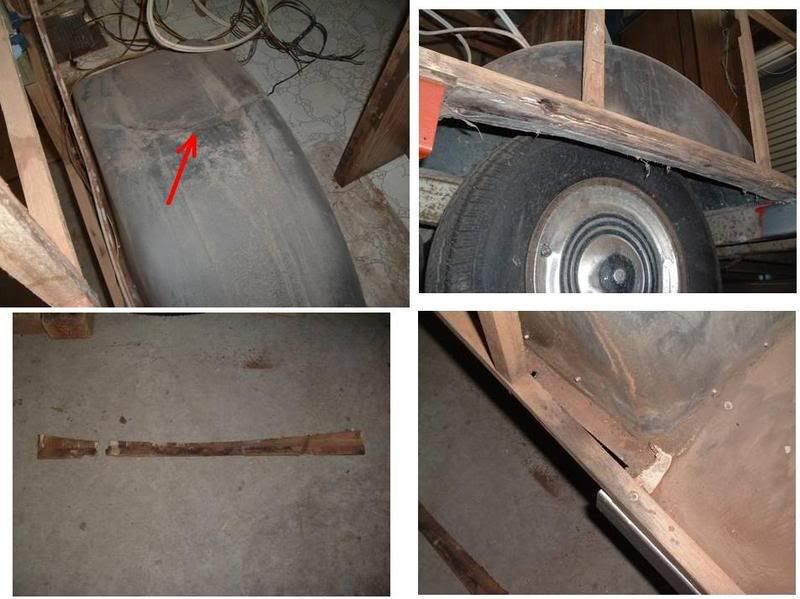 Note in the bottom right hand photo how much red dust has built up in the bottom edges around this van. Methinks this van has done quite a few miles on dirt roads in its lifetime. A couple of days this week were spent wire brushing and priming the rear half of the chassis. Tomorrow the silver topcoat goes on, and then back to completing the repairs on the framework. More to come... cheers, Al. |
|
|
|
Post by millard1399 on Aug 2, 2008 17:56:39 GMT 10
...And here are the before-and-after photos of the rear half of the chassis... 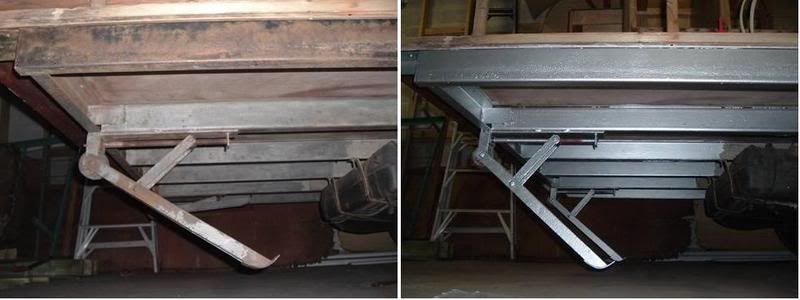 ...thank goodness I don't have to crawl around underneath the van again!!  ;D ;D cheers, Al. |
|
|
|
Post by millard1399 on Aug 5, 2008 18:12:02 GMT 10
Here we go again with some more resto stuff to report... The strip of ply flooring on the outside of the mudguard was 'cactus', and a new strip was cut out of treated pine. Next, the rotted framework above the flooring strip was cut away and new framework put into position. Some pink primer dabbed around, and a few coats of paint on the new floor strip, and it's back to looking like new... 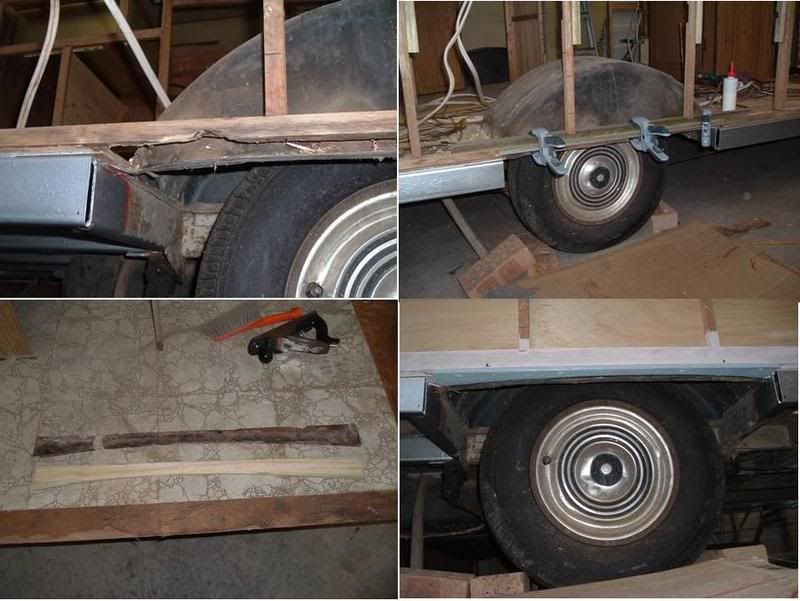 Now that the wheel arch timber is sorted out, the cladding on the inside of the wall is being worked on. Photos show the new bottom strip in position, and the rear top sheet being cut using the old sheet as a template. Last photo shows the before-and-after sheets, with the new one on the right. I'm using a Gunnerson's product known as "Rezilience Wall Art", Classic Blonde colour. This is the closest match to the original cladding, some of which has been left in the van, so the new cladding had to be compatible... 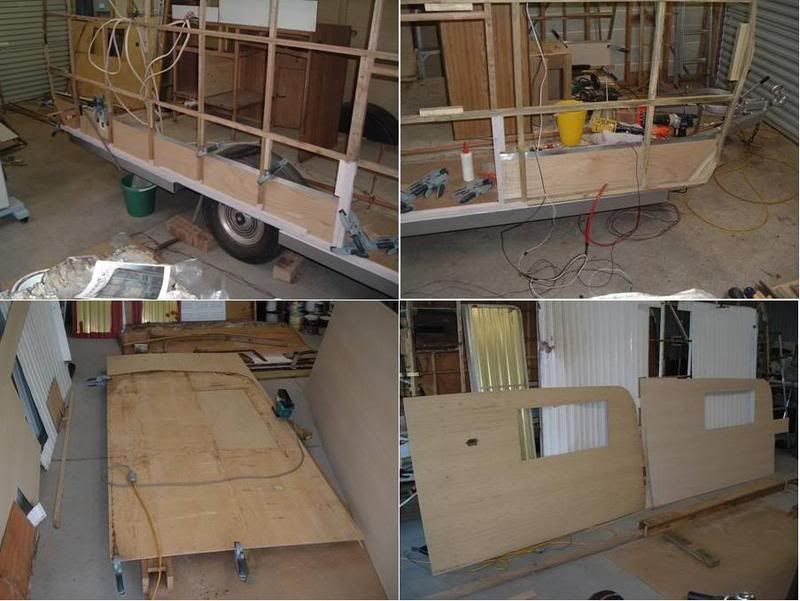 Tomorrow we see if the new top sheet fits into position (if not, you'll hear someone cussing loudly! At $30 a sheet, I can't afford any mistakes!!  ) cheers, Al |
|
|
|
Post by keelz on Aug 5, 2008 20:36:29 GMT 10
Great photos Al, it is really coming along now!
I think you missed your calling as a caravan builder!
Keep up the good work.
Keelz
|
|
|
|
Post by millard1399 on Aug 13, 2008 21:39:23 GMT 10
G'day All, another progress report... A fair bit of time has been spent working out how to redesign the framework so that the internal fixtures can be anchored with screws into the framework (rather than the original staples from the outside of the panelling into the fixture). This meant that additional bits of timber were added in places to act as the anchoring point. I also took the opportunity to paint the flooring under the kitchen cupboards with enamel primer to help prevent any further woodrot occurring in the flooring. This first group of photos shows the new internal panelling being progressively installed on one side, and the pink primer on the floor... 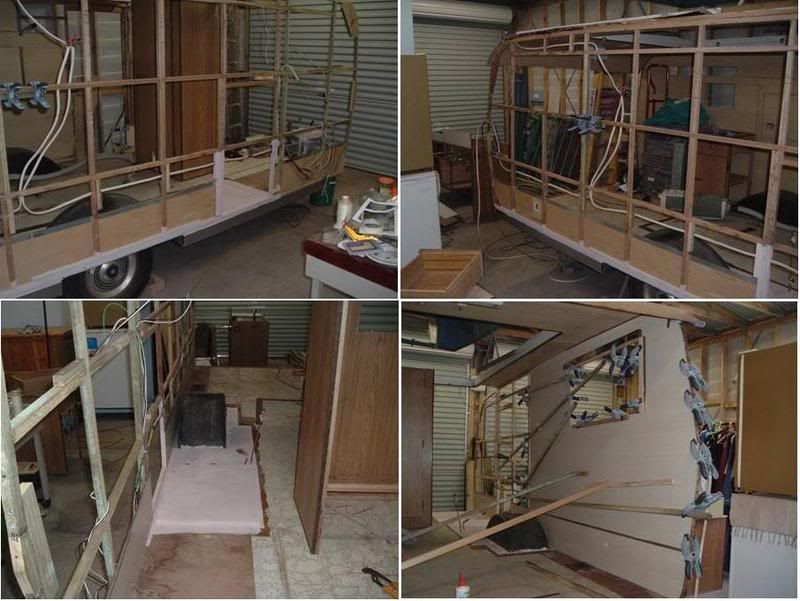 As well as additional framework, I also had to strengthen the cupboard frames to allow these fixtures to be screwed to the wall. In a number of cases the staples used to hold these structures together had come loose or were showing signs of rusting. This photo shows the repairs being carried out on the kitchen cupboards... 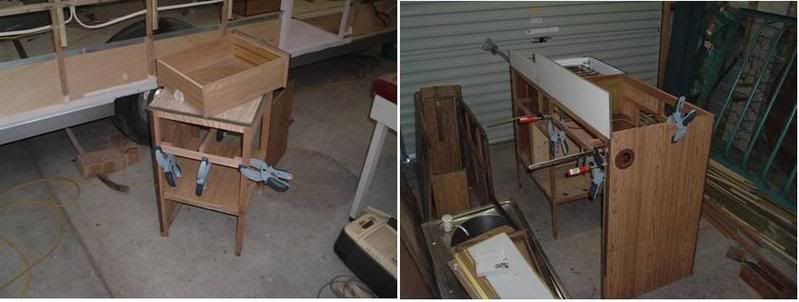 And finally, the front seat on the offside also needed some additional framework to allow for the new anchoring method. These photos show how the seat fitted originally, and then the new design with additional timber framework (including some repairs to remove some rotted timber on the top of the frame)... 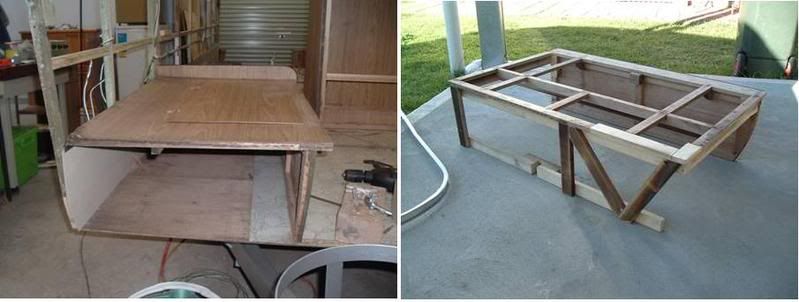 Tomorrow the other section of wall panelling will be cut and fitted, and then all the fixtures down that side can be re-installed. Starting to take shape now. Till next time... cheers, Al. |
|
Deleted
Deleted Member
Posts: 0
|
Post by Deleted on Aug 15, 2008 22:39:10 GMT 10
Gee Al, ;D ;D
ever thought it might have been quicker to make a new van from scratch? ;D
Seriously, you're doing a great job, luckily you could use the old linings as patterns, mine came off in rotten pieces so I had to make profile boards and do some really close measureing, ( working to 1mm tolerance is simple now, lots of practice ;D).
painting all the lower timbers is a good idea, did mine with wood preservative, only using paint on the new timbers. hopefully this will prevent further rot.
Keep up the pictures,they are very helpful to those starting out on their projects.( and us nearing completion).
Denis
|
|
|
|
Post by millard1399 on Aug 23, 2008 18:29:34 GMT 10
Work progresses... I have completed re-lining the internal cladding on the offside, and refitted the plastic cover strips around the windows... 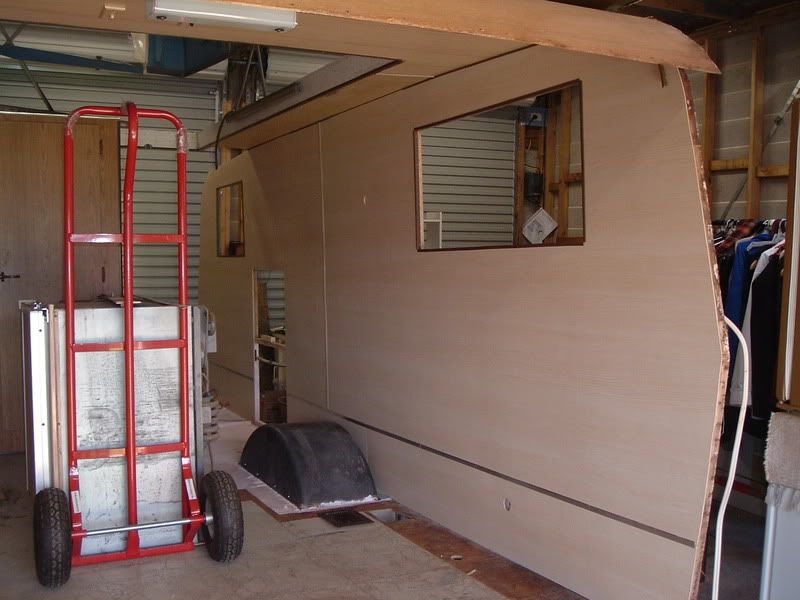 I was going to put the kitchen cupboards etc back in down that side, but decided I wanted to splash some pink primer around the bottom of the cupboards to give them protection from any future water problems. At the moment it's freezing cold and rainy here, so I'll leave that until the sun comes back out. In the meantime I've started repairing the woodrot across the floor at the back and the nearside framework. In the following photo group, you'll see the extent of the woodrot on the floor. I decided to cut a strip across the floor and replace it with something else. Put my thinking cap on and came up with the idea of using an old door jamb. Off to the local Secondhand Junk man and luck was my way. I needed to make some fancy cuts on the jamb so that it would fit under the end of the ply flooring, plus fill the gap from the strip cut-out, plus have an angle at the back of it to fix the rear ply panelling to it. Lots of plotting and planning, but the end result was good... 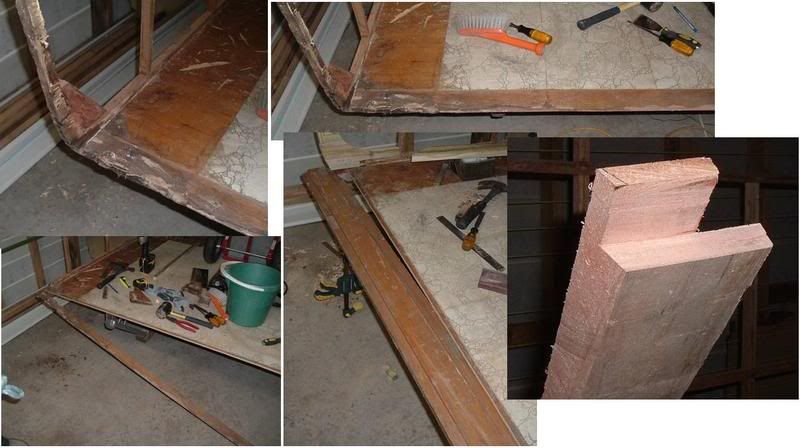 I'm currently painting the 'floor jamb' before fitting it into position permanently. Then it was on to the rear framework on the nearside. Woodrot had taken hold on the bottom half, but I decided to replace the whole height rather than muck around with half old and half new. I used the old framework as a template, but I also needed some intricate carpentry cuts at the bottom to allow one new piece of timber to replace two dud pieces. This photo group shows the various sections that were replaced... 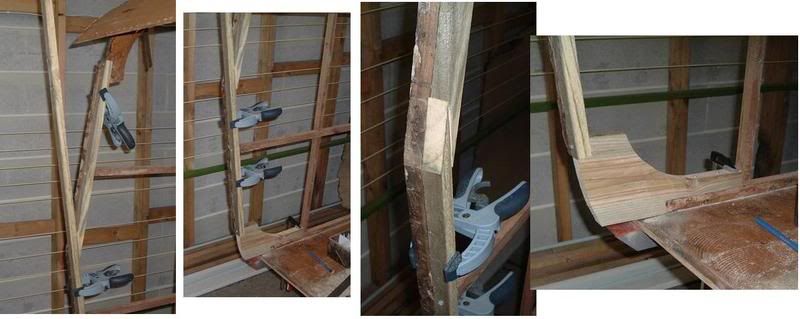 Tomorrow I get a day off, but on Monday I'll replace the timber at the nearside wheel arch, same as I did on the offside (shown above in this thread). There's only very slight woodrot in this area, but I'll take the opportunity to put treated pine here while I have access to it. Once that is completed I can reline the nearside inside. The fridge that's in the top photo has now been taken out and hooked up to power in the shed to test if the fridge is working ok. So far so good, but I'll leave it going for a number of days to make sure the 240V side of it is working well. Down the track I'll hook it up to gas and give that side a test as well. Till next time... cheers, Al. |
|
|
|
Post by atouchofglass on Aug 24, 2008 7:18:58 GMT 10
Hey Millard1399 With all the work you've got going there do you get time to do anything else!!!!!  ?? It will be one nice van when finished The good part about doing it yourself is you know what has been done and it is done right..... No factory short cuts as compared to homemade shortcuts... IE they usually make it cheaper and less durable... What have you insulated the walls with, in-between the aluminium exterior cladding and the interior ?? Atog |
|
|
|
Post by millard1399 on Aug 24, 2008 21:32:29 GMT 10
Atog, this van consumes the majority of my waking hours! At the moment it is taking up considerable space in the garage, along with the other space needed to store the cladding, windows, and wall sheets, etc, for the rebuild. I want to reclaim all that space as soon as possible, so I'm really focussed on getting this van back together and out of the way. Sundays are when I get to "have a life" and do what sane people do! ;D ;D (...I'm convinced you have to be certifiably 'nuts' to belong to the restoration/renovation part of the population...   ) With regard to the insulation of the van...yes, I've thought about what could be done there, but I wonder what advantage wall insulation has on a pop-top, given that the pop-top skirt offers no real insulation qualities. Does insulating the walls make much of a difference? I have said previously in this thread that there was a token length of thin insulation sheeting in the roof above the dining table (looks like builder's Sisalation sheeting), and that was the extent of insulation in the van. I was thinking of putting something more substantial back in that section and also in the roof above the bed at the rear, to at least offer some protection from direct sun onto both those sections. But I'm struggling to believe that something in the wall cavities as well will give significant benefit. Perhaps other members/readers can offer their opinion/experiences...(please do!!!) cheers, Al. |
|
|
|
Post by atouchofglass on Aug 24, 2008 21:57:35 GMT 10
Hey Millard 1399
Good thought about the insulation
I asked because I have been in vans that are not insulated and the cold of the evening seems to creep in quite quickly as the sun goes to bed.
Having insulation of some type in the roof must stop some of the outside temp.
My old cabana probably didn't have much in the way of insulation either...
At the moment insulation is also on my mind because of the need to put some in the Olympic.... more on that later
Atog
|
|
|
|
Post by millard1399 on Aug 28, 2008 22:04:30 GMT 10
Another day...another bit of glue...  I've put the new lengths of treated pine into the framework above the nearside wheel arch, and started to slap a bit of pink primer around... 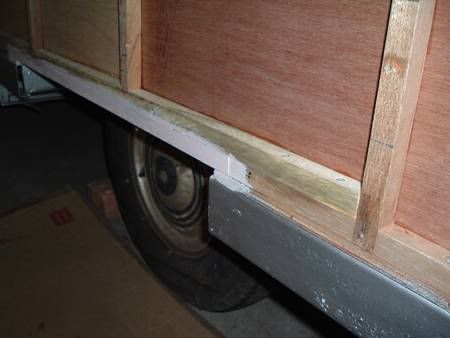 That allowed me to then put the bottom row of panelling on the inside... 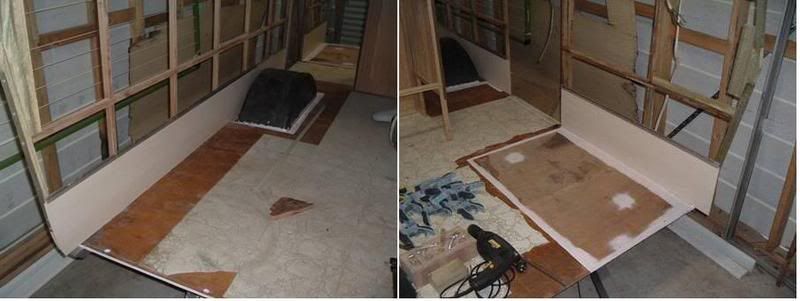 But before I can put the larger sheets of panelling on the top, I have to do some work on the fixtures so I can anchor them into the framework later on. The front seat needed some additional timber, and some repairs to a bit of wood rot, and the wardrobe is getting an additional bottom shelf put in (dunno why there wasn't one there in the first place...cheapskate Millard!)... 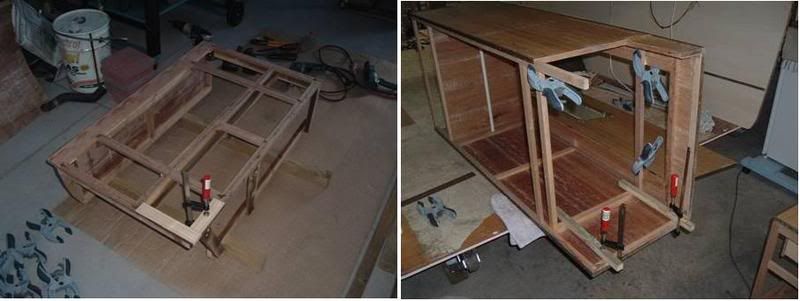 With lots of glueing and screwing going on around here, there's a few time lags waiting for the glue to set so that I can move onto the next bit. While I'm waiting I'm doing some other 'finicky' little jobs that fill in the time. The bottom of the gas stove was rusty, so it got a rub back and a bit of paint around the bottom. Same with the legs of the bed spring. Wire brushed the rust off and then some metal primer and silver paint (...I'm using the chassis paint up  )... 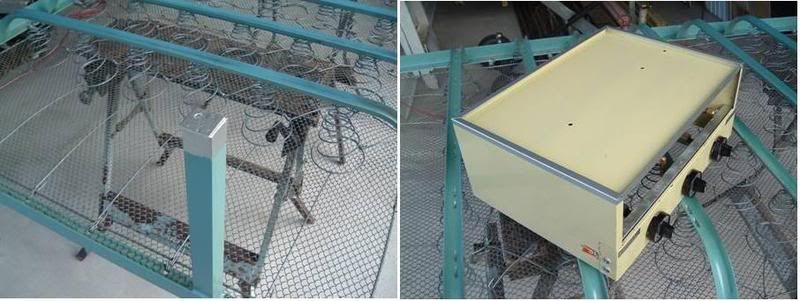 And that's all I've got to say about all of that!  ;D cheers, Al. |
|
|
|
Post by millard1399 on Sept 5, 2008 19:08:52 GMT 10
G'day All again... The panelling has been installed on the nearside wall, and the plastic window trims have been glued and nailed into position. This photo group shows how the progress went from rear to front... 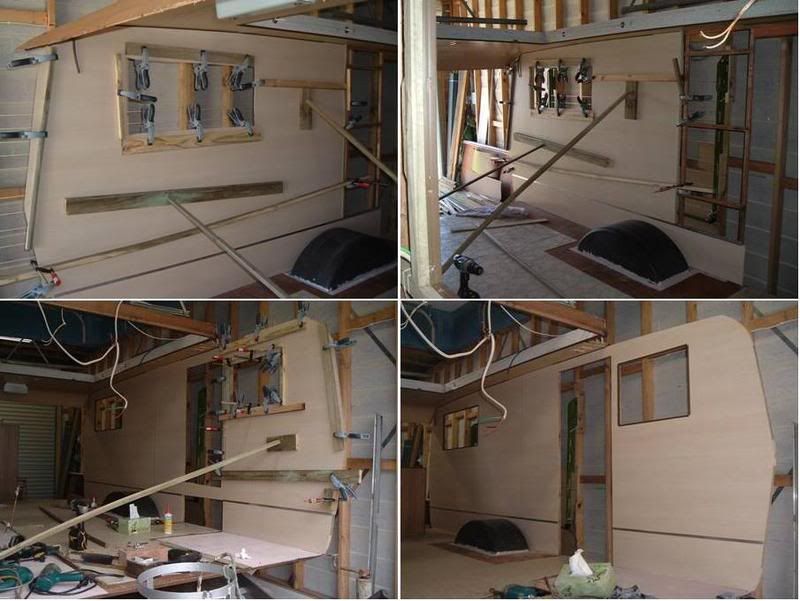 With that completed, the nearside cupboards could be put back into position. I had to do some repair work to the tops of the wardrobe and bedside tables. It appears that the pop-top window flaps have been left open during rain and drops of water have bounced off the lower roof and into the van, landing onto the tops of the furniture. The tops are made from chipboard but have not swelled like chipboard does when it gets wet on the edges. Rather, the tops have become very bumpy. At first I was thinking of putting some laminex on the tops to give better protection, but I couldn't scrounge any suitable laminex and had to go to Plan B. I ended up sanding the tops back level again and putting some Wattyl colourwood stain on them followed by two coats of Estapol satin. The end result doesn't look too bad and they don't look any crappier than what they did before. This photo group shows the tops being worked on, and then the cupboards back in position, including the new additional shelf at the bottom of the wardrobe. Cupboards are now screw-fixed into the framework and are locked in pretty tight... 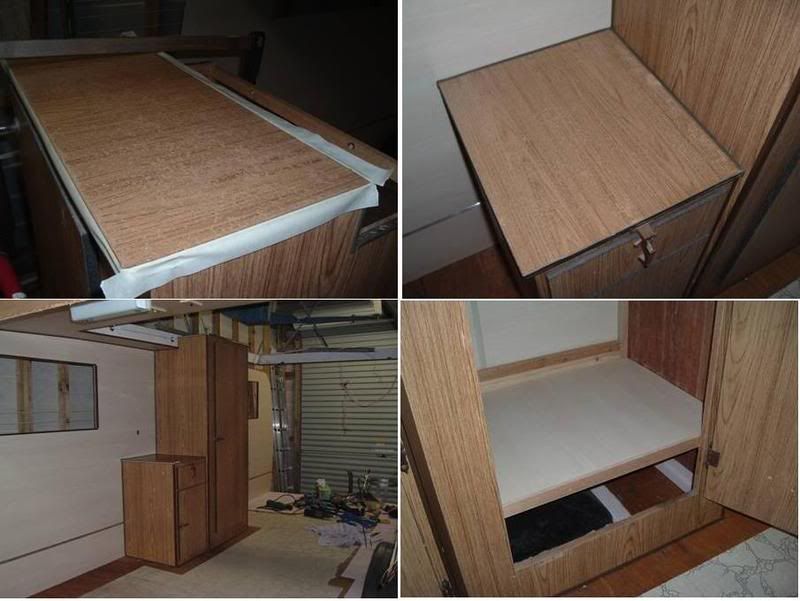 Now I can get to work on the front seats and get them back into position. See ya then... cheers, Al. |
|
|
|
Post by millard1399 on Sept 11, 2008 22:15:53 GMT 10
...And so on, and so on, and so on... Will this van never end??!!... I've thrown a bit of white enamel paint around, some on the shelves in the kitchen cupboard, and some on the floor where the fridge and front seats will go... 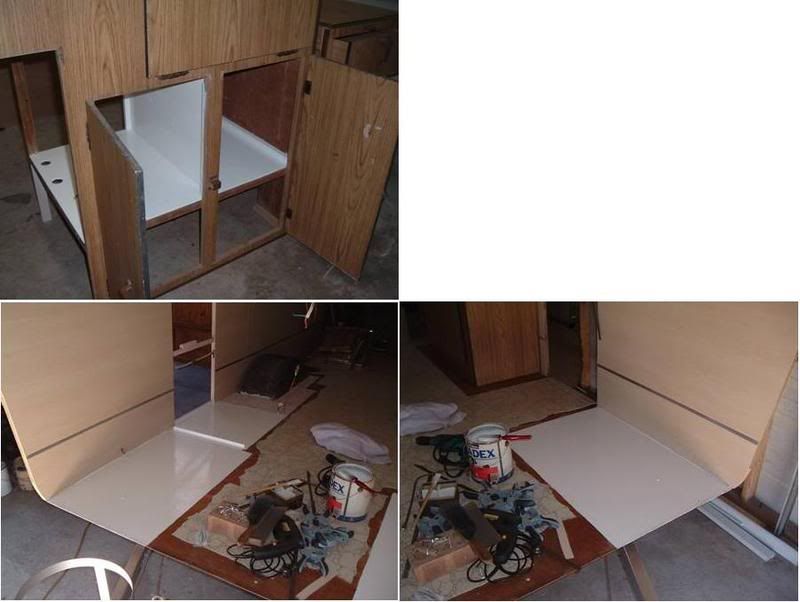 Then I set about working on the front seats. The original seat ends were made from chipboard, and were swollen and damaged from water leaks. I had to gently prise the plastic cover strip out of the groove from each end piece... 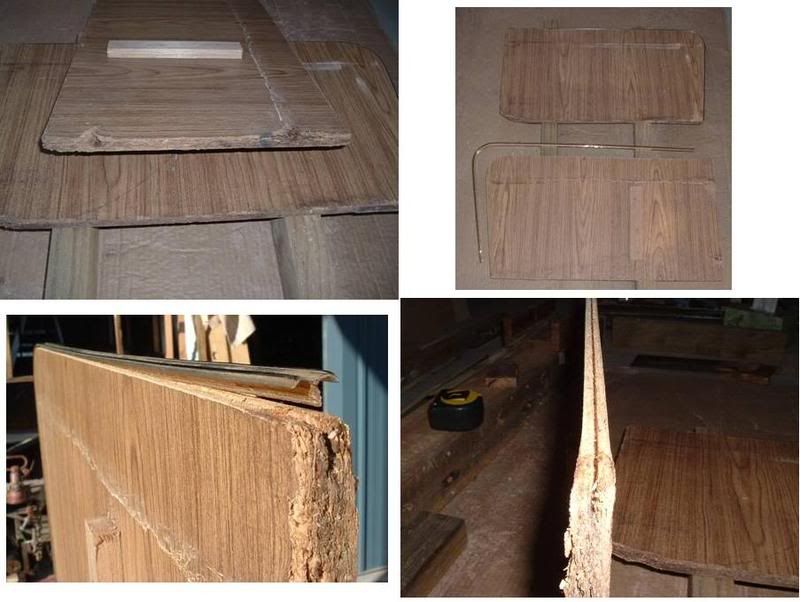 ...and then I made new ones from scratch. I used offcuts of the wall panelling to make two new faces for each side. I cut some timber up into 5mm thick strips and then made a 'sandwich' of panelling with timber strips in between. A bit of glue, wait to dry before a final trim-up to shape with the jigsaw, and two new seat ends appeared... 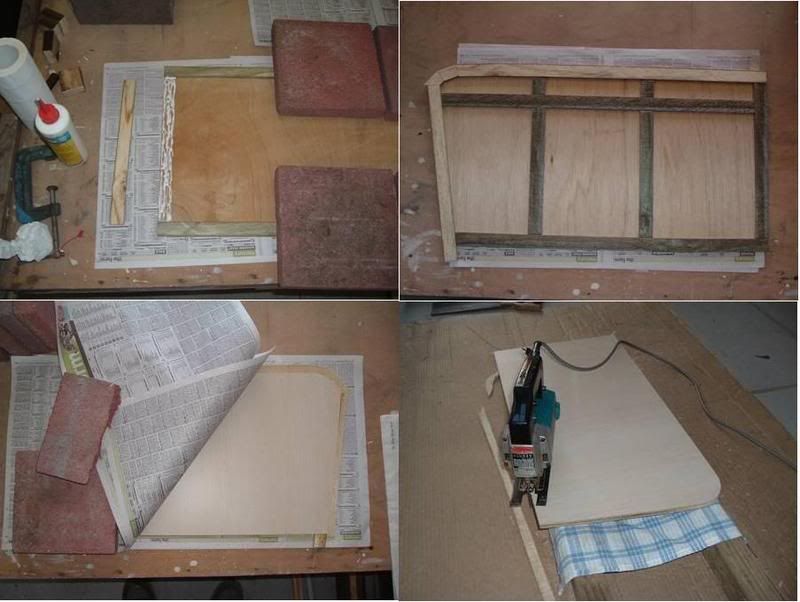 Next came the tricky bit of cutting the grooves back into the new seat ends to take the plastic cover strip. I presume they had some sort of rotary cutter in the factory to make these grooves, but I didn't have that equipment, so I needed to think of another solution. I came up with the idea of clamping a piece of timber to a handsaw. The timber was set a measured distance above the teeth points so that it acted as a depth gauge. It also acted to keep the saw blade straight and rigid. With some careful cutting (the saw was heavy with all the clamps, etc), I managed to reproduce a 'professional' groove in the new ends, and inserted the plastic cover strip into position... 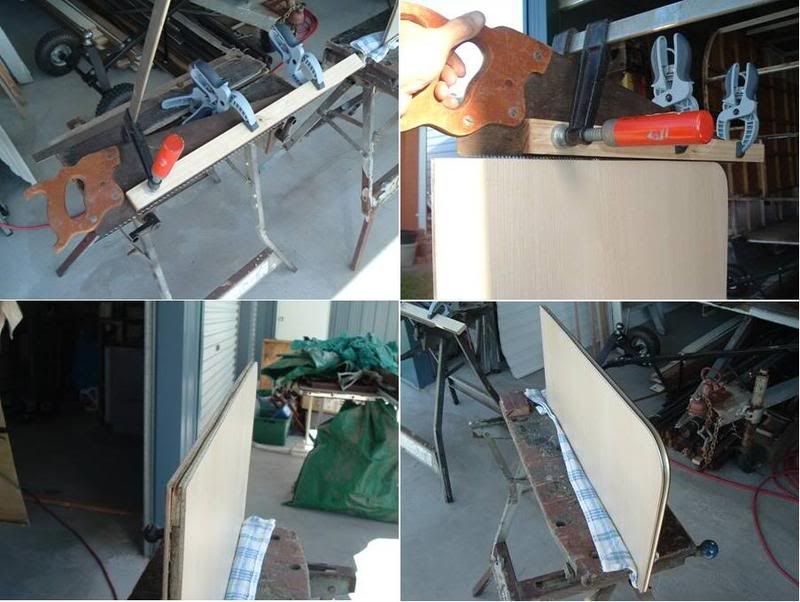 Having puffed my chest out and thought "what a clever d*ck I am!!" after that effort, I turned my attention to recladding the tops of the seats. I cut some more of the panelling up to size and then jigsawed a cut-out for under the seat flap (that allows access to the storage underneath). Some more glue and lots of clamping, and bugger me if two new seats didn't appear!... 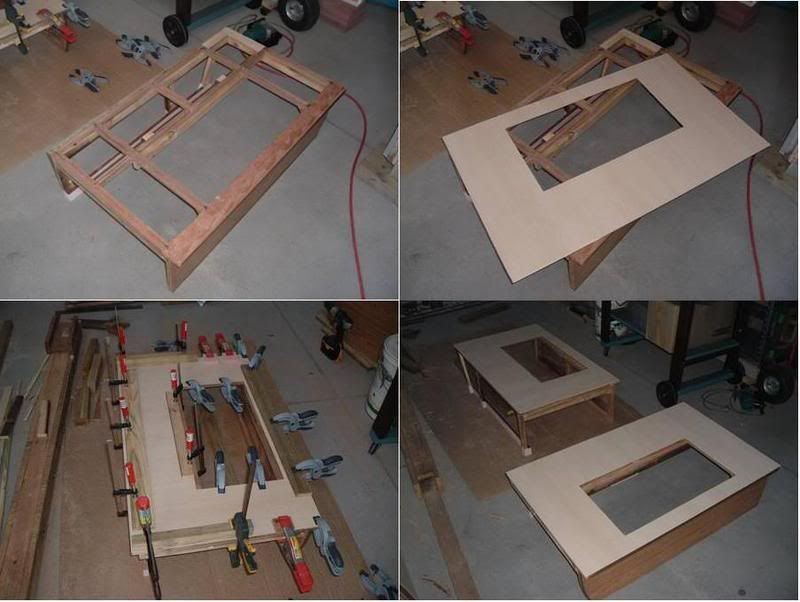 I've salvaged the hinges that were on the original seat flaps, but they are pretty rusty from water damage, and I'm now in the process of rotary wirebrushing them back clean and painting them up again. Then I can cut the seat flaps and fix them in position. Almost getting to the point now where the seats can go back into the van. The "She-who-must-be-obeyed" at my place says we need a holiday, so we are going away up the Coast next week for a week's R&R. The Millard will have to stew in its own juice for a while until I get back all rejuvenated and ready for another onslaught. See yers on the other side... ;D ;D cheers, Al. |
|
|
|
Post by atouchofglass on Sept 12, 2008 6:32:13 GMT 10
Hey Al Talk about dedication!!! You take the prize there me ol' mate    Love the ingenuity of the saw.... The groove could also be made with a laminate cutter and appropriate sized cutter... cost under $120 for a reasonable one But with the "Al Saw and depth gauge" who needs a laminate cutter?   ;D ;D Thought I had a few clamps until I looked at your photos    hmmmmm "Honey just going down the shops to buy aarrrr some ....things...   " Gotta keep up with the Jones's besides can never have too many clampsKeep going mate and you will soon be using the Millard for outings all around the place Cheers Atog |
|