|
|
Post by millard1399 on Jun 16, 2008 20:58:24 GMT 10
G'day All, Thought I'd come over and play with you guys for a bit. First post for me in the Classic section...usually hang out over in the vintage part (I'm Franklin1 over there). Anyhow, why I'm here is more by accident rather than intention. We needed a van for short term accommodation for a relative. Was one on ebay only a coupla kms from home. Went and checked it out, and ended up winning it, warts and all. Basically complete, but suffering badly from water damage at both ends. The canvas on the pop-top is R/S. Bought the van home last Friday, and spent the weekend assessing the repairs required. The more you take apart to allow inspection, the more you realise that even more is required to be taken off as well.  Have decided to more or less do an extensive "rebuild".  Rego paperwork with the van says it is a 1977 build. Van is 14ft long x 7ft wide. Runs on 13" wheels. Weighs 880kgs (has mechanical override brakes). Identification number on drawbar is MM1399. First group of photos show outside and inside photos taken from the ebay listing... 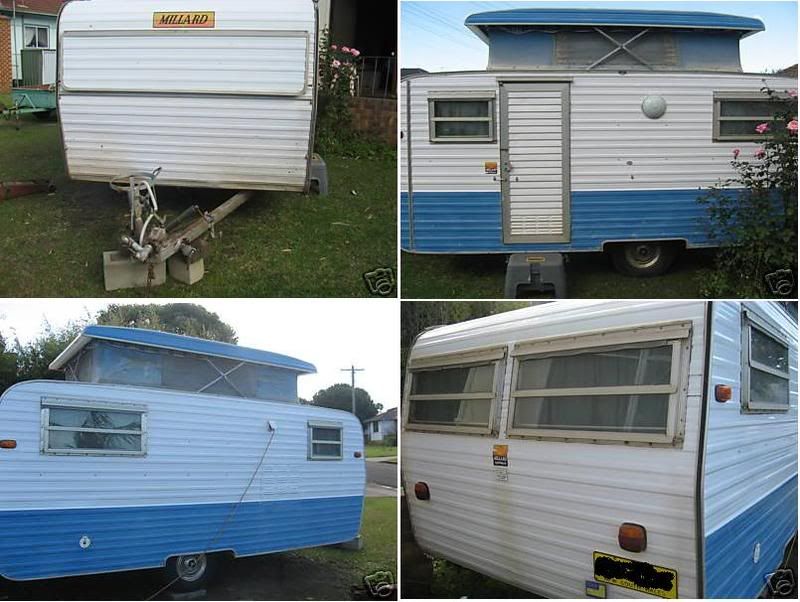 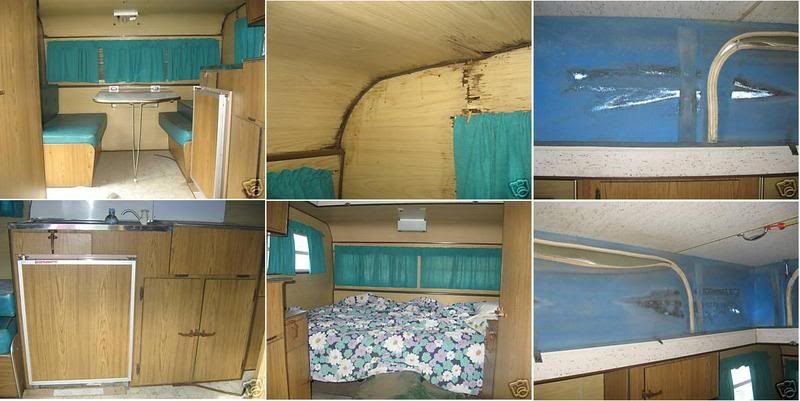 You can see the evidence of some water damage in the inside photos. Next group of photos show the van being progressively disassembled... 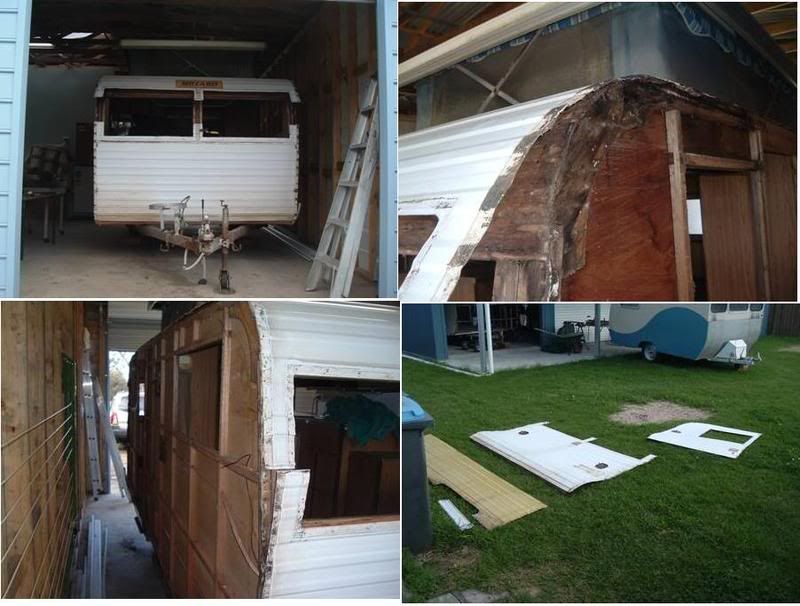 Note the gold lacquer coating on the inside of the aluminium cladding lying on the ground. All pieces are like this...the exterior colour is either white or blue. Next photos show the water damage on the offside... 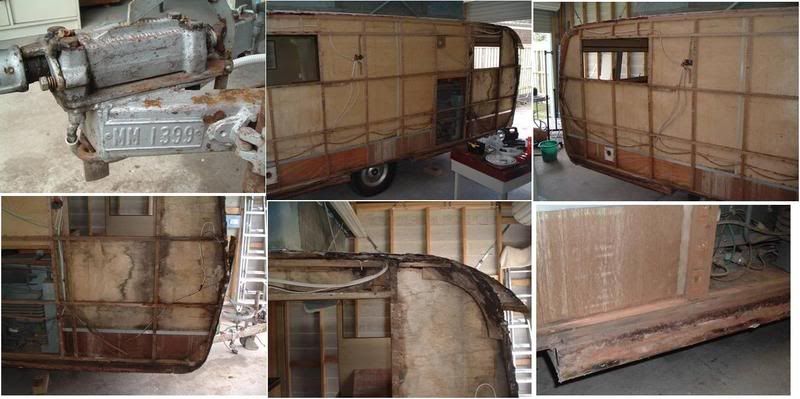 The bottom right photo shows the mud and rust that had built up between the chassis and the aluminium cladding. There is a cover strip bridging the two, which I've already removed. There is no way you would be able to see this during a pre-purchase inspection. Last group of photos show the rear end water damage down in both bottom corners... 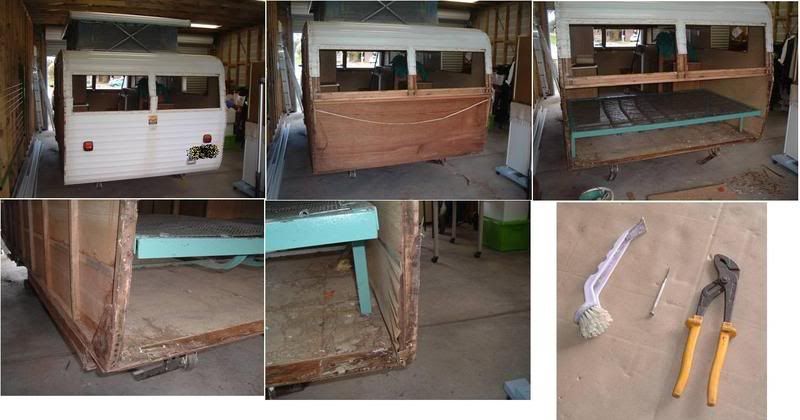 The bottom right photo shows the three tools that have been worth their weight in gold during the dismantling. The brush on the left is made of tuff plastic and has a chiselled edge at one end. Great for scraping the mastic/sealant from all windows/cover strips, and does NOT damage the painted aluminium surface. The middle tool is a jeweller's screwdriver which I'm using to prise the million-and-one staples up slightly, so that I can get the parrot-beak pliers onto them and pull them out. Whoever invented staple guns orta be shot...they are a restorer's nightmare!!   So there you have it so far... Thought I might as well come over and post the info as I progressively work through the job. Might be of some use to someone contemplating their own restoration. Till next time, cheers, Al. |
|
Deleted
Deleted Member
Posts: 0
|
Post by Deleted on Jun 17, 2008 9:22:45 GMT 10
Hi millard1399, Thanks for dropping and sharing your large resto with us. I love this stuff.  One day I'll get up the courage to dismantle my 1978 York to touch up some interior woodwork. However it has an aluminium frame on a galvanised chassis, which put simply, don't suffer the water damage and subsequent collapse of meranti framed vans. So my advice on a classic van purchase .... if you don't want to buy an immediate renovation project, buy aluminium frame (or fibreglass maybe) .... and by the way, pop rivets are used much more sparingly than staples  I'd guess that any 70's timber framed van unless 100% shedded will look the same. |
|
Deleted
Deleted Member
Posts: 0
|
Post by Deleted on Jun 17, 2008 11:52:12 GMT 10
Hey there Millard 1399....welcome to our forum. ;D Lotsa work there to bring it back to a real classic. Hope you enjoy.  I wouldn't be brave enough to do that sort of work, mainly because, just don't have the facilities and equipment, nor the bride of 30 years, would have a bar of a project of that magnitude.   It has been a mission just getting the "RetroLiner" up to scratch....pikkies coming soooooon.   We hit the frog and toad July 1st.   Enjoy your resto and look forward to the final result.  Cheers & beers vkgreenie |
|
|
|
Post by keelz on Jun 17, 2008 20:40:22 GMT 10
     Wow Millard1399 that is sure quite a "small" job you have bitten into. Good on you for sharing the photos up on here, keep up the good work would love to see more progress pics down track. I love the shed and working space, lucky you can get it undercover to really get stuck into it and spend time on the timber frame before you re-clad. It's interesting about the yellow/gold colour on the inside of the cladding, when i've cut penetrations in my Viscount's wall cladding for hot water heater install, mains pressure inlet etc the inside face of the ally cladding has the same goldy yellow coating from when the material must have been produced and rolled into coils originally prior to manufacture into the ribbed sheets....... Cheers Keelz
|
|
|
|
Post by lacem on Jun 18, 2008 12:23:45 GMT 10
And so we meet again  . I have just accquired a Millard too, a 16.5 footer, as an onsite van. I will post photo's shortly. I bought it off the local antique dealer, he attends all the local auctions and clearance sales, (gets all the bargains). I noticed in his yard today that he has accquired a van identical to yours but a York. What is the similarity? Was there a buying out of York to Millard or as in the case of the Toyota Lexcen and Holden Commodore a few years ago, did Millard or York share the same van for a few models? Happy Classic Vanning...chat soon, Trish  |
|
Deleted
Deleted Member
Posts: 0
|
Post by Deleted on Jun 18, 2008 21:22:27 GMT 10
York /Millard are like Toyota /Lexen .... or so I was led to believe?
Check out if the frame is aluminium, rather than timber and if the chassis is full galvanised?
|
|
|
|
Post by lacem on Jun 18, 2008 22:38:24 GMT 10
My one is fully galvanised but I'm not sure about the one in the yard? Will let you know. Is it better/worse for a galvanised frame? Better because it does not rot? the van does seem great weight wise for towing, not nearly as heavy as I thought!
|
|
|
|
Post by millard1399 on Jun 25, 2008 21:47:36 GMT 10
G'day All, another progress report... Have unfastened the pop-top and hoisted it up into the rafters of the garage, clear of the van. This allowed me to remove all the cabin cladding, after a fair bit of time removing more staples  and areas of patch-up silicone sealant   to allow the sections to be pulled apart. Also removed all the staples holding the seats/cupboards onto the internal ply cladding, so that the inside can be stripped bare for the new wall cladding. Photo shows the suspended pop-top, the cladding removed, and the fixtures released. Last photo shows the "ant trail" of staples holding the overhead cupboards in position... 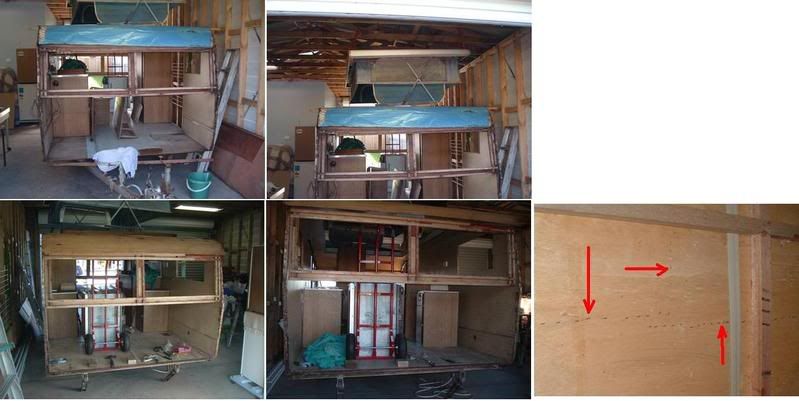 Can't understand why it takes a hundred staples to hold something to the wall, when if you think you've removed them all but leave one in it still takes a bit of effort to wrestle the fitting off the wall.  I count staples in my sleep now, not sheep  Second group of photos shows the water damage on the nearside frame, including the broken framework. Photos also show the water damage on the seat framework... 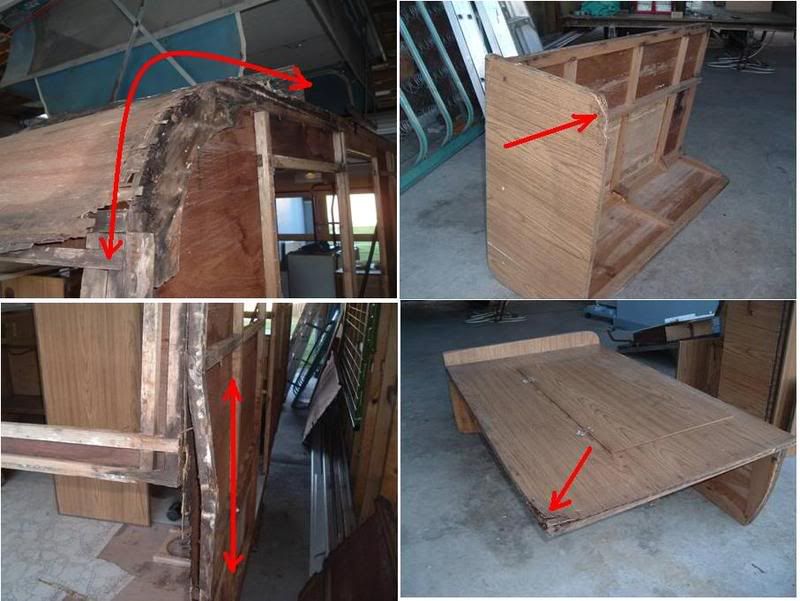 Somebody mentioned elsewhere on this forum about the use of chipboard for furniture.   Couldn't agree more... Next photo shows the aluminium cover strips in 'before' condition, and then after much time was spent removing the crusty old mastic sealant, and then cleaning them with soapy steel wool. (you'll need your 'sunnies'  )... 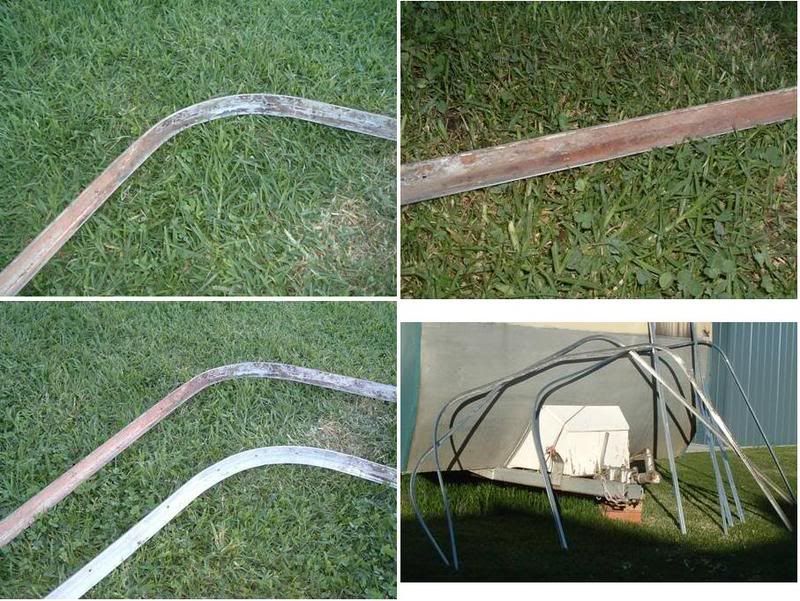 Where the cover strips wrap around the cabin and go under the edge rail of the chassis, dust and water had found its way into the gap and had corroded the cover strip (see top right photo above) and rusted the steel chassis rail. Not major, but certainly significant. I'll have to have a think about how I can prevent this sort of thing happening again in the future. Last group of photos show the cladding now being worked on, to chip away the crusty old mastic sealant from around the edges, and then give the surface a good scrub with soap and a scourer. Top two photos show the 'before' and bottom two show the 'after'... 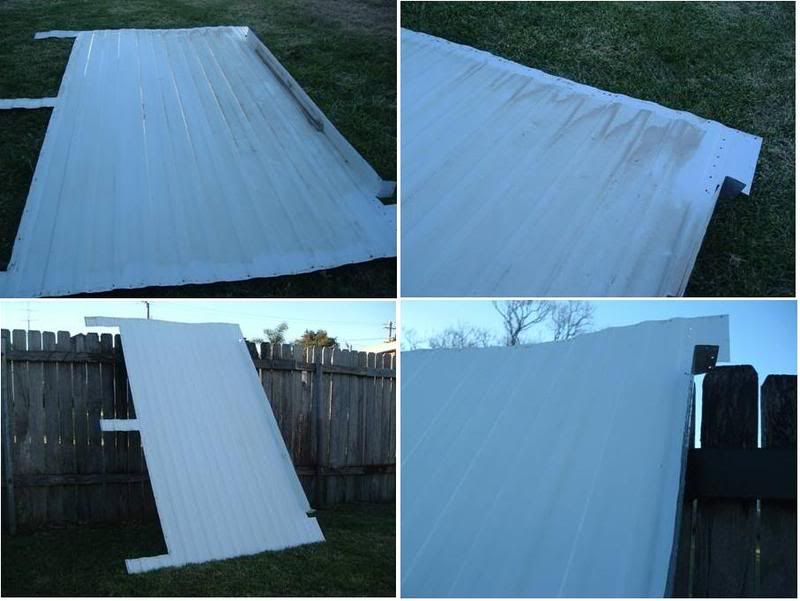 That's where I'm up to so far. Hoping the get treated pine timber on Friday to commence the replacement framework. Plenty of scrubbing of the cladding still to do in the meantime. Things I've learnt so far... 1. Silicone sealant can be removed using a sharpened plastic scraper to undercut the silicone sealant. Use it like a chisel. Sometimes a side-to-side sawing action was needed to slice through the thicker sections. Once the majority is removed, brushing or dabbing turps or kero onto the remaining silicone and leaving it for a minute or two seemed to work well to 'soften' it enough to be able to scrape it away. Sometimes it needed a second application of turps or kero (both seemed to work the same way) to get rid of it completely. Also, older silicone sealant is more easily removed with the plastic scraper than newer sealant. 2. There seems to be two types of mastic sealant used around the van. One is a cream colour and has hardened to a mostly crusty solid sealant over the 30 years. This cream mastic was used around the aluminium edge cover strips and where the cladding sheeting overlaps. Elsewhere around the van (windows, cladding sealed to outer face of chassis), the mastic is a blue colour (looks kinda like Blu-Tac), and this is still pliable and sticky. Assuming no-one has renewed the sealant around the windows over the 30 years (it doesn't look like it), then the blue mastic is far superior in sticking/sealing power than the cream stuff. 3. All internal cupboards, etc, are anchored to the ply wall cladding with staples fired from the outer side of the ply into the fixture. Then a number of screws are driven through the framework and into the fixture, again from the outer side. To remove any internal fixture, you need to remove the outside cladding to get to the staples/screws. Which essentially means pulling the van apart. During the rebuild, I'm going to redesign this system and make it so the fixtures are anchored from the inside of the van. If they ever need to be repaired/replaced in the future, they'll be much more easily removed from the inside. 4. This van was built in the following stages... a) chassis built b) floor ply fixed to chassis c) 'vinyl' floor tiles laid on floor d) cabin timber frame built on top of edge of floor tiles and riveted into chassis I have chipped a few of these floor tiles when removing the fixtures. From memory they are the old Armstrong-Nylex floor tiles, and contain a percentage of asbestos to give them their hard-wearing qualities. They are very brittle and break easily. I'm going to pull them up and replace them with a better vinyl floor tile. Only problem is getting them up where they've been built over at the edges. Might have to carefully cut them with an angle grinder (asbestos dust issues). More to come... Sorry this is long-winded, but I'm trying to cram as much as I can into the thread in case anyone else is wanting to do a similar job. cheers, Al. |
|
|
|
Post by keelz on Jun 25, 2008 23:13:39 GMT 10
Great progress report Al. It's certainly coming along now. I've found the silicon removal a nightmare aso. Some people and silicon just aren't a good combination   . Maybe it's time they lock that stuff up with the spray cans in the hardware stores!  I think between a couple of old caravan dealers and my vans past owners they must have applied about 3 boxes worth of dodgy roof n gutter silicon etc in the worst places possible. Every job i touch - re-sealing a window, fitting, fridge louvre vents, etc the "silicon-ator" has been before me spreading his smear campaign!.  It was interesting you use steel wool on the corner trims. I had to clean back one of my roof strips on the weekend to re-seal the roof edge before i install a new sail track.... since i'm always limited with time on weekends i thought there must be an easier way to get rid of these 3 layers of silicon, caravan leak sealer, old mastic/dried out putty and bird poo!. I walked back into the garage and there it was, the answer was staring me in the face sitting on the workbench. Hello black and decker with wirebrush still in the chuck from last weekend spent playing under the van. On went the goggles and earmuffs. I had the entire 5 metres cleaned back to nice shiny aluminium (tinted safety goggles needed  ) and clean roof sheet adjoining in about 30 minutes  . Bye bye scrapers and stanley knife death to all silicon and dried up putty ;D I found if i kept the speed nice and slow the wirebrush simply lifted it up and peeled it off without melting the silicon and it just came off in chunks. A quick blow with the compressed air gun and a wipe with turps before re-sealing i reckon it sure saved some elbow grease. Keep up the good work and thanks for the progress pics. Keelz |
|
|
|
Post by atouchofglass on Jun 26, 2008 6:54:55 GMT 10
Greetings All
Just another option in addition to Keelz
To remove old silicon and similar goo I have used a nylon brush on my 4" grinder
Not as vicious as a wire brush but quite effective
Also used it to remove all the built up cr*p inside the cupboards of the Olympic.... Fibreglass came up clean and removed all the gunge very well...
As always goggles and dust mask are recommended
Atog
|
|
Deleted
Deleted Member
Posts: 0
|
Post by Deleted on Jun 26, 2008 21:30:28 GMT 10
Superb post millard1399. Keep up the good work. It's simply inspirational.  |
|
|
|
Post by millard1399 on Jul 6, 2008 19:26:51 GMT 10
G'day All, Well, another week gone and time for another quick update. I got some treated pine timber last week. Still a bit 'wet' from the treatment process, so a couple of days to let it dry out a bit more. Big problem with the existing framework on the van is that it is 23mm thick timber... a non-standard size so not readily available. Fortunately I have a table saw so I was able to buy wider planks and cut them down to the 23mm size required. Otherwise, I would have been looking at a special order  It's worth checking the framework size on your van first if you are contemplating a similar restoration  First photo group shows the new framework being built over the old framework, using it as a template... 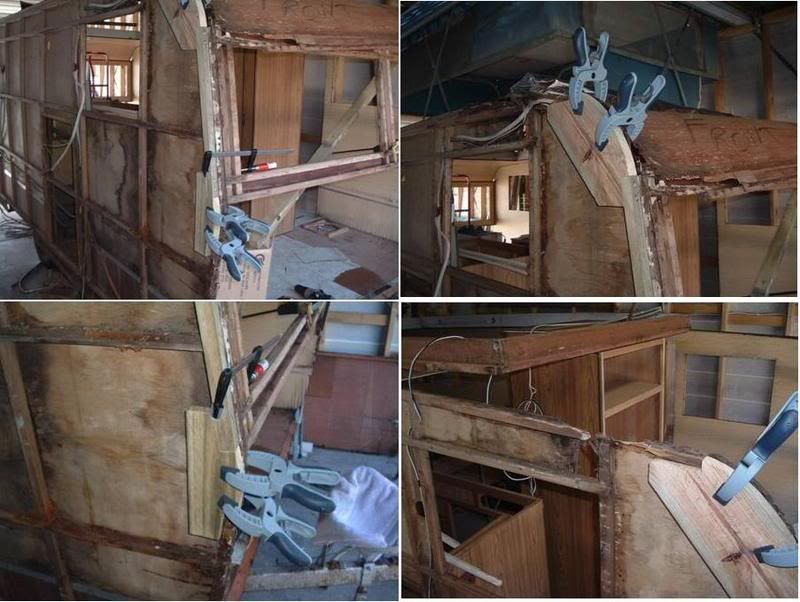 A modification was made to the new frame at the front middle height joint position (see bottom left photo above), to eliminate the original 'butt joint with staples' and instead have a 'glued and screwed' joint. Second group of photos shows the completed framework on both front sides, married into the existing framework about a quarter of the way along the length... 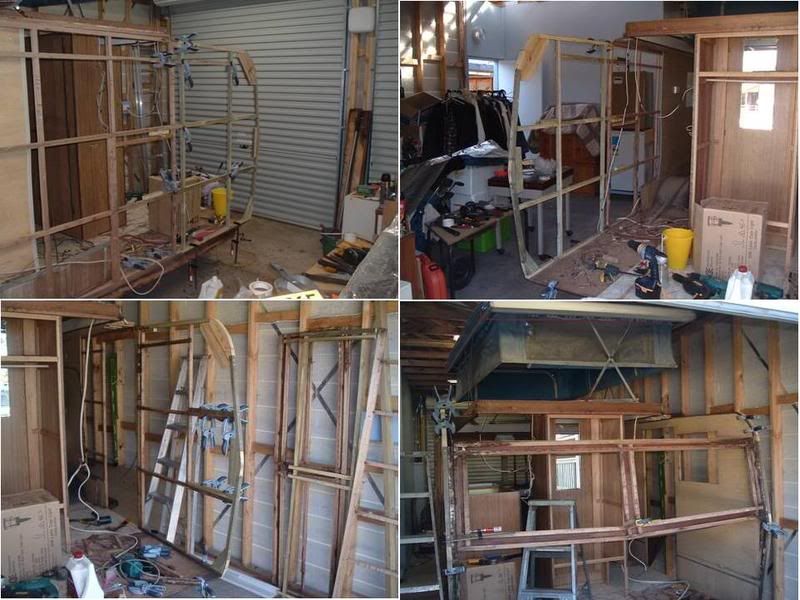 The bottom right photo shows the collapsed window framework prior to its removal. That's where I'm up to at the moment, and have almost finished re-doing it. Shouldn't be too long before the front half of the van can be reassembled with new internal ply lining, etc. More to come... cheers, Al. |
|
Deleted
Deleted Member
Posts: 0
|
Post by Deleted on Jul 7, 2008 7:54:50 GMT 10
Another awseome post Al. Thanks. I can feel a 100% reno coming one.
PS I guess the floor is sound?
|
|
|
|
Post by millard1399 on Jul 7, 2008 19:50:30 GMT 10
Hi wahroonga,
The floor is shot right in the very corners on both sides at the front, immediately underneath the framework. I broke some small bits of floor woodrot off with my fingers, and then poked and prodded progressively away from the rot. It's not excessive enough to need repairing and the new framework should hold everything together ok. At the rear of the van it's a different story, and I'll be replacing a 3" wide strip right across the back floor. Have to work out the best way of marrying the new strip into the existing flooring.
Keeps the old brain active, eh?
cheers,
Al.
|
|
Deleted
Deleted Member
Posts: 0
|
Post by Deleted on Jul 8, 2008 21:48:46 GMT 10
I guess it was originally some sort of low grade marine ply?
Or was ordinary ply used?
|
|
|
|
Post by millard1399 on Jul 9, 2008 17:34:57 GMT 10
Hi wahroonga,
No, it is rescote plywood, made by John Symonds Australia in Sydney. He was one of the largest (if not the largest) manufacturers of plywood in Australia from the 1970s back to about WWII. Rescote is (was) marine grade plywood with a plastic film bonded on one face to provide additional weather protection. In the vintage caravan era, rescote was commonly used all over the bondwood vans. As the bondwood era petered out, rescote was used in the floors of aluminium vans (or at least it was in Millards until the end of the 1970s). The plastic coated side faces the road, so the other 'unprotected' side is exposed to water that leaks into the van. As you probably know, it's only the glue in marine grade plywood that is 'waterproof'...the timber veneer layers are still prone to woodrot just the same as other timbers. In the case of my van, the water has been leaking into the van over some considerable time and eventually found its way down to floor level, where it has been unable to dry out properly. That's lead to ideal conditions for woodrot to occur.
I have also discovered slight woodrot on the very edge of the floor next to the mudguards on both sides. Because this van has aluminium cover strips all the way around each side, including around the wheel arch, then the flooring is not fully exposed to drying air. Consequently, water splashed up from the wheels has soaked into the flooring and was never able to dry out completely. Over a number of years of this happening repeatedly, woodrot has started to occur. I'm not an expert on these Classic Vans, but I suspect mine wouldn't be the only one affected.
The other thing I might mention, while I'm blabbing away, is that I've spent the last two days wire brushing and re-priming the front half of the chassis. In the process, I have discovered one of the main chassis cross beams has broken welds at both ends; the chassis has a crack in the metal in one corner; and two of the welds holding the step frame in position have broken. I suspect not many people (like me) get down and crawl underneath to inspect the chassis closely on any regular basis. Food for thought...
It's all a great learning experience!!
cheers,
Al.
|
|
|
|
Post by atouchofglass on Jul 9, 2008 18:33:08 GMT 10
Greetings All
No matter how long I am on this forum I am amazed at how much can be learnt.
We have a great pool of knowledge going here
Keep up the posts and photos as we all see how much work is involved in a restoration....
makes the hesitant more confident and that means more vans saved.... ;D ;D
Gotta love that
Atog
|
|
|
|
Post by keelz on Jul 9, 2008 21:15:54 GMT 10
I have also discovered slight woodrot on the very edge of the floor next to the mudguards on both sides. Because this van has aluminium cover strips all the way around each side, including around the wheel arch, then the flooring is not fully exposed to drying air. Consequently, water splashed up from the wheels has soaked into the flooring and was never able to dry out completely. Over a number of years of this happening repeatedly, woodrot has started to occur. I'm not an expert on these Classic Vans, but I suspect mine wouldn't be the only one affected. You're right Al, not alone at all. As i've been working both underneath on the chassis of my van and in the cupboards and under lounge storage areas the plywood flooring shows the water stain marks, mainly around the wheel arches. I had to replace the silly particle board boxes over the back of the wheel arches in my bed area when i first stepped on one and put my foot straight through it ooopps.... Chipboard?  what were they thinking!!!   I suppose the 12 month warranty, not aiming for 30 years.... It really comes down to a fundamental design flaw when they originally built these vans (well it has been in my case). They just used to notch the plywood around the black plastic wheel arches. Edges of plywood boards are not sealed around these areas and the area between the plastic wheel arch and junction with the chassis and flooring has a gap that is not suitably waterproofed. On my list of things to do is to caulk these areas up to close up the gaps where the water sprays up when towing. Then i am going to apply a waterproof membrane from the plastic dressed over the junction and lapped onto a decent amount of plywood, then the remainder of the plywood will be re-sealed under the van later on. Hopefully this will keep the water out of these areas in the future. The plywood is just like a sponge, it soaks up the water, sits for weeks on end and you can see the old pressed rivets that hold the plywood floor to the chassis have corroded, expanded, etc. If only they detailed these areas differently when they built it!! The funny thing is i've had a squiz under new vans in the sales yards and some are still constructed in the same fashion.... go figure. Cheers Keelz |
|
Deleted
Deleted Member
Posts: 0
|
Post by Deleted on Jul 10, 2008 18:01:59 GMT 10
Good work Keelz. Yes it's a bit sad that simple waterproofing solutions weren't employed. Simply a case of doing as little as necessary.
And the same foible can still be found the same on real expensive vans today.
|
|
Deleted
Deleted Member
Posts: 0
|
Post by Deleted on Jul 10, 2008 18:03:54 GMT 10
Hi wahroonga, No, it is rescote plywood, made by John Symonds Australia in Sydney. He was one of the largest (if not the largest) manufacturers of plywood in Australia from the 1970s back to about WWII. ...... As the bondwood era petered out, rescote was used in the floors of aluminium vans (or at least it was in Millards until the end of the 1970s). .... Al Tks Al for the great info as usual. BTW what does the term 'bondwood' mean? |
|
|
|
Post by millard1399 on Jul 10, 2008 21:26:47 GMT 10
Hi wahroonga,
that very same question intrigued me when I joined the Vintage forum just over two years ago, because "bondwood" was not a term I was familiar with here in NSW. From my subsequent research, it appears that the term is commonly used in most other States when referring to waterproof plywood. Over the years, I've always just referred to the product as 'waterproof ply' or 'marine grade ply', but never as 'bondwood'. Perhaps there were some trademark issues with using that term in NSW...not sure.
cheers,
Al.
|
|
|
|
Post by atouchofglass on Jul 11, 2008 6:22:01 GMT 10
Greetings All Not owning a Millard my comments may be useless but here goes anyway As is obvious by my posts fibreglass is seen as a very useful product sooooo has fibreglass been considered as an alternative to a plastic waterproofing paint? Strength par excellence never leaks and with little practice is very easy to apply. perhaps even sealing it with resin as a starter before grinding and then applying a glass skin Matrix or Sikaflex are also very good for sealing joins/joints May not be applicable in this case but you never know speaking of modern vans having old problems... On a recent visit to my old workplace one of the blokes there told me they had a 5 year old RV in recently.... part of one side/bottom of the fibreglass shell was rotten They had applied glass over ply and not sealed it properly. The ply had rotted out leaving a very thin layer of glass to hold everything together..   The glass had nothig to support it so it cracked up even worse There are still a lot of cowboys out there and paying upwards to 150k won't guarantee you a good RV Atog |
|
Deleted
Deleted Member
Posts: 0
|
Post by Deleted on Jul 11, 2008 8:19:02 GMT 10
Hi atouchofglass, The problem with fibreglass as a waterproofing agent is it is not terribly flexible. It's fine if the entire structure is made of glass or it is bonded to a continuous structure like concrete (no much used in caravans  . However when glass is used as a 'veneer' on a flexible medium (timber) and over joints, failure is guaranteed. As an example, it is no longer used to form 'insitu' waterproof bowls in shower screens etc in home building. |
|
|
|
Post by atouchofglass on Jul 11, 2008 17:03:09 GMT 10
So there you go
As I said earlier, this forum teachs us lots and I've learnt something new... again
Thanks for the info
Atog
|
|
|
|
Post by hooligan on Jul 11, 2008 23:01:04 GMT 10
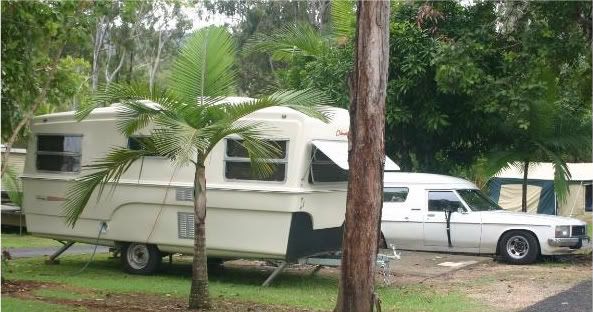
G'day Al. What's going on here....that aint no Franklin! Hmmmph, at least my classic caravan is a Franklin  Oh....... hang on my VV isn't any longer a Franklin....     Seriously, looks like one heck of a project you've taken on. As I'd expect you have tackled it very thoroughly! the 23mm framing, is it meranti? Looks like the stuff I pulled out of the franklin egg. Fortunately I had some recycled timber in good condition that was the right size when I did it, coz I don't own a table saw.....don't think the chainsaw would have been very accurate  Keep up the great work! Cheers, gristy (PS hows the Franklin going?) |
|


 .
.  and areas of patch-up silicone sealant
 I count staples in my sleep now, not sheep
 Couldn't agree more...




 .
.