|
|
Post by millard1399 on Nov 21, 2008 21:01:18 GMT 10
G'day All, I've been studying the Atog timber joinery techniques over the last few days so I could repair a little bit of woodrot in one corner of the rear window timber frame. I'm not sure I've got it perfected yet, but the end result seemed to be ok... 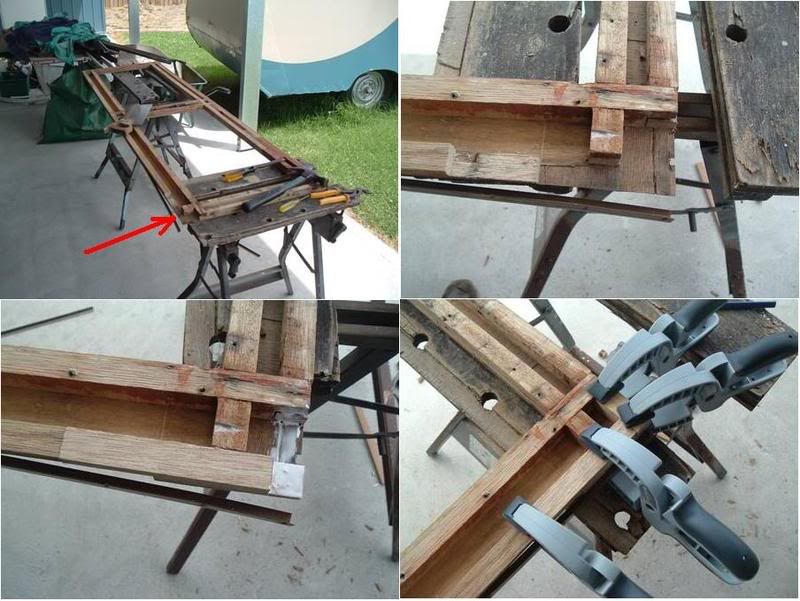 Luckily, this side of the frame is covered by the aluminium cladding, so any poor workmanship will be well out of sight!  ;D The other thing I've been doing is to dismantle the first aluminium window. Don't ask me why...for some weird reason my brain decided we should pull the window completely apart and clean all the parts up with steel wool. If you're reading this, don't try it at home...better you should just get a hammer and keep hitting your thumb with it...that's much less painful than trying to refurbish an aluminium window!!   I had to carefully remove all the phillips head screws, some of which were stubbornly stuck in from corrosion. Then I had to drill out four rivets to allow the frame to be separated. And finally I had to drill out four rivets to allow the winder gearbox to be opened up... 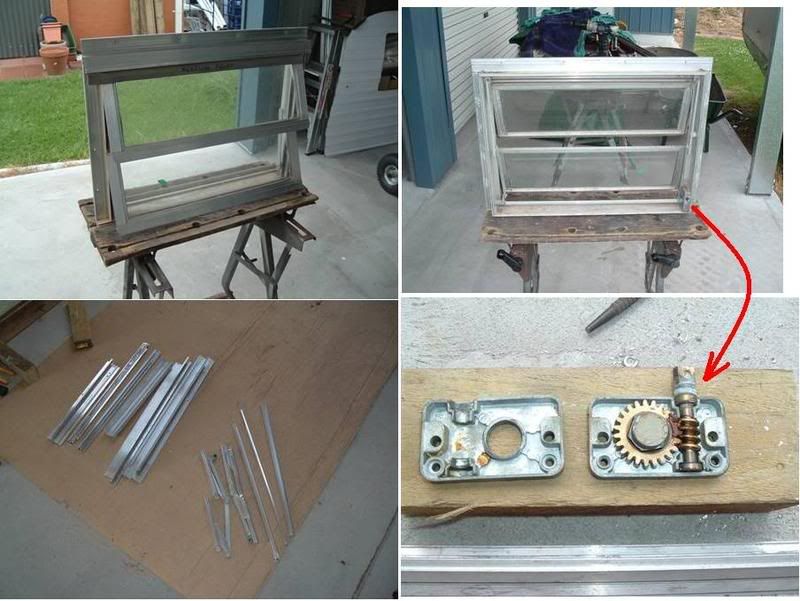 The tricky bit was trying to get new rivets that fitted back into the old holes. I could get two of the three sizes from Bunnings, but a longer length one had to come from a specialist shop. I had to drill a couple of the holes in the gearbox case a bit larger to take the rivets sizes that are sold today (...you can't get exactly the same size as the original  ). I also had to file the diameter of the rivet head down on a couple of them, because the head sits in a recess (...and guess what, you can't get small diameter head rivets anymore either   ) But I've now mucked around with the first window frame, and I'm starting to feel confident it will come up looking in reasonably good condition. Rubbing with the steel wool won't remove the pitted corrosion (I think only sanding the metal back would do that), but generally the rest of the aluminium looks considerably brighter. I'm also greasing all the components of the winder gearbox, and spraying a little WD40 on to all the pivot points in the framework to loosen them up. So far it's looking promising, and all the movable bits in the framework are working much freer than they were. And finally...I spent just under $300 on the Caravansplus website the other day, buying bits and pieces for the van. My estimate of $3505 finished cost for the van mentioned in another thread has now been blown out of the water. Looks like $4005 might be closer to the mark. I didn't realise how expensive the bits for the aluminium windows would be (eg. $85 for 30 metres of new glazing rubber for all the windows). But I now have the new kitchen sink pump, the new water filler inlet, the new 240v power inlet, some new cupboard handles, etc etc. Gotta give full credit to the Caravansplus people for prompt, courteous service!! Ordered Monday night on the internet...delivered Thursday morning to my door. Gotta be happy with that! ;D ;D Enough waffle...time for a cuppa! cheers, Al. |
|
Deleted
Deleted Member
Posts: 0
|
Post by Deleted on Nov 22, 2008 18:59:55 GMT 10
Missed a lot of this while 'away'. Great progress Al. My two cents worth. TVConnection is generally straight through the wall as already suggested with a purpose made RV fitting. However if you decide on a fixed antenna mount (on the drawbar, rear bar etc), I would suggest running an internal feed in quad shield RG6 cable (using crimped connections), similar to a quality home installation, with a panel f-type female connection for the external antenna and pal or f-type at the TV end. The good news on TV is that as the digital roll-out progresses, all transmission will move to Ch6 and higher, meaning that a small 'caravan antenna', will do the job. A Fraccaro LPV345HV log periodic is the top choice here.  Wiring WiringNew vans run 12v systems for internals (lighting, fridge, exhaust fans etc) with 240 GPO's for 'boiling the jug and TV etc. You need inverters and chargers and 240/12v changeover switches and circuit breaker panels etc etc.  However However ... All 240v GPO's and switches must have double pole switching. This ensures that 'active neutral faults' in park outlets or van connection leads is safely accommodated. Consider an 'Anderson plug/socket' which provides for a 'heavy duty' DC connection to the vehicle. The battery and solar panel provision idea is good, as is upgrading the DC cable wiring (the original '240v figure eight' DC cable is complete rubbish). For a re-registration, the LPG system must have a gas fitters compliance plate and certificate. Probably a good thing to do in any .... as it professionally pressure tests the system for any leakage. Test your final 240v wiring with an earth leakage detector. Maybe simply an earth leakage protected GPO to power the van. You've already had one near miss and it's an all too common a problem. |
|
Deleted
Deleted Member
Posts: 0
|
Post by Deleted on Nov 22, 2008 19:46:28 GMT 10
Hi Al,
Stupid question. But a lot of gluing (and screwing) has gone on in the project.
What glue. Simply PVA?
|
|
|
|
Post by millard1399 on Nov 22, 2008 21:05:24 GMT 10
Hi Wahroonga, glad to see you back!! ;D Hope all is well. Thanks a million for the advice about TV connections and general wiring for the van. The wiring diagram you've posted is a beauty, and will certainly help me down the track. I reckon all this sort of information is very useful for the overall restoration, so you get an extra lolly for your efforts!  ;D The glue I've used everywhere on the van is Selleys exterior grade Aquadhere. Claimed to have a bit of water resistance compared with the common old Aquadhere interior grade. I figured the exterior grade might be able to cope a bit better with the moisture levels in a van over the years. The majority of the framework I've done has been glued and screwed, but the internal wall panelling was just glued to the framework, no nails/screws. If the glue loses its 'grip' over the years, it will be the side wall panelling that falls off first     cheers, Al. |
|
|
|
Post by atouchofglass on Nov 23, 2008 6:35:32 GMT 10
Hey Al
Seems Aquahere exterior is popular...
That's all I'll use as it does a real nice job
Cheers
Atog
|
|
Deleted
Deleted Member
Posts: 0
|
Post by Deleted on Nov 23, 2008 8:55:52 GMT 10
Harping on the 240v side of things again, here is a good primer on the key safety issues ..... with simple diagrams. You might consider the installation of a twin pole circuit breaker with earth leakage detection as depicted here (for about $50). Courtesy of Caravans Plus  |
|
|
|
Post by millard1399 on Nov 23, 2008 17:27:44 GMT 10
I managed to get my rcd/mcb on ebay a few months ago. A fella in WA was selling four double GPOs, all double pole, plus the double pole 16 amp rcd/mcb complete with base and cover. All were Clipsal, and all brand new. He'd decided he wasn't going to do his planned restoration (...smart man...  ) and was unloading the things he'd bought. I managed to win all the GPOs and the rcd in separate auctions for less than half the price of new. The rcd cost me about $25 from memory. After corresponding with the seller throughout the auctions, he ended up throwing a double pole light switch into the pack for nix. That switch was used for the new light fitting in the kitchen. This is the photo of how the rcd/mcb has been fitted in the van... 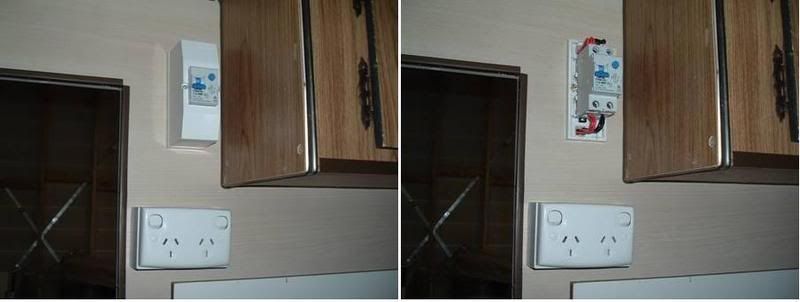 Mounting blocks have also been put behind each GPO to make them sit off the wall and allow a bit of distance between the wiring terminals and the wall of the van. Originally, the power outlets were flush on the wall and the wiring looked a bit too close to the aluminium cladding for my comfort. A laminex cover plate goes over the back of the wiring connection, so it would never have been a problem, but for the sake of $9 for 3 mounting blocks, I now think the wiring is safer. A new 20 amp Clipsal rcd/mcb went on ebay last week for $24.50 plus $6.50 postage. But no cover/base included. cheers, Al. |
|
Deleted
Deleted Member
Posts: 0
|
Post by Deleted on Nov 24, 2008 11:58:57 GMT 10
Nice work as usual  Low profile switch GPO mounts are the go (as you have done). |
|
|
|
Post by millard1399 on Dec 1, 2008 19:25:08 GMT 10
G'day All, work has slackened off with the Millard, due to me working on another job from the household 'Gunna-doo' list. My shed was erected just over one year ago, and slack-old-me has been avoiding buying a water tank so I can hook up the stormwater system. Finally a week ago I lashed out and bought a small tank as a token gesture to water conservation, and I'm now part way through putting the stormwater pipes and the tank in place... 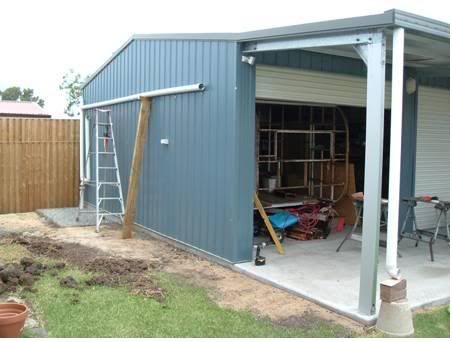 You can see the framework of my 1956 Franklin caravan peeping out of the first shed bay. It's waiting patiently for the stupid bloody Millard to be completed...   Speaking of stupid bloody Millards, I managed to spend a bit of time on it today. Last week I received the bits and pieces from Caravansplus, and when I went to hook up the pipes to the sink drain and the tap, I realised that where they go through the floor, the chassis had not been painted. That meant I had to go crawling under the van again and do a bit more painting. I also figured that with the new water filler inlet, the new tap, and the new pipework, I might as well pull the water tank out from under the van and give it a good clean up. BIG MISTAKE!! The four bloody bolts holding the tank brackets were all seized and were the wrong type to easily undo. So after trying multi-grips and shifters, I had to resort to the hacksaw for the back two. But the front two were too confined for a hacksaw, and I had to get all the protective gear on and crawl under there with an angle grinder. Talk about being frustrated to the MAX!! Not pleasant at all to be in a confined space with a grinder whizzing around. With a lot of care, I eventually cut the bolts off. This photo group shows the chassis paint for the kitchen pipes, and the water tank thrown in disgust onto the ground out back... 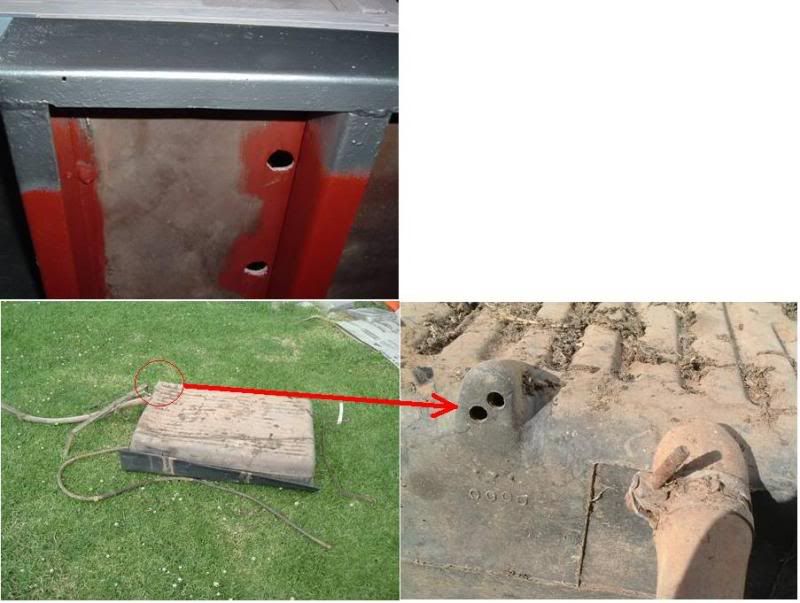 I have a question about the two little breather holes...should they have some sort of mesh over them to stop any nasties crawling into the tank, or are they ok as they are?? The other thing frustrating the crap out of me at the moment is the window winders. These are made from a cast alloy (probably lead, tin, and/or zinc involved), but they have a steel grub screw that holds them onto the brass worm shaft. Needless to say that after 30 years the steel grub screw has rusted in solid in three of the eight windows. I've tried WD40 to free them up but no luck. I then drilled one of the grub screws through the centre to try and free it up but that didn't work either. Now I'll have to look at some other idea to try and get them out without damaging the cast alloy. Any ideas??... 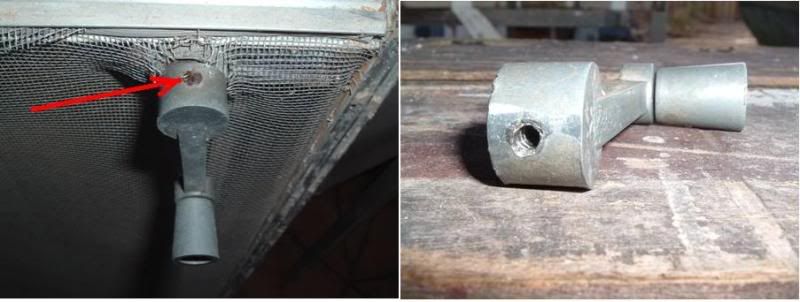 (...stupid water tank!...stupid window winders!...stupid Millard!!... (...stupid water tank!...stupid window winders!...stupid Millard!!...     ) )cheers, Al. |
|
|
|
Post by bobt on Dec 1, 2008 20:34:55 GMT 10
Hi Al
Like the shed.
Have you thought about just drilling the grub screw out and tapping a new thread?
If that was my water tank I would be putting some sort of cover over it to let the air flow and keep the creepies out.
Isn't amazing how much time little things like grub screws can occupy. ;D ;D
|
|
|
|
Post by millard1399 on Dec 8, 2008 13:57:08 GMT 10
I've been studying Keelz's instructional video on painting a caravan chassis, and decided to put the instructions into practice... 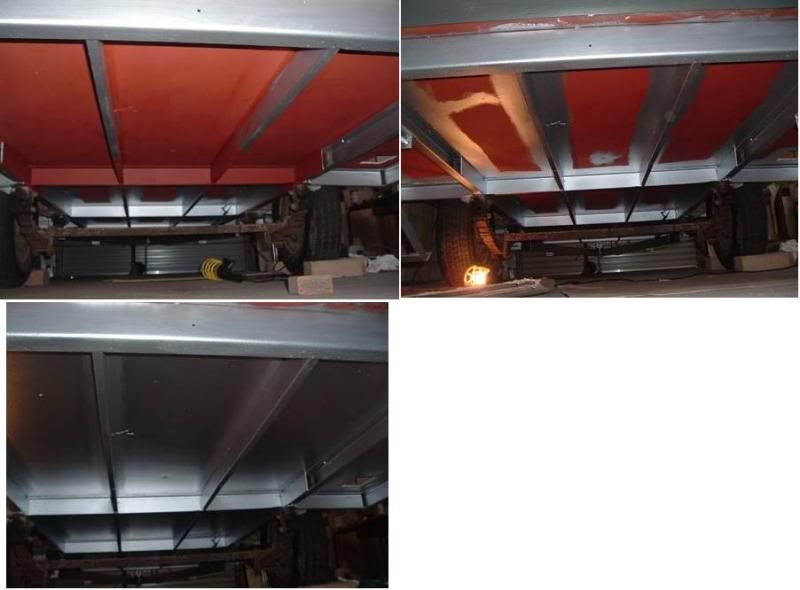 I purposely painted everything in the Aluminium colour so that if the van was ever upended in a cyclone, the silver bottom can function as a roof to keep the sun and heat out while the van is used as emergency accomodation  I also painted it all the silver colour because I was too bloody lazy to muck around using different paints. It's a big enough pain in the butt to be under there in the first place, so whatever gets the job done in the shortest possible time is just fine by me! ;D ;D And all of this effort just because of a stupid water tank!!!   cheers, Al. |
|
|
|
Post by atouchofglass on Dec 8, 2008 17:50:08 GMT 10
Hey Al The bum of your van is looking good    Paint something rude under there so when it is sky side up you'll have something to talk about ;D ;D ;D Red and silver ..... almost a Japanese theme there Perhaps a few lotus flowers or cherry blossoms underneath while your there Let your Michelangelo come out ;D ;D ;D    Cheers Atog |
|
|
|
Post by keelz on Dec 8, 2008 18:38:37 GMT 10
Al I quite like that silver look to the whole underside. mmmmm now you're giving me ideas....i'm very tempted to finish off my ply flooring with a lick of the chassis paint!  It's looking great, keep up the good work  keelz |
|
|
|
Post by mike on Dec 11, 2008 20:47:01 GMT 10
Greetings Al,  Just back from some touring up the coast and back. ;D ;D Thought I'd throw some more thoughts into the thread as I've had some experience in some of the stuff you've dealt with here. You're probably over it anyway, but here goes...  1. On the topic of the angled stand for the solar panel: (ours is mounted on the roof hatch) we find we need to charge the van battery while travelling from B to C (we don't use the car's alternator which is isolated from the solar panel), and you can't go off fishing and get the battery charged while you're away (possible theft of the panel if left out); the panel has to be stored safely somewhere?? inside the van when not used outside. (Also, our panel is moderately heavy and bulky to keep handling on a daily basis.) But the stand option is an easy fix for the problem of solar charging the van battery. 2. Bobt had a great suggestion about fitting wiring NOW up to the roof is anticipation of later hook-up to a solar panel, and you've used 12v garden lighting wiring which is relatively quite soft and a great choice of wire type for the purpose: the 240v wire installed for the 12v lighting is not so good because the copper is a lot harder and more resistant so as to not melt so easily when used for 240v purposes. However, our solar panel came with a 2m length of 12v wires sheathed in black plastic (which we painted white where needed) attached. We fed that wire through a drilled hole in the hatch, then across the ceiling (exposed) for 500mm into a cupboard where it was connected further to the regulator then on down to the battery: from the regulator to the battery the wiring again is exposed but relatively hidden being tucked into a 'vertical' corner. 3. Our water tank didn't even have breather holes drilled when we had to install a new one, but I reckoned that would create trouble with an internal air-lock when trying to fill it. I drilled one hole and used epoxy putty (Selleys) to mould a fitting (that looks like your one) that sealed in a small rubber hose that I extended to the edge of the van. The path of this hose forms an arc with its high point just under the floor, and then falling to the outside edge of the van: this is to avoid having water sitting in a low spot inside the hose when the van is not used. Now, when filling the tank from a hose, I can see its full when water starts streaming out that little hose, and I then pull the filling hose out of the filler. I plug the end of the small breather hose with a large 'self-threading' screw to stop small bugs flying into it to make their homes. 4. What a great solution (sheet of white plastic) to the missing ceiling light cover: I need one of them!! I'll be posting some photos shortly on our efforts at installing our solar panel etc in a separate thread. Cheers Mike ;D ;D ;D |
|
|
|
Post by millard1399 on Dec 12, 2008 18:18:49 GMT 10
G'day All, after five days, I've managed to crawl out from under the van to give another progress report. But first I have to take care of a couple of catch-ups... 1. bobt, sorry mate, I realised I haven't answered your question about the window winders. Yes, I think they can be rethreaded, so I'll be going to harass my younger brother (who has been involved in making and flying model aeroplanes/helicopters/etc for over 30 years, and who has a neat little machine shop in the basement of his house ;D ;D) 2. Mike, welcome back, sounds like you had a FUN time away (and I assume you had no time to spare a thought for those of us trapped inside our front fences   ) Your info on the wiring is much appreciated, however just to clarify that I've understood you correctly, you are saying the 12v garden light cable I've put in will be ok for future solar power, but the original figure-8 cable I've used for the internal 12v lights is not ok? Have I got that right? -------------------------------------------- So, on with today's progress report... After painting all the chassis and underfloor in the silver colour, the wheels and axle looks decidedly crappy in comparison. And so, you guessed it, my ol' brain says, "Heyyyy, I gotta idea!" [oh, oh] "Why don't we fix up all the axle and wheels? It'll be FUN!!" [why don't you just shut up!!] "Ah, c'mon, what else are ya gonna do this week! Tell you what, you go and get all the tools, and I'll sit here and plan the whole job out!" [Tell you what, you go and get @#$%ed, and I'll sit here and bludge!!]So I went and got all the tools...   and started to wire brush and paint various parts of the metal. After a couple of days of cramped conditions under the van, I bit the bullet and decided to dismantle the springs and shackles and get them out for a proper overhall... 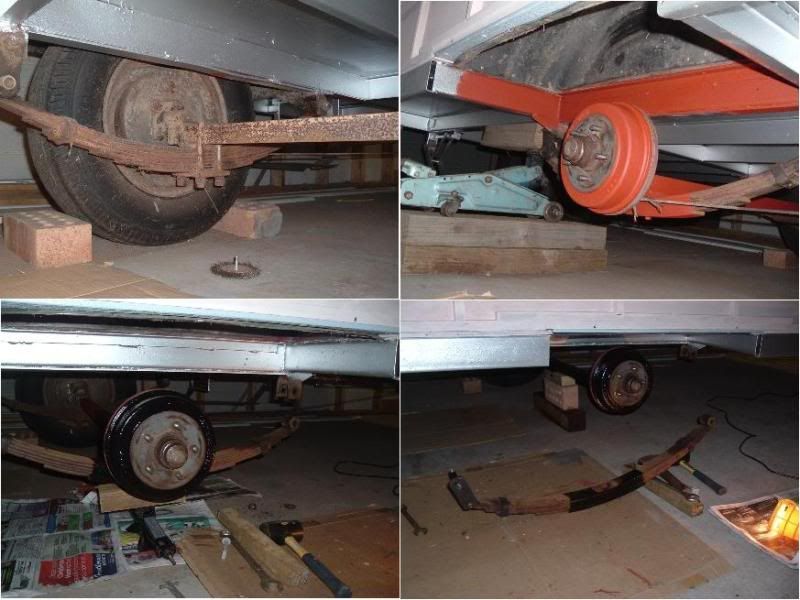 ...as well as clean up and paint the wheel... 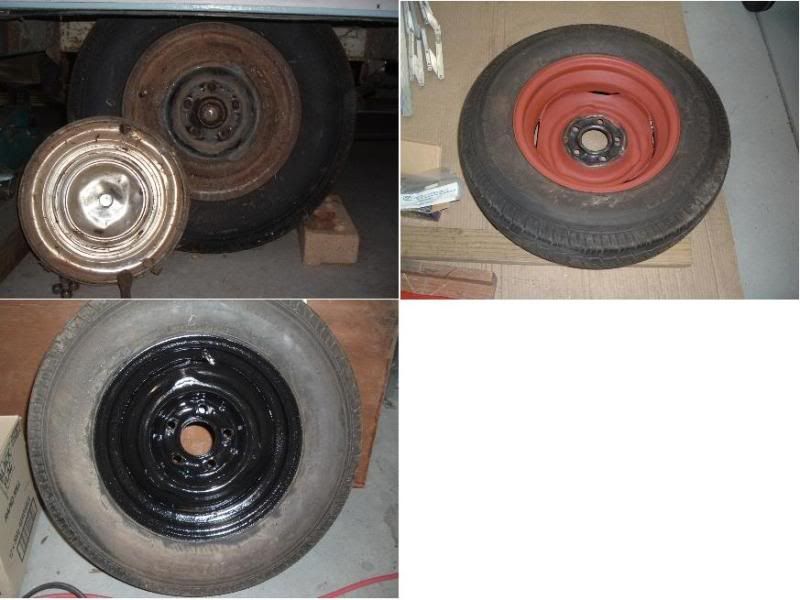 The grease inside the shackle bolts had coagulated into a dried solid mass. I had to dig it all out with a small jeweller's screwdriver and clean out the inside with a cotton bud soaked in turps. I doubt whether this van has seen a grease gun in a long, long time...   Bit by bit I'm working through degreasing/cleaning all the parts of the springs and then painting them. After 3 or 4 days (...I've lost count now...), I'm still working on one side, with the other side still to be started. Luckily, today was a day of constant rain, so a bloke might as well be under a van, eh? Can't do much else in this weather... cheers, Al. |
|
|
|
Post by bobt on Dec 12, 2008 19:34:50 GMT 10
Hi millard1399 My car club has a saying "Keep the shiny side up"   you sure have thrown a spanner in the works with this saying... ;D Glad you escaped from under neath ok. Its looking good. Keep it up |
|
|
|
Post by atouchofglass on Dec 13, 2008 6:12:03 GMT 10
Looking good mate Lookin good You have inspired me to take up the tools again and make a fresh start on the Olympic ...... again    Keep it up and you will be finished and sitting in my front yard in a fold out chair, beer in hand, shouting instructions on what to do next.... Atog... Get your lazy butt back in that van and WORK !!!!!! Damn it boy ..... don't make me stick my foot up your..... ;D ;D ;D ;D ;D ;D ;D ;D ;D ;D ;D ;D ;D ;D ;D ;D ;D ;D Cheers Atog |
|
|
|
Post by mike on Dec 18, 2008 19:39:01 GMT 10
Hey Al,  All this work going on is enough to get my head spinning. I'd rather be touring... whoo hoo!    Down to the nuts and bolts...  Regarding your 12v gardening wiring and the 'figure of 8' wire: I have assumed that fig of 8 wire is standard 240v electrical wire. I am not an expert at this stuff, (I think Keelz has that expertise) but, 1. I have been told that 240 v wire is very hard relative to 12v wire because it has to push a lot more volts/muscles along, and that that requires energy which at the 12v level becomes critical when under load. Softer wire of the garden variety enables 12v to be more efficient at delivering the energy round the system. That said, I would not rip out the 240v wiring that is just being used for 12v lighting, as you have said you'd be leaving it!! 2. Having said that the 12v garden lighting wiring was better than the 240v stuff, it would not have been my choice of 12v wire for wiring up anything in our van. I bought some 12v vehicle wire in the past at Repco, Auto One, and Supercheap. It was mostly used for wiring up stop, tail/clearance, and indicator lights on several trailers over the years. It was labelled "3mm 16/0125". This is multi-strand wire (perhaps it means 16 strands of very thin wire measuring 0.125mm diam each?), sheathed in coloured soft plastic, and the outside diam is 3mm. This would be the wire I'd use for future 12v low current eg lighting. To wire up our 12v DC -> 240v AC (300 watt) inverter, which I knew needed to have the least resistance in the wiring hookup and carrying a possible peak 20 amps or 250 watts from the car alternator all the way into the van... and suffer the least voltage drop possible (ie to be not less than 12 v at the inverter connection in the van), a much bigger wire was needed: (and this was the minimum, because I'm a bit of a cheapskate@#*), the label reads LOW TENSION CABLE, 7.5M, General Purpose Automotive Wire, 4mm 20 AMP 26/ 0.25mm. This again, is a multi strand wire. Up to 6mm was a possibly better size for this purpose, but the 4mm has been successful as fitted. Anyhow see the new thread on this topic when I finally get to posting it in a few days or so. However, one final note: iF you decide to pull out the 12v garden lighting wire, the size of the solar panel you install will determine the size of 12v (low tension) automotive wire you use for hooking it up to your van battery. As an example, our panel can charge up to 40 watts on a clear sunny day. That's about 3.3 amps [AMPS = WATTS/ VOLTS] . So the 3mm auto wire above is ample for our system. (Larger panels producing higher charge rates will need assessment as to adequate wire size). Hope this has been useful. ALSO, now that you have your water tank out of the van, if you don't have a powered water pump installed in your sink, you might like to consider an easy retro-fit before you re-install the tank. Again, I'll outline that with some piccies (hey, hey!!) on a separate thread as well, in a few days or so... I hope!! Cheers Mike ;D ;D ;D |
|
|
|
Post by millard1399 on Dec 21, 2008 16:28:04 GMT 10
Mike, thank you so much for the information about the wiring. As I've said before, this part of the van can end up being quite complicated getting it all right, eh? I'll digest all that you've written and work out where to go with it all. Maybe a good quality torch would eliminate a lot of the problems with choosing the correct wiring??   -------------------------------- And so to the latest update on the Millard... A lot of painstaking work has been done to complete just one side of the axle and wheel. There were so many bits to clean up and paint separately, and it seemed like the job was never going to end. However, despite distractions from Xmas parties, plus working on the shed stormwater system, plus building a replacement boundary fence, I managed to keep plugging away and finish the offside of the van. Here's the photos showing the side I've still got to do, and the other side all put back together, with fresh grease in all the shackle bolts... 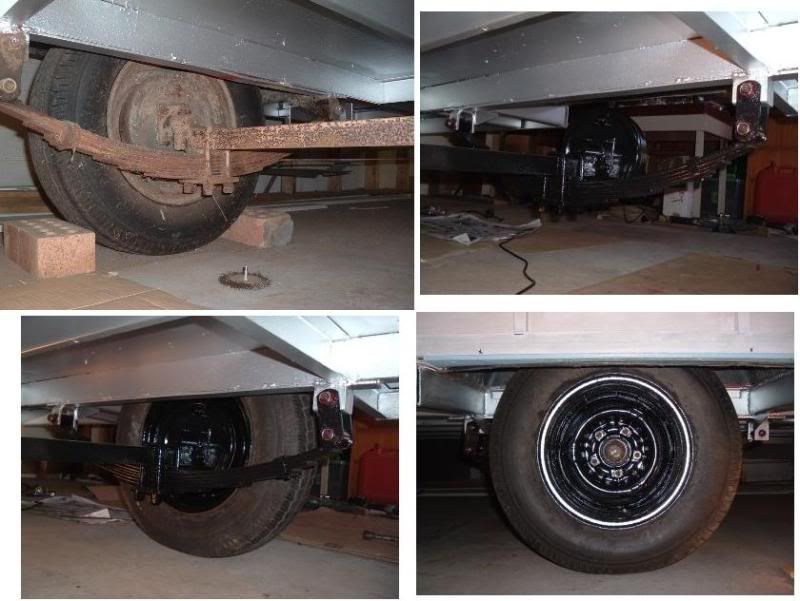 No, the bright ring around the steel wheel centre is the camera flash, not a fancy new white-wall steel rim, ha ha. I also spent some time with a small artist's paint brush and repainted the black rings around the hubcap. This photo group shows the before and after... 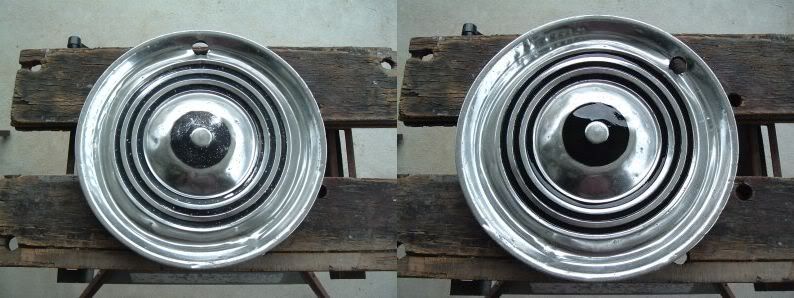 The hubcap facing is aluminium clamped onto a steel ring around the outside. The ali facing is fairly pock-marked from wear and tear over the years, but it now looks a little bit more like new. Having 'practised' on the one side for the last two weeks or so, I now have the joy of doing the other side of the axle. Hopefully I've learn't a few shortcuts... cheers, Al. |
|
|
|
Post by atouchofglass on Dec 21, 2008 17:51:37 GMT 10
Hey Al Two weeks solid work .....   D@mn !!!!! Not looking forward to doing that little job on the Olympic...    You've done a marveloooos job there Any chance of coming over here for a month and doing the Olympics axle and drums??? What's that you say? Go and get ... What you say? Fair enough ...  One van's running gear is enough ..... for the moment.. Yes you're right ... I need the practice    The hubcaps have come up a treat    Amazing what a lot of TLC and elbow grease can achieve.... Keep at it mate Looking forward to the next installment Cheers Atog |
|
|
|
Post by millard1399 on Dec 21, 2008 20:30:02 GMT 10
Atog, in an ideal world, we would jack our vans up all round and remove the axle and springs and have them grit/sand blasted by someone in a couple of hours. But from enquiries I've made in my area, that can cost a couple of hundred dollars plus you have to transport the bits there and back. What I should have done from the start is dismantle the springs and fittings from the axle, rather than persevere trying to rotary brush the metal while lying in a cramped position under the van. It's just too d@mn hard doing it the way I started. The backing plate for the brakes has all sorts of little nuts and fittings which are not easily accessed when the springs are in position, plus bits like the spring U-bolts are hard to clean all round as well. It was certainly much easier once I bit the bullet and pulled the springs out of position. That also allowed me to clean up and paint the chassis brackets for the shackles properly. Judging by the amount of insect cocoons, webs, etc, behind the hubcap and at the back of the wheels, my van has been stationary for quite some time, so the axle assembly really needed to have a proper and total overhaul for painting and greasing. Speaking of insects, when I took the nearside wheel off today in readiness to do that side, the back of the wheel centre had some sort of insect mound made from clay stuck to it. Don't know what type of insect makes this sort of home, but it was further evidence that all sorts of creepy crawlies had decided to make this van their home... 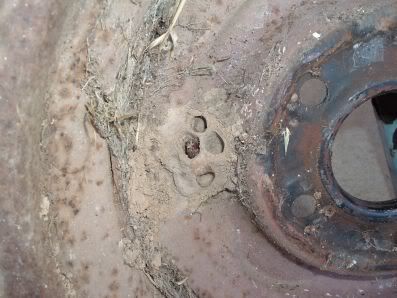 All in all, when you're in the midst of restoring the axle/springs/etc the job really sucks, but once you're at the end of it, the result can be rather satisfying. Only problem is that no-one can normally see under the van to appreciate the effort that is put into restoring that part...   cheers, Al. |
|
|
|
Post by millard1399 on Dec 28, 2008 17:59:33 GMT 10
They say xmas can be quite a stressfrul time, and it certainly was for the Millard. It fell apart on xmas eve, underneath the nearside...couldn't handle the pressure...  But...you'll be please to know I've taken care of the situation, and have got it well primed for New Year's Eve... ;D ;D 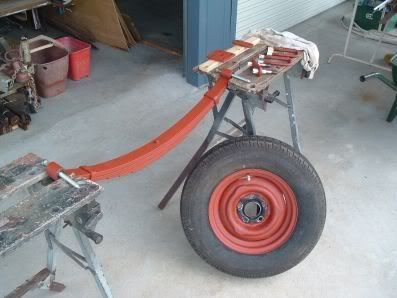 [comedy?...don't give up your day job! [comedy?...don't give up your day job!   ] ]cheers, Al. |
|
|
|
Post by kiwijim on Dec 29, 2008 5:31:55 GMT 10
G'Day Al, that's a very good job you have done on the spring and wheel, I am just wondering....is that Red lead paint you have used ? the reason I ask is that I have tried to buy some to paint the chassis of the THOMSON, but have been informed that this paint has been banned from use and is no longer available, It's good to see that you took my advise and painted it pink, ready for use in the SPRING ;D ;D ;D cheers kiwijim  |
|
|
|
Post by millard1399 on Dec 29, 2008 8:17:19 GMT 10
kiwijim, when lead was banned in paints, they switched to an oxide formula, and metal primer paints are now generally marketed as "red oxide" primer paint. This one I'm using is from a small independent paint manufacturer based in Sydney, and so far seems to be quite good quality. I managed to get it for half price earlier this year when a local hardware shop was closing down. Can't resist a bargain!! ;D ;D
cheers,
Al.
|
|
|
|
Post by millard1399 on Jan 2, 2009 15:01:31 GMT 10
Now that all the partying is over, it was time to get back to some serious work. After a bit of black paint was applied, the nearside axle parts could be reassembled... 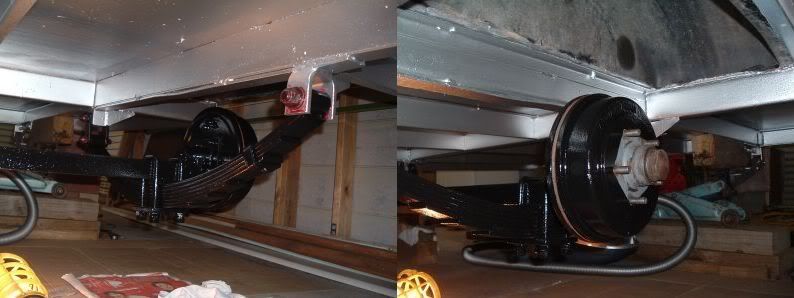 And that's just about it for painting all the chassis and axle assembly. Who's a happy boy NOW!!?? ;D ;D Just need to connect the brake cable back up again, and I reckon I can tick this whole job off as 'complete'. It'll be nice to be able to work 'above ground' again on other bits of the van.   cheers, Al. ...although there is that d@mn water tank to finish off...   |
|

 ;D
;D


 ). I also had to file the diameter of the rivet head down on a couple of them, because the head sits in a recess (...and guess what, you can't get small diameter head rivets anymore either
 )
)
 ;D
;D


 ). I also had to file the diameter of the rivet head down on a couple of them, because the head sits in a recess (...and guess what, you can't get small diameter head rivets anymore either
 )
)


