|
|
Post by keelz on Sept 12, 2008 16:07:16 GMT 10
|
|
|
|
Post by millard1399 on Sept 12, 2008 17:35:19 GMT 10
Yeah, no worries Keelz, bring your van over!   It'll be 4th in line behind the Millard, a 1956 Franklin, and a late '50s Castle van! ;D I was thinking of going to a transplant surgeon and getting an additional pair of arms sewn on...oh, and a smaller 5th arm at the back so I don't have to stop to scratch me bum! ;D ;D But luckily I'm likely to live till I'm 137 so there's plenty of time (just) to get through all these projects!   Holiday!!??...who's got time for a bluddy holiday!!?? cheers, Al. |
|
|
|
Post by millard1399 on Sept 23, 2008 22:24:19 GMT 10
Well, here we are again, back from a week's R&R and supposedly refreshed and rearing to go with work on the Millard (...but then why am I finding excuses to delay getting back into it??!!...must be the thought of the life I could have if I was somewhere else... ;D ;D) Anyhoo, before I left last week, I was in the process of testing the fridge on elect and gas to see if it worked ok. Was good on elect (3 deg in the freezer, and 6 deg on the floor, with the temp control set at the mid-point), but the gas regulator was totally cactus with leaks. While I was away, I took the opportunity to pop into a "specialist" gas supplies shop and asked for a replacement regulator and hoses to suit. Came away $114.70 poorer, but with what is apparently the latest "Rolls Royce" regulators... 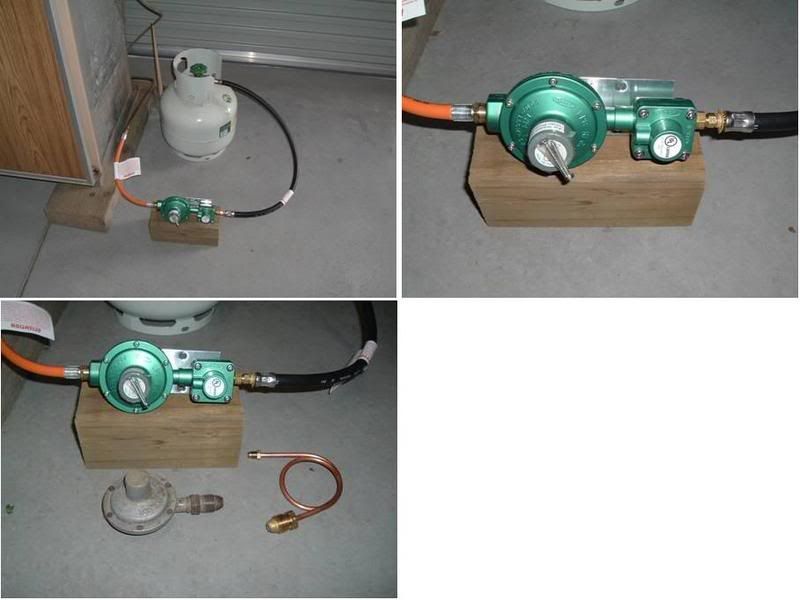 It has a double regulator in it so that if one breaks down the other one acts as a backstop. This alone cost $80 (I think it's made of gold under the green paint  ), and the orange hose with the special male outlet fitting was $9.70 and the black inlet hose $25. The regulator came with the little copper tubing fitting you see in the bottom photo, for coupling the reg to the bottle. But I opted for the black hose to allow for an easier screw-in process to the bottle. The orange hose carries a label saying these hoses are not intended for "permanent" use, and should be changed on a frequent basis...this one by 2013. So if you've got old hoses on your van, older than 5 years, it might be worth considering the implications (not to mention the explosions  ) Now I've been able to test the fridge on gas, and it works a beauty! Can get it down to zero in the freezer on max control setting, but hums along at 2 deg on mid-point. This fridge is in very good condition for something that's 30 years old!   The other thing I did before I left was to rotary brush and paint the seat hinges for the seat flaps. Here's a photo showing the originals in the top (the one on the left is after brushing), and how they came up after painting (using chassis paint), in the bottom photo... 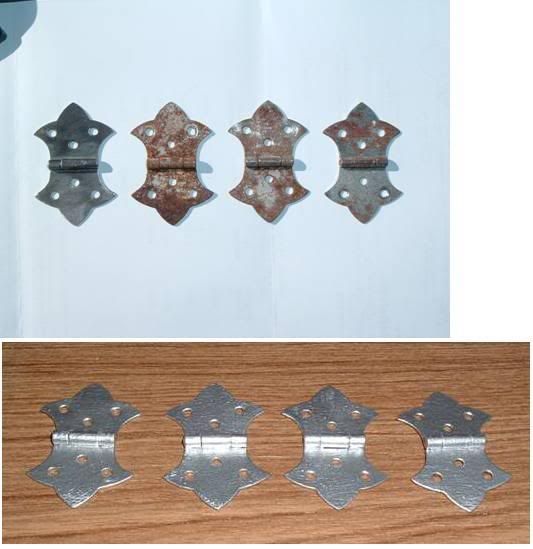 It was a good test to see how well some of the rusty bits on the van might come up after a good brush-off and some silver paint. I'll get stuck into a few other bits of metal down the track...just as soon as I can get myself off this deck chair...   ;D ;D cheers, Al. |
|
|
|
Post by keelz on Sept 23, 2008 23:28:55 GMT 10
Hey Al, A word of warning on the black flex hose vs the copper pigtail hose upstream of the new $$$ regulator..... The reason why they supply copper pigtail to fit from the POL bottle fitting into the regulator as opposed to a rubber flexible hose (from what i have learnt reading on other forums and doing some 'googling') is that the rubber hoses have a tendancy to break down and clog up you're regulator with crud (or perhaps is attacked by additives/chemical components of the lpg as suggested by some). Some people also suggest mounting the regulator in a certain vertical orientation, not sure if this is to do with moisture sitting inside the regulator. The copper pigtails are more awkward in terms of installing/removing however it won't contaminate your regulator, one less thing to go wrong i guess. I'm a bit of a sceptic/cynic, however after reading some of the experiences other people have had on other vanning forums with regulators failing, i've changed my setup. I've now got mine setup so that regulator has a POL fitting and goes straight into bottle, with a flex hose after the regulator outlet to connect onto the vans copper line. I take the whole lot off the van when not in use and store the regulator inside the van. I'll replace the flex hose every 2-3 years as it shows signs of perishing etc. I started taking a closer look at new vans in the magazines and they also run copper pigtails from bottle/s to the regulator. Aren't the regulators pricey?!? i just replaced mine 2 months ago - OUCH!  I paid from memory about $65 for just the plain jane version..... In Yoda voice "me thinks a cartel is at work".....the thing will probably turn itself into scrap metal 3 days after the warranty expires also. Nice hinges! Nothing a coat of chassis paint won't fix ;D cheers Keelz |
|
|
|
Post by atouchofglass on Sept 24, 2008 6:48:40 GMT 10
Greetings Gents
Thanks for posting the advice on regulators and the copper pigtail.
Hadn't given it much thought but will be looking into it when I reach that stage
Cheers
Atog
|
|
|
|
Post by millard1399 on Sept 24, 2008 20:09:31 GMT 10
Keelz, thanks for the heads-up about the black flex hose. Looks like it makes a lot of sense to use the pig-tail fitting instead. I only bought the black hose because it had the collar around the screw-in nut to fit the bottle...much easier to turn by hand than having to use a spanner on the nut. Luckily the black flex won't be wasted...I can use it to whip myself whenever I slow down on the Millard job   ( Carn ya lazy bludger!! [WHACK!]) cheers, Al. |
|
|
|
Post by keelz on Sept 25, 2008 20:39:05 GMT 10
No problemos gents thats what this place is all about - sharing the good oil  Al watch out - those brass hose ends will leave marks! ;D I'll borrow the hose from you - i'm only 1/3rd of the way thru my 'chassis blitz' and i'm struggling for motivation....  I liked my old regulator which also had the hand wheel around the POL fitting to screw into the gas bottle - great when you run out of gas you don't have to go hunt down the shifter out of the toolbox half way through cooking dinner, which old mate 'Murphy' made you forget and leave back 500km away at home on the workbench.  So, what i did was to buy a Gas-fuse with the handwheel nut fitting on the end that screws into the bottle. I've then got my regulator screwed into the Gas-fuse and then flex hose attached after the regulator. When i need to pull the gas bottle off the van for storage or swap the bottle while travelling, it means i can quickly un-do and re-install without having to hunt down Mr Shifter  cheers Keelz |
|
|
|
Post by millard1399 on Oct 4, 2008 16:18:43 GMT 10
Keelz, if you're out there reading this, I can highly recommend the black gas hose as a 'motivator' to get cracking on your van! After a number of days of attempting to head towards the garage, only to veer off at the last step and go do something else, I had to give myself a severe "whuppin'" with the hose to focus my attention back on the van! ;D ;D All was not lost though because I did manage to get a couple of other jobs crossed off the 'Gunna-doo List'.   Then it was back to the van with a vengeance. I cut and shaped some timber to put at the front of the van. Originally the front wall panelling was anchored at the bottom by staples fired through the panelling into the end of the floor. I wanted to have a bit more 'meat' there to allow the new panelling something more substantial to anchor to. I also decided to put some anti-slip matting inside the seats to give a bit more protection to the floor from storage of jockey wheel, wheel brace, etc under the seats... 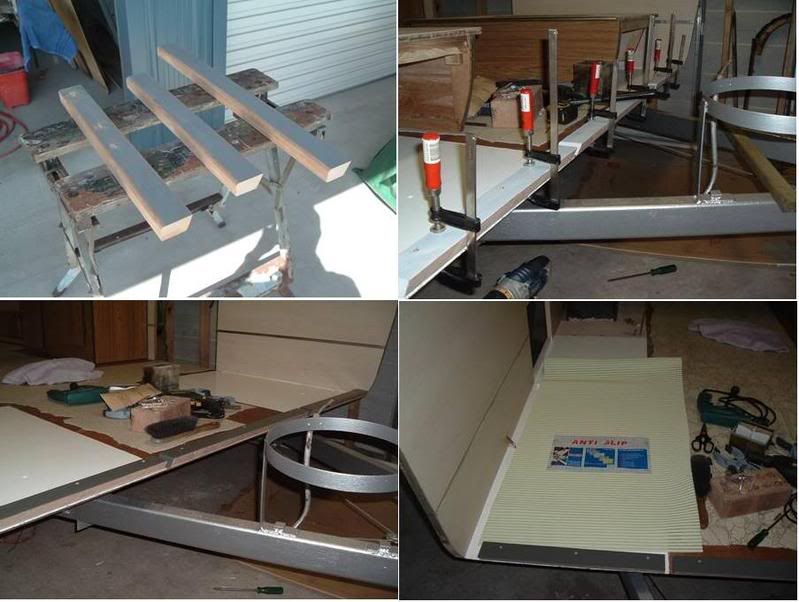 Next came the front seats. There is a plastic cover strip used throughout the van, which on the seats had cracked in various places. Needless to say, you can't get this sort of stuff anymore, so I had to 'think outside the box' a bit, and I found some second hand plastic joining strips at the Second Hand Yard. These joining strips are used when people put wall panelling into their homes. I carefully cut the centre fin out of the strips, leaving a nice right-angled cover strip to use. The bonus was the cover strips had a woodgrain pattern on them which was very compatible with the original panelling in the van. These photos show the cover strips being replaced. You can hardly detect the 'new' strip in the bottom left photo   ... 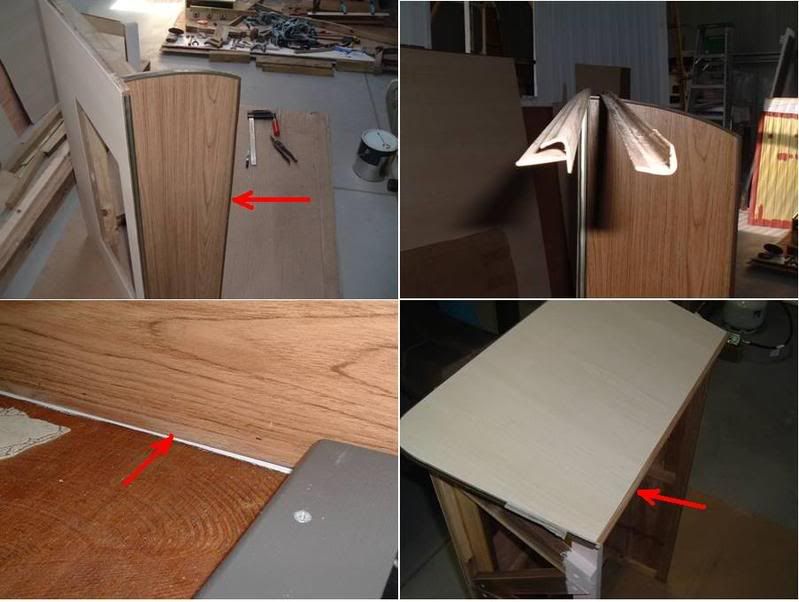 Finally, the seats were then fitted into position, screwed into place, and the seat ends fitted in position as well. If you place your hand over the top half of your eyes when you look at these photos, the job doesn't look too bad, heh heh... 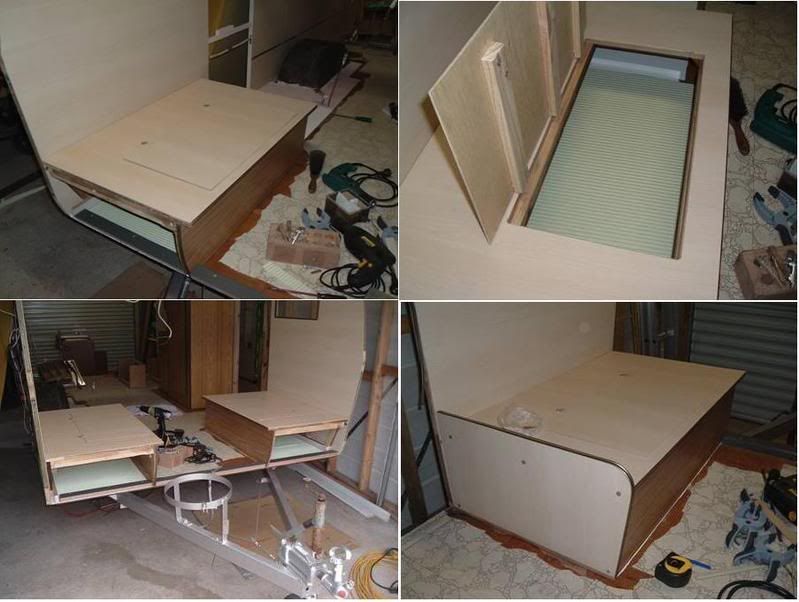 Who would have thought a flexible hose used in an appropriate manner could achieve so much?!! ;D ;D cheers, Al. |
|
|
|
Post by atouchofglass on Oct 4, 2008 19:01:13 GMT 10
Hey M1399 i tried the black hose thing.....       apart from a tingle in the cheeries...... and a good smile on the dial....... Not a lot of work got done ;D ;D ;D   The Poptop is starting to come together Your doing a really good job and will reap the rewards soon enough Perhaps a pat on the back is in order Instead of a hose whipping ........ that is unless you like that sort of thing ;D ;D ;D ;D ;D cheers Atog |
|
|
|
Post by keelz on Oct 4, 2008 21:07:52 GMT 10
3 cheers for the black flexy gas hose! ;D ;D ;D hehe
Great stuff Al, the progress update pics look great.
good idea about the extra fixing strip down the base of the walls, will certainly make life easier when putting the cladding back on.
inspiring just watching it all come back together!
cheers
Keelz
|
|
|
|
Post by millard1399 on Oct 6, 2008 21:00:35 GMT 10
atog, you might have been holding the wrong end of the gas hose!!   Ya gotta hold it so the hand-wheel end hits you right where your tear ducts are connected to your scream box!! Worked a treat for me, so-much-so that today on a PUBLIC HOLIDAY here, I managed to complete a little job that will allow me to put the kitchen cupboards back in. The sliding cover over the stove had the screws pulled out of the dreaded @$%*&board stuff it was made of. Decided to get the "heavy artillery" router out and rebate the damaged section away. Inserted a hardwood strip and glued into position. A bit of estapol to seal the new strip, and Bob's your Aunty. Now the little nylon runners can be screwed into the hardwood strip... 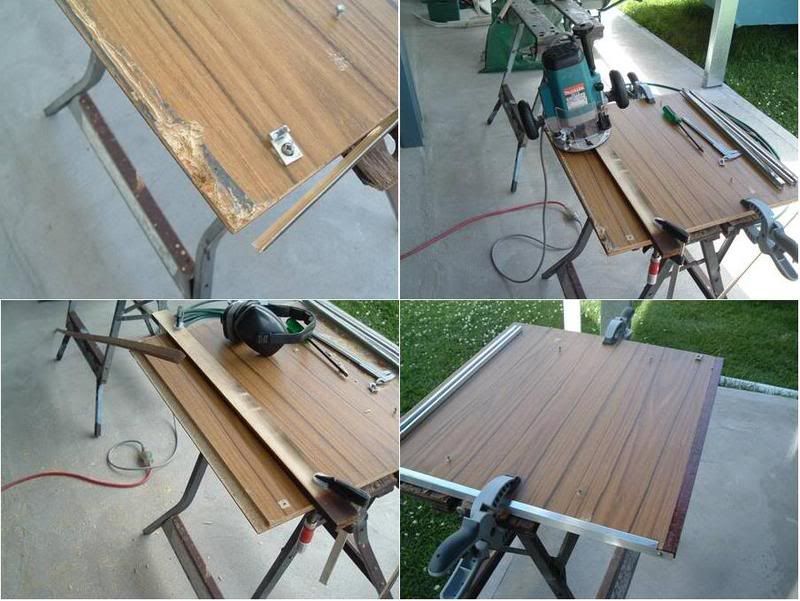 Tomorrow I can start putting the cupboards and sink, etc back into position... cheers, Al. |
|
|
|
Post by atouchofglass on Oct 7, 2008 6:21:15 GMT 10
mmmmmmm wheel end.....    Now there is the difference ..... You see a challenge to overcome and fix the door Me? Throw it away and make a new one... I like your work.... very impressive Keep it going and she'll be on the road turning heads in no time Cheers Atog |
|
|
|
Post by millard1399 on Oct 10, 2008 17:04:05 GMT 10
Well, lookee here...almost ready to cook dinner in the Millard!!  I gave the sink a good scrub, and dismantled the tap for a thorough clean. The smaller tube in the tap has almost perforated near one end from corrosion, so it looks like a new tap will be required in the near future. Then the whole kit and caboodle was put back into the van. The sliding stove top that I repaired the other day was fitted into position, and everything looks how it should be. I can smell those sausages cookin' as I type...mmm mmm ;D ;D 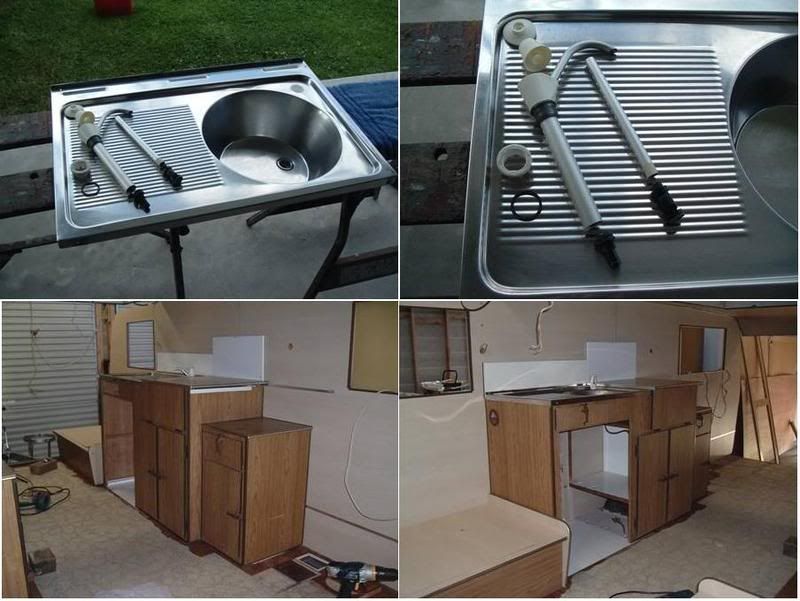 Anyone seen the sauce?? cheers, Al. |
|
|
|
Post by keelz on Oct 10, 2008 20:42:32 GMT 10
That sinks cleaned up nicely Al and the joinery is coming along well. pity about the tap  I haven't come across a van yet of this age which still has a working hand pump tap! at least they still sell the replacements.  cheers Keelz |
|
|
|
Post by atouchofglass on Oct 11, 2008 6:36:41 GMT 10
Bacon and egg sanga please    The new and improved version of your sink After all those years of service she deserves a new fitting or two.. So the new tap will brighten the sink up even more    Often think when repairing stuff like sinks and proudly showing the wife ..... It's like saying "Hey Honey look a new place you can work" ;D ;D   Looking good Al keep at it and you will be finished in no time Well enough of this back slapping I need to get out and do some work on my van Now .... where's that hose..... mmmm wheel end.....     Atog |
|
|
|
Post by millard1399 on Oct 22, 2008 20:17:04 GMT 10
G'day All, I've been a bit slack updating this thread, so here's a long-winded post to catch up...  It seems like it was "years ago" that I built the new front window frame, but I finally arrived at the point of reconstruction where it could go back in. First I decided to put a piece of cladding back on temporarily and check the outline of the cladding with the outline of the new side frame... 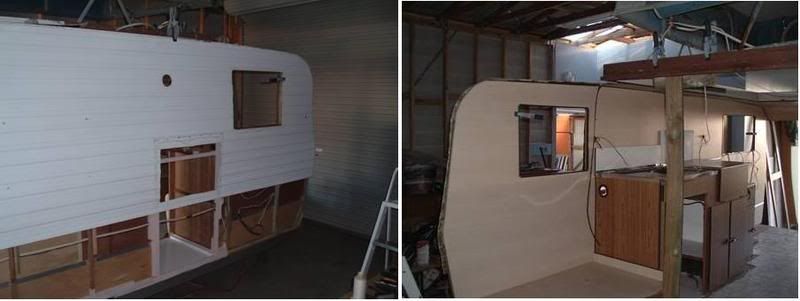 It's not "perfect", but I'm sure the use of my trusty sledgehammer down the track will encourage any misalignments to fit properly!   Then I fitted the widow frame into position and screwed it into place. It looked ok, so I then cut the ceiling panelling and nailed that into position. The tricky bit here is bending it around the front curve, but using a couple of clamps on a long piece of timber spanning both sides, I was able to progressively work my way around the curve, nailing the panelling behind as I went. This photo group shows the window in position, and the ceiling sheet being fixed... 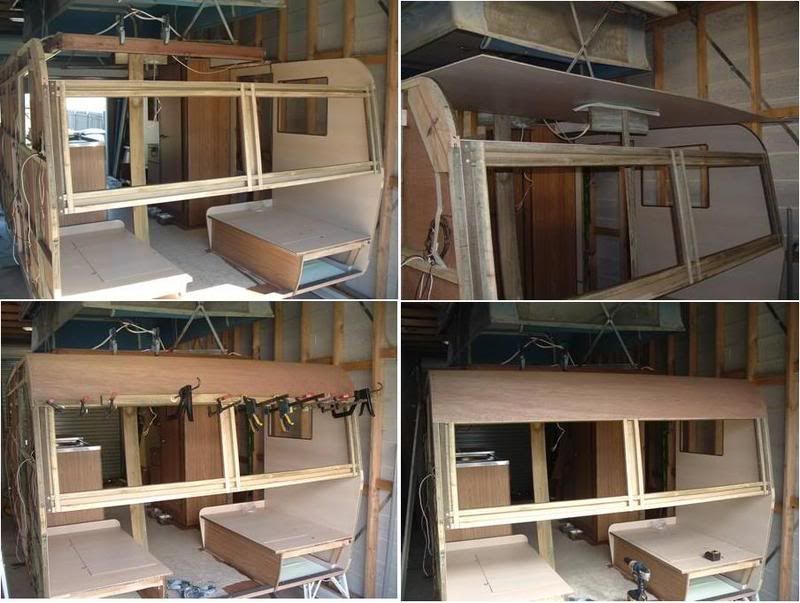 The van is starting to look something like it did originally, so I guess I haven't stuffed up completely yet. Gotta be happy with that! ;D ;D Next came the new ladder frame that sits on top of the roof and supports the ceiling panelling as well as the pop-top frame opening. The old ladder frame was damaged by water, so a new one was necessary. I went to the local Second Hand Yard, and found a couple of door jambs made out of oregon timber. This is a good timber for strength versus weight, and the oregon in door jambs is straight grained and knot free, so is ideal for this part. I cut the jambs into strips on my trusty table saw, and a few seconds later (...I wish!...) a new ladder frame appeared. This photo group shows the old frame, and the new one made up and fitted into position... 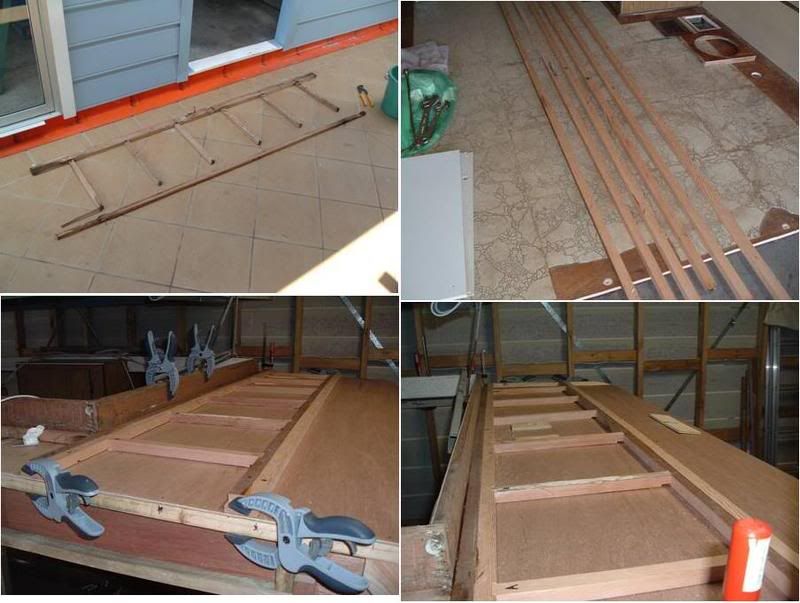 I modified the design of the ladder slightly, and made it a bit longer so it sits on the side frames, rather than being butted to the frame and stapled in position as it was originally. Now the weight of the ceiling and pop-top frame is supported by the van sides. With everything looking pretty good so far, the final bit was to put the new top rails on top of the side frame and lock them down onto the ladder frame ends. Now the whole framework is one interlocking unit. This photo shows the new top rails going in, and a little side job I did to repair some rust damage in the base of the light fitting where water had leaked in. The tin of chassis paint is copping a real hiding wherever the dreaded rust has shown its face... 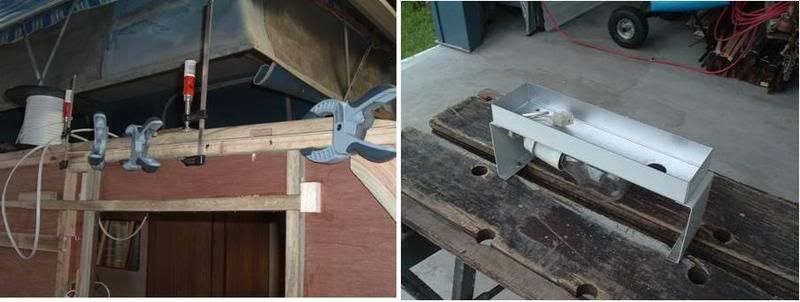 So there you have it. I've already progressed beyond these photos and am part way through making the panelling section for the lower front wall under the window. I'm also in the midst of painting the "backside" surface of all the panelling at the front before I put the new wiring into place. See you all next time... cheers, Al. |
|
|
|
Post by keelz on Oct 22, 2008 21:48:29 GMT 10
Al you are going to know this van inside and out once you have finished.  You should be writing a DIY book on how to re-build timber framed pop-tops  look forward to the ceremonial smashing of beer bottle across the bow! Brainwave..... You can use that black gas hose we talked about to attach to the beer bottle, hang it from the roof of the shed to swing the bottle as you drive it out of the shed on maiden voyage(after you have finished whipping yourself of course! ;D) photos look great  cheers Keelz |
|
|
|
Post by atouchofglass on Oct 23, 2008 6:11:45 GMT 10
I heard that black hose was kept by his favourite girlfriend .... "Madam Lash" from the pleasure and pain emporium ... masters of fine leather crafts ;D ;D Mate hats off to you for the amount of effort being put into rebuilding the poptop.    The idea of tying all the frame in to support the roof ..... excellent A bit of lateral thinking there Keep at it and you will be rewarded for your efforts Thanks for the photos and the update Cheers Atog |
|
|
|
Post by millard1399 on Oct 23, 2008 17:13:28 GMT 10
Hey, how about this?!!...a "limited edition pink Millard"!   ;D ... 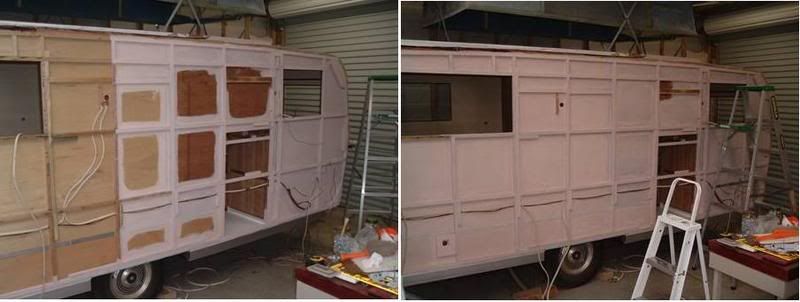 But that's enough mucking around   ... time to get serious with a question to all you experts out there. I'm at the point where I'm ready to put some of the wiring back into position, and I was mulling over what modifications I could put in place to allow for other options for 12 volt supply. The photo on the left shows the wiring loom coming from the tow bar up into the van wall. The black and white cables are the 12v feed and earth return wires. I was thinking of drilling a small hole in the wall panelling (red dot arrowed), and feeding a loop of each wire through the hole and into the seat box on the other side (right hand photo)... 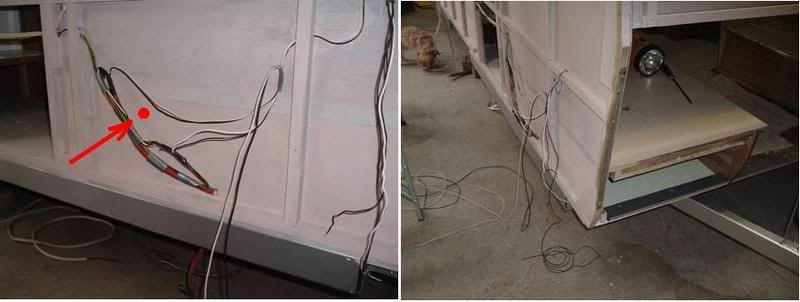 This would allow the possibility of later cutting the loop and setting up a battery in the seat box, with a 2-way switch to allow the option of drawing 12v either from the tow vehicle or from the internal battery. (Hope I'm making sense). Am I thinking along the right track, or should I be doing something totally different? Any thoughts would be appreciated. I'm just looking to maximise the opportunities while I've got the van in its present state. Better now than later when the van's put back together, thinking: "Aargh! I shoulda done this and I shoulda done that..." Over to you for your opinions... cheers, Al. |
|
|
|
Post by atouchofglass on Oct 23, 2008 18:46:24 GMT 10
Hey Al Makes sense to me .... But I'm no expert in electrics Perhaps put a cover or box over the loop to keep it from damage. Make an extra long loop to allow for the wires to be pulled through and used.... Joining it would be a pain and untidy.... But by the looks of your preperation.... You already would have thought of that   Cheers Atog |
|
|
|
Post by keelz on Oct 23, 2008 20:15:32 GMT 10
Don't know about the pink, unless you want to enter her as a float in next years Mardi Gras ;D ;D ;D a good preventative to future rot  Ok down to business. Al, you're spot on with the 12v planning. I'm currently mulling over the same setup for wiring on my van and where to cut-into the existing 12v circuit to install a battery setup so I can juice up the 12v lights in the van for free camping without 240v power and not having to leave the van connected to the tow vehicle draining it. Yep, break the positive wire feed from the draw bar 7 pin plug near your seat box. Solder on some new wires of min. equal size/capacity and feed into your seat box. Solder/Connect a new earth wire onto the existing earth wire in the wall cavity and leave this terminated in the seat box perhaps in a junction box for future connection to battery setup. As Atog has suggested need to protect/insulate those new connections once completed so you don't have a short in the wall cavity. Use soldering to avoid loose/dodgy crimp connections and minimise voltage drops. Run the new positive loop wires into your seat box and install a decent rated amperage toggle switch (or any similar switch with 3 pins (could be a 2 or perhaps 3 position switch eg an On-Off-On ) that allows you to select the positive supply source from either a) the wire from the van's tow plug (power from car) or b) a future 12v battery inside the seat box - if it's just 1 or 2 12v led lights you could fit a small 12v alarm backup battery that has a 240v volt trickle charge to keep it maintained. This allows you the option later to add sealed battery, bus bars, fuse holders etc later on that could also feed a 12v control panel eg for water pump, lighting, radio, tv, etc. You could then remove the change over switch and the existing van 12v wiring circuit you are tapping into would simply be connected up to the new battery setup with it's own dedicated fused circuit if you decide to go the whole hog  In the interim, check if the positive wire running back to the draw bar has been terminated onto one of the pins in the tow plug (most vans these vintage it seems they used to wire onto the reverse pin. Then have the spare pin on the tow car socket juiced up for constant or switched 12v feed with a fuse near the car battery. This will let you feed power to the van from the car if you want without having to have a full battery setup in the van immediately and will allow you to switch on some 12volt lighting - eg while on the road or short stays. If you used LED lighting you could do this quite comfortably without flattening your tow vehicles battery. You want to make sure that when you throw the switch over to battery source it disconnects the wire that run back to the vans 7 pin plug. This way you won't have a van battery and cars positive feeds being electrically connected resulting in some unwanted side effects. Is there any existing 12v lighting in the Millard? ? (On my Viscount there is a different coloured set of switches for the 12v globes in the internal and external dome lamps). I have replaced the globes with new LED style replacement globes that use far less power than normal incandescent 12v globes. Should add - before you re-install the external cladding, now is the time to consider if you want to install any new low voltage lighting around the van - eg reading lights, downlights, etc - so maybe run/rough-in some extra low voltage cabling around the van walls, simply parallel splice onto the existing cabling where needed... just a thought. Hope this aint all too confusing - apologies for all the waffling on!   |
|
|
|
Post by millard1399 on Oct 23, 2008 22:25:18 GMT 10
Atog and Keelz, thanks for your thoughts. Keelz, I'm gonna have to try and work through your advice bit by bit to make sure I understand it all   I'll come back to you for further clarification if necessary, but I get the gist of what you are saying. Sounds good to me. The existing lighting in the Millard is as follows: Above the dining table and above the bed are identical light fittings (that's the metal housing I repaired the rust in...the photo's a few posts above). There is a 240v globe and a 12v globe in each housing. The third light fitting is the round one outside the door, and this also has the 240v/12v combination. I have plans to put another light above the sink/stove area but I'm still working out what the best way of doing this is. Once I put the overhead cupboards back in above the sink, I'll have a better idea of how much room I have and what sort of light fitting will best go in that area. I think I have some downlights in the shed that might suit the van, so I'll have a look around tomorrow and see what I can find. I'll come back with some further questions about lighting once I see what stuff I've got to work with. The other question I had about wiring was about TV cable. Is it worthwhile putting any aerial cable in the framework and a socket plate in the wall, or do people just whack an antenna up and run the cable through a window? Any other wiring/cable I should be thinking about? I'm not looking to make the van into a NASA mobile space station  , but anything that makes good sense that I should be considering... Thanks again fellas, cheers, Al. |
|
|
|
Post by keelz on Oct 24, 2008 14:05:57 GMT 10
no probs Al, just give us a hoy if u need any help. I did a few years at Tafe doing Electrical tech. so anytime u need assistance just holler.
be careful adding downlights if the downlights you're thinking of are 12v halogen. If you splice onto the existing 12v wiring in the van there is probably not enough capacity in the wiring already installed which will result in heating up the cables and maybe causing some damage later on. So couple of options - run some more reading lights or downlights in LED type fittings off the existing 12v cables or if you want to install more power/amperage hungry halogens you would be best to rough-in new dedicated cabling and switching with wires running back to your proposed 12v source in the van eg battery box for future connection.
TV is changing a bit - particularly with the new better grades of coax coming out and the changeover to digital on it's way. A lot of people recommend the straight thru wall type connections(which can be installed after the cladding is re-installed) as distributed by Explorer antennas i think or Happy wanderer. Gives you a F type coax socket on the outside of the van that you can either hook your antenna up to or a coax lead from the van park Tv outlet (some parks now have a tv point on the power pole) and a screw type outlet on the wall inside the van that you plug your tv or set top box straight into. The less amount of connections apparently less signal drop and less chance of problems particularly in weak signal areas.
I chose the cheap option hehe ;D - went to Bunnies and mounted a surface mount socket just under the floor of the van at the front underneath the tv cupboard with a little rubber 'booty' that fits onto it when travelling. Then i ran high quality thick insulated coax cable up inside the cupboard onto the bench where i hook up the tv when away. You could have a loose tail of lead or surface mount a socket on a wall or benchtop. You can buy short pre-made cables with the male screw connectors at each end ready to go......kinda saves a lot of time buggering around stripping and soldering coax.... my setup has worked fine with a caravan park tv cable and my explorer antenna on the mast pole.
caravansplus stock all the different types of wall mount sockets, thru-wall connections, etc. Different options - depends on how much you wanna spend.
Whatever you chose - go for the F type (screw fittings) for all the external connections, will make sure your setup is ok for digital and give u best signal delivery to your top box or tv.
cheers
Keelz
|
|
|
|
Post by millard1399 on Oct 24, 2008 16:21:31 GMT 10
Keelz, you are an absolute Keelzapedia Brittanica!!   Thanks a million for all the really useful info you've given me. Lots to digest, so I'll go through it and see which way I head with it all. In the meantime, I had a BIG win today. I put the overhead cupboards in and then went scrounging around the shed to see what light fittings I had that might suit the kitchen. I found a new fitting with a double globe which was a perfect length for the opening in the cupboard. Then I had to sit and think for a bit about how I could convert one of the globe sockets to a 12v fitting. Lo and behold I found a truck clearance-light in the shed, so I pinched the globe, socket and bracket out of it, and with a bit of drilling and screwing I turned the light fitting into a dual 240v/12v light! How cool is that?!! But wait!...I also found a single brown light switch and a white switch that I can use for the different voltages!   I think I'll go and buy a couple of lottery tickets... ;D ;D Here's the photos showing the overhead cupboards, and the light fitting before and after modifications... 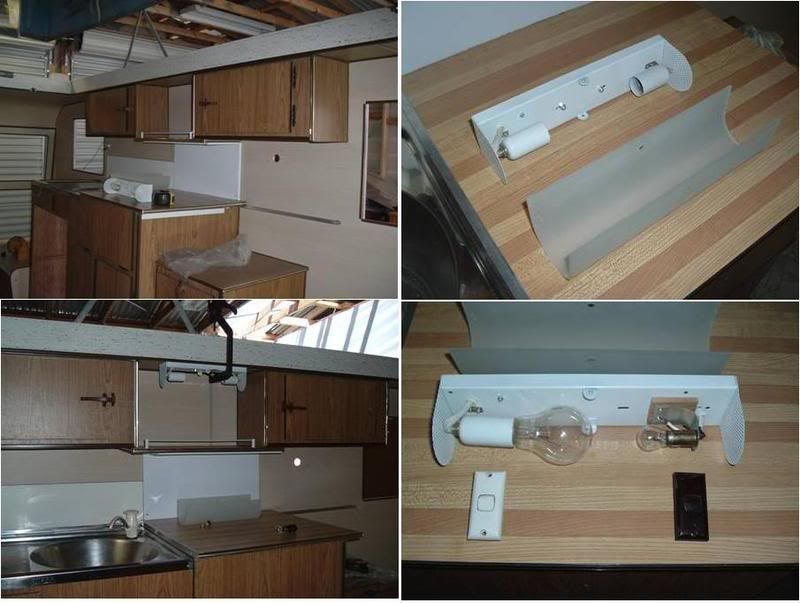 (Sometimes I just amaze myself...    ) Now I'll keep searching to find the pack of four downlights I've got somewhere. Who knows what other goodies might show up!! cheers, Al. |
|
|
|
Post by keelz on Oct 24, 2008 18:44:23 GMT 10
What can i say soz can't help myself i love chatting vans and fixing things ;D Mate there is nothing more gratifying than walking into the shed, under the house, rustling through a box of "junk" in the garage to find something that can be re-used at zilch cost to the re-furb. That fitting mod work you have done looks great! Good stuff.  cheers Keelz |
|