|
|
Post by Mustang on Jan 11, 2018 18:44:12 GMT 10
Wonderful talent displayed here, great that you are sharing the reno with us.
|
|
|
|
Post by Husky on Jan 12, 2018 13:44:57 GMT 10
Ok time to look at buttoning up the front and filling that huge hole that seems to mock me every time i pull into the drive way. The plan has always been to remove the wrap around corners. I've been told by a few renovators that they can be nasty to seal properly and i never liked them anyway. Speaking with the misses we came up with a functionality concept that then i just had to make work. We both like air flow so the windows had to open, don't like bugs so fly screens are needed. Access from inside the van will be zero to open windows once the dog crates are in, they need to lock and obviously water tight would be good. hmmm easy  Rummaging around in my house Reno pile I found an aluminum window frame that I'd ripped out of a house somewhere along the line. It was 80mm to long and twice the height i needed. Perfect! Check list in hand it has two sliding windows for air flow, TICK, fly screens, TICK! Just have to repair frames and put new mesh in them, Windows can open from outside...... um TICK Just turn the whole window around so inside becomes outside and handles now accessible from outside which was the inside, Lockable? Yep got a packet of sliding window locks here somewhere and last but not least water tight? er um no. It seems the inside which is now the outside never required sealing from the designers point of view. With plans to build a custom stone shield over the window it occurred to me if i have it close against a strip of rubber to protect the new paint work then use the old hatch locks to pull it in tight the whole window now becomes water tight from the outside which my friends is the outside and not the inside as with the window the inside is the outside........ Confused yet? let me show you.   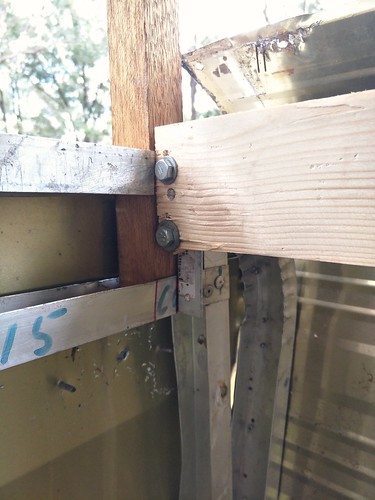
Firstly i cut some square holes in the framing and fed in a piece of timber that will work as the corners of the window and give me something to attach the frame too. then i pop riveted two pieces of aluminum angle to the side walls set back far enough so the face of the cross beam i put in will be flush with the verticals. Cross beam in and bolted to the angle. i set the cross beam 15mm higher than it needed to be so it sits right up inside the frame. this will give me something to attach the skin to on the outside and then when the window frame sits on top it will squash it all together under the frame so for water to get in it will have to travel uphill and get through two layers of Aluminum. Should be water tight i think
See Easy...... dunno about yours but my head hurts 
|
|
|
|
Post by Husky on Jan 16, 2018 14:08:42 GMT 10
So it's been a few days since i posted an update. Problem with custom built is it takes time and patience, well i'm running low on time and patience wore thin as i spent a whole morning panel beating the front sheet so it would sit where i wanted it which annoyed me more as it just wouldn't cooperate. the next day it just all fell into place. Bottom piece of frame sandwiching the front skin and the lower beam
Lower piece of frame and uprights in
Entire frame in now was interesting trying to get the top skin squashed between the top frame and top support beam
Complete frame, sliding window frames and fly screen frames in
So now it's ready to glaze and mesh the fly screens. Having a sticky at Snoops rear window on his Franklin i decided to go with Lexan Polycarbonate tinted sheeting. After googling it i found a supplier close to the office and paid them a visit. Got heaps of facts about it and a 600 x 1200 sheet 4.5mm thick for 10 bucks from their off cuts bin so enough to have a play with and get some of the side wall windows re glazed too. Pretty sure normal van windows are only 3mm thick. i was told i could slice the window seal in half and only use half on the weather side. not sure about this though. What do you guys think?
|
|
|
|
Post by Husky on Jan 16, 2018 21:53:11 GMT 10
So a few people have asked me what i do with so many dogs through winter and why i'm camping in my van at 0 to -5 degrees getting up before the sun chipping ice of water bowls and in the middle of a forest where there is no power, running water or you know the luxuries of life. I do my best to explain but i thought why not show you guys.
This is me and my five dog team at the State Cup in 2017. Normally I would be running a six dog team but unfortunately I had to have one of my team put down during the season due to illness. From the start of race season (April) to the end (September) we are lucky to get one or two weekends off and then there is training during the week. The Fur kids love their work and hopefully will see a few snow races this year at Diner Plain and Baw Baw. I have thousands of pictures so if you would like to see more let me know.
|
|
|
|
Post by 78466noM on Jan 17, 2018 18:13:36 GMT 10
The six of you look like you are all having a ball  |
|
|
|
Post by snoops on Jan 17, 2018 19:34:40 GMT 10
You look like a wannabe Harley rider, but your method of motivation up front is much cooler. 👍
|
|
|
|
Post by planner on Jan 18, 2018 7:25:27 GMT 10
The six of you look like you are all having a ball  Five look to be having a ball, the sixth one hard to tell with the mask.  |
|
|
|
Post by planner on Jan 18, 2018 7:32:59 GMT 10
So a few people have asked me what i do with so many dogs through winter and why i'm camping in my van at 0 to -5 degrees getting up before the sun chipping ice of water bowls and in the middle of a forest where there is no power, running water or you know the luxuries of life. I do my best to explain but i thought why not show you guys. One of your races is held each year about 4-5kms from home (Moira Park). I've been out a couple of times to have a look with the kids, I've probably seen you rush past. I checked this years calendar and see it's on the June long weekend. Unfortunately I'll be away that weekend at a clay target shoot, otherwise I would have caught up. Planner |
|
|
|
Post by Husky on Jan 18, 2018 8:31:19 GMT 10
The mask is sometimes so I don't freeze but the main reason is the dirt and stones that get flung up by the six kids in front.
The adrenalin pumping through you is like jumping out of a plane at 30,000 feet knowing the only thing that is going to get you safely round the track is your training and the ability to work with your team. Never felt anything like it before. My focus is 100% on my team and the other 50% is on wild life and hazards. Roos being the biggest pain in the butt but a well trained lead dog will take a team through 50 - 60 roos jumping all over the track in front and behind. Seriously the ride of your life.
The race at Moira Park your talking g about is the Victoria Classic held queens birthday every year and yeah I'll be there this year like any other. It's the biggest race in Vic unless the nationals are being g held here.
|
|
|
|
Post by Husky on Jan 18, 2018 22:06:17 GMT 10
ok enough about the fluffy butts cause
Must admit though i am one happy soon to be camper in my 22 ft Viscount. This window material not only looks awesome but is easy to work where as with glass it's like score score snap score score snap SMASH  Start again lol. just need to go get the central piece tomorrow then i can finish squaring up the frame clad and trim the front corners and she is ready for paint at long last
Also also ALSO i managed to score enough "log cabin profile" aluminum as i now know it to be called to tidy up all the holes i'm about to create in the van!! gotta wait two weeks for the owner to come back from holidays then i get to spend a day stripping their van which they are parting out and the skin is all mine. Not a bad score for a days work.
|
|
|
|
Post by Husky on Jan 30, 2018 19:39:40 GMT 10
hehehehe INTRODUCING Viscount R33077 or should i say whats left of Viscount R33077..... 
no seriously no Joke  ok stop laughing  you all know i have rebuilt worse than this but good news is that this is only for parts.
I posted on Face Book that i was looking for second hand log cabin profile cladding about 3 weeks ago and received a message from a woman in Kilsyth who said she had a van to suit. Then she went and listed it as wrecking for anyone wants parts. Well the vultures descended. i offered to take it as it was then deal with the people who wanted the parts myself but they weren't up for it. They returned from holidays on the weekend so i was chafing at the bit to get hold of this van so we agreed i'd remove the parts before taking the van. When she said come down tomorrow (Monday) i jumped on it. Even sent snoops a message begging for help which he graciously agreed (top bloke that snoops) Id been sent photos of the side skin but not much else so i was kind of shocked at the condition it was in as apparently a tree branch had fallen on it and was mostly open to the elements and therefore pretty much cactus.
The plan was to tow it home. yeah you read that right tow it home. took me just one 2.5 hours to get down there and most of it freeway driving so 110 KMp/h. we met there at 3, got started ripping parts off it by 4 and two hours later what you see in the pics is what we were left with. Snoops ran the led Light bar and as we finished up it started to rain, then rain harder and then pour. Even with a unregistered vehicle permit I was stressing about towing it home pushing it aside i hit the road with thoughts like should of checked the wheel bearings, are the tyres any good, what were the pressures like.
Got to east link without a drama and noticed the side skin starting to flap around the windows. forgot to gorilla tape them so pulled over in the pouring rain, taped the skin, checked wheel bearings for heat, drivers side was warm but ok, Passenger side a little warmer than i like but pressed on. cruised right through the middle of the city towards city link and was approaching the last intersection to tun right and there was a car crash on the other side of the road with no less than four cop cars in attendance F#&K. The light went red and i had to stop DOUBLE F#&K.
One of the coppers signaled me and made a motion like writing a ticket. i nodded, thinking he meant permit. light went green and i calmly pulled on to city link. None pursued me so i kept cruising with my heart booming in my chest.
Got to Calder BP and decided to check air pressures which were both down. Wacked em up to 36 and kept going. Amazing what a bit of air does as i was then able to cruise at 100 - 110 no drama once i cleared the Macedon ranges and it stopped raining.
I dont think i have been more happier to pull into my drive. i reversed it into the top yard and breathed a huge sigh of relief as i unhooked it.
Thanks again snoops your help was awesome i owe you big time. and if i ever try something like this again please just shoot me.
A few more pics
|
|
|
|
Post by snoops on Jan 30, 2018 19:57:59 GMT 10
I certainly had my doubts when we first looked at it that it should be towed, but underneath was actually the best part of the van after the cladding. Probably a lot less wind resistance the way it was, and it would have weighed bugger all. Was really glad when you texted me to say you'd made it home safely - I was waiting for the call 'It's spread all over the freeway, can you come help me shovel it into the gutter'... 😁
Happy to help any time I can - I was over that side of town for work so worke out well. 👍
|
|
|
|
Post by Husky on Jan 30, 2018 22:16:39 GMT 10
Time to separate the men from the boys. Now i have the parts van in my hot little hand i took five mins away from the dog trailer i'm fixing to go play with the Viscount. now you see wall......
now you don't. i feel a bit like a cyberman from dr Who "Delete Delete... move. So we have a small hole left by removing the front wrap around window, heading towards the back that window is being deleted, door way stays where it is, next window hole is being lengthened and centered between the doors, second doorway stays put and rear side window is being replaced with one half it's size so i can put floor to ceiling cupboards in the rear corners then of course the hole left by the rear wrap around and the round holes left by the lights that have also been deleted.
While i was doing this the misses and young bloke pulled out the tools and got stuck into stripping the parts van. with a bit of luck i should have the van re skinned in the next week or two. gotta love playing jig - saw puzzles
rebuilt and test fit of first window. very happy chappy cant wait to get this damn dog trailer done, which was used to take dogs to the beach quite regularly so you can imagine the effect on a thin wall RHS frame that wasn't painted. the rust omg the rust 
Night All
|
|
|
|
Post by Mustang on Jan 31, 2018 9:18:17 GMT 10
OMG    YOU TOWED THAT!!!!!!!!!! Possibly the "flow through air" saved the day?  |
|
|
|
Post by Husky on Jan 31, 2018 13:24:35 GMT 10
I know Mustang I am completely mad lol
Especially with the huge storm that hit aqua planing was interesting
|
|
|
|
Post by snoops on Jan 31, 2018 19:51:15 GMT 10
Yeah, it pissed down once I got home, glad there was nothing in the van needing protecting from the elements. 😁
|
|
|
|
Post by Husky on Feb 4, 2018 14:35:06 GMT 10
Just when you think your on the home stretch with a job something always kicks you in the butt taking more time when you have no time to spare. This is a bit off topic but i really want to share how critical to do checks of your trailers regularly to prevent a holiday turning into a catastrophic event.  So this is an extremely popular brand of Dog Float. A Toledo Six Berth Float. Large spacious berths, fully lined, insulated, plenty of vents with flatner air extractors on the roof. RHS frame, Aluminum sheet roof and walls. Light weight and strong. Honestly in this business everyone i know either has one or wants one. A second hand one will set you back 6 to 7K brand new your looking at around 10K. This one is registered and was regularly used by the previous owner. Originally the plan was to fix up the lining, add some more external lights, fit a tool box to the front and we were away. yup as always Plan A stands for ABORT!!! |
|
|
|
Post by 78466noM on Feb 9, 2018 15:13:28 GMT 10
Everything I do seems to come down to the wire.
I think you have done the right thing with the chassis as putting pieces in will take longer and what looks good may not be so good.
Just work on getting your van to usable then do things you want done as you go we are still doing little things as I have just set up power for water pump and fridge fans also hot water plus a ton of other things since we have come back from its maiden voyage.
|
|
|
|
Post by Husky on Mar 3, 2018 16:47:11 GMT 10
Bits and pieces have been going on in the back ground with the Viscount. When ever the misses runs out of things to do or i'm waiting for materials to be delivered etc. no where near as much work as i would like but you get that in business. I decided to spend a few hours on it today as its the weekend and sometimes i just need a break from customer work. So i got the last piece of window for the front window. it's still sitting in the workshop though as after working on the Doug and framing with nothing attached to it i decided the Viscount needed to be completely stripped down to make moving and putting in new windows easier. Something easy for the misses to attack and i finally got to take down the corrugated iron on the roof that has bugged me since day one. Due to the heat of the day we did this first. ever tried to handle this stuff after it's been in the sun for a while? it gets red hot i swear 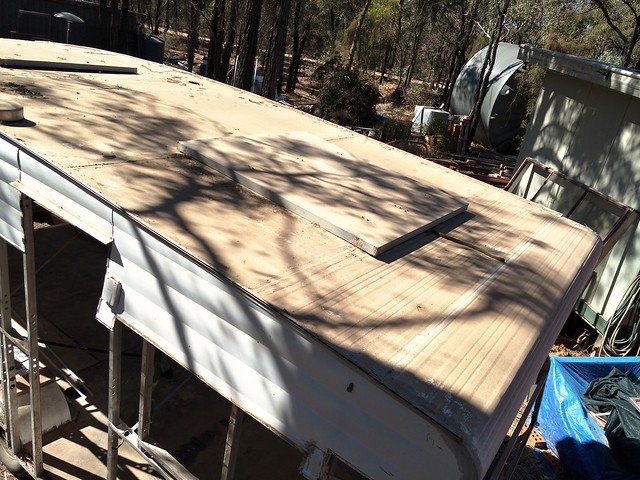 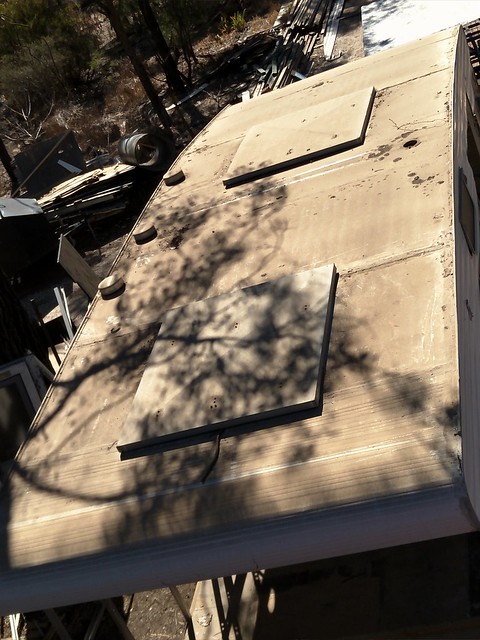 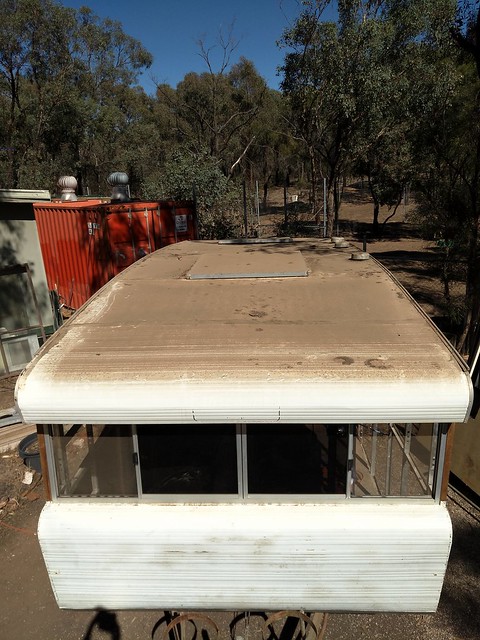 The roof is in really good nick which i was very happy to find. Sure there are a few minor holes to be fixed and one of those chimney things has been removed from the drivers side. Apart from the 10 years or so of dust I'm pretty happy with the roof. i can now remove the hatches, modify the frame work and drop in a couple of four seasons hatches. My apologies to the purists but as far as functionality and purpose goes i couldn't think of anything better to do. The hatch i built on the scenic..... yeah I'll never built one like that again. Now a catch up on the rest of the van and Lisa's awesome work.
Floor Stripped out and started leveling the Chassis to make framing easier
|
|
|
|
Post by 78466noM on Mar 6, 2018 10:31:48 GMT 10
Nice size chassis on the old girl that plate welded on isn't covering any cracks or joins I hope though it looks like it has been pre-made for the handbrake cable wheels . I have only read about your suspension and as long as it is in good condition it says it is very good some say better than springs. I think if I remember correctly some one said they still can be rebuilt new rubber pressed in. By going to spring suspension it looks like it will raise the van a bit.In the rush to get things home sometimes thing are taken for granted that it is right hub caps on one would think it had all of it wheel nuts who knows it could have done thousands of kilometers like that you know how some people think is It hasn't fallen off she'll be right  |
|
|
|
Post by Mustang on Mar 7, 2018 7:58:57 GMT 10
On our modern we built the weight around (our then Prado) so decided not to have heavy suspension & chose Dexter rubber based on your design link |
|
|
|
Post by bogwot on Mar 25, 2018 7:50:37 GMT 10
With our latest rebuild, I replaced one axle with a new and complete setup so now I have electric brakes on all wheels. The cost in replacing both axles isn't all that expensive. It also helps if you want to increase your ATM which I did. I do love the 2 doors. I bought mine from these people. www.bawatrailerparts.com.au/ Very helpful indeed. |
|
|
|
Post by Husky on Apr 17, 2018 18:14:26 GMT 10
ok well i know i've been a bit of a Ghost lately but have been flat out on the dog trailer. Barely got it usable by Saturday morning so i was a day late but you get that. its fully wired with two way led strip lighting inside. Ran out of time for the roof rack so still got a few bits and pieces to do on it. 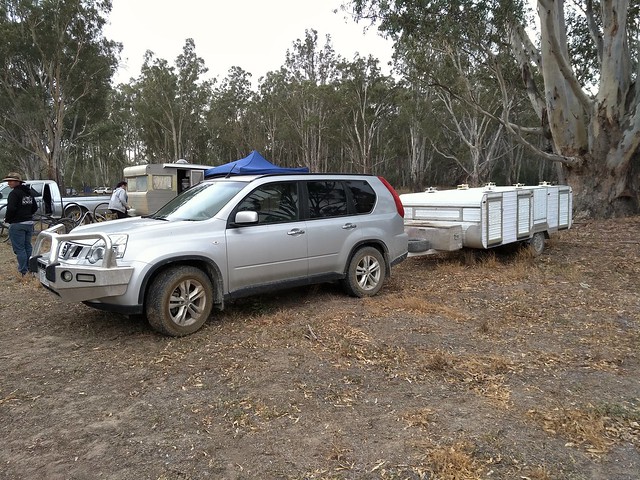 So after awarding myself a day off yesterday, spent it running around after bits and pieces and getting my back fixed after i totally screwed it up but ignored it and kept working the last few weeks, the misses and i decided to jump onto the Viscount. I got to inspect the chassis in detail for the first time since the floor, tanks, plumbing etc was removed. truth be told the chassis is cactus. The main Chassis Rails are not one piece front to back they are two pieces joined between the axles. i saw this first and thought from an engineering perspective it is not ideal but passable.
|
|
|
|
Post by 78466noM on Apr 17, 2018 19:03:34 GMT 10
I think you may be better off with plan B make your own main rails that way you know it will be perfect probably cheaper every one who has a chassis wants to turn them into trailers plus you would need one specific to your van
|
|
|
|
Post by Mustang on Apr 17, 2018 19:07:05 GMT 10
Sad outcome this far into your reno, but I feel you have made the right decision with another chassis.
|
|