Deleted
Deleted Member
Posts: 0
|
Post by Deleted on Sept 4, 2015 17:38:19 GMT 10
The time I am spending on this forum is driving the missus mad. Apparently I'm not doing enough around the house. just spending all my time trawling through old posts. If I get sucked into another one.....
|
|
|
|
Post by Mustang on Sept 4, 2015 19:38:15 GMT 10
She( Your darling) will get used to it, invite her out to coffee now & again.
Show her images of "wrecks" (show her Vincent) & others that are trying to manage & she will think you are intelligent,
"all the good times we have had in this van"....ohh darling I'm preserving family history.
|
|
|
|
Post by doublechevron on Sept 4, 2015 22:53:09 GMT 10
The time I am spending on this forum is driving the missus mad. Apparently I'm not doing enough around the house. just spending all my time trawling through old posts. If I get sucked into another one..... You gotta train them from a young age..... i already had 1/2 a dozen, er, " garden sculptures" around the yard when I met my wife..... and was already spending far to much time on car forums  seeya, Shane L. |
|
Deleted
Deleted Member
Posts: 0
|
Post by Deleted on Sept 5, 2015 22:05:27 GMT 10
Yeah, I think it was the lack of projects laying around in our early days that has created a rod for my own back. She's going to spew when I find a 70's falcon to restore for our son.
Anyway, while she was at work today I was able to get some more time on the van. Removed the front window protector, all ok there, just needs a clean up. Started on removing the front panel, basically removed all screws from aluminium moulds. Quite afew bottom and top required assistance for removal, suggesting rotted wood in behind. Also removed the annex pole holder that had been put on many years ago to reveal the vin code on the chassis. Number is 5155-1. If anyone can shed some light on the actual vintage of the van, that would be great.
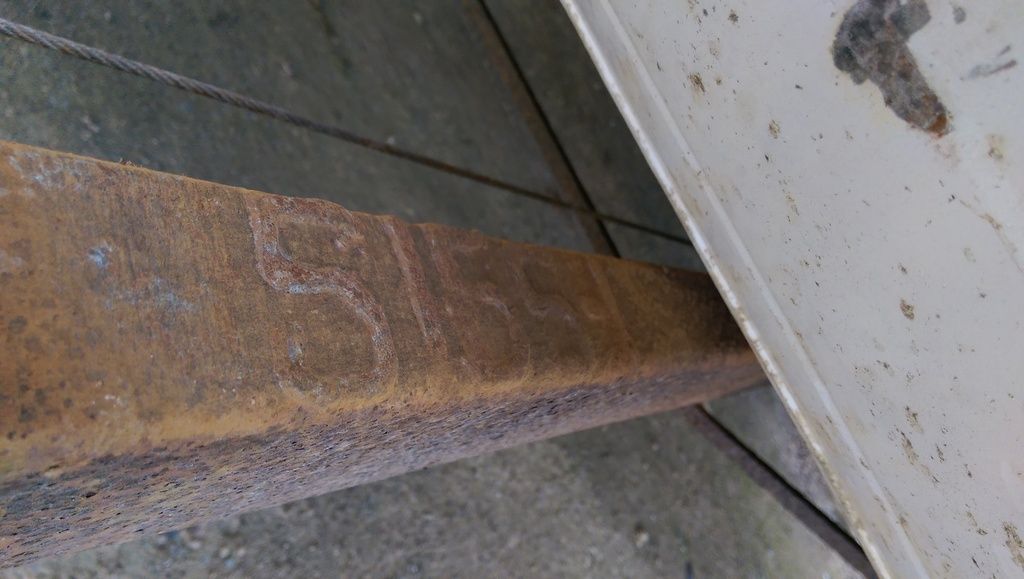
As can be seen, there is quite a bit of rust on the drawbar, which is to be replaced. Today I also removed the oven, quite easy including the gas line. Working 2 way fridge also removed. This was a bit difficult. I ended up sticking a screwdriver between the floor and the fridge and levering it up just enough to get a demo saw with a metal blade in to cut the bolts that went through the floor. Bolts were rusty as and weren't going to come out as a one man job. Once the fridge was out I discovered the 7 pin plug wiring and its junction point. Also pulled the sink out. After removing all these bits, it seems that 40 years of holidays had rattled a lot of screws loose that were/are holding the cupboard timbers to the walls. Nipped them all up while I was in there. I'll post some more photos shortly. I made some calls late Friday and think I have found a supplier of the aluminium trim for the outside of the van, and a metal fab company that may be able to roll the aluminium profile to replace damaged panels on the van. If both come off, I'll post details on the forum.
|
|
|
|
Post by pisces51 on Sept 6, 2015 21:30:37 GMT 10
G'day albinochimp,
Your chassis number of 5155-1 decodes as follows:
5155 is the 5,155th chassis built that year.
-1 is 1971.
Franklin would have been building up around 6000 units per year during the early 1970s, so your van would have been built towards the end of 1971.
cheers,
Al.
|
|
|
|
Post by planner on Sept 7, 2015 12:42:46 GMT 10
After removing all these bits, it seems that 40 years of holidays had rattled a lot of screws loose that were/are holding the cupboard timbers to the walls. Nipped them all up while I was in there.
Hope all those screw slots are all lined up now   If you look through enough threads, you'll see what I'm talking about. Although that may not be appreciated by SWMBO. |
|
Deleted
Deleted Member
Posts: 0
|
Post by Deleted on Sept 7, 2015 20:26:42 GMT 10
G'day albinochimp, Your chassis number of 5155-1 decodes as follows: 5155 is the 5,155th chassis built that year. -1 is 1971. Franklin would have been building up around 6000 units per year during the early 1970s, so your van would have been built towards the end of 1971. cheers, Al. Thanks Al. That seems like an awfully large number of vans to be building annually back in the early 70's. Franklin must have been a booming business back in the day. Assuming some automation back in the day, to be popping 20 vans out a day in a 5 day working week would have been cranking. Cheers Trav |
|
Deleted
Deleted Member
Posts: 0
|
Post by Deleted on Sept 7, 2015 20:32:22 GMT 10
After removing all these bits, it seems that 40 years of holidays had rattled a lot of screws loose that were/are holding the cupboard timbers to the walls. Nipped them all up while I was in there.
Hope all those screw slots are all lined up now   If you look through enough threads, you'll see what I'm talking about. Although that may not be appreciated by SWMBO. I do know what you mean, but thankfully, these were the hidden Phillips head screws, so no lining these babies up. However, those visible screws...... |
|
Deleted
Deleted Member
Posts: 0
|
Post by Deleted on Sept 7, 2015 22:02:07 GMT 10
Got in on the weekend and did a bit more deconstruction, this time the front windows and edge moulding. Removing the annex wall rope track has exposed the old orange stripe colour up near the clearance light. Will be good to have that orange back once we finally get around to the repaint. Note internal rotted timbers above and below the windows.....  Not sure if the mastic under the aluminium trim over the edges where the front and wall panels meet is original, but there was not a chance of leaking. The Aluminium trim was a bit difficult to separate from the van. I think I have had a reasonably easy time removing almost all the trims and windows using a metal spatula about 50mm wide in the blade. It moves beautifully through the mastic without damaging any of the aluminium or even scratching the paint. I think the almost flat profile of the aluminium cladding has also assisted in this regard.
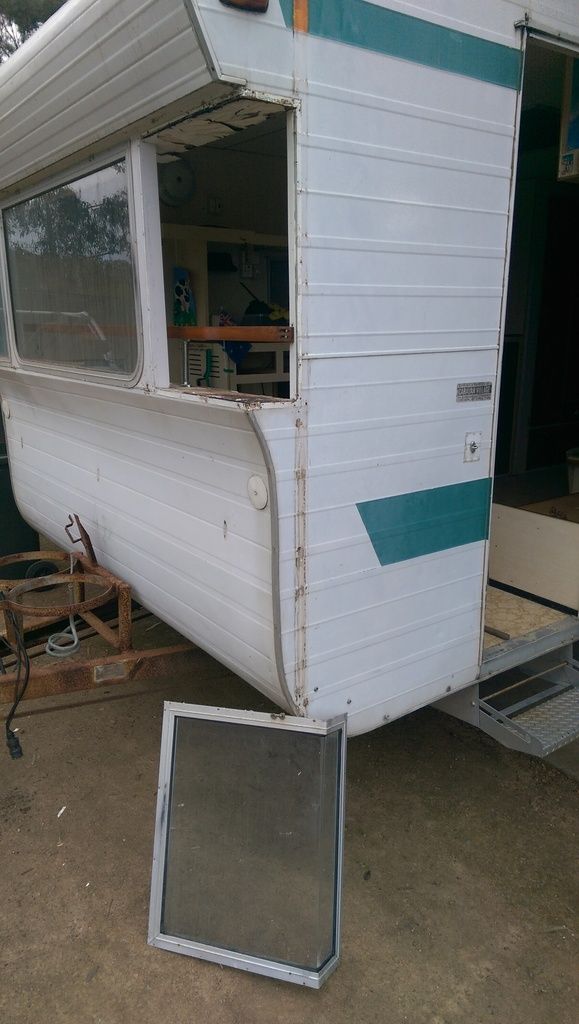 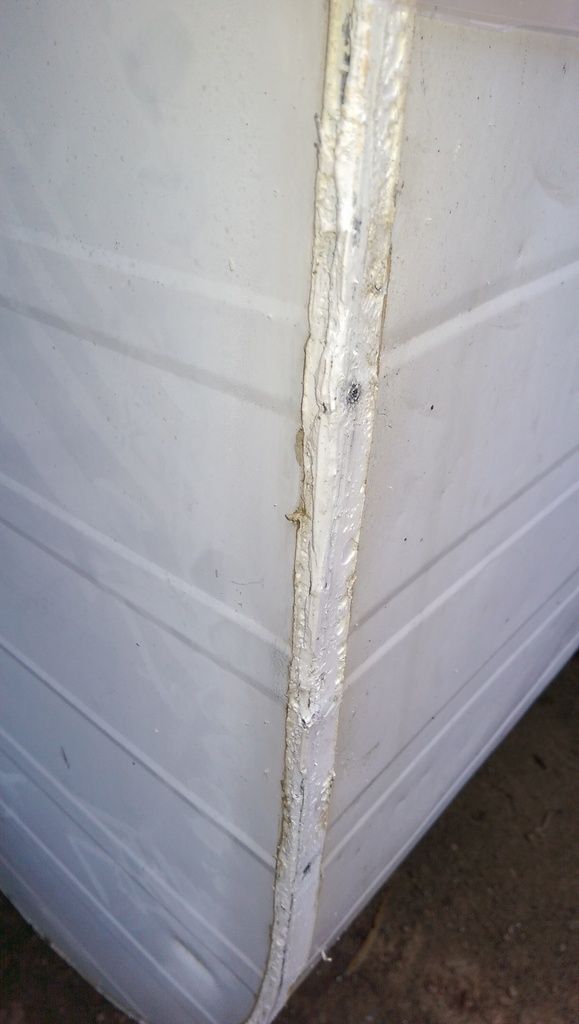
Below shows how I have detached the cupboards and seating from the floor, all without damaging any of the timber.
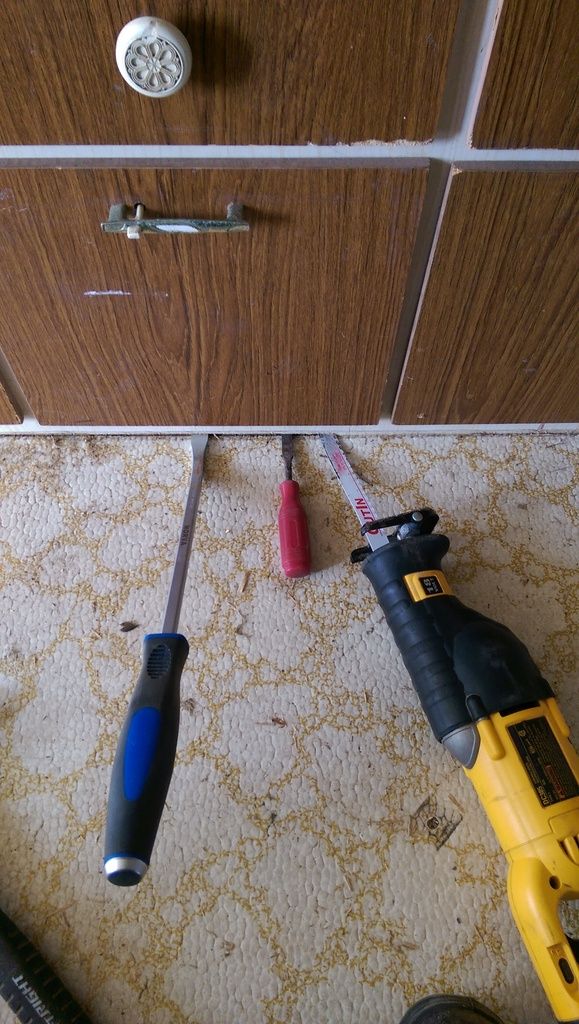
All internal appliances removed. So hopefully the lightweight construction of the cupboards will ensure they remain on the wall once the floor and chassis are removed.
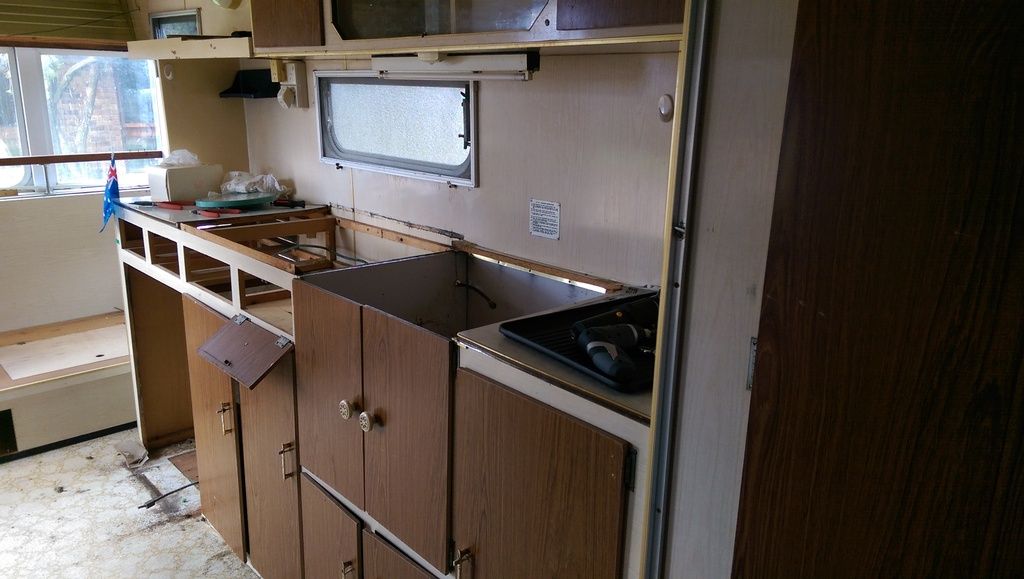
|
|
|
|
Post by planner on Sept 8, 2015 8:40:43 GMT 10
Thanks Al. That seems like an awfully large number of vans to be building annually back in the early 70's. Franklin must have been a booming business back in the day. Assuming some automation back in the day, to be popping 20 vans out a day in a 5 day working week would have been cranking. Cheers Trav I was approached at the Pimba roadhouse by a retired bloke who wanted to buy the Franklin badge from the van. I assumed his name must have been Franklin, but it turns out he worked there during the 70's. I commented that he probably worked on our van, his reply was that dozens of vans left the factory every day, he "might" have worked on it. Photos I've seen of the Ballarat factory, don't show too much automation. One interesting point, was that he recalled that employees were not happy with the chassis of the time (too light), but they were built to a budget, not necessarily to last. It was a shame that I met him after the resto, he may have been a quite valuable source of info, especially early. |
|
Deleted
Deleted Member
Posts: 0
|
Post by Deleted on Sept 9, 2015 20:20:13 GMT 10
Interestingly, I think I agree with the employees of the time, although it has lasted more than 40 years. There is a lot of flex in the walking areas of the floor now, and when you get under, the spacing of the floor supports is quite large. I think there may be afew extra supports put in under the 'walkway' areas of the floor to eliminate flex in future.
With the great weather coming this weekend, I am hoping it will be the time the chassis comes out.
|
|
|
|
Post by Mustang on Sept 10, 2015 6:51:26 GMT 10
Interestingly, I think I agree with the employees of the time, although it has lasted more than 40 years. There is a lot of flex in the walking areas of the floor now, and when you get under, the spacing of the floor supports is quite large. I think there may be afew extra supports put in under the 'walkway' areas of the floor to eliminate flex in future. With the great weather coming this weekend, I am hoping it will be the time the chassis comes out. We have these soft spots also, from an otherwise good condition floor. So I have bought 6mm marine play which I,m going to screw/glue to the floor before the vinyl goes down. I will keep you posted, about the success. |
|
|
|
Post by planner on Sept 10, 2015 8:35:29 GMT 10
We have these soft spots also, from an otherwise good condition floor. So I have bought 6mm marine play which I,m going to screw/glue to the floor before the vinyl goes down. I will keep you posted, about the success. Mustang / Trav I've also seen the marine ply used to strengthen those soft spots from underneath. Just make sure you don't use long screws, or you'll need the work boats inside  |
|
|
|
Post by planner on Sept 10, 2015 8:43:27 GMT 10
Interestingly, I think I agree with the employees of the time, although it has lasted more than 40 years. There is a lot of flex in the walking areas of the floor now, and when you get under, the spacing of the floor supports is quite large. I think there may be afew extra supports put in under the 'walkway' areas of the floor to eliminate flex in future. With the great weather coming this weekend, I am hoping it will be the time the chassis comes out. Trav, this bloke was talking about the drawbar and main chassis rails. Definitely built to a budget  If I get too energetic with the jacks under the front corners, the door wont open or close, due to the flex in the chassis. With the "lid off", are you taking the opportunity to replace the floor? I rebuilt an old camper many years ago and replaced the entire floor with 16mm marine ply ( the original was chipboard  ). Added a bit of weight, but no more flexing, and will outlast the cockroaches. Planner |
|
|
|
Post by doublechevron on Sept 10, 2015 9:37:30 GMT 10
This is probably a dumb question  But how are you going to support the body if you remove the chassis ? The problem I see if a wall has been removed (think of one of those crappy garden sheds with a wall removed). seeya, Shane L. |
|
|
|
Post by supreme78 on Sept 12, 2015 13:49:24 GMT 10
I wrecked one of those vans a few years ago. It had a big hole in the side due to being onsite. and in sad condition. I was surprised what little held the body to the chassis. but someone had put bolts through the body and chassis to keep to connected only on one side.
The way they were built with the sandwich panel design was revolutionary for its age but it makes it hard to run wires and repair damage to the side panels. I like your old van and all the best with your renovations/Restoration.
i always believe its worth not taking to large a bites as it sometimes causes people to give up as it gets to hard.
i have restored 3 vans and they can be cans of worms thats for sure.
regards
Paul
|
|
Deleted
Deleted Member
Posts: 0
|
Post by Deleted on Sept 13, 2015 20:40:31 GMT 10
Hi Guys, today spent a couple of hours drilling out rivets and rusted nuts and bolts. Scarily, the 1 inch long screws holding the sandwich panels to the chassis all pretty much fell out, with many actually hanging out about half way. This tells me the timbers they are screwed into have almost no density and are pretty much rotten through.
Plan for lifting off the walls from the chassis keeping all intact is to start at the front and lift up by only a couple of inches and place timbers along the bottoms of the walls and then place a beam under these across the width of the van. These will be shot together with chocks to ensure the walls don't pancake. Then work on the same in the rear. Ultimately it will be lifted and sitting on 4 car stands. Then all going well, I should be able to wheel the chassis out from under it all.
I was beginning to think I had bitten off more than I could chew, but I am feeling enthused as it is the sourcing of parts that was getting me down, but all good now.
As soon as I start the lift of the walls, I'll post more photos.
|
|
Deleted
Deleted Member
Posts: 0
|
Post by Deleted on Oct 5, 2015 19:45:06 GMT 10
Hi guys, haven't posted for a while and haven't done much to the van since last post. But, I have been around to local caravan repair shops and was getting a bit disheartened that there really aren't many older parts available. I might add, that it wasn't a surprise. I did find someone who could fold the same pattern as the franklin wall panelling of the 70s but at $700-$800 a sheet, it was a bit too pricey. Then I found a repairer who could supply new aluminium trim and a panel close to original, so sweet.
Hoping to the lift the van next weekend, will take photos during process and once off.
|
|
|
|
Post by snoops on Oct 5, 2015 20:23:30 GMT 10
Which supplier did you end up finding? Do they have a website at all?
|
|
|
|
Post by tedalley on Oct 8, 2015 18:54:10 GMT 10
Then I found a repairer who could supply new aluminium trim and a panel close to original, [/quote]
I need new trim around the wall opening for the outside door.
Do you think he can make it for me?
Ted
|
|
|
|
Post by Mustang on Oct 9, 2015 19:30:56 GMT 10
Interestingly, I think I agree with the employees of the time, although it has lasted more than 40 years. There is a lot of flex in the walking areas of the floor now, and when you get under, the spacing of the floor supports is quite large. I think there may be afew extra supports put in under the 'walkway' areas of the floor to eliminate flex in future. With the great weather coming this weekend, I am hoping it will be the time the chassis comes out. We have these soft spots also, from an otherwise good condition floor. So I have bought 6mm marine play which I,m going to screw/glue to the floor before the vinyl goes down. I will keep you posted, about the success. 6mm ply screwed & glued, made an amazing difference, well worth the effort  |
|
Deleted
Deleted Member
Posts: 0
|
Post by Deleted on Oct 13, 2015 20:03:06 GMT 10
Then I found a repairer who could supply new aluminium trim and a panel close to original, I need new trim around the wall opening for the outside door. Do you think he can make it for me? Ted[/quote] Hi Ted, They cant make the the panel, they buy it in. Jump on www.thervrepaircentre.com.au for info. They are in Bayswater Vic. From what I am seeing, if you want to match panel on old vans, you need to wreck another van or be willing to part with big bucks. Good luck. |
|
Deleted
Deleted Member
Posts: 0
|
Post by Deleted on Oct 13, 2015 20:04:36 GMT 10
|
|
Deleted
Deleted Member
Posts: 0
|
Post by Deleted on Oct 13, 2015 20:20:39 GMT 10
I wrecked one of those vans a few years ago. It had a big hole in the side due to being onsite. and in sad condition. I was surprised what little held the body to the chassis. but someone had put bolts through the body and chassis to keep to connected only on one side. The way they were built with the sandwich panel design was revolutionary for its age but it makes it hard to run wires and repair damage to the side panels. I like your old van and all the best with your renovations/Restoration. i always believe its worth not taking to large a bites as it sometimes causes people to give up as it gets to hard. i have restored 3 vans and they can be cans of worms thats for sure. regards Paul Paul, well you were right!! The can of worms has been opened. One the weekend I lifted one side of the van walls off the chassis by about 3 inches and wow..... How the van was remaining on the chassis has got me stuffed. The timber running along the bottom of the wall between the ply and outer aluminium sheet basically disintegrated as the wall came away from the angle it was resting on. Bit of a job ahead now!! As you have done restos, any tips on what to use to glue the interior ply to the foam sandwich panel. I am assuming there are plenty of glues out there, but probably plenty that might affect the foam. Cheers Trav |
|
|
|
Post by planner on Oct 14, 2015 7:34:32 GMT 10
any tips on what to use to glue the interior ply to the foam sandwich panel. I am assuming there are plenty of glues out there, but probably plenty that might affect the foam. Trav I re-applied ply to a couple of walls in our arrow. I was directed (by local van repairer) to use Liquid Nails Fast Grab because it didn't dissolve the foam. I would assume that most water based glues would likely be okay. The Fast Grab stated on the tube that it was suitable for polystyrene. Planner |
|