Deleted
Deleted Member
Posts: 0
|
Post by Deleted on Apr 1, 2014 10:17:35 GMT 10
I thought about doing that too while the frame is all exposed it would be pretty easy. What would I use to seal all the timber? Certainly a good idea. Also the reverse side of all the ply lining? Just ordered my self a 18v narrow crown staple gun for all the attaching of ply and plastic moulding etc. will make the job a lot easier. Just have to order some galvanized staples to go with it. At least the won't rust.  |
|
|
|
Post by supreme78 on Apr 1, 2014 14:09:22 GMT 10
The staple gun is a great idea. I just use a hand powered job as my rechargeable one never had enough charge whenever I needed it. I also have one of those multi saws like the renovator they advertise. It's been worth it's weight in gold. For doing small cuts and joining timber. Also for trimming ply and timber to shape.
I guess as a sealer just some sort of timber undercoat. Like pink primer I guess. It's got to be better than nothing.
Keep up the good work.
|
|
Deleted
Deleted Member
Posts: 0
|
Post by Deleted on Apr 8, 2014 9:15:24 GMT 10
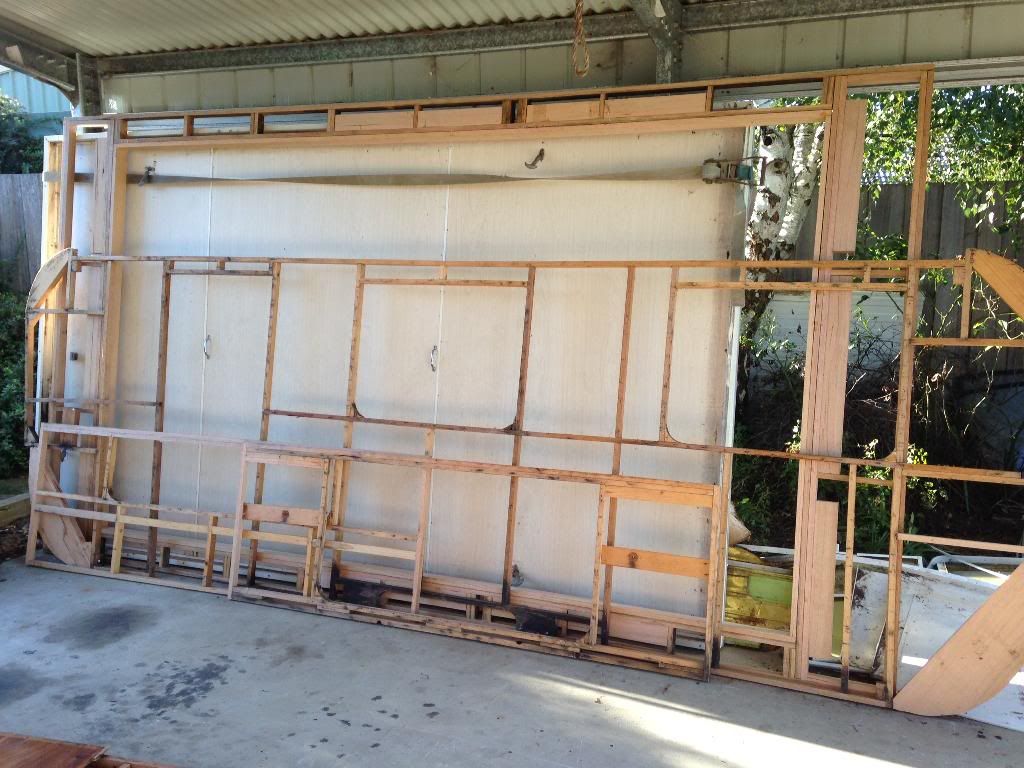
Out side pop top roof section all rebuilt and back window frame repaired. My only concern is that the new roof section is heavier than the old roof section. Will this cause any concern? I have also added extra support in sections that I intend on building over head cupboards. What problems would I have if the caravan is a little heavier than what it was originally? Is it just the tow weight that makes a difference? Or will I have any structural problems?   |
|
|
|
Post by ForumMod on Apr 8, 2014 21:56:20 GMT 10
Very nice job on the framework, dede!  The main issue with weight in the design of this style of poptop (where the poptop roof is smaller than the caravan cabin lower roof), is how the poptop opening framework is supported by the side frames of the van. If there is not enough support transferred to the sides of the van, you'll find over time that the poptop section will sag. Usually there is a wardrobe on one side of the van that supports part of one side of the poptop framework. On the other side there are usually the kitchen overhead cupboards fixed to the wall, and which also provide a little support to the poptop framework, but since these kitchen cupboards don't have any direct support underneath them, the support they provide to the roof is really just a token amount. You have to look at having timber supported on the caravan side frames, and which in turn supports the poptop framework. That means you have full-width timber at the front and rear of the poptop frame, spanning from side to side of the caravan. The poptop frame is then fixed to this spanning timber in the centre area. If all of that sounds like a load of gobble-de-gook, then this link will take you to the Millard poptop I restored, and you can see how I remade the ladder frame that supported the front of the poptop frame. You'll see how the ladder frame was fixed to the side frames, and the poptop frame was then fixed to the ladder frame in the central area. At the rear of the Millard poptop frame, there was a full width length of aluminium square tubing (1" x 1"), which was bolted to a piece of timber the same size, and also full width. Both the tubing and the timber spanned from side to side of the van, and were fixed into the side frames of the van. That's how it was originally - I didn't have to make any repairs in that rear end area. I don't think the additional timber will make a noticeable difference to the overall weight of the van. Maybe a few kilos if anything. It shouldn't affect the towing of the van, nor the weighbridge weight to any degree. The main issue you have to focus on is making sure the poptop framework is well supported, otherwise in ten years time you'll notice the roof sagging inside your van.  Let me know if you need me to try and explain it better. cheers, Al. |
|
Deleted
Deleted Member
Posts: 0
|
Post by Deleted on Apr 9, 2014 6:39:03 GMT 10
Excellent thanks FM, that's exactly the information I wanted. This forum is brilliant and giving me so much information, I really would be stuck without it. I'm planing to build an island bed with cupboards either side from floor to roof, and at least one or two more floor to roof cupboards to add support to the roof frame. I will have a good read through your link as well, as the main part of the side frames are the next part I'm repairing. I want to make sure everything is spot on. Thanks again.  |
|
Deleted
Deleted Member
Posts: 0
|
Post by Deleted on Apr 9, 2014 14:46:57 GMT 10
Wow a very inspiring thread which I read with great interest. I can relate to all you are saying especially about picking up the tools and doing the carpentry. I'm making a back bed frame and I am a bit stuck with it at the moment…..:-) Cant wait to see your next post Mandy. Cheers
|
|
Deleted
Deleted Member
Posts: 0
|
Post by Deleted on Apr 13, 2014 18:18:02 GMT 10
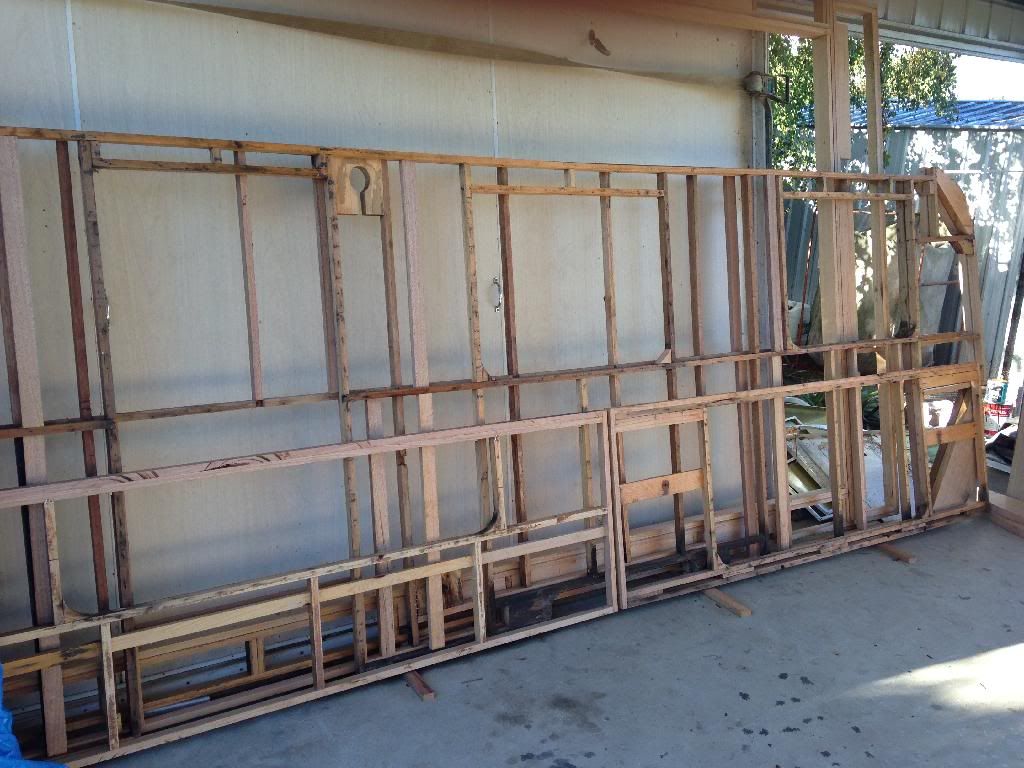
A bit more done today on the caravan frame. Completed one long length, just got to add some extra floor to roof supports to add extra support for the roof section. It's a slow job but I'm getting there.   |
|
|
|
Post by ForumMod on Apr 13, 2014 21:48:23 GMT 10
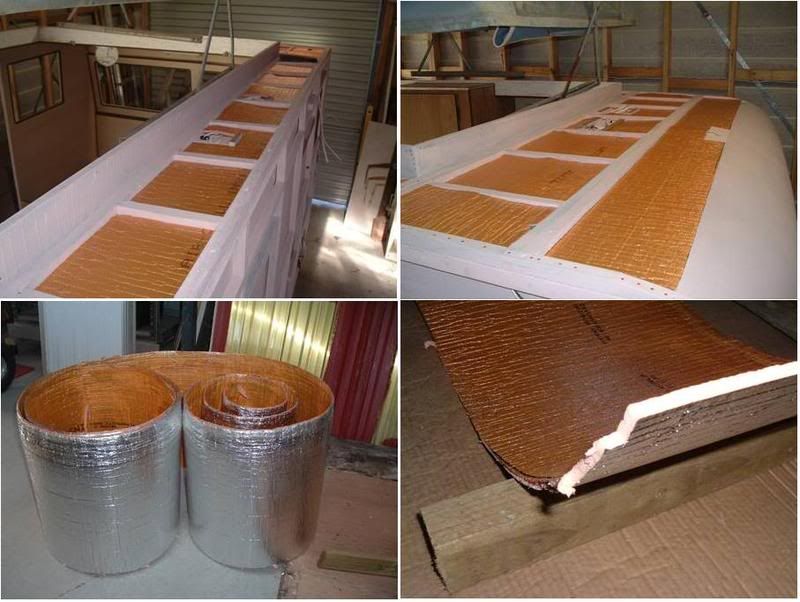
Ahhh...good, good, GOOD!!  Now that I can see your complete roof framework, and how it sits on top of the side frames, what you've done to the roof is PERFECT, dede!!   Just a word of caution with regards to those fill-in blocks you've added to the sides of the roof framework...if you have to run any electrical cables along either of those sides, the blocks might get in the road of where the cables need to go. For example, the following photos, of the roof of the Millard poptop I had, show the insulation being cut and fitted into position, but in the top left photo you can see electrical cables along the side of the roof support framework. These cables were for the lights above the kitchen sink and stove...  It's just something to be mindful of for further down the track.  Nice going so far!  cheers, Al. |
|
Deleted
Deleted Member
Posts: 0
|
Post by Deleted on Apr 13, 2014 22:19:10 GMT 10
The fill in blocks along the long length of the roof frame are the same as what was originally on the old roof frame. No electrical wiring ran along the long lengths at all, only along the shorter lengths to go from one side of the van to the other, and for brake and park lights etc. all the lighting that was in the original set up were wall mounted. I'm thinking of sticking to the same set up as well.  What kind of insulation did you use in the attached picture? |
|
Deleted
Deleted Member
Posts: 0
|
Post by Deleted on Apr 13, 2014 22:25:35 GMT 10
Oh and those fill in blocks are for screwing the scissor lifts to for the pop top. These were almost completely rotted away on one side of the old frame work. I really don't know how the whole pop-top didn't collapse with no support.  |
|
Deleted
Deleted Member
Posts: 0
|
Post by Deleted on Apr 21, 2014 18:16:05 GMT 10
Spent another day on the caravan frame today. Finished the other long length. Just a bit of tidying up to do then I'm ready to start putting on the ply (once we go get it). Looking forward to putting the frame on the caravan chassis. A long long way to go and I only seem to get one day a week to work on it. My plan is to have it finished by Christmas, but I really don't know. Oh well I will finish it, I'm not giving up now.
|
|
Deleted
Deleted Member
Posts: 0
|
Post by Deleted on Apr 22, 2014 18:52:50 GMT 10
Finally got all 4 sides and roof frame all repaired with extra support added. I managed to spend the last 2 full days finishing off. I had to completely rebuild the roof section, replace all 4 bottom corners of the frame and one top corner, also quite a few sections of each frame where water had rotted the timber. Also modified a section of the frame to add a access door where I will store the 12v battery setup. Now I need the ply to line all the walls, just have to wait for hubby with his trailer so we can go and pick the ply up. I'm really enjoying seeing each step completed.   [/IMG] |
|
Deleted
Deleted Member
Posts: 0
|
Post by Deleted on Apr 23, 2014 9:08:35 GMT 10
G'day Mandi, It's worthwhile thinking about whether you really want to go down the path of pulling the van apart and fixing the bad bits up. Too often these projects become all-consuming and people lose interest, or too many other things in life keep getting in the way of you finding time to work on the van. Never be disappointed in admitting it's beyond your capabilities. Sometimes you just have to cut your losses and run, otherwise you could end up with a van pulled apart and no real idea about how to go about putting it back together. A van pulled apart is not really worth much to anyone, except for spare parts. An option for you is to quit the project now, and sell it for whatever you can get for it in its present state. That may sound like a "waste of your money", but the reality is that if you continue with the project, there's no guarantee you'll get back all the money you spend fixing it, and there's certainly no guarantee you'll get back the value of the time you spend on it. The most successful people on this forum are those who really "like the idea" of working on an old caravan to bring it back to a much better condition. You also need to have plenty of time to work on the van (up to 12 months is a minimum, depending on how much work is required), and you need to have the spare dollars for all the bits and pieces required. If you decide to grit your teeth and start plugging away on the van, we'll certainly help you with any questions along the way. And yes, the scissor lifts (or canopy lifters) for the poptop roof have to be tied to stop them springing back open when they are disconnected from the van. You need some strong wire, or strong rope, because they have quite a bit of springyness when they've opened up a bit. Good luck, whichever way you decide to go. cheers, Al. Was just reading back through all the posts and laughed when I read this. How right you are ForumMod  I'm glad I kept going though, there were certainly times I felt like giving up on the whole idea. But now I have got to the stage of putting bits back together I'm really enjoying the challenge. |
|
Deleted
Deleted Member
Posts: 0
|
Post by Deleted on Apr 30, 2014 15:47:42 GMT 10
As I am still waiting to get the ply for the frames (hopefully will pick up Saturday) I have been cleaning up the cladding ready for painting. Removing all the staples, silicon, car bog and black rubber silicon is time consuming. But I manage to finish one side today. I laid it out to make sure I had all the bits.  |
|
Deleted
Deleted Member
Posts: 0
|
Post by Deleted on May 1, 2014 12:20:24 GMT 10
Hi everyone, I'm planning to replace the bottom length of cladding on both long sides and the front stone guard with checker plate. My question is more to do with the long sides, can I get a length of checker plate that is 4.3 meters in length? Or do I need to have a join somewhere along the length? And if I need a join how would I go about it so it's water tight? Thanks in advance  |
|
|
|
Post by peter92 on May 1, 2014 20:02:04 GMT 10
If you cant get it in one piece, get it TIG welded, that would work fine for you
Regards Peter
|
|
Deleted
Deleted Member
Posts: 0
|
Post by Deleted on May 1, 2014 20:10:55 GMT 10
Thanks Peter  |
|
Deleted
Deleted Member
Posts: 0
|
Post by Deleted on May 2, 2014 21:08:54 GMT 10
Wow Mandi your project so far is amazing, good on you!
|
|
Deleted
Deleted Member
Posts: 0
|
Post by Deleted on May 6, 2014 14:23:34 GMT 10
I have made some enquiries on buying Bending ply, but from what I am being told it sounds like it's not suitable for staining, It will be visible on the inside of the caravan and I would really like it to look good and match in. The rest of the caravan will be a wood grain laminated ply called Cherry crush.
What have other people done?
|
|
|
|
Post by peter92 on May 6, 2014 17:56:48 GMT 10
Hi DEDE
Is it the grain in the wood, that you cant stain it, i cant see why it cant be stained
I sanded floors and stained them for a living and used stains
The CHERRY RUSH would look nice
Regards Peter
|
|
|
|
Post by greedy53 on May 6, 2014 18:19:28 GMT 10
there is a bendy ply at bunnings,you can get the long bend or the side bend,watched my m ate use it wish i had known about it when i was building my teardrop
|
|
Deleted
Deleted Member
Posts: 0
|
Post by Deleted on May 6, 2014 19:01:11 GMT 10
Apparently the bending ply has fillers in places and not really suitable for staining. It's 5mm thick and something like $85 a sheet.
I must check out Bunnings and see what they have. I didn't think they stocked anything like that, but I will enquire. Thanks.
|
|
Deleted
Deleted Member
Posts: 0
|
Post by Deleted on May 12, 2014 13:43:19 GMT 10
Picked up the ply sheets but they didn't quiet have enough, I also need to order some rolling ply so we will have to go back to pick up the rest. The other issue I had is they didn't have the right color extrusions moulding I needed. After a bit of research I contacted Procom plastics in Victoria and made an order for all the moulding I need except the J mould insert and roof piping as they only sell that in 250 meter rolls so will try and source that elsewhere.
|
|
|
|
Post by ForumMod on May 13, 2014 14:03:57 GMT 10
G'day dede, Have a read of caprinut's thread about his Capricorn van. He put checkerplate along the sides with a join in the sheets. If his thread doesn't explain how the joints were waterproofed, send him a Personal Message and ask for more info. cheers, Al. |
|
Deleted
Deleted Member
Posts: 0
|
Post by Deleted on May 14, 2014 6:24:23 GMT 10
Thanks Al, Will have a look through his posts  |
|