|
|
Post by Caprinut on Feb 16, 2012 23:20:09 GMT 10
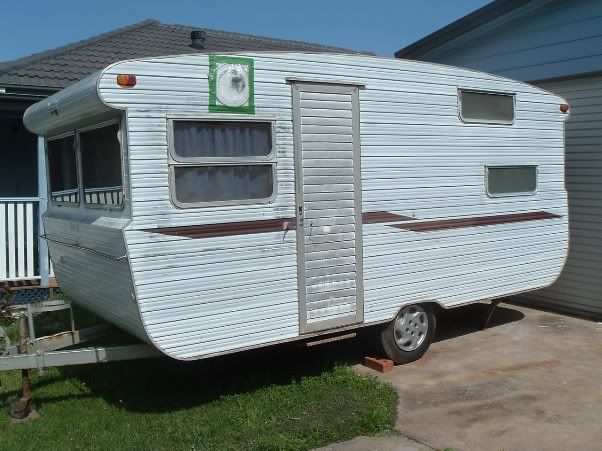
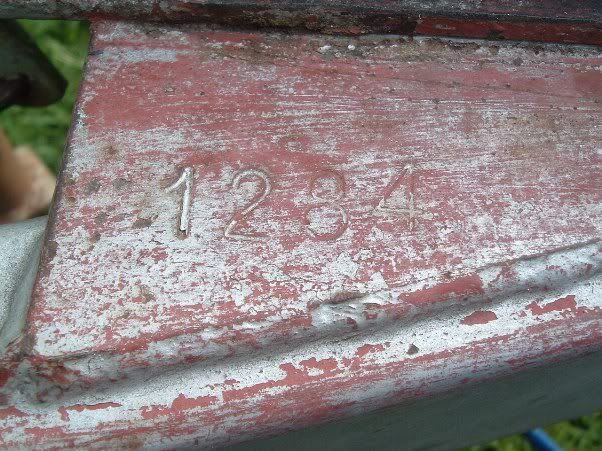
Hi Peter here from Adelaide . We bought a van called a Vogue Capricorn. No chassis number but also has stamp in cupboard ply dated 1975 made in Taiwan. I also ripped off all four walls as the ply and frame had also rotted on all four corners plus plenty of water stains visible on inside . Spent days under the floor painting and scrubbing chassis and had to go to chiro afterwards due to crick in neck.! Ended up replacing most of timber frame as splicing just complicated things. Used lots of biscuits and half-lap joints in timber to give it a better chance than just staples. As there were stains on the ceiling also from the four-seasons hatch I decided to glue a Laminex sheet over the ceiling using contact glue and a lot a swearing ang foot shuffling with the wife. Amazingly we got it glued and straight as contact glue grabs and no mistakes can be made! Why builders will make a meranti 19mm frame and then drill 10mm holes all along it to run the wires thru amazes me as the offside had also collapsed from human termites. I decided to rewire using pvc square trunking inside the overhead cupboards so that will solve many problems and ensure a rigid frame, plus you can add wires later. Will post pics once I get familiar. Also bought many tools on project- never enough.  My caravan is eventually -sigh- is almost ready to launch down the ramp. Mainly my fault it took several years as each fix lead to another obstacle and I love an opportunity to improve and also complicate things as I go along. What was going to simply be a fixit became a complete makeover, so I dont even know if it can be called a classic, other than the fact that under the fancy new skin is a 35 year old skeleton.  Ive added every modern convenience I could as the intention is to travel and hopefully live in the caravan without too many sacrifices  The major change that I did was to eliminate the curved lower section front and back as I felt it was flimsy at best and a total waste of space. By squaring it up I got the same exterior dimensions but an extra half meter inside front and back.  . The result was a square caravan that looks like the proverbial dunny. So I added some streamlining to the front by adding a nosecone.  The nosecone gives me space to store the spare wheel and all the hoses and sully pipes. Ingenious. |
|
|
|
Post by millard1399 on Feb 17, 2012 11:23:18 GMT 10
G'day Peter, As I said to you in a Personal Message (PM), I've collected the info about your van from mausie's thread, and created a new thread for your van. Just keep adding info about your van into this thread, and it will keep your story all together here. I must say that you've done some amazing work there. Too much for me to take in with a quick view, but it's easy to appreciate the number of hours you must have slaved away doing all the changes. Where did you end up getting the new cladding from? Dario's in Adelaide?? I'm certainly looking forward to seeing some more photos showing the new cabin shape, and what you did to the inside. Congratulations on the really great work you've done!   cheers, Al. |
|
|
|
Post by Caprinut on Feb 18, 2012 20:40:08 GMT 10
Thanks for the help, Millard1399. Thread started as a comment to Mausie but - Yeah- there are lots of pics of my progress as the phoenix rose from the dead. Like most builds you start with modest intentions then you look at the catalogues and go online and Voila- a shiny new caravan. I'll post pics of the interior showing the poor state of the panels, all hidden by backrest cushions.    Basically the overhead cupboards were holding the whole shebang together as everything at the bottom was rotted where it joined the floor. The interior has a wardrobe that acted as a box support to brace the top and keep it from dropping down. To answer your question as to where I got the skin sheets from that is a story in its own as they come in 9,5m strips and to get them home from Cararest about 10kms from home I nailed some wall studs together, put it on the roofrack of my ute and with it hanging over the front and back by a couple of meters made a dash for home. I intended to use the original sheets but due to the lenghty delay in my rebuild they were really daggy plus full of the scars of 35 years of use. |
|
|
|
Post by millard1399 on Feb 18, 2012 21:34:00 GMT 10
G'day Peter, Well, you certainly had your hands full when you decided to take on the project!  Isn't it great to find all those nice surprises when you dismantle bits of a van? Although I sometimes think it would be great to also find a stash of 1970s dollars behind one of the seats, just to compensate us.   Are you sure your van doesn't have a chassis number? The Capricorn van I had a couple of years ago had a chassis number stamped on the plate that the coupling was bolted to...   At the time I had it (which was only for a couple of weeks before I sold it again), I estimated it was from about 1973. cheers, Al. |
|
|
|
Post by Caprinut on Feb 19, 2012 22:04:26 GMT 10
Al, thanks for the hint. I'll have to scrape the accumulated paint off that area as I assumed it would be on the side rails as a big weld chassis no. I'll let you know the result.
|
|
|
|
Post by mausie on Feb 21, 2012 18:41:51 GMT 10
Hi Peter So that is what we have to look forward to     We are sure that if the overhead cupboards were not solid that the whole roof would have caved in. It will be interesting to see the interior finished. Keep up the good work. ;D ;D ;D Mausie & Joe |
|
|
|
Post by Caprinut on Feb 22, 2012 0:25:50 GMT 10
 The state of interior with walls stained and rot in corners.  Front with curved section removes and window to go.  Front wall rebuilt in Tas oak veneer with shelves and console tunnel for all electical wires.  Kitchen area with extractor moved closer to ceiling and open shelf so we have more room as we are tall and bump our heads. Wall laminated with melamine.  Sub-frame for rear to extend and eliminate curved section and supply bike rack and support vertical rear wall. Rear wall constructed using foam core colorbond refrigeration panel, rigid lightweight and insulated. New window fitted with pull down exterior roller blind hidden in wasted roof curved section.  |
|
|
|
Post by Caprinut on Feb 22, 2012 0:32:53 GMT 10
The rear wall from the outside showing lights and roller blind. Light wires buried in foam core wall so no visible wires inside and out. Double lights in case bottom lights are obscured by bicycles.  .All wiring now runs in square trunking inside cupboards so no more fragile wall frames |
|
|
|
Post by Caprinut on Feb 22, 2012 21:33:27 GMT 10
|
|
|
|
Post by Caprinut on Feb 24, 2012 22:19:51 GMT 10
Some more pics of front of Capricorn rebirthed. Nosecone hinges at top to act as canopy for laundry as well as space for spare wheel and hoses.  Kitchen and front sitting ares showing shelves and table to fit on bracket under console  Roof hatch moved from front four seasons that leaked all the time to a rear hatch above bed . So romantic  |
|
|
|
Post by atouchofglass on Feb 26, 2012 7:32:14 GMT 10
Like the nose cone idea to lessen the wind resistance.
Turning it into an awning for washing etc.... top marks.
Caravans are one of those things that require a bit of lateral thinking.
Anything that can be used for two or more purposes is a good idea.
Cheers
Atog
|
|
|
|
Post by Caprinut on Feb 26, 2012 19:48:35 GMT 10
Thanks Atog for the encouragement. As I squared up the front I was left with little room on the A-bar for a gas bottle and spare wheel so I moved the wheel up higher and braced it with a upright under the nosecone. I have read plenty of warnings about loading too much weight on the rear so the wheel was not going there. Have tried to centralise all the weight, battery sits in wheel arch in cupboard and weighs 36 kg so tthese things add up. Will move water tank to ehead of axle from its current rear position.
And so we complicate our lives!
|
|
|
|
Post by mausie on Feb 26, 2012 21:49:41 GMT 10
Hi Peter We like the look of your kitchen cupboards     What did you use for the edging?? Wet weather here in Canberra again this weekend so no work on the Capricorn      I expect it could be a bit hot on the hill of Parliament House tomorrow ;D ;D ;D ;D Cheers Mausie |
|
|
|
Post by Caprinut on Feb 28, 2012 23:43:45 GMT 10
Mausie, What I did was cut all my cupboard fronts out of 3mm ply as per the old ones. The old ones were all chipboard and apart from the weight, do not like moisture and all had swollen up and crumbled in places.I had bought a sheet of laminex 1200 x 2400 in a colour I liked. Sort of reminds me of an aerial view of the brown outback. Look around and you will find amazing choices. Used a different spotted colour for the Cooking area wall. Very practical and durable.
Now if you go to most Bunnings you will find plastic edge beading in several colours and profiles for corners and right angles. They are designed to grip a 3mm ply and of course can take all the bashing of edges and corners that camping will inflict. Because I used ply the edges of ply always splinter and look daggy edge on. Cut the beading as you would a picture frame and slide it around all four edges and you have a neat and tough door. This was glued to a simple box frame for each door and drawer. I still have to drill and fit latches and handles.
Bloody caravan has 17 doors, and will cost a fortune so am looking around.
Hope this helps you. Peter
|
|
|
|
Post by Caprinut on Feb 28, 2012 23:52:40 GMT 10
Mausie, I forgot to say that the Laminex is cut roughly a bit bigger than the door and contact glue applied to both contact surfaces. Instant grip so dont go skew. After this you carefully use a blade and cut with several strokes along the edge of the ply to trim it exactly to size and then slip the plastic edge beading over this. Voila.- a pro job at little cost. Do your own kitchen rejuvenation the same way. Put the big boys out of business.
|
|
|
|
Post by Caprinut on Mar 8, 2012 21:55:08 GMT 10
New pics of interior kitchen counter with fold up counter flap. This goes up when bed is being used as space is limited, also serves to shield sleep area from cooking splashes. Different to usual flaps that hang down when not used.   Table has now been fitted, drops down as extra bed  Getting there, just waiting for an electrician to certify wiring and then fix brakes and then launch it! |
|
|
|
Post by Caprinut on Jul 19, 2012 19:28:09 GMT 10
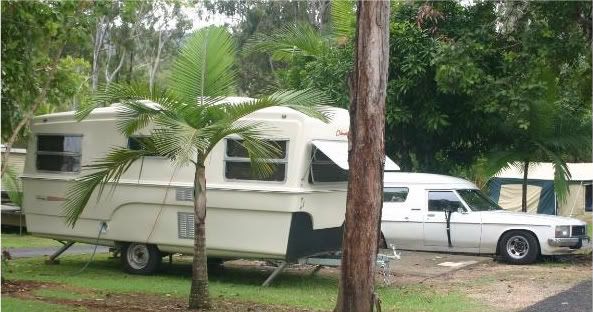
Great News! The Capricorn rebuild is reaching its last stages. Taken it on the road for a quick tour of the neighbourhood to set the new electric brakes. Hard to believe but- slowly slowly catch a monkey- got it to this stage Before pic  Final pics    Just the upholstery to do now and then our first sleep. Slight problem in that I thought that ordering thicker foam would be more comfortable but it is too tight too the underside of the table and so now I need to shave 30mm off all the cushions. Tried to use a hot-wire to cur them but not so successful as the wire does not heat up enough or burns out, so still looking for a way to trim them. Interior otherwise nice, and a proud father I am. Radio in front console  Kitchen shelf and extractor  New roof hatch to replace 4-seasons  Shelves and blinds done  Lights all LEDS using small deck lights wired to 12v battery  Bedroom privacy curtain  And finally bed that folds up as a bench for daytime use, courtesy of Ikea   |
|
|
|
Post by Caprinut on Jul 19, 2012 20:31:28 GMT 10
Some more pics to update my build- Photobucket giving grief! Original van  Final build  Exterior rear bike rack  Interior privacy curtain  Water pump with modified gardena t-piece to draw from either of two tanks under van  Hope these pics come out okay Exterior rear pull out awning   |
|
|
|
Post by viscount6116 on Jul 20, 2012 13:31:59 GMT 10
Howdy Caprinut Wow what a great make over!!It looks fantastic Cheers Andy    |
|
|
|
Post by mausie on Jul 20, 2012 20:27:55 GMT 10
Great result. You must be very proud. It looks great    Here us a tip for cutting foam. Use an electric carving knife - it works a treat. They are not too expensive providing you can still find one in the shops. Otherwise try garage sales or Sunday markets    ;D Mausie |
|
|
|
Post by barkpaint on Jul 20, 2012 22:10:45 GMT 10
Love your van. I have used an electric carving knife on foam many times, just keep it straight. If you don't have one, ask a neighbour? cheers, Heather
|
|
Deleted
Deleted Member
Posts: 0
|
Post by Deleted on Jul 21, 2012 8:09:59 GMT 10
love your work  what is the bentch top color called? cheers gav |
|
|
|
Post by Caprinut on Jul 22, 2012 18:09:34 GMT 10
Thanks to those with their compliments.
Mausie, how goes your Capricorn rebuild ,or is the cold weather slowing you down.
Gav, I cant recall the exact name but it is a Laminex colour something like Cassaba but consists of soft dots of various colours almost like gummi sweets, so adds a bit of fun as does the curtain.
The roof still needs a coat of gloss clear to go over the ThermoShield matt paint but the weather has been months of damp and cold here in SA so I will wait till it warms up. The next task is to take it to a weigh bridge cos I am anxious to see if it has gained much weight.
Cheers, Peter
|
|
|
|
Post by mausie on Jul 22, 2012 20:18:28 GMT 10
Hi Peter Our rebuild has come to a temporary pause.  First I had a total knee replacement and 2 weeks ago Joe had his knee replaced. Yes ouch and that would slow anyone down.  The Capricorn is still in our daily chats. I am making a cross stitch table cloth for it and have just finished 2 crocheted bedspreads ;D ;D We are looking at ways of fitting LED lighting into the old style lamps inside the van. Joe is drawing plans for building a 1:10 scale model - well it keeps him occupied while he is laid up. Cheers Mausie |
|
|
|
Post by mausie on Jul 31, 2012 11:41:36 GMT 10
Ok you have got us going again.  Joe with his crook but recovering knee and all has found sitting jobs to do on the Capricorn    We now have prepared and painted the remainder of the chassis but that will be a story against our post with pics ;D ;D ;D What size wheels did your van have originally? Cheers Mausie & Joe |
|


 .
.


 .
.


