Deleted
Deleted Member
Posts: 0
|
Post by Deleted on Feb 26, 2009 11:44:28 GMT 10
Hi Millard1399,
There is reference to the where abouts of a flip over jockey wheel plate earlier in the post. I spoke to some people at Cara Rest here in Adelaide and they have them in stock.
Their version is bolted to the wind up jockey wheel part and flips over as previously shown. They dont sell the plate part separately but someone else might. At least it is out there.
Cara Rest said that you only use it in soft ground where you are normally unable to wheel the jockey wheel anyway and the plate is flipped over before the van is unhitched off the tow ball.
Hope this helps,
Cheers, techron
|
|
|
|
Post by millard1399 on Feb 26, 2009 18:40:34 GMT 10
Thanks for that info techron ;D I had a look at the Cara Rest website, but unfortunately they don't have a 'search' function to allow me to see the product.  Sounds like it is similar, so at least we know there is still something like it on the market. Good one... And while I'm here... The Millard is now a travelling advertisement for Bunnings Warehouse... 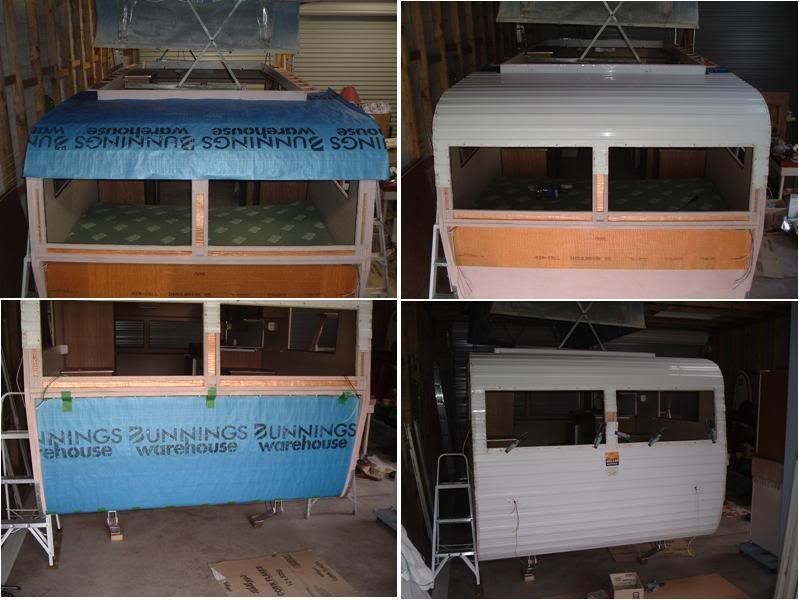 ...although fortunately the cladding very quickly covered that over   I'm currently mucking around nailing the cladding into position, and at the same time trying to make sure the original screw holes line up. It's amazing how difficult that can be. You would think everything would go back reasonably in its original position, but not so. Sometimes you can get within half a hole but just can't get them to line up exactly. It's going to be a bit easier at the front (I hope) because it's all new timber at that end and so there are no original holes in the timber to line the cladding holes up with. I can just drill through the cladding holes wherever they fall. As a side job, I've dunked the rear lights into hot soapy water to remove all the caked-on mud that was in them (I reckon this van has seen a lot of dirt roads pass under its wheels). I also gave the galvanised metal separators a cleanup and some silver chassis paint. This photo group shows the before and after... 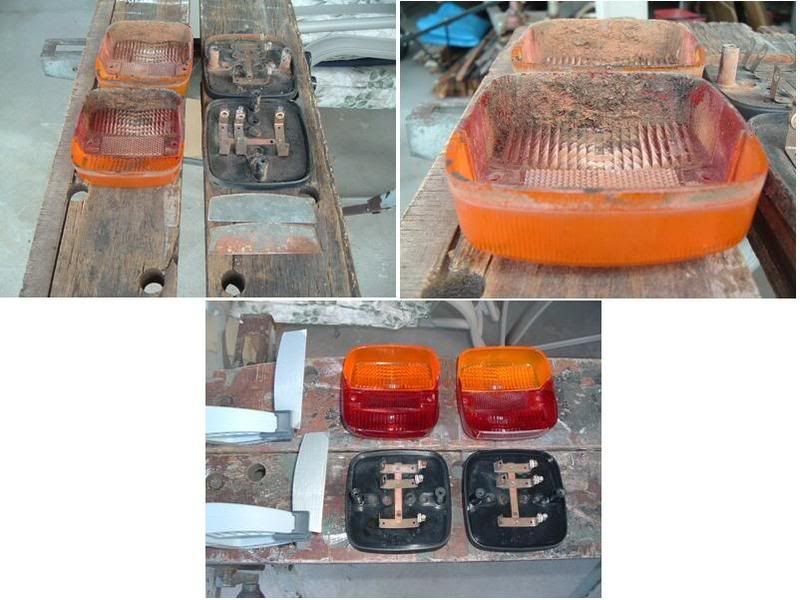 A bit more to do on the rear cladding before I can move to the front. cheers, Al. |
|
|
|
Post by millard1399 on Feb 28, 2009 18:33:56 GMT 10
Just a short update today... I cut new cover plates from an old piece of laminex, and glued them over all the power and light inlets... 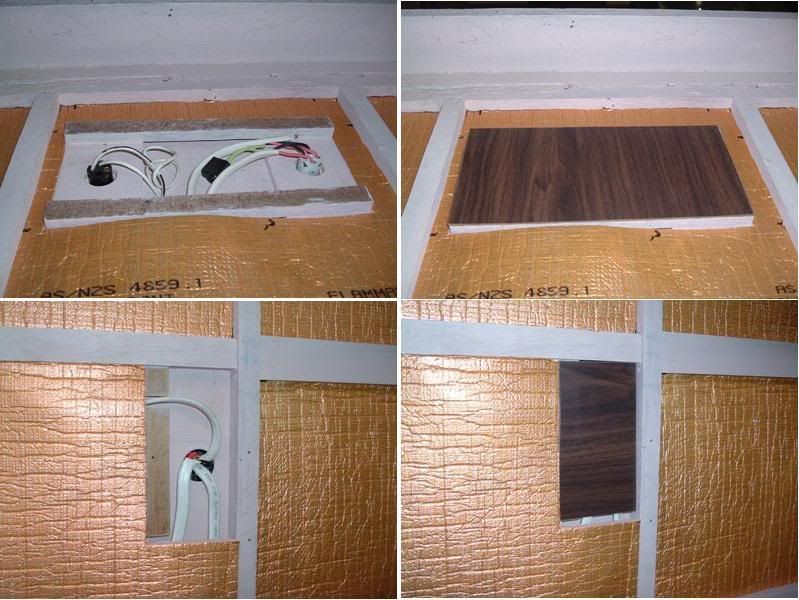 Still have to sort out the last one which covers the mains inlet power. Can't do that until I've got the socket on the external cladding positioned correctly. Till next time... cheers, Al. |
|
|
|
Post by bobt on Feb 28, 2009 21:22:25 GMT 10
Hey Al It is all looking good, what with a painted timber frame, the clothes going back on, shinny lights and the backing going onto the electrical, it sure is coming along nicely. I have never seen the sheet removed or fitted on one of these I take it each sheet inter locks and is screwed to the frame in the corners. Sure would be a challenge trying to use the existing screw holes.. looking real good  bobt |
|
|
|
Post by atouchofglass on Mar 1, 2009 8:08:14 GMT 10
Hey Al Looking good mate..... Getting there with lots of sweat and swearing I bet ;D ;D ;D     The lights are one of those things I've struggled with I've fitted LED lights and while they are the bees knees..... The light companies have a way to go yet in finding suitable shapes and sizes for caravans Yours will look good Narva have brought out a range of LED lights that are exactly the same as the normal 12 volt bulb lights So it would be easy to change over to LED's Unfortunately I don't like the fact that they stick out so far from the body of the van       So I am stuck with lights that aren't to my liking either way To quote one nasty woman..... "tough titties" for me ;D ;D ;D ;D ;D ;D Keep at it mate and we'll see each other on the road in no time Cheers Atog |
|
|
|
Post by keelz on Mar 1, 2009 9:21:25 GMT 10
Al I think i've said this before that your van is being put together with more attention to construction detail than probably what it was ever given when built in the factory.  Keep up the good work, it's great to see that ally cladding going back on. Are you using a staple gun that has the ability to shoot those small tack kinda nails or you nailing by hand? The work you've done tidying up those light fittings is perfect example of the attention to detail you have given this van. Atog, there are now guys on Ebay selling LED globes (festoon bulbs etc) that fit into the existing 12v fitting globe holders (such as the fitting shown in Al's post above). So never fear, you can keep you original fittings and still convert them to LED operation  You can get most sizes and configurations even the more conventional stop/tail bulbs. On the downside not exactly cheap but i think over time we will see more suppliers in the market with improved/cheaper prices and higher intensity led's. cheers Keelz |
|
Deleted
Deleted Member
Posts: 0
|
Post by Deleted on Mar 1, 2009 9:33:07 GMT 10
I'm surprised,given the overall well worn condition of most things on the Millard, just how good those fittings have held up. Are they original? They don't look like Hella? PS Personally I avoid the use of festoon style lights in tail stop indicators. There lifetime is limited. Globe quality is also a mixed bag. Many I've used, blacken.  Bayonet or Led as Keelz has indicated. |
|
|
|
Post by keelz on Mar 1, 2009 12:39:51 GMT 10
now don't forget, at this point in the project you leave the special note inside the wall cavity!  ;D   Last opened in year 2008! Keelz |
|
Deleted
Deleted Member
Posts: 0
|
Post by Deleted on Mar 1, 2009 12:51:41 GMT 10
Somehow, I don't think this van will ever be 'opened' again. Or maybe simply the url of this thread .... if urls are still around in another 40 - 50 years.  |
|
|
|
Post by millard1399 on Mar 1, 2009 21:38:53 GMT 10
Thankyou to all for your supportive comments ;D ;D Sometimes I feel like a lone soldier fighting a battle single-handedly, so it recharges the batteries to have your "peers" offering words of encouragement. The stick of dynamite has been put back in the "Easy-Way-Out" cabinet, and we forge on   To clarify a few things about the Millard from the above questions... 1. The cladding is being nailed back on with 20mm hot-dipped flat head nails, as seen in this photo (top right) I posted in the Sealant thread recently... 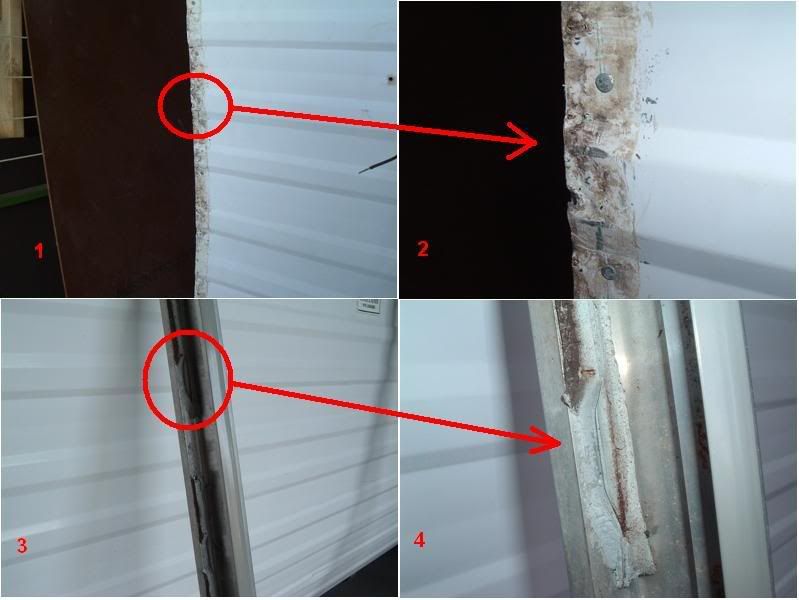 I just drill a pilot hole through the cladding and then hammer the nail in with a hammer and centre punch so I don't accidentally hit the cladding full on with the hammer head. Can't afford to damage the cladding after all the work done so far   Wherever separate pieces of cladding join together, there was originally some double-sided waterproof(?) tape used. In many places, this tape had lost its 'stickiness' which contributed to water being able to get into the joint. In the rebuild, I'll be replacing the tape with sealant. 2. The tail lights are the Real McCoy, genuine Hella...made in Oz. I'm pretty sure they are original based on the screw holes for them being the only ones in the cladding, and they match photos I have for other poptops from the same era. Light globes can be a bit of a lottery. My box trailer is 19 years old this year. I've changed two of the six festoon globes in all that time. The trailer sits out in all weather. I have a good stash of globes in the shed if the Millard lights start to play up. 3. Good idea about putting a note in the framework. I've done that before when restoring old furniture, say, under a chair seat cover. Down the track when someone takes the upholstery back off they'll see a note from me about when it was restored. For the Millard, something like: "Are you an idiot, or what?!! What do you think you're doing trying to restore this Millard??!! Take it from me, buddy, you'd be far better off spending your money on wine, women, and song! But if you're determined to continue, then I wish you good luck...but somewhere down the track remember these words: 'I bloody-well told ya so!!!!'. Cheers, Al, Bellambi NSW 2009. Have a nice day   " That'd be a nice surprise finding, eh?     cheers, Al. |
|
|
|
Post by millard1399 on Mar 17, 2009 20:19:14 GMT 10
Well, the builder doing the house extensions had a day off today, so I was able to use the backyard to work on a piece of the Millard cladding. A couple of weeks ago I cleaned up the roof panels that sit on one side of the pop-top opening. A couple of aluminium brackets had been pop rivetted, in the past, to the cladding either end of the roof. Dunno what they are there for...maybe to hold a fishing rod or something. They'd been sealed with the dreaded silicone stuff, so I thought I'd take them off and reseal them (...can't leave them off and have four rivet holes either end   ). I discovered one of the brackets had only been sealed around the extreme perimeter and had a layer of dirt in the inner area (photo 3)... 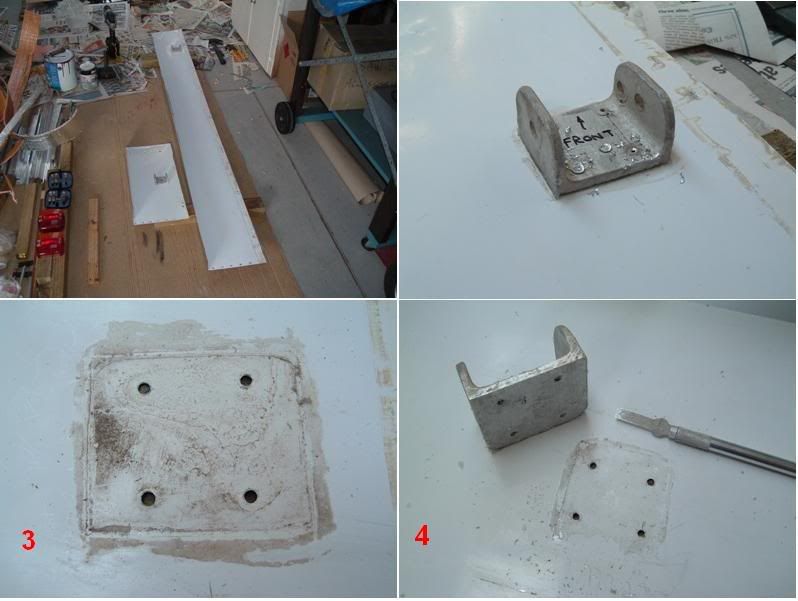 The other bracket (photo 4) had a good layer of silicone under it, and was a real *&$# to remove! I had to carefully undercut it with a sharp craft knife, trying hard not to scratch the painted surface (didn't succeed  ). The moral of this story is...always check the seal on any fixtures or fittings. Re-sealing them is worth the effort. Today I worked on cleaning the mastic edges of the front roof cladding. This photo shows how little of the sealant was applied in one section. (Maybe the operator sneezed at this point.) Again this illustrates how you can't rely on your van having been sealed correctly previously. You can see the rust marks where moisture has got into the seal and rusted the metal staples that held the cladding to the frame originally... 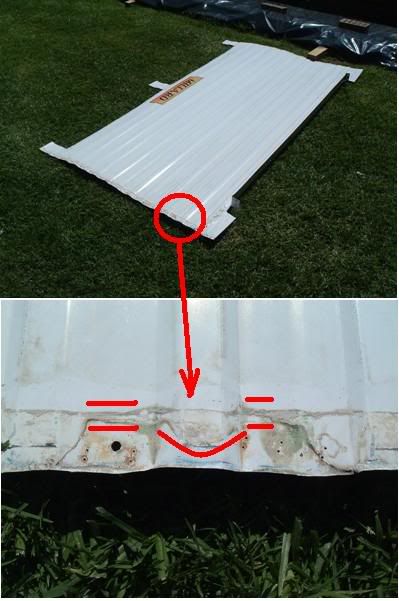 All being well, I can fit the Bunnings insulation paper and this piece of roof cladding back on tomorrow. I can do that without interfering with the builder.   cheers, Al. |
|
|
|
Post by keelz on Mar 17, 2009 21:23:29 GMT 10
Gday Al, ah yes, the clean-up works before re-sealing..... i know how time consuming it can be  I cheat - smallest narrow wirebrush on the cordless drill - does wonders to remove all the junk along the perimeter (where it will be covered by the corner angle, so loss of paint is not an issue - it will actually allow the future sealant a good 'key' into the real aluminium surface. Just got to hold it steady and keep the speed slow - works wonders and saves elbow grease. You're right, they never used to get enough mastic in between the cladding and the aluminium mouldings, probably due to cost cutting - the labour time spent properly masking adjoining surfaces and cleaning up excess sealant was something the manufacturers wanted to avoid, just enough to get it thru the 12 months warranty period without leaking. The way i see it, you need to waste a lot of sealant when re-bedding the corner angles, making sure plenty is squeezed out so there are no air gaps or pockets where water can track in later on. So - forget the clothing bin, all old unwanted clothes are now to be retained as caravan re-sealing rags for wiping off excess sealant off both van and ones fingers! Cheers Keelz |
|
|
|
Post by atouchofglass on May 10, 2009 17:26:39 GMT 10
Hey Al
You've been a little quite about what's happening with the Millard of late
Sooooo
What's happenin?
All the sides back together..... perhaps?
Atog
The curious
|
|
|
|
Post by millard1399 on May 10, 2009 18:22:38 GMT 10
Hi atog, the Millard is "out of bounds" at the moment, due to the house extensions being done. Not enough room for both a caravan restoration and a house extension to be done at the same time. "She who must be obeyed" wants the extension done yesterday, so it has top priority. Looks like another month before the builder packs up for good, which means 3 months will have passed since the Millard was touched. That should be more than enough time for the "renovation batteries" to have been recharged, and it will be all fingers out and back into it. So at the moment the Millard is maturing in the garage like a good wine...   cheers, Al. |
|
|
|
Post by bobt on May 12, 2009 22:12:25 GMT 10
Hey Millard1399
Can not wait to see the next installment on the reno... caravan that is.
When this new extension is finished will it interfer with your renovation projects?
Bobt
|
|
|
|
Post by atouchofglass on Jun 23, 2009 6:11:24 GMT 10
So...... Al How's the house extension going? And by extension     .... restarting on the van soon? Cheers Atog |
|
|
|
Post by millard1399 on Jun 24, 2009 21:46:15 GMT 10
Hi atog, well...I have good news and bad news ;D  The good news is that the extensions received final approval from the Council inspector last week, so at least it was built to some sort of standard. The bad news is that I now have a million-and-one finishing jobs to do to make it totally completed. I've posted the first photo group before, but here it is again. These are progress photos during Feb-March this year... 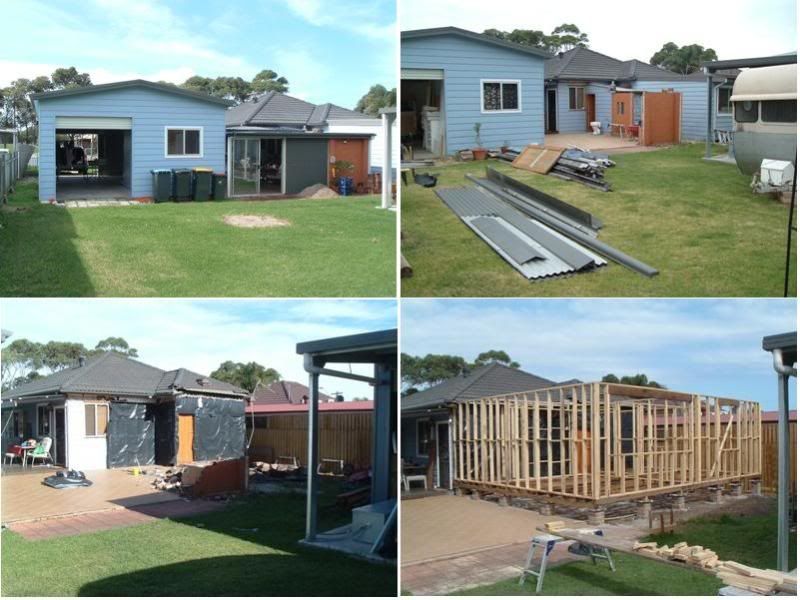 ...and this is what we ended up with... 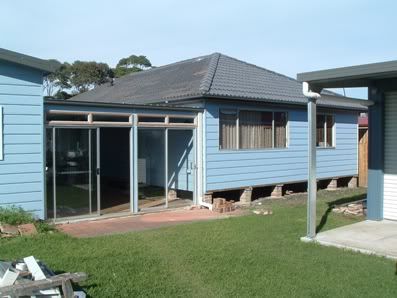 All the blue paint is my handywork. In an effort to minimise the total costs, we have chosen to do as much as possible on the finishing side (meaning, more money is left for caravan restorations ;D ;D). So apart from painting, I've built framework and shelving for a walk-in wardrobe, a built-in wardrobe, and a linen press...  But I'm not just a painter and a carpenter  . The centre glassed-in section, shown above, originally had a large tiled concrete floor which had to be partly cut up to allow the new brick piers to be positioned. Which meant I had to do some precision cutting and tile laying to repair the floor back up to the piers... 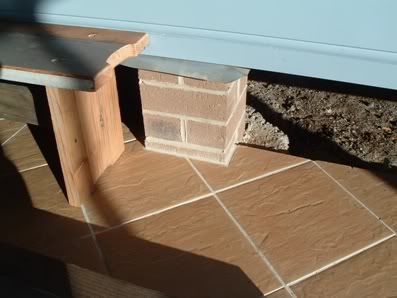 But wait!! No sooner have I finished being a tiler, when I have to put the carpenter's hat back on and make a bench stool to cover the unsightly gap where the piers are at the side of the undercover area. I'm recycling big planks of oregon that were salvaged from the original demolition... 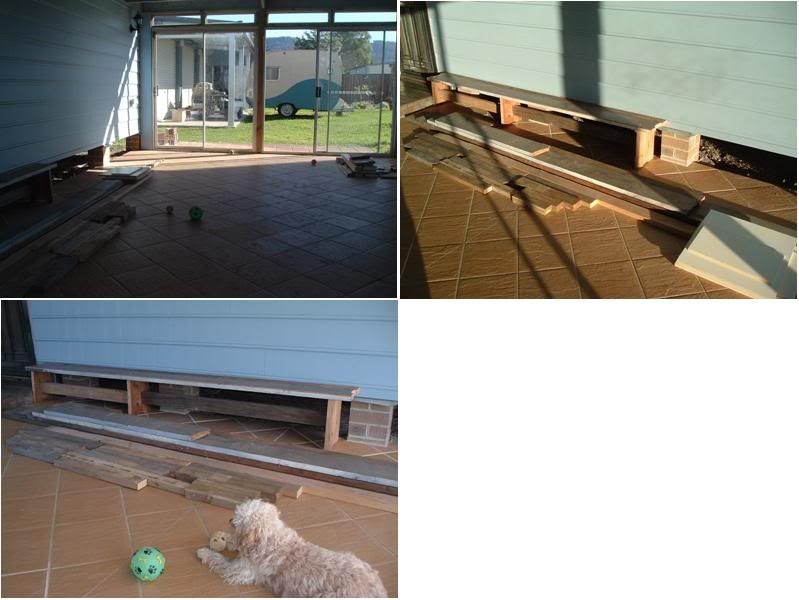 I have another stool to make to cover the full gap length, and then nail hardwood decking strips along the front face of the stool legs (like horizontal slats) to hide all the piers. The dog in the photo is supposed to be my "second labourer", but as you can see she is usually on her "smoko" break     . All of this mucking around with jobs on the house should make for getting good skills for caravan restorations. I might have to try working on a van one day...   As far as the Millard goes, the last time I actually had time to look at her, she was being used to prop up ladders and bits of timber for the extensions... 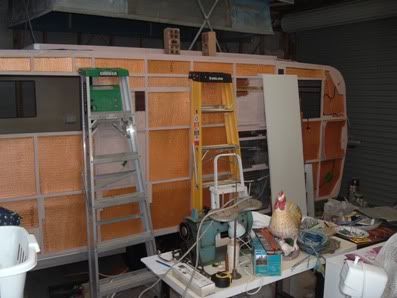 A number of the squares of insulation I painstakingly cut into the framework have fallen back out and are on the floor somewhere under the van. I'll have to retrieve them eventually. In the last five months, the only thing I've really done towards the Millard was to buy an industrial sewing machine about a month ago for the bargain price of $60 from the local Salvo's store. This will allow me to have a go at doing the upholstery and curtain requirements for the van when I get to that stage. Then I can claim to be a painter, a carpenter, a tiler, a curtainmaker, an upholsterer, a ??... 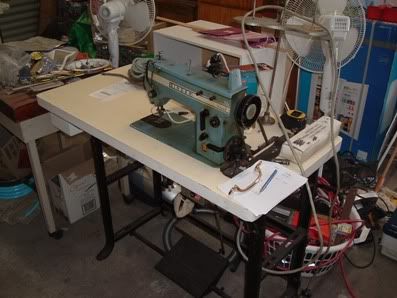 So, there you have it. Most days I'm knackered by the evening and too tired to do much of anything. Even the Classic forum history section has suffered from lack of energy and time, however I do try and do a little bit every now and then. The Viscount history thread is almost complete if anybody is interested in having a look through it. It will give you an idea of what I'm hoping a number of the other brands will eventually look like in terms of detail. Even as tired as I am most days, I'm still keeping an eye on what you and others are doing to your vans. I understand stocks of rosewood are in very short supply in Australia as a result of some bloke up north buying all the available supplies.     The Millard will have to continue to 'mature' for a little longer, like any good wine. Hopefully it hasn't turned to vinegar by the time I get back to it    cheers, Al. |
|
|
|
Post by atouchofglass on Jun 25, 2009 5:52:13 GMT 10
Maaaaate !!!!!!!! You have been a busy boy haven't you!!! Looks good to me Al The extension has fitted in as if it was original congrats and well done     Even love the fluffy slipper with legs in photo ten ;D ;D ;D So this is your new bedroom/office/sewing room/spare room/  ? Or just a workshop closer to the vans     Mate keep at it and you'll be swinging that cat in next to no time Think of it as a sort of caravan without wheels   I like your tile choice so much there is something similar throughout my house and on the front verandah With all those trades behind you now do we call you "Jack"? Cheers Atog |
|
|
|
Post by millard1399 on Aug 30, 2009 16:20:54 GMT 10
G'day All, Well, after a six month lay-off for the house extensions, the Millard workshop is now back in full production! ;D There's been a flurry of activity over the last week or so! It's almost like one of those exercise circuits where you have to run to the first corner and do 50 push-ups, then run to the second corner and do 100 star jumps, then onto the third corner, etc etc... [Whew!!] So let me update you with a bit of what's been happening... Front lower cladding:This had been peppered with road stones during its life, so it needed a good paint job to bring it back to something presentable. The final spray coats are still to come. Under the newspaper I just handpainted it silver (forgot to take a photo  ), but above the newspaper will be white gloss... 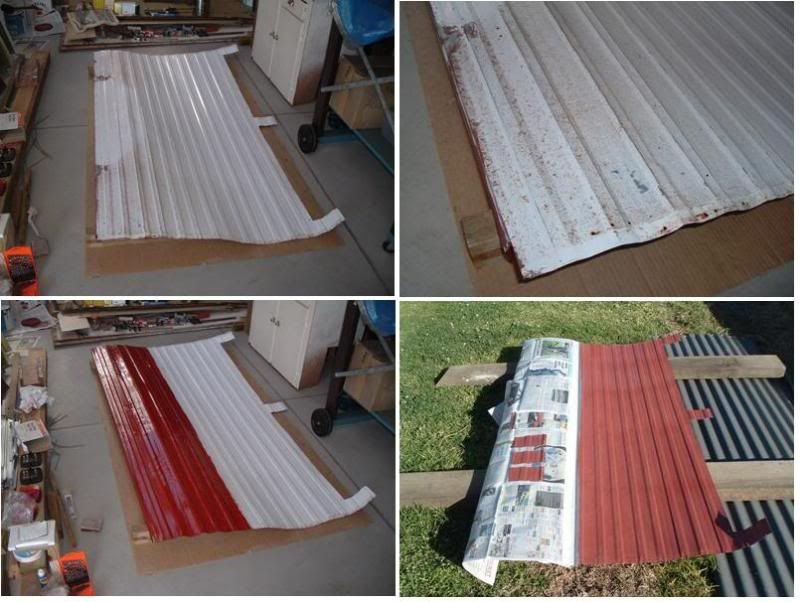 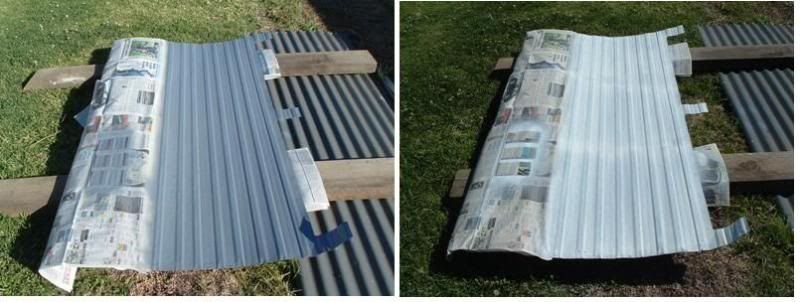 Exterior light fitting: Exterior light fitting:All the old foam rubber seal was scraped off and the rim of the light given a good rubbing back. Then a bit of spray painting, followed by new foam fixed into position... 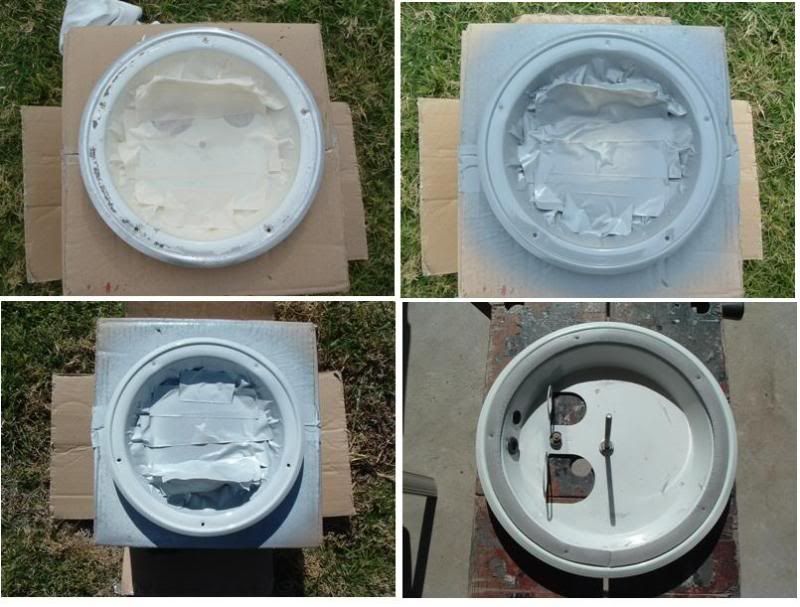 Window fittings/Table fittings/Front window shield: Window fittings/Table fittings/Front window shield:A lot of fittings around the van have rusted due to the original galvanised coating wearing away. Lots of fittings are being repainted... 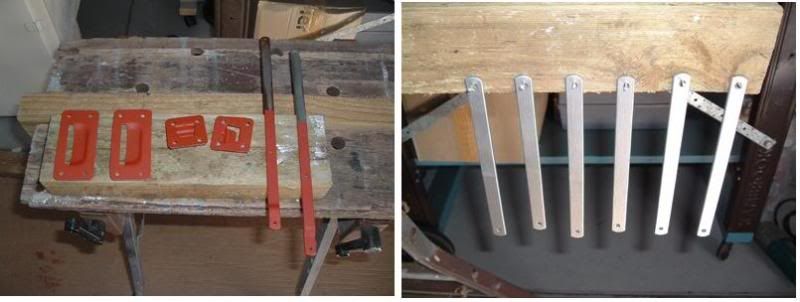 Millard stickers: Millard stickers:All old stickers were removed with the help of a heat gun and a plastic scraper. The only problem is that most of the glue stays behind on the cladding, and is a real bast*rd to remove. About the only thing that removes it fairly easily is metho, but it also removes the paint off the cladding after a bit of rubbing. Lots and lots of time is spent trying to get the glue off with various cleaners, but leave the paint behind undamaged. New stickers have arrived from CaravansPlus, and will go on after the windows have been reinstalled... 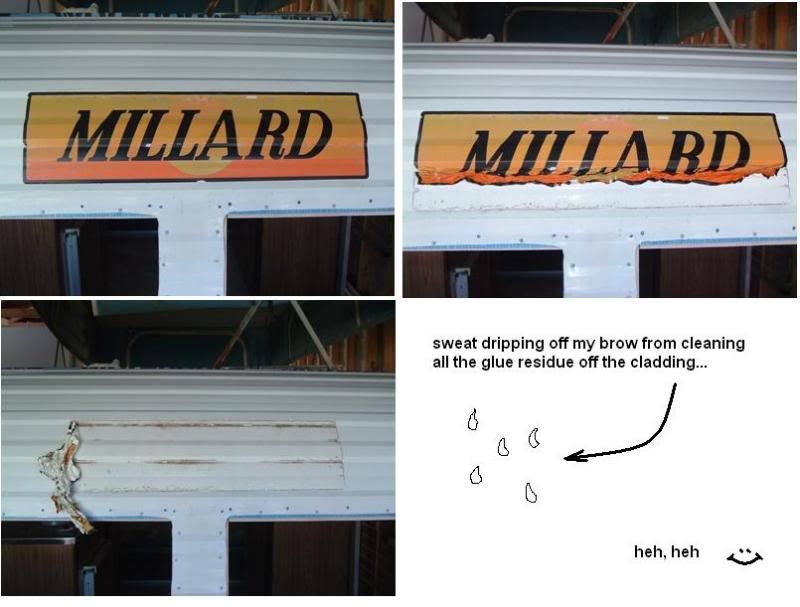 Entry door: Entry door:This was pulled apart and the old sealant scraped out of the side channels. I bugger*d up three of the four plastic angles that hold the frame together, when I was trying to knock it apart with a rubber hammer. I had to go to the local Second Hand Yard and get some heavy guage Aluminium plate, and cut some new angles out of that. A few pop rivets down the track and it should go back together again ok. The segments of white cladding out of the door, were all given a clean and polish ready for the reassembly... 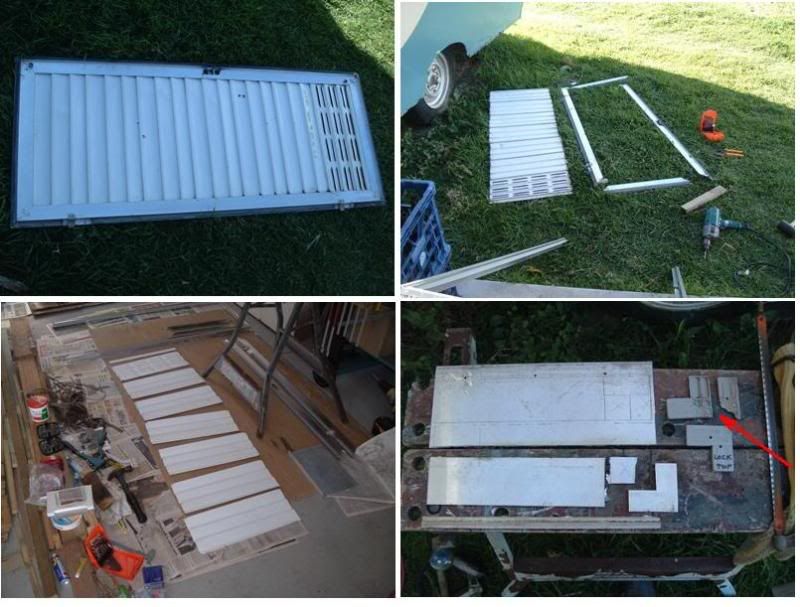 Windows: Windows:I've dismantled three of the eight windows so far. Totally pulled apart and scrubbed each bit with soapy steel wool. New grease in the winder gearbox. New weather seal foam strip ready to go. Window tint came from ebay last week. Replacement glass louvres for the cracked ones have been bought and are ready for tinting. Just waiting for Bunnings to come good with the Special Order of Sika sealant so I can start to put the windows back together again. Certainly making up for lost time!! ;D ;D cheers, Al. |
|
Deleted
Deleted Member
Posts: 0
|
Post by Deleted on Aug 30, 2009 17:11:08 GMT 10
Hi Al,
As usual, top work. What is the red paint on the aluminium and what paint are you using to top coat?
|
|
|
|
Post by atouchofglass on Aug 30, 2009 17:33:50 GMT 10
Hey Al Looks like the digit has been removed convincingly Lots done and plenty to go by the looks Those lousy plastic corner bits will always break..... your aluminium replacements will last forever     Well done Keep the photos coming and the work progressing        Cheers Atog |
|
|
|
Post by kiwijim on Aug 30, 2009 17:44:51 GMT 10
Hey Al, Great to see the Millard coming together, Should be ready this Summer, I see that you have been having fun with the glue from the stickers, I have found the easiest way to remove this glue is to paint over the glue with General Purpose spraying thinners, Leave the thinners for a few little while to soak into the glue then use a kitchen scouring pad....the type with an abrasive on one side and foam on the other, Soak the pad in thinners and a couple of rubs should see the glue disappear. Keep at it Mate.........You're winning. kiwijim  |
|
|
|
Post by millard1399 on Aug 30, 2009 20:31:47 GMT 10
Thanks for your supportive comments, fellas! ;D [although you could be a bit MORE supportive and come 'round with a paintbrush...     ]Wahroonga ]Wahroonga, the red paint is the red oxide primer that I've been using on anything that doesn't move out of the way.  Same stuff has been used on the chassis, springs, seat hinges - in fact ANY metal that needed painting has got a coat of it.  The white cladding was rubbed back with soapy steel wool to remove the oxidised paint layer, and to roughen up the surface a bit to provide a 'key' for the primer coat. Then the red oxide was hand painted on with a paintbrush. Then rubbed back with plain dry steel wool before the spray coats were applied. The cans of spray I've been using are the really cheap crap good value cans from the Auto chain store. It says "Export" quality on the can, but I think it's the sort of export market that takes two plane trips, a bus ride, and a week on a donkey's back to get there.  I'm predicting that when the Millard sees sunshine again, this paint will fade, blister, and peel within a couple of days. Luckily it's only a Millard, otherwise I'd be upset   The price was right though... 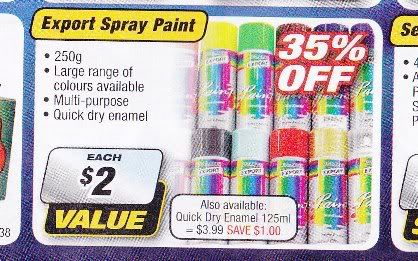 The cladding gets the red oxide coat, followed by a grey primer spray coat, followed by a white undercoat, and lastly will get two coats of white gloss. One full can is used for each coat, so I splurged and bought a heap of cans, at $2 each, for all the other panels that will be done (all the blue panels are getting resprayed. The other white panels are still ok and will only need a good polish.) kiwijim, does the paint thinners have any effect on the white cladding paint? Don't want to put anything on it that will wear it away. I think the paint coating is fairly thin already after 30 years of weathering. cheers, Al. |
|
|
|
Post by kiwijim on Aug 30, 2009 21:39:45 GMT 10
|
|
Deleted
Deleted Member
Posts: 0
|
Post by Deleted on Aug 30, 2009 23:02:21 GMT 10
Gidday Al, The van is lookin good mate as is the extension on the house as well, nice bit of tiling there. That good value paint might be just the stuff I'm looking for to give my old girl a bit of an external lift too - bit on the pricey side tho'  cheers mate Carl |
|