|
|
Post by millard1399 on Mar 17, 2010 16:26:06 GMT 10
...And here is the roof painted in pink primer...(quick, ay!?!   ) 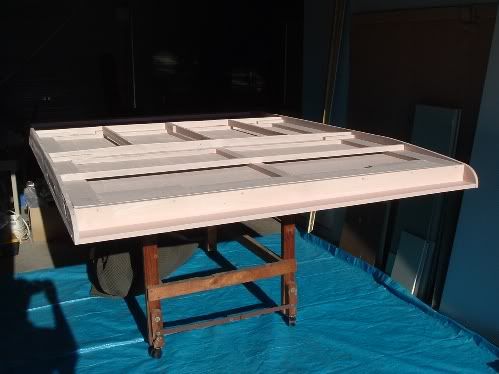 |
|
|
|
Post by atouchofglass on Mar 18, 2010 6:33:44 GMT 10
Hey Al Does your back hurt? You know Since this week you seem to have: Your shoulder to the wheel Nose to the grindstone Eye on the ball Head down - bum up Must be murder on the back    ;D ;D ;D ;D Maaaatttttteeee That is some progress Seems that Kiwijim's gallivanting around the map of Tassie Excuse me?   ;D ;D ;D And my adventures up the Lake Has given you the much needed boost to rush outside and fix everything in sight...... look out if your next door neighbours dog isn't spade   ;D ;D ;D ;D ;D Looking good mate Soon be off down the road and enjoying this wide brown land. Cheers Atog |
|
|
|
Post by millard1399 on Mar 18, 2010 18:32:20 GMT 10
Hey atog, yep all fingers have been extracted of late! ;D The canopy lifters and roof clamps were completed a week or so ago, and were just sitting in the wings waiting till they're required. But the work on the roof is the current focus. I've set myself a deadline of April 16th to have the van "completed" here at home. For some reason I had it in mind that the van is due for re-rego some time in June, but the other night I was looking through some paperwork and found last year's rego papers...with a date of May 1st. Yoiks!! So I'm planning to have the "home stuff" completed by April 16th, which will leave a fortnight to have the brakes system checked and refurbished, and to have it inspected for rego. I'm currently painting the underside of the roof around the edges. But while I was waiting for the paint to dry today, I knocked up this little job using some leftover treated pine, some fencing wire staples, and some poly rope... 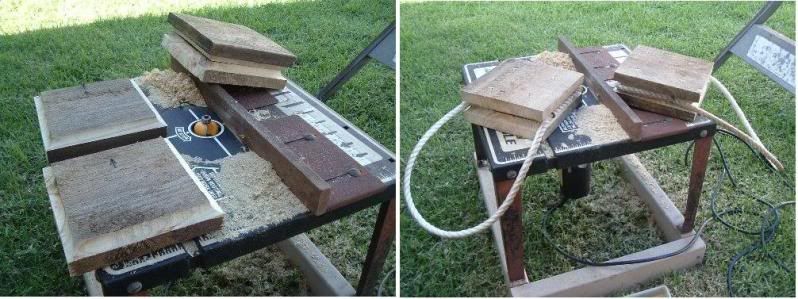 ...thought they might be useful under the rear jacks on soft ground. But...that's enough bludgin'!...time to get the paintbrush out again!!   cheers, Al. |
|
|
|
Post by kylarama on Mar 18, 2010 20:22:57 GMT 10
So I'm planning to have the "home stuff" completed by April 16th, which will leave a fortnight to have the brakes system checked and refurbished, and to have it inspected for rego.  You mean theres something on the van your not doing yourself! So far we've seen you as a Carpenter Cabinet maker Spray Painter Canvas Maker Seamstress Plumber Gas Fitter Electrician Fridge Mechanic Metal Polisher Window Tinter Glazier All round Madman (Come on! who puts that much effort into sole plates for stabilizer jacks) Have I missed some? Now your saying you won't have a crack at a set of mechanical brakes  Or are we upgrading to electrics? Looking good. Something tells me it will pass rego with a breeze. |
|
|
|
Post by millard1399 on Mar 18, 2010 21:33:23 GMT 10
Holy mackeral, kylarama!...when you put together a list like that, it's no wonder I feel like I need a holiday!!    Unfortunately my skills (and interests) don't extend to the mechanical (automotive) side of things. Which is rather odd, because I'm one of four sons, and the other three brothers can pull a car into a million pieces and put it back together again, whereas I'm, like, standing there going "Ummm...what's that thingy do?". I think I missed out on my Dad's genes for that sort of thing, because he was a mechanic for a part of his lifetime too. But he was a pretty good handyman for various other things, so I got those genes instead.  My oldest brother has had a mechanic's business for 28 years now, so I entrust all my car servicing to him. I just tell him to do whatever needs doing, and make sure the d@mn thing doesn't break down on me! So, the van will be put into his capable hands to make sure it will stop when it's supposed to. I suspect the drums will possibly need remachining, and judging by the amount of rust that was on the outside of the wheel hubs, the insides are maybe in just as bad a condition. No upgrade to electric brakes...just want to have the existing system checked out by someone who knows what they are doing (...which is NOT me  ). ...now what'd I do with me paintbrush??   ... cheers, Al. |
|
|
|
Post by philouise on Mar 19, 2010 11:22:25 GMT 10
G'day Al. Keep up the good work - I, and the rest of the forum i'm sure, really enjoy viewing your posts. But tell me - the photos on post 296 - how are you going to remove the overspray on the bondwood  Cheers. Phil. |
|
|
|
Post by millard1399 on Mar 19, 2010 13:27:41 GMT 10
G'day Phil, that old bondwood is a really sad case. If the Millard hadn't have come along to spoil the party, the old bondwood was going to get a ground-up restoration, because it NEEDS it. It's in shocking condition, with woodrot everywhere, plus severe rusting (read perforations) in part of the chassis. The bit of overspray I did the other day has probably increased its value ten-fold, because that would currently be the best part of the van.    cheers, Al. |
|
|
|
Post by bobt on Mar 20, 2010 21:05:09 GMT 10
Hi Millard1399
Its all coming along nicely. Bit of a rude shock that one...the expiry date on the rego..
Must admit I perfer to have a professional look at the brakes on my caravan too. I call it peace of mind.
Like to sole plates. Miles more advanced then mine.
bobt
|
|
|
|
Post by tassietiger on Mar 21, 2010 16:54:28 GMT 10
Nearly there Al. Well done. I will be taking the Tiger Hunter in this week for an RWC and then rego. I would be interested to "compare notes" on how each of us goes with the rego and costs etc. Like you I am not a mechanical type prefer the "wood and nails" approach.
|
|
|
|
Post by millard1399 on Mar 21, 2010 21:28:43 GMT 10
G'day tassie, yep it will interesting to see how we both go with the rego. Here in NSW we pay $146 to the authorities, plus $33 to the inspection station (in my case it's my brother), so all up it's $179. But as you know, we have six-lane freeways between every town in the State, so we don't mind paying through the nose.    The Millard story continues: Underneath the poptop roof is a ceiling of decorative plywood. The canvas skirt sits about 4 inches inside the perimeter of the roof, all the way around. That 4 inch strip of decorative ply on the outside of the canvas has weathered over the years, to the point where in some areas the top layer of ply has separated from the others (glue bond broken down). So I've had to do a bit of neurosurgery to glue these areas back down again. Then I sanded this strip lightly, before applying primer, undercoat and top coats, using paint leftover from the house extensions. These first two photos show the ceiling and a section showing the weathered appearance... 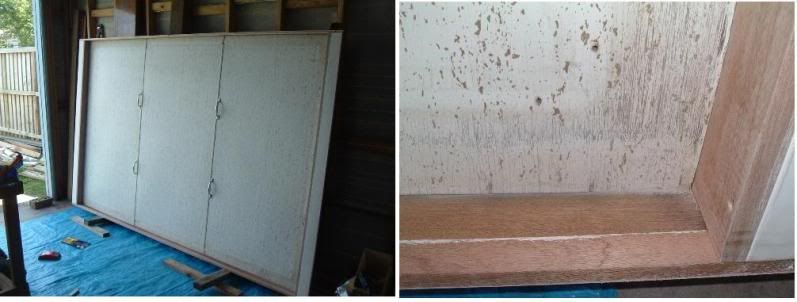 ...and what it looked like after the primer coats, and when it was finished. The canvas skirt fixes to the ceiling right on the border between the blue and the white... 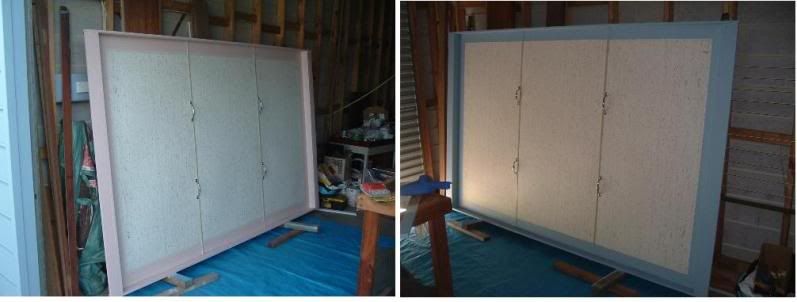 I'm letting the paint cure for a couple of days before fitting the cladding back on. In the meantime, I've been mucking around with the table for the inside of the van. The dreaded chipboard was used as the base of the table. I've noticed with chipboard that after a number of years the resin bonding breaks down progressively from the surface inwards, and so you end up with small flaky chips breaking away from the surface. That was the case with the underside of the table, so I gave it a good brushing with a wire hand brush to get rid of all the loose stuff, and then painted it with a couple of coats of Estapol from an old tin in the shed, to seal the surface. The other problem I had was with the plastic edge trim shrinking slightly over the years. It wouldn't sit neatly in the slot anymore, so I tried some construction adhesive but still the cover strip pulled away from the table a bit. I had to resort to putting some screws in strategic positions to make the cover strip stay where it should. These photos show the Before and After shots of the underside of the table, and the problems with the edge cover strip... 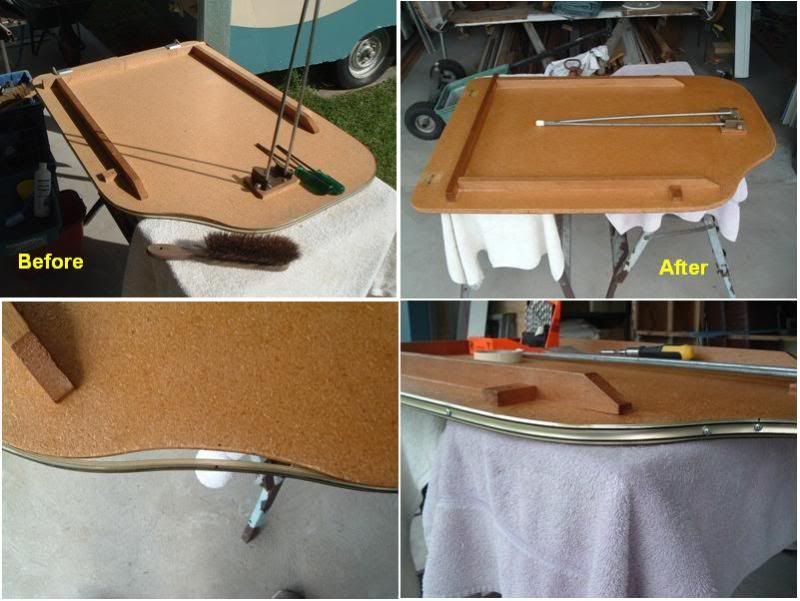 Late this afternoon, I installed the table in the van. If you look closely at the bracket on the wall underneath the table, you'll see two little black dots above the bracket. These are screw holes from when I stuffed up the position of the brackets. I had to redrill the holes, and now I'll have to bog the holes up with a bit of woodfiller putty. I thought I had the angle of the dangle correct, but missed out "by THAT mutch".   (bloody amateur! ;D)... 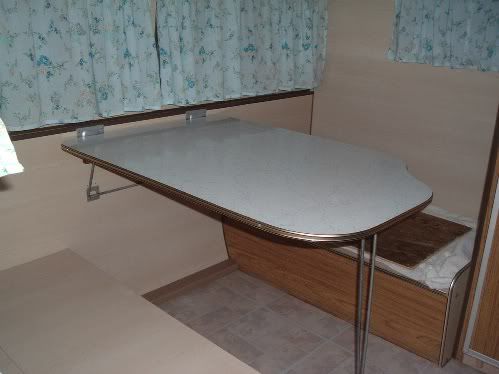 Finally, I've got the canvas, the zippers, the flymesh, etc for the canvas skirt, so we're not far away from starting the fun and games of making the new one. Hope my swear words don't harm any of your young children!     cheers, Al. |
|
|
|
Post by tassietiger on Mar 22, 2010 6:18:40 GMT 10
You can send those extra holes down here if you like  I'll probably need them at some stage. RWC down here is $77 and its happening tomorrow then I suspect I won't get much change out of $200 for the rego. Our six lane goat tracks are expensive to maintain ;D Will be very interested to see extensive interior shots once she's finished  |
|
|
|
Post by millard1399 on Apr 6, 2010 22:49:06 GMT 10
G'day All, after a major effort over sixteen days, I now have a replacement canvas skirt for the poptop.  ;D This job has been by far the most challenging part of the restoration. The first six days I spent basically going round in circles...making stuff, and then remaking it the next day. Spent a fair bit of time trying to get the fangdangled sewing machine to work at a slower speed, as well as testing out various needle thread and bobbin tensions. Discovered that canvas skrinks when sewn with these sorts of machines, because they stitch 6 stitches per inch rather than the commercial models doing 4 per inch. More stitches means more 'gathering' of the material. It's a pain when you want something to be 1 metre long, but after sewing a seam it is 15 mm shorter. A number of major stuff-ups along the way. I cut the first panel of canvas, marked it up, and put the plywood template for the window cut-out on it, and cut the window. Walked past the canvas a little later, and thought "Hmmm...that don't seem right." I'd put the template on the wrong baseline.  One panel scrapped... 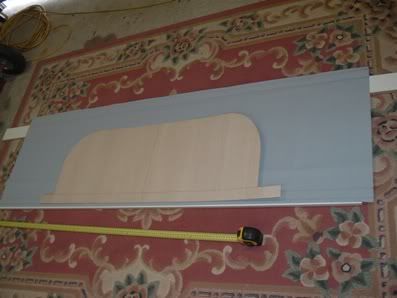 Remade the panel, and got to the stage of sewing the zipper around the curve. Couldn't do it for nuts. Was using a wide zipper and thought that might be the problem...too big for the tight radius. Second panel scrapped. Went and bought narrower zippers...made no difference. It wasn't the zipper, it was the idiot behind the sewing machine!  Went searching on the internet for info on how to do it. Learnt all about "easing a zipper around a curve." Now I'm a 'professional'. These photos show the first attempt...[Warning! If you're a good sewer, you may find these photos distressing  ] 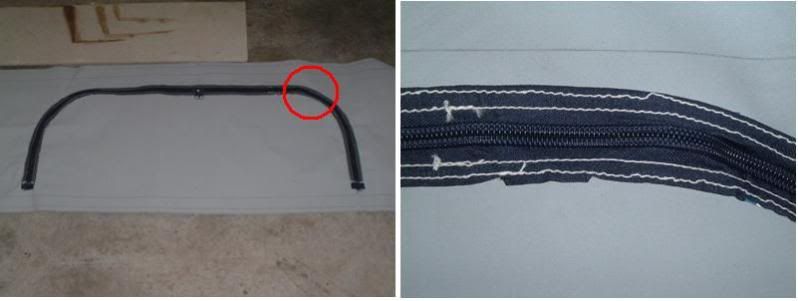 And this photo shows the difference, once I knew what the heck I was supposed to do... 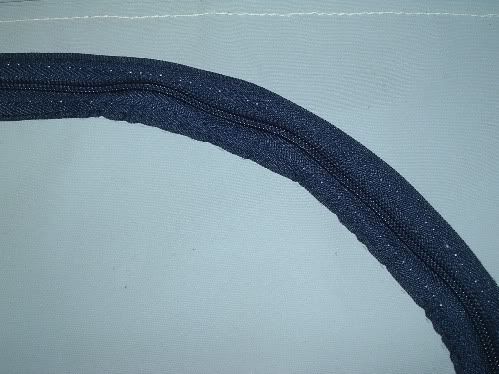 Along the way I managed a few successes amongst the many failures. Made new pockets and refurbished the rubber deflectors. These fit on the inside of the canvas walls, and deflect the canvas inwards when the roof is pulled down. The original rubber was shot, so I salvaged the plastic strips and put new rubber cord on them. I also added handles to the pockets for when this new rubber perishes in the years to come. At least I'll be able to pull the canvas inside manually... 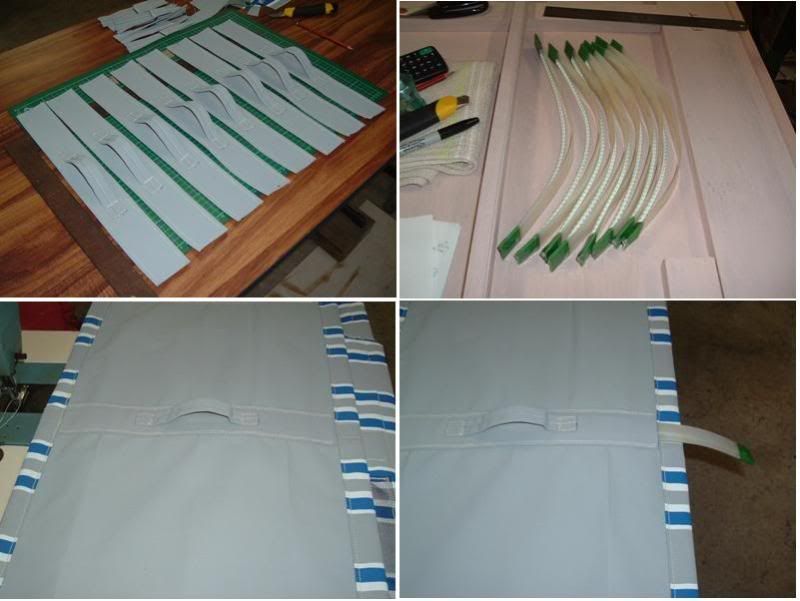 Eventually I managed to get one complete panel made, including the flyscreen over the window, and the weather protector triangles at each end to stop water getting through the zipper bottoms... 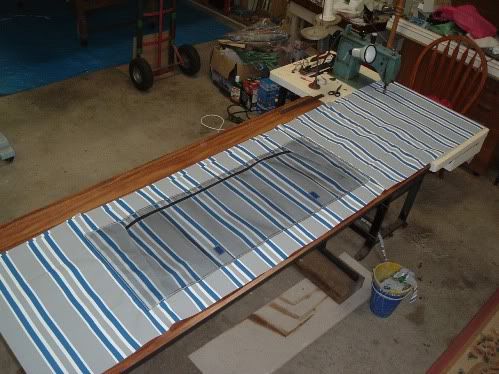 Once I'd completed one panel, the others seem to take a lot less time to make. The biggest disaster occurred two days ago on Easter Sunday morning. I'd joined three panels together for three of the sides, and was working on the fourth panel to join it up. I measured, and measured, and STILL cut the d@mn thing too short!  You might have heard screaming on Sunday morning, and thought it was some neighbourhood kids on an Easter egg hunt. On the contrary...it was me reacting to what I'd just done.    Third panel scrapped. Spent another day remaking that last panel, and carefully measured it every which way before making the final cut. Agony! Didn't have enough canvas left to keep remaking another panel, so had only one shot left. And this time it was RIGHT! ;D ;D ;D Put all the aluminium strips back into the top and bottom hems, and sewed everything together. End result?...one new poptop canvas... 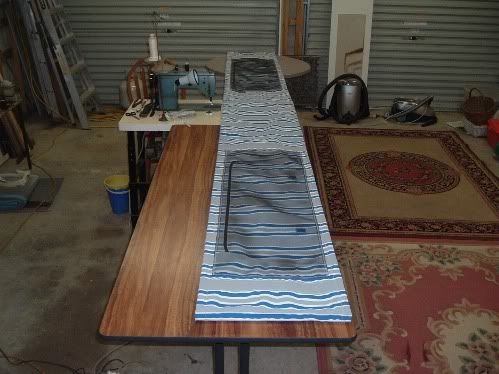 In the middle of last year, I was quoted $880 by the local canvas shop to have a new one made. Cost of materials for me to have a go at doing it myself was $150, so there must be a fair bit of labour charge in the shop. Maybe the $730 difference also includes anxiety, anger, frustration and disappointment charges as well. I can certainly understand the need for those.    cheers, Al. |
|
|
|
Post by bobt on Apr 6, 2010 23:41:35 GMT 10
Hi millard1399 Congratulations on the end result. It looks magnificant. See all that effort was worth it. The sewing looked pretty good to me. Seen worse by 'professionals' You certainly took on a challenge I have never considered attempting. The handles are a really good idea. I would like them on my current poptop. well done...  [glow=red,2,300] Hey everyone... guess who can make skirts for poptops[/glow] |
|
|
|
Post by bobandjacqui on Apr 7, 2010 5:59:43 GMT 10
G'day Al, Love your work   amazing what you have done with your restoration. Thanks for sharing the pics and info   Cheers Bob and Jacqui |
|
|
|
Post by tassietiger on Apr 7, 2010 6:28:06 GMT 10
Well done Al! Obviously you weren't tentative about taking on such a sew n' sew of a job and your didn't need to canvas support just zipped right into it. Just as well you didn't lose the thread of what you were doing or you would have been bobbin' about with anxiety. Still you are probably in stitches about it now    |
|
|
|
Post by atouchofglass on Apr 7, 2010 6:55:51 GMT 10
OOOhhhh TT you beat me to the punchline      ;D ;D ;D ;D ;D ;D ;D Hey Al Lookin slick now mate Glad to see the job turned out well. Only you will know were the oops or two are. After awl the problems you have overcome time to take a bow. Cheers Atog |
|
|
|
Post by philouise on Apr 7, 2010 16:57:11 GMT 10
G'day Al.
That is excellent canvas work.
Do you have an annexe yet-i don't remember?
And she'l look right royal when those rugs go in.
Try not to get any paint on them.
Cheers
Phil.
|
|
|
|
Post by millard1399 on Apr 9, 2010 23:04:18 GMT 10
G'day All, Thanks for your positive comments, as well as the witty ones. I reckon it's great to have a laugh in amongst the headaches of restorations.    Well, we're almost there! There's been a flurry of activity since the sewing machine was packed out of the way. The canvas skirt was fitted up to the ceiling. Fitted perfectly!! ;D ;D Next, I ran a bead of sealant down the underside of the two joins in the roof cladding, to ensure they stayed waterproof... 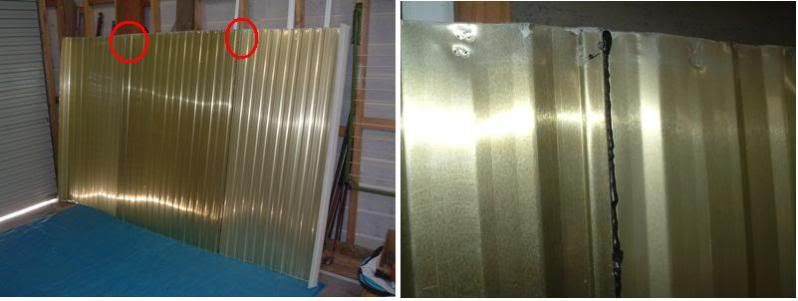 Then I fitted the insulation into the roof space, and I also put a bit of dampcourse along the bottom of the timber sides. I figured this aluminium dampcourse material would help keep any water off the timber bottom, and I had it sitting in the shed doing nothing anyway... 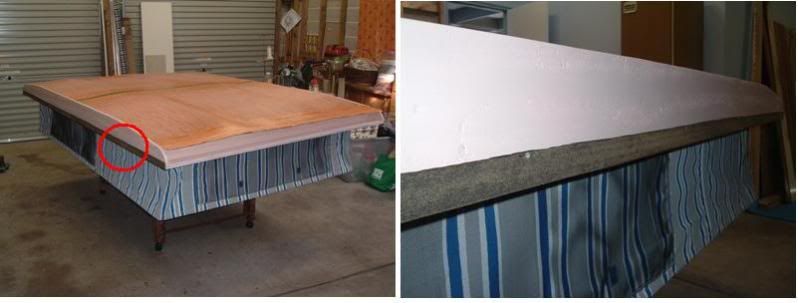 I had some of the white "noise stop tape" left over from when I used it on the chassis rails to keep the aluminium cladding away from the steel chassis. I decided to run a strip along the tops of the side timbers, for no other reason than to use it up. Originally the roof had a sheet of builders insulation paper over it with some thick tape, so the noise stop tape just substituted for that. The roof cladding was then fitted on. Way back at the start of this restoration, I was going to use SikaLastomer-710 as the sealant, but changed my mind after reading more about SikaLastomer-510. But, I'd bought 3 cartridges of the 710 stuff, so it was time now to use them. The van will be a travelling scientific experiment, to see which of the two Sika sealants I've used lasts the longest... 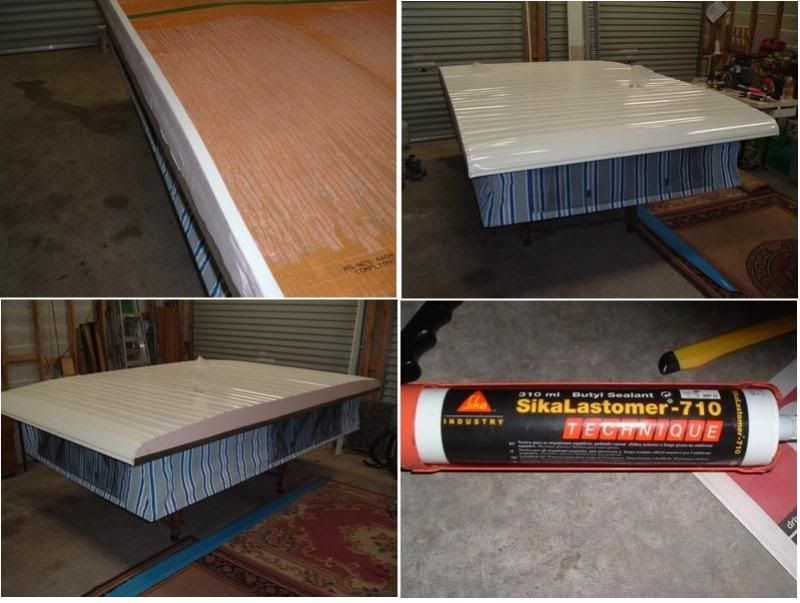 And, here we are with the roof almost completed...  Two more cover strips to be fitted up underneath the roof ends, and the spring-loaded canopy lifters to be fitted back in position, and then it's time for the whole kit and caboodle to be hoisted back up into the rafters ready for fitting back onto the van. By the way, the white cans of spray paint I bought to spray the roof with were just as crappy as the previous lot of cans I bought. Same problem when trying to wipe off some excess sealant with the dunny paper wetted with turps. The paint came off easily, but this time I'm leaving it looking crappy because it's up on the roof and you can't see it from the ground.    Got 7 days left before it's due for completion!   ps. philou, those crappy old carpet mats are for me to lay on when I'm fitting bits and pieces up under the roof. Better than the cold concrete! ;D No good for the Millard...only good for the doghouse.   cheers, Al. |
|
|
|
Post by tassietiger on Apr 10, 2010 7:54:04 GMT 10
Are you into levitation Al   That roof looks like its floating in mid air  A magic carpet perhaps for Al(i) Looks great. I really like how the aluminium mouldings have come up. Really sets if off. Heres hoping mine might look like that some day. A real inspiration. May have to put the gardening on hold today and get stuck into the Tiger Hunter  What's the 7 day deadline? |
|
|
|
Post by atouchofglass on Apr 10, 2010 7:54:29 GMT 10
Hey Al
The roof is looking mighty slick.
Even the blue sides are a nice touch
Hope you've got a couple of strong mates to help lift the roof back onto the van.
She can't be too far off finished now.
After all the effort and time it will be a real nice feeling just sitting in the van somewhere else. ;D ;D ;D ;D ;D
Nearly two years to refurbish.....
Sounds about right
Mine was just a bit over that.
Looking forward to the launch date
;D ;D ;D
Cheers
Atog
|
|
|
|
Post by millard1399 on Apr 10, 2010 22:24:33 GMT 10
G'day again All, The roof is now awaiting hoisting up for reattaching to the van! ;D ;D rossjools, I reckon that electric cable hoist you posted elsewhere on the forum might be what I need to get it up to the rafters.    The last two cover strips were fitted. Then the canopy lifters had to be screwed up under the roof. In the fully expanded position, they are far too high to fit, and operate at only about half that size. So I had to work out a way of reducing them down to enable them to be fitted properly. When the roof is reattached to the van, the process is to first screw the canvas skirt into position, and then lower the roof a bit more and screw the bottoms of the canopy lifters in position. I made up a timber jig out of some scrap timber, and then compressed the canopy lifters into the jig. Then I tied the lifters up with some heavy duty string... 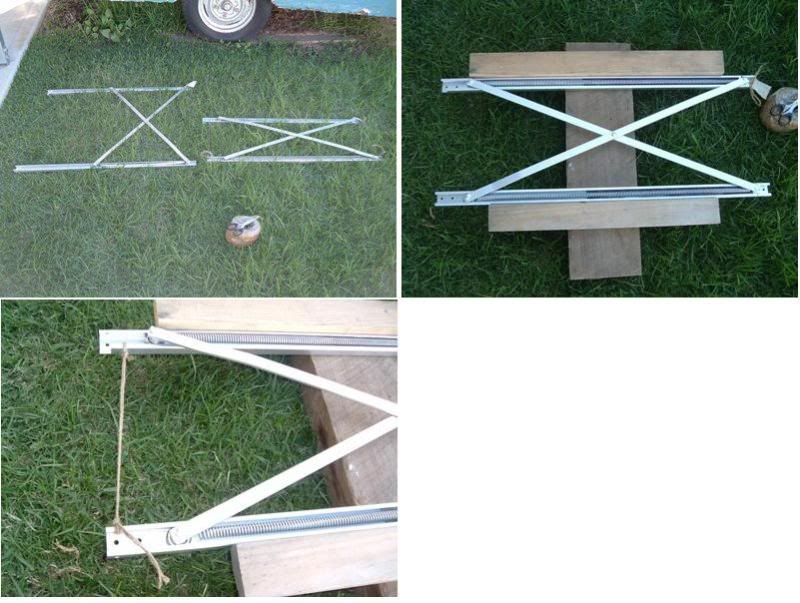 You can see how they sit above the bottom of the canvas skirt, so the canvas skirt can be fitted first... 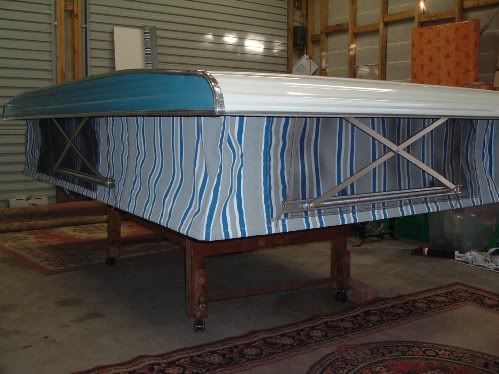 tassietiger tassietiger, you mention levitation? Ordinarily I wouldn't do this in case young children might be watching, but here's a quick look up "under the kilt", showing how the roof is supported. And while we're looking up somebody's skirt, we can see the refurbished roof clamps back in position...  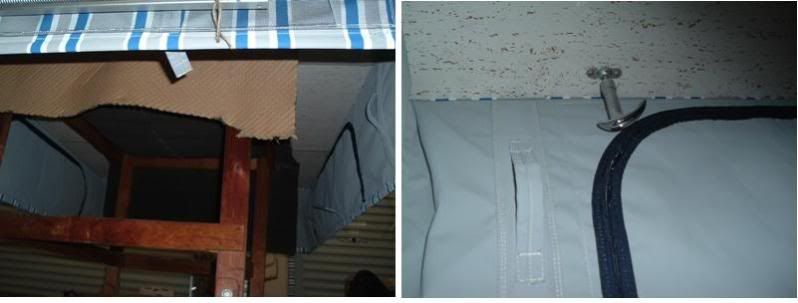 philou philou, you asked about an annexe earlier? One came with the van, but I've never been game enough to open the bag and see what's inside. I figured that based on the condition of the van when I bought it, the annexe was not likely to be any better, so I just threw the bag aside and haven't got back to it. Maybe I'll find some time soon to open it up and see what surprises are in there. I posted the following story on the Vintage forum almost two years ago, but I'll repeat it here for the interest of Classic readers. I went into the local Salvo's store back in 2008, for a bit of a squiz to see if there was anything interesting for sale. Came across a bag with a Salvo's label saying "Canvas Awning, $30". Opened the rope tie, and had a bit of a rummage around in the bag. Saw enough evidence to suggest there was something more than just an "awning" in the bag. There wasn't enough room in the store to take it out of the bag and have a good look at it, so I decided to take a punt and pay the $30. I figured the worst I'd end up with is either some canvas I could use for something, or I'd end up with another painter's dropsheet.   When I got the bag home and spread the contents out in the backyard, this is what I found... 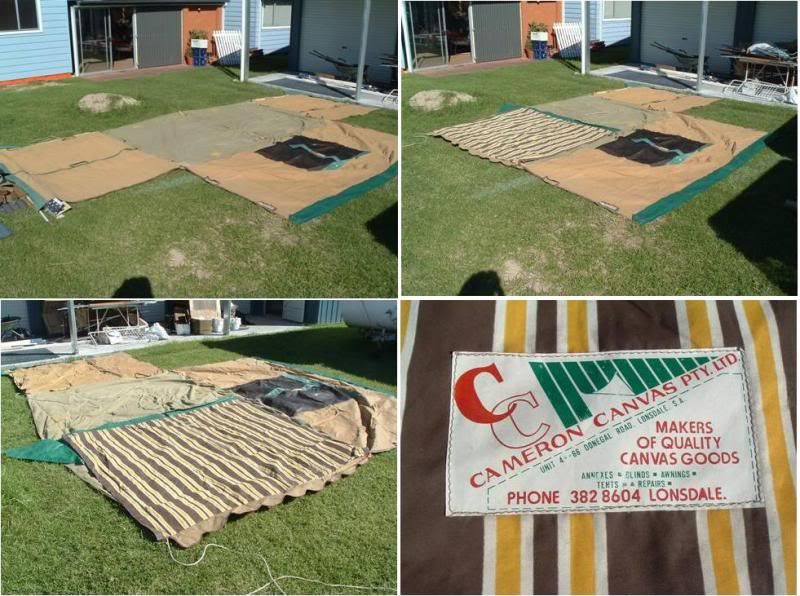 Yep, a poptop canvas annexe, in very close to "new" condition, that suits a 14ft van. Funnily enough, I have a 14ft van! ;D There were no poles with it, but I had already been collecting the old style wooden tent poles over a period of time, so I had a stash in the shed. A $30 annexe...what a shocking bargain...ripped off (NOT!! ;D ;D). cheers, Al. |
|
|
|
Post by libstar on Apr 12, 2010 11:35:43 GMT 10
Good to see your "seam/stress" skills have progressed to skirts now Al ;D It's all looking so good - wish I could get my Mojo back  What type of needle and thread did you use for the canvas? I used a diamond shape / leather one for the vinyl on a regular (non fancy industrial) machine which worked a treat..but I am thinking of covering my ugly aluminum stone protector that goes over the front window with some canvas I bought.. |
|
|
|
Post by renovator on Apr 12, 2010 22:50:36 GMT 10
You are a miracle worker Al.  That's it, I need you over at my house. |
|
|
|
Post by millard1399 on Apr 12, 2010 23:19:58 GMT 10
Hi Libby, I ended up using a No.20 needle, standard shape, with an upholstery quality thread. About 25 years ago I had a hobby of making outdoor furniture, and I bought a cone of thread at the time containing 2000 metres of white upholstery thread. Made in the UK it was - good stuff. The hobby never did take off into anything more, so the 2000 metres was hardly touched. 25 years later, I'm still trying to use it up  , although the canvas skirt managed to put a big hole in the metres left. For the navy blue zippers, I went and bought a reel of that Gutermann brand of upholstery thread. Man-oh-man, is that stuff strong! I reckon you could use a single thread as a tow rope  !! $5.99 for 100 metres, from that you-know-where shop. The jumbo Singer I've got can pierce through 9 layers of 12oz canvas. It will sew 5 layers with the motor, but 6 to 9 layers need a few thumps with the hand wheel to pierce through. 10 layers breaks the thread  . There were a couple of places in the canvas skirt where 9 layers resulted from hems meeting other hems, and more places where 7 layers occurred. Only used the one No.20 needle from start to finish, so they must be good quality ones they gave me. cheers, Al. |
|
|
|
Post by millard1399 on Apr 14, 2010 11:21:46 GMT 10
The Millard has finally rolled off the restoration production line, two days ahead of my self-imposed deadline. ;D ;D A couple of days were spent building a lifting cradle, and then rigging everything up to the rafters. A bit of heave-ho and up she went. Brought the van in underneath, and lowered the cradle to allow the poptop skirt to be screwed into position, and then the canopy lifters... 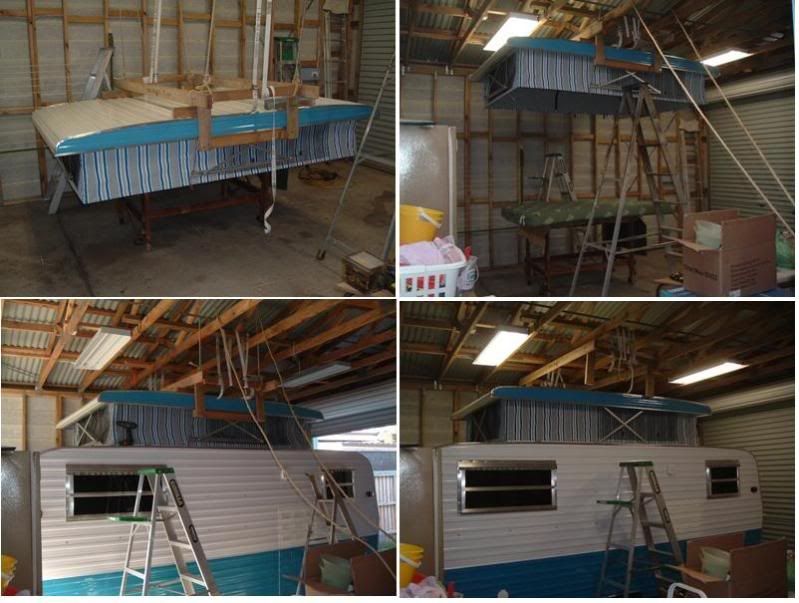 And here it is this morning, hauled out of the garage... 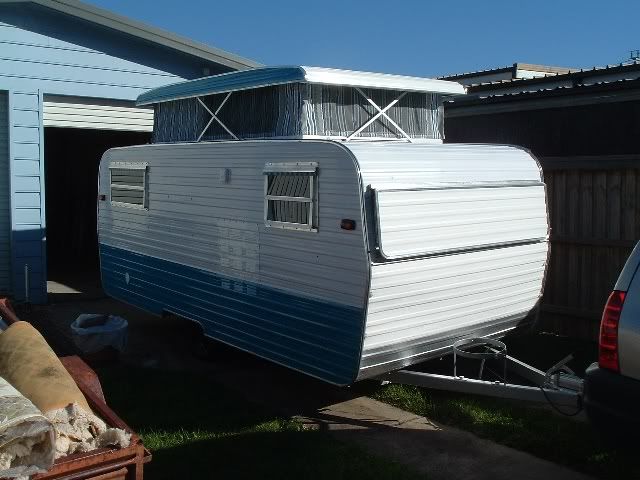 It's booked in for next Monday, to have the brakes overhauled, new tyres fitted, and the rego inspection. In the meantime, there's a few final jobs to complete, such as fitting the new gas regulator; replacing some broken cupboard handles; fixing a couple of broken buttons that snapped on the seat cushions; a general cleanup of the inside, etc etc. Once it's back from the mechanic's, I'll fit the new Millard stickers front and back, put on a couple of the Classic Caravan stickers on the windows, and THEN it can be officially launched ready for rock and roll. ;D ;D cheers, Al. |
|