|
|
Post by nac on Jan 27, 2010 21:32:35 GMT 10
Hi Al
Real nice job you are doing there.
On my previos van they had two vents for the fridge. both were on the side, one at the base of where the fridge was and the other above the top to create a draft for the hot air to escape.
Fridge worked real well. Manufacturer claimed the trick to a good working fridge was to remove the hot air it created.
Keep up the good work
nac
|
|
|
|
Post by millard1399 on Jan 27, 2010 22:23:24 GMT 10
So really what you need to have to improve the fridge efficiency is some mini Xpelair exhaust fans in the cover panel near the top of the fridge!? I've got a standard size Xpelair exhaust fan sitting doing nothing in the shed. Although it might be a bit too powerful and keep sucking the dining cushions out through the fridge compartment.   Mike, I contemplated cutting into the bottom panel for about a SECOND! Every time I thought about cutting into that newly sprayed panel, I started to get the shakes. Shoulda done that sort of thing before the spray cans came out. But, I still have that option down the track when reality and a heatwave hits.   cheers, Al. |
|
|
|
Post by mike on Jan 28, 2010 17:51:57 GMT 10
G'day Al, ;D ;D ;D Yeah, the Xpelair would probably be too powerful.  I'm going to use some fans salvaged out of a couple of old desk-top computers that were being tossed out: old 386 or 486 PCs.   The best fan was in the powerbox at the rear of the cabinet: used to suck air out of the cabinet over the 240v power transformer and out the rear. Just needed to unscrew the box from the cabinet, screw out the transformer, then the fan from the power box. ;D ;D Its 12v DC and uses 0.26 amps, which at 10 watts per amp, is about 2.6 watts!! It measures 80mmx80mmx25mm, has 4 mounting holes and two wires: red and black. Here's what it looks like... 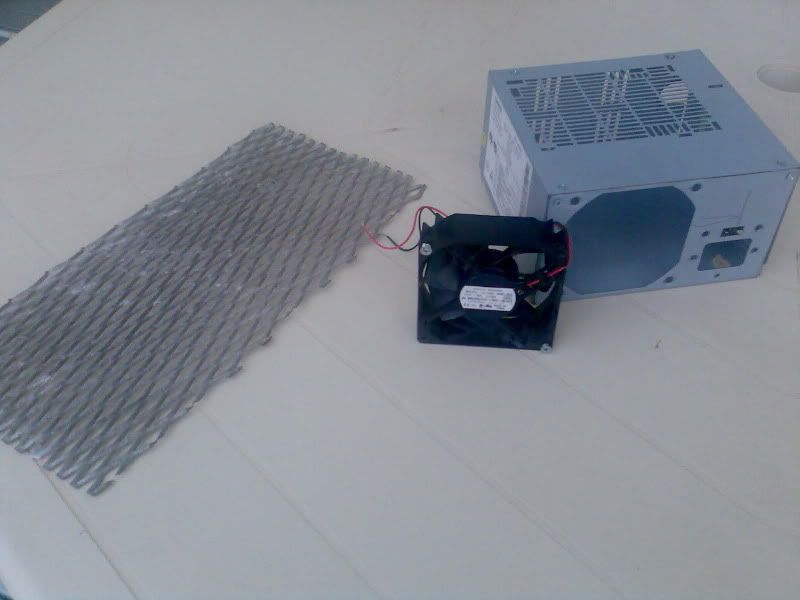 I'm considering using the old metal power box to mount the fan and attach the box to the wall bench work inside the van.  The grill on the left of the picture is a bit of a cars old mesh sunscreen visor and I had considered using it over the opening in the cladding, but I'll probably cover the 78mm hole needed to be drilled, with a polished stainless steel louvered vent, because it also offers protection from rain getting into the van... like the rest of the venting in the van wall.    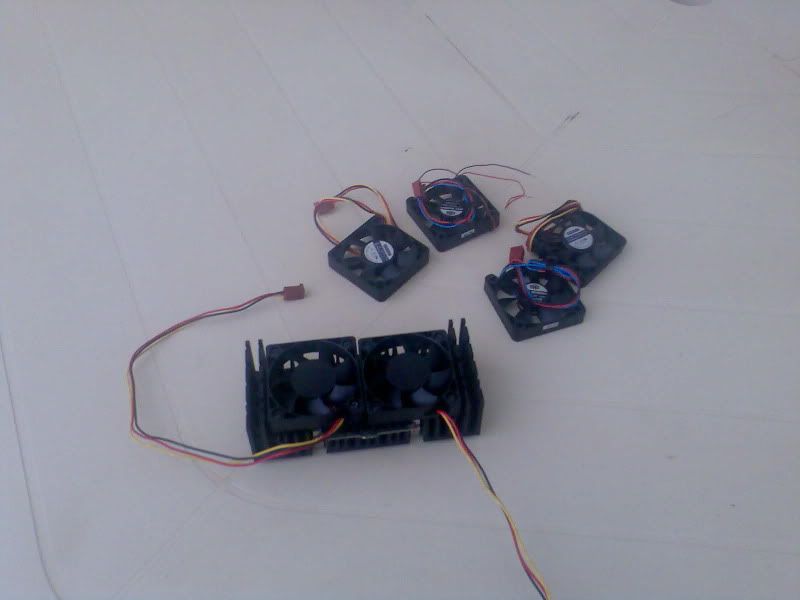 These smaller fans 50mmx50mmx10mm can be found mounted on the circuit board of old desk-tops. Two fans can be seen still screwed into the 'heatsink' which is a piece of aluminium cast into many fins to absorb heat from various parts of the circuit board. This heatsink was merely clamped to the 'processor' which can get very hot as a result of just doing what processors do. You may be able to see the small clamp still on the heatsink.    But its the fans that I'm interested in, just unscrew the 4 small screws for each fan and you've got a 12v DC fan that uses 0.15amps or less than 2 watts!!   The red wire is the positive and the other two are the negative: I haven't yet tested which of the yellow or black are best for the negative.. both appeared to work the fan on a simple test. ;D I already have an on-board battery charged up each day by a 40watt solar panel. We normally run a 5 watt 'night-light' ( for other reasons) all night... no probs. So to run a total of 5?watts by day on these fans is nothing!  Its everything if the fridge just doesn't get below zero degrees on very hot days, BUT is likely to do so with these little fans blowing and sucking!!    [That's the plan anyway!!] ;D ;D ;D I'm intending to use two of these mounted on a "bracket" to blow a gentle breeze of air vertically up over the heat radiating pipes.  The larger top fan will suck hot air out to the atmosphere. ;D ;D ;D This may be useful to you, if you're really thinking of something like this.    But we don't want to delay you un-necessarily on the May deadline. ;D ;D Cheers mike ;D ;D ;D |
|
|
|
Post by millard1399 on Jan 28, 2010 21:14:16 GMT 10
Hey mike, old computers never die...they just get recycled into Classic caravans, eh?!    I can see what you are planning on doing, and I can understand the concept, and you seem to have a very good handle on how it all works. I guess what I'm baulking at is getting it all together and then working out a way of supplying 12V to it all (which I don't have). Let me ask you or anyone else this question: Is this concept necessary for all temperatures, or just when the air temperature goes above a certain figure? By that I mean, do these fans improve the fridge efficiency significantly when temps are down around say 15 to 25 degrees, or do they only show a benefit when the temps are up around say 35 deg and above?? I'm just curious to understand it more clearly, so thanks for any further info. -------------------------------------------------- And sooooo...another thrilling instalment on progress on the Millard...   The annexe sail tracks are fitted. I never knew what the bore diameter was of these sail tracks, so I sussed it out with my drill bits. If you're ever asked this as a Trivial Pursuit question, mine are 9mm  ... 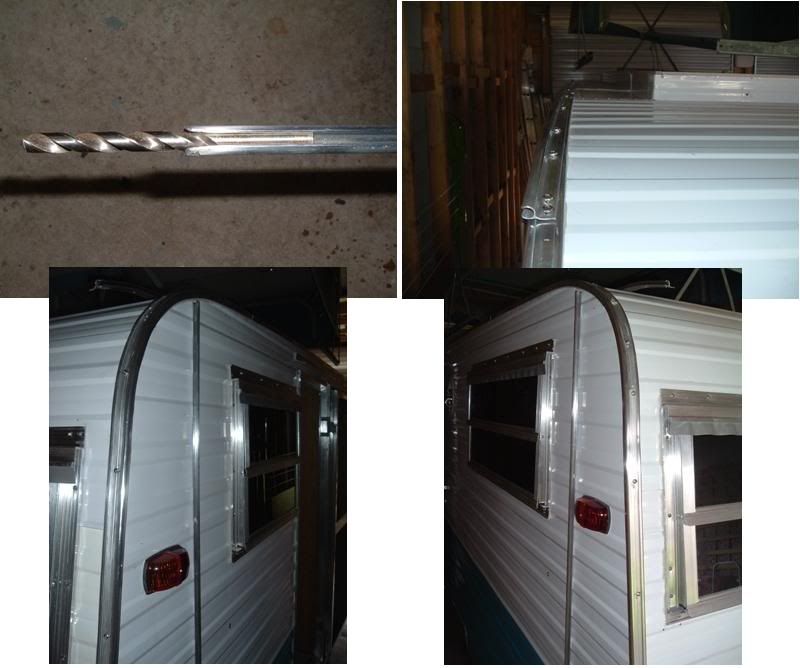 And here's the plastic infill strip being put into the edge trim channel... 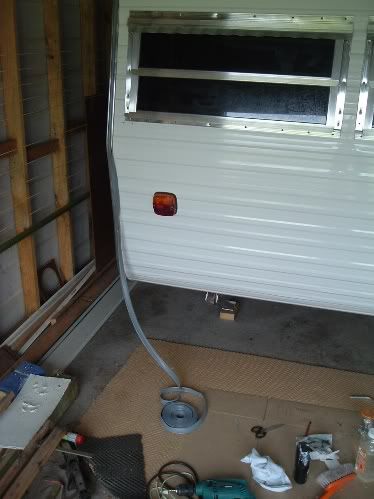 Elsewhere, I've been working in the background on refurbishing the front weathershield. It was in a really cruddy condition, so I stripped it apart and cleaned all the bits with the rotary brush and soapy steel wool... 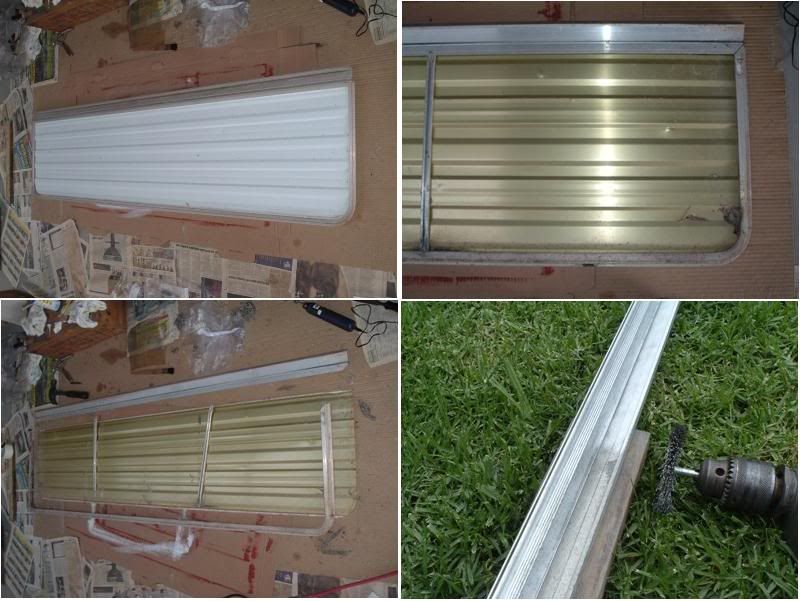 The cladding insert was repainted... 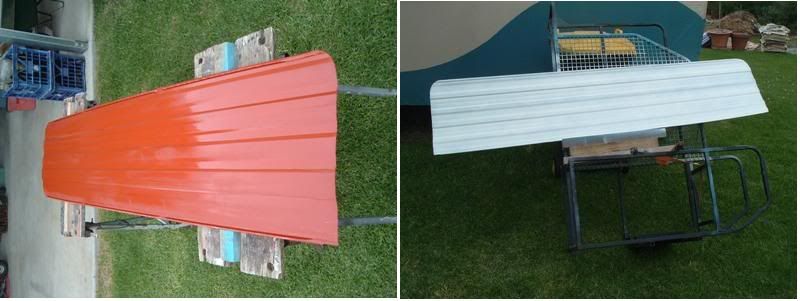 And I found some scrap aluminium angle in the shed to make replacement brackets for the old rusty ones. New spring loaded Anti Rattle catches were bought from Caravans plus... 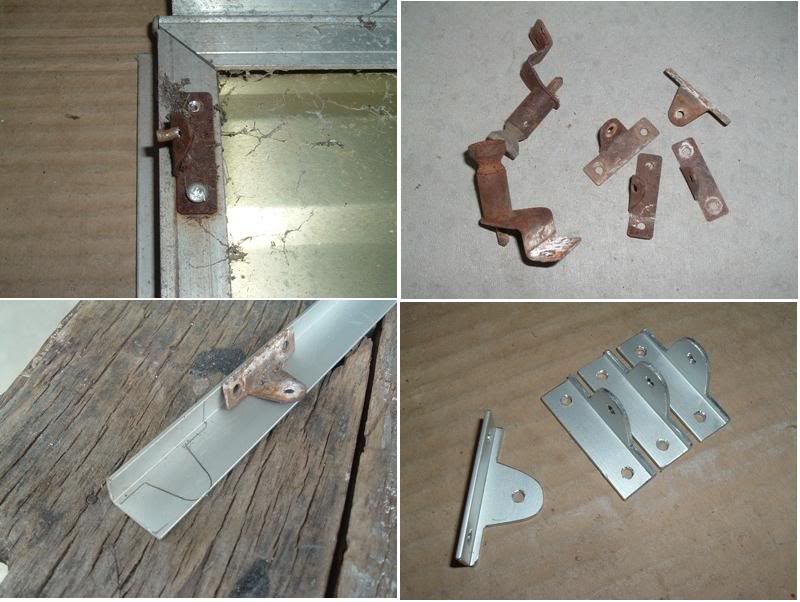 But...BIG problem today when trying to progress that job. Way back when I rebuilt the front window frame, the timber was bowed and I couldn't do anything to flatten it out. So I installed the bowed frame and merrily went on with the rebuild. Today I discovered why it's essential to have a flat front on the van, particularly across the top of the windows. When I went to do a "dry fit" of the top weathershield rail, the bow in the van means I've got a half inch gap at both ends. I can't bend the rail into the van, because the next part of the weathershield slides into that rail, and it won't swivel up and down if it's bowed. So I have to put my thinking cap on and come up with a way of packing the rail ends out. Keep this in mind if anyone has to do any work on the front of their van. Flat, flat, flat from side to side, otherwise big trouble!  cheers, Al. |
|
Deleted
Deleted Member
Posts: 0
|
Post by Deleted on Jan 29, 2010 7:47:53 GMT 10
Gidday Al, Could you pack out the hinges with some sort of a shim to make up the difference of the 'bow' or even make some longer hinges to suit. Possibly fix the 'slip-in style piano hinge' to a sqare aluminium chanel and then attach the chanel to the van at either end using appropriate length purpose made asthetically pleasing brackets (just a thought). By the way mate she is looking mighty impressive for sure, you wouldn"t want to come for a trip over to the west and do a bit of a touch up on an old viscount would ya   - Free beer in it for ya ;D ;D Carl  |
|
|
|
Post by mike on Jan 29, 2010 13:12:28 GMT 10
Hey Al, ;D ;D ;D Fridge cooling... no 12v,.. no fans!! ;D I liked the idea because our fridge struggles especially in hot weather. So anything to assist seemed like a good plan...  Doesn't that van of yours look just something!! You're gonna get questions when travelling!!!    One question for you right now..  See this quote in your last post here: "And here's the plastic infill strip being put into the edge trim channel..." Q. I read the line, I see the photo but, what does this mean?  You are really powering ahead now. Loved the brackets you made up from aluminium angle for the front stone guard. I have some probs with ours in these areas.  Cheers mike ;D ;D ;D |
|
|
|
Post by millard1399 on Jan 29, 2010 20:30:26 GMT 10
Hey there Kiwicarl, very tempting offer mate! ;D VERY tempting!! Only problem is I'd probably bump into that "Jim Thomson" fella along the way and get sidetracked. Probably end up in Tassie instead!!   ;D Thanks for the ideas on the weathershield. I'll keep them in mind if my present idea doesn't work. I'm part way through a "fix" that I hope will solve the problem. That scrap length of aluminium angle is sure coming in handy to provide various brackets for the van.     ------------------------------------------------------- Hey there mike. Here's a photo showing what the Millard edge trim looks like, and how the plastic cover strip "clips in" behind the trim moulding edges. The original stuff was hard and brittle after 30 years, so new stuff was bought from CaravansPlus. The new stuff is really flexible and you just squeeze it with your fingers to make it fit into the edge trim... 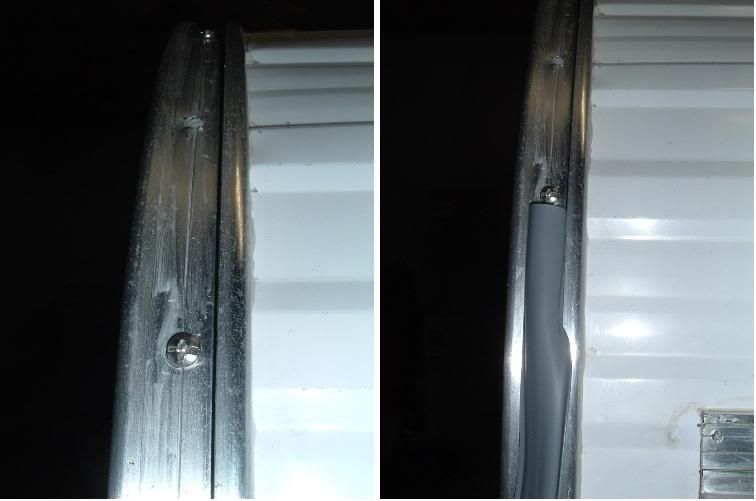 And while I've got your attention, mike, I bought this serving tray from the local Charity Shop today for one dollar. (Cheapskate!  ). I was thinking about how it could be used to make a "cowling" to fit over the exterior of the fridge vent panel. Cut a hole or square out of the existing vent panel, and mount the computer fans on the inside on some framework. Cut the top of the serving tray across the red dotted line, and mount it on the outside of the van. It's stainless steel, and it sticks out from the cladding no further than the clearance lights. Add a bit of flymesh on the inside somehow, and Bob's yer Aunty! Waddya think??... 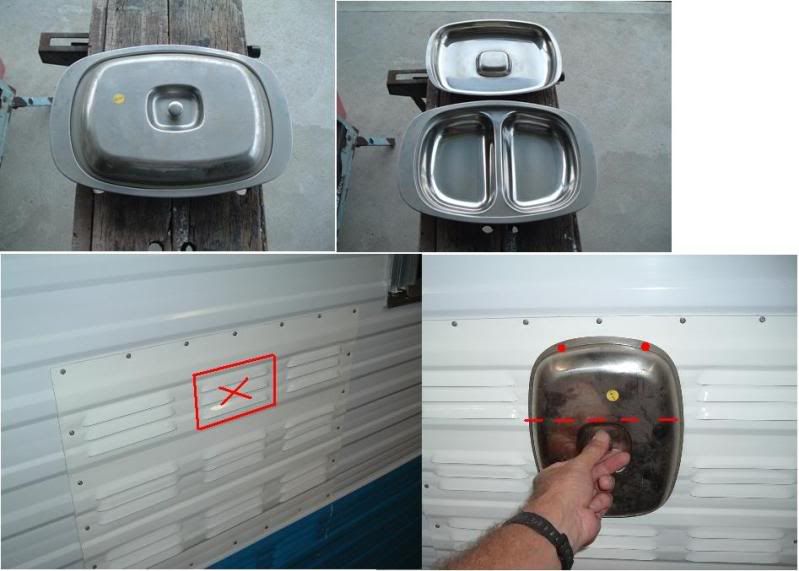 ...and just to upset you a little bit, I also got this pressed stainless steel tray for 60 cents! Bargain!!... 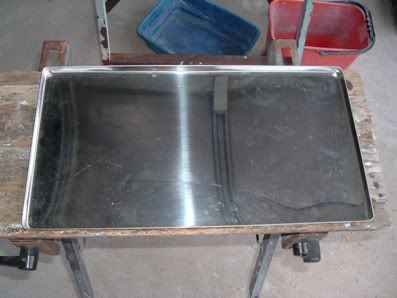 cheers, Al. |
|
Deleted
Deleted Member
Posts: 0
|
Post by Deleted on Jan 29, 2010 20:52:30 GMT 10
Hi Al, You've been busy. Love those cute 'ali' brackets. I mean to reply with a bit of detail on the fridge stuff, but in the mean time to keep your brain cells going (not that that is required), one cute method of mounting PC fans is with 4 o-rings (one per corner) to isolate them completely from the 'chassis'. A noise and vibration thing. Very effective. Have a play.  And what can I say about your very successful shopping sorte? The terror of the bargain bin!  |
|
|
|
Post by bobt on Jan 29, 2010 21:54:49 GMT 10
Hi Millard 1399 I have not looked here for a little while. You progress has been terrific.  Appreciate the profile picture of the cladding. Was always curious about how it held together. Now I know. ;D You paint work stood up well to the abuse you gave it with that masking tape. Is ure makes it easier. The van is looking really good. Looks to me like your May trip wll be easily achievable. Where too? Look forward to seeing the effort your going to put into the top. As for the 12v fans for the fridge. I think they are a great idea. BUt my fridge seems to perform ok on Gas or Electric during hot ones (mid 30's) I think if you are going to be enduring temps in the high 30s +++ then your would need to look seriously about giving the fridge a little helping hand. bobt |
|
|
|
Post by mike on Jan 30, 2010 12:30:06 GMT 10
Greetings Al, ;D ;D ;D Well, you millard guys just can't have those ugly stainless steel phillips screw heads around the edge trim showing for all to see: you have to cover them up with plastic strip... That's what it was all about!!! ;D ;D ;D Nah, nice neat finish! Great work! ;D ;D ;D ;D The 'Silver Serving Tray' finish for the fridge fan: absolutely perfect!! Spot on!    I had been wondering if the stainless steel vent cover mentioned earlier, would have actually prevented free-flow of the exhausted hot air to some extent, but there wasn't any alternative cowl big enough on the market that I could see. I'd even toyed with fabricating/moulding a fibreglass one.    Now we also know that, as well as old computers, stainless steel serving trays also end up re-cycled into classic vans!!     Another question.  Q. How do you illustrate your photos with that red line?  Looking forward to your pop-top reno!   Cheers mike ;D ;D ;D |
|
|
|
Post by millard1399 on Jan 30, 2010 15:12:52 GMT 10
Hey mike, ...AND aluminium cake tins, AND second-hand perspex as well!! Remember the little repair I did on the screen door rail, and the light cover I made?? Yep, ya gotta save costs with these restorations by recycling as much stuff into the van as you can find! ;D ;D ;D The little red line in the photos? All Microsoft operating systems such as Win98, ME, WinXP, etc, come loaded with rudimentary graphics software called "Microsoft Paint". I guess it's around about a "Pre-school" sophistication level (which is why it suits me, heh heh  ). You'll find it on a computer by clicking on Start -> Programs -> Accessories -> Paint. It has a basic Drawing package that you can use to add bits and pieces to photos. There are probably other much more user-friendly programs around, but I grew up with this one and I can easily do the basics with it now. And we in the Millard fraternity will ignore your cheap shot at our stainless steel screws.   But, I'm with you. I also query why Millard put a cover strip around the edge trim, and then left the screws exposed around the window frames. I have to concede that Millard made the most complicated edge trim and window frame designs you could possibly come up with. It must have been a nightmare in the aluminium extrusion factory to keep the extrusion dies in good condition. Certainly nowhere near as simple as the other brands of vans. -------------------------------------------------- I think I've solved the problem with the bow in the front of the van, and the weathershield rail. First I made a bracket to go on the outer ends of the windows. This bracket "packed out" the gap at either end... 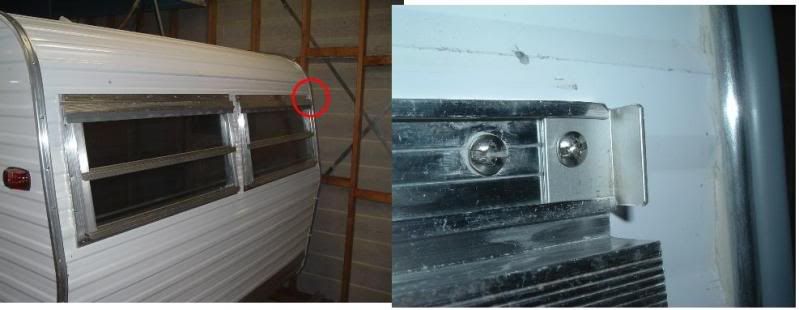 I fitted the rail and checked it for straightness. All seemed good, so I made a second bracket and slid that into the end of the rail. The two brackets overlap, and will be pop-rivetted together... 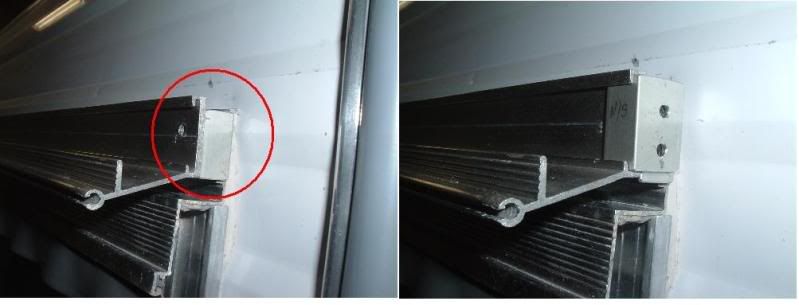 Then I slid the next part of the shield (which is actually the top of the shield frame) onto the top rail and checked that it swivelled up and down ok. It did, so I think I can now go ahead and reassemble the whole kit and kaboodle and fit it onto the van. The last photo shows how the gap changes from the edge of the van into the centre [bloody amateur caravan restorer!!    ] ]... 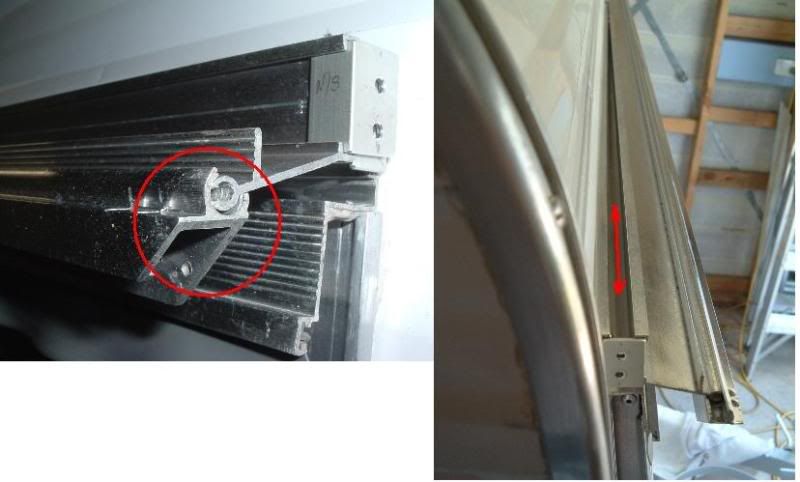 ----------------------------------------------------- And while you're here, can some of you knowledgable people tell me what I'm missing from the telescopic arms that actually keeps the shield in the "up" position? I can't remember anything being there when I dismantled the van. Is there some sort of "pin" that goes through both parts to lock it "up"??   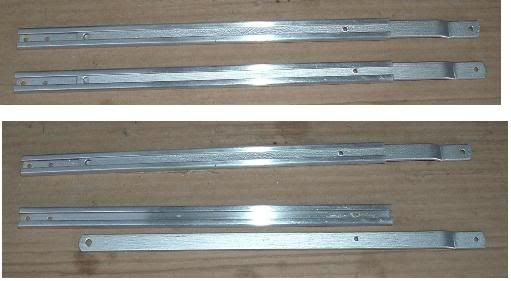 Thanks for any help... cheers, Al. ps. bobt, the Classic forum has received an invitation to attend the Vintage Caravan Nationals in Mildura in May this year. I've been a member of the Vintage forum for nearly four years now, but I've never gone to any rallies (my Vintage Franklin is waiting...waiting...waiting...in the shed  ). So, I'm now pushing to have the Millard ready, and hoping to attend the Nationals to represent the wonderful, friendly, Classic fraternity [...except that mike fella who takes the micky out of Millard.     ] ] |
|
Deleted
Deleted Member
Posts: 0
|
Post by Deleted on Jan 30, 2010 16:50:47 GMT 10
I think I can see wee problem with the new 'straight front' weather-shield, or is it a job for one of those 'spare' Sikaflex tubes.  Here's a couple of pics of the offending parts.   |
|
Deleted
Deleted Member
Posts: 0
|
Post by Deleted on Jan 30, 2010 16:56:07 GMT 10
I bought a couple of these to renovate the York's front awning. They are not the correct bit however the screw assembly is identical and they were in a bargain bin. On the' to do' list.  |
|
|
|
Post by millard1399 on Jan 30, 2010 21:33:04 GMT 10
Thanks for the piccies wahroonga. ;D I searched through the pile of discarded screws and bolts from the caravan demolition, and there's nothing like that there, so I guess I never had it to begin with. I'm still a bit perplexed about how that knurled knob works. It obviously screws onto something, but what does that 'something' look like? I had a good look at the metal rod part of the 'stay', and the larger hole at one end isn't threaded, so nothing screws into it. But the hole looks like it is slightly tapered, suggesting maybe there's a tapered bolt goes through it.(?) If you would be so kind as to provide a close-up pic of the actual bolt, I would be grateful. If you look at the photos of my stays a couple of posts above, you can see a small hole about a third of the way along the metal slider. There is a corresponding hole in the aluminium channel, and they seem to line up when the stay is in the collapsed position. I presume that when the anti-rattle spring loaded catches eventually rusted solid, this idea (that I got from another forum) was used as a substitute to keep the shield locked down... 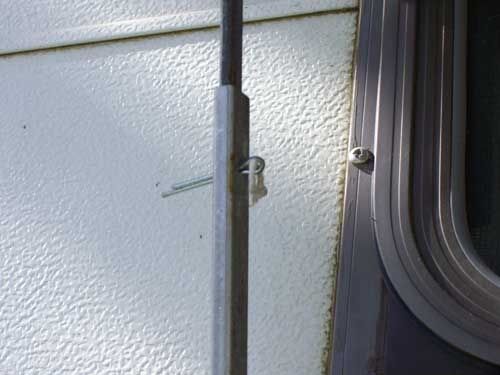 ------------------------------ The gap in the weathershield rail might end up being a blessing in disguise. When I dismantled the van, the corrosion on the top of the front window frames was far worse than the corrosion on any of the other windows. From the study I did of metal corrosion during my working life, I believe that because the tops of the front windows never got rained upon, then the accumulated atmospheric pollutants never got washed away. Continuous accumulation coupled with high humidity over the years, and the nasty pollutants started chewing into the aluminium. With the gap now there, at least rainwater can get down to the window frames and give them a bit of a rinse every now and then.
So the "goof up" might end up being not such a bad thing!  ;D ;D
cheers,
Al. |
|
Deleted
Deleted Member
Posts: 0
|
Post by Deleted on Jan 31, 2010 6:17:27 GMT 10
I'd seal it. It's nice to have windows open in a tropical downpour.  Back to the stay. Sorry I guess i knew wot I was looking at.  There is a short threaded section welded to that tapered hole. I guess yours fell out long ago. Perhaps you could grind down the head of a bolt and still get clearance? Or weld /braze a thread in. |
|
Deleted
Deleted Member
Posts: 0
|
Post by Deleted on Jan 31, 2010 18:41:36 GMT 10
Hi Al, A bit more. The threaded section is 'riveted' to the sliding rod (ie the thread is 'burred over' on the underside); so I'm sure you can come up with a solution. The knurled nut is 'captive'. The burled section makes the sliding rod captive due to an indent in the holding rod ... if that makes sense?  Pity I can't spell tHread'.  Also a pic of the (old) awning clip and mounting arrangements.  I don't like the split pin.  |
|
|
|
Post by millard1399 on Feb 1, 2010 7:51:32 GMT 10
Hey wahroonga, thanks to your very helpful pictures and information, I was able to do a 'workshop fix' to the problem yesterday. By scrounging bits discarded from the van demolition, some cleaning with the rotary wire brush, some drilling and some cutting, I put together a reasonable "Acme" brand of weathershield stay. With the help of my brother and his silver-soldering skills, the Millard now has this... 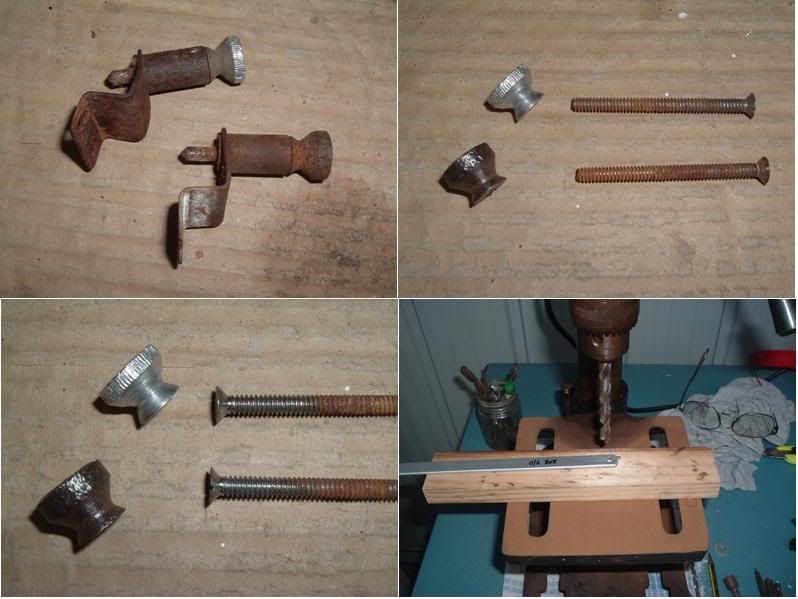 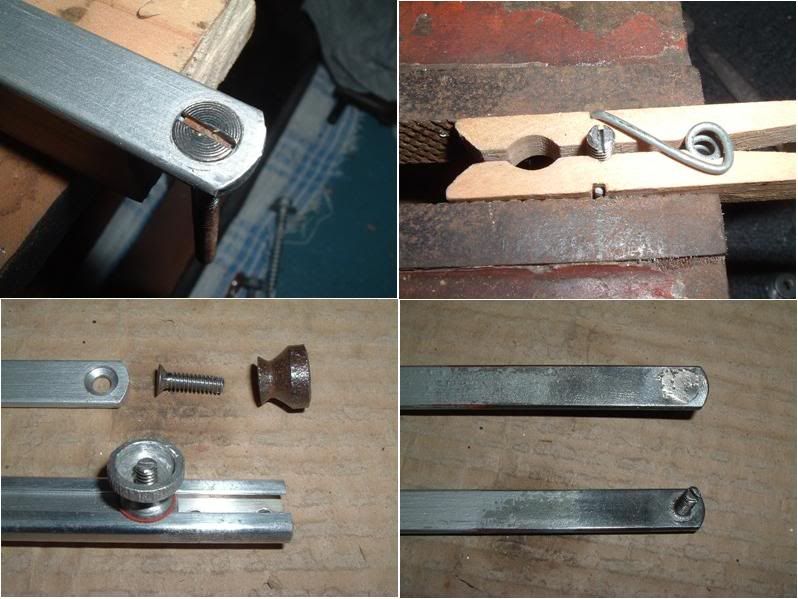 The bits are currently in the shed being painted with chassis paint. Once that cures a bit, I'll be able to whack all the weathershield parts together and finish off that job. Thanks again for your help! ;D ;D cheers, Al. |
|
Deleted
Deleted Member
Posts: 0
|
Post by Deleted on Feb 1, 2010 8:53:18 GMT 10
Hi Millard1399,
I used to use a bolt and wing nut, through the stay and slide track, in addition to the knurled knob friction clamps (which you have beautifully restored) to "lock" the shade open (much the same way as the split-pin) when on-site for a few nights as the friction clamps were notoriously unreliable if it got a little windy.
You may have to drill the appropriate holes.
I really enjoy your posts and it brings back great memories for me.
Cheers,
Ian.
|
|
Deleted
Deleted Member
Posts: 0
|
Post by Deleted on Feb 1, 2010 10:22:21 GMT 10
Nice resto.  |
|
|
|
Post by millard1399 on Feb 3, 2010 20:31:55 GMT 10
Well, the front weathershield has been fitted! Yay!! ;D ;D I assembled all the bits and pieces for the stays, and fitted them to the van. The anti-rattle catches have the thin zinc coating (how stupid!) and I don't see them lasting very long before they start to rust. I ended up putting a short length of electrical tape on the bracket to keep the rust from pitting the aluminium channel like it did previously... 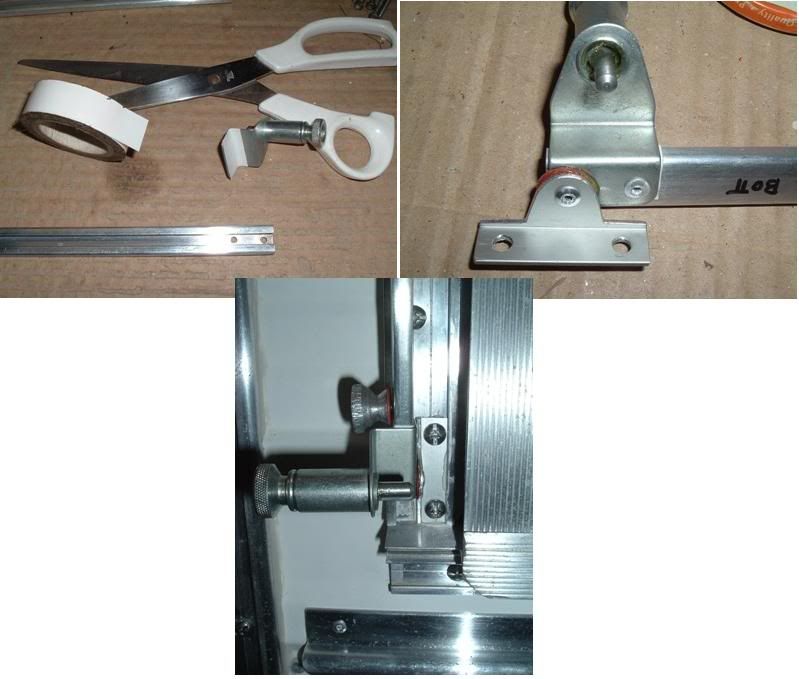 Then the top rail and weathershield were fitted to the van, and everything connected up... 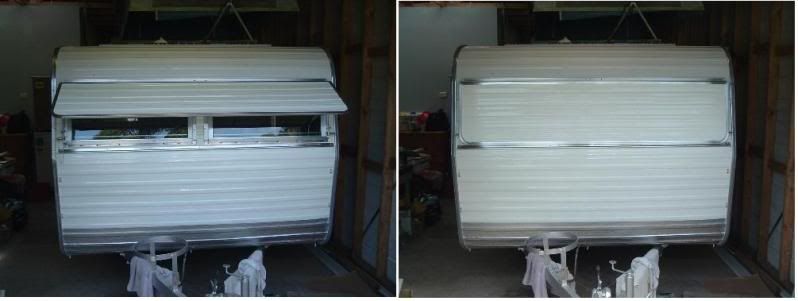 As jikah says above, the friction knobs are pretty useless with a fibre washer between the knurled knob and the aluminium channel. No wonder people use split pins further up the stay. Has anyone added any better engineering to their shield to make it a bit more rigid and able to withstand reasonable winds? Seems to me the current design is ok for calm days, but wouldn't stand up to a decent wind. I was thinking maybe a couple of additional removable stays in the 1/3 and 2/3 positions across the face of the shield (maybe where the vertical struts are in the frame) might make the thing a bit more robust. The other job I've done is to fit a new door stop on the outside of the van. The one that was on there when I bought the van was made from a towel rail bracket and a bit of electrical conduit. Probably with a rubber cap on the end of the conduit, but the conduit had snapped inside the bracket, so I'm not sure what it looked like. However, I threw that into the scrap bin, and went and bought one of the 45mm plastic cushion door stoppers. Probably won't last long in this Aussie climate, but at $1.20 each, I can afford to get a couple of spares to last me a bit longer... 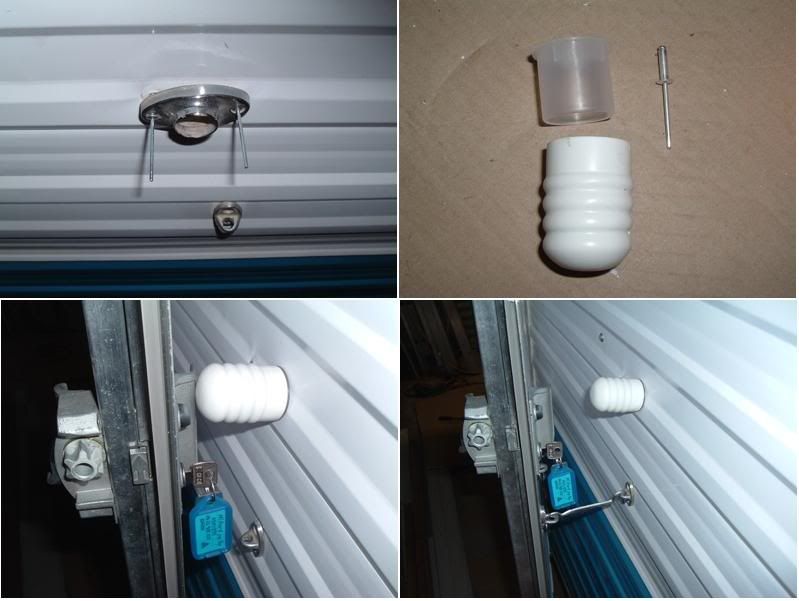 Gotta start work on a temporary timber A-frame roof for the van so I can put a tarpaulin over the pop-top opening and wheel the van out into the backyard. cheers, Al. |
|
Deleted
Deleted Member
Posts: 0
|
Post by Deleted on Feb 3, 2010 21:27:16 GMT 10
...As jikah says above, the friction knobs are pretty useless with a fibre washer between the knurled knob and the aluminium channel. No wonder people use split pins further up the stay. Has anyone added any better engineering to their shield to make it a bit more rigid and able to withstand reasonable winds? Seems to me the current design is ok for calm days, but wouldn't stand up to a decent wind. I was thinking maybe a couple of additional removable stays in the 1/3 and 2/3 positions across the face of the shield (maybe where the vertical struts are in the frame) might make the thing a bit more robust....
cheers,
Al. Great work as usual. She's looking very pretty now. I like the fibre washer job. Infinitely adjustable is handy. Play around with an additional metal washer or rubber washer. Problem is that you cannot get much purchase on a little knurled knob. But then I always have my trusty Leatherman at the ready ... to nip things up a bit.  I'm sure you'll make it work.  |
|
|
|
Post by millard1399 on Feb 3, 2010 22:23:50 GMT 10
wahroonga, I do have a couple of Stilson wrenches in the shed that don't come out much. Maybe I'll carry one in the van, eh? One look at the Stilson, and those knurled knobs are gonna clam up tighter than a fish's ...ummm  ;D ;D ;D cheers, Al. |
|
|
|
Post by millard1399 on Feb 12, 2010 20:07:54 GMT 10
Whinge...moan...groan...   February is such a crappy time of the year in our region. It's the month when we pretend we have a sub-tropical climate. Sunny days are disrupted by regular showery periods, plus afternoon storm lashings. Humidity is rife, and perspiration and clammy clothing are the order of the day.   It's enough of an effort just to sit around in front of the fan!   I'm still trying to build the "temporary" roof cover to allow me to get the van body out into the backyard, so I can lower the poptop roof down and work on that. So far all I've done is remove the canopy lifters and the canvas skirt... 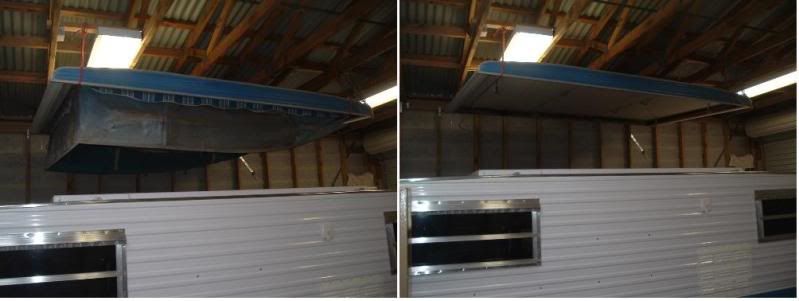 The canopy lifters have been rotary brushed to remove all the rust and corrosion, and are currently being repainted. I have unpicked the stitches in the top and bottom hems of the canvas skirt, and salvaged the aluminium strips. Even these had some spots of corrosion along them from when the canvas has got wet and not been allowed to dry out properly. So I had to rub all these back with sandpaper to try and remove as much of the corrosion as possible... 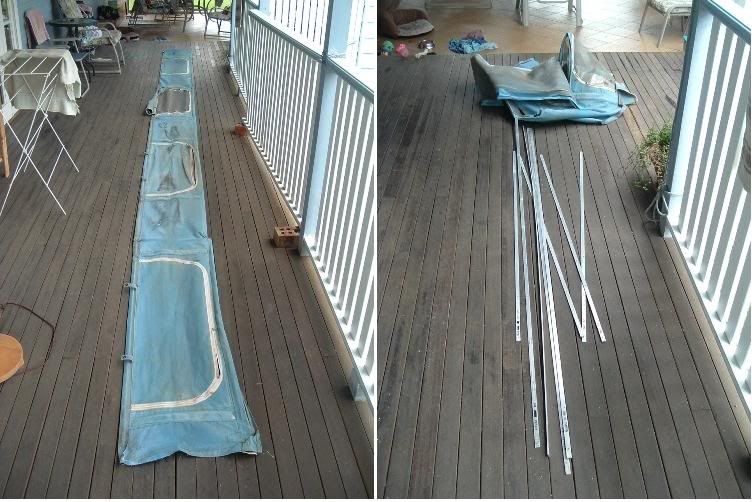 I've got the new canvas I bought from ebay ready to go, but I have to go hunting for some suitable zippers for the windows. The fibreglass mesh is easy. I've got the sewing machine and the thread to suit. Just need to find some room to spread it all out so I can see what the heck I'm doing with it all. Roll on March, and give us a break from all this sweltering.  cheers, Al. |
|
Deleted
Deleted Member
Posts: 0
|
Post by Deleted on Feb 12, 2010 21:51:08 GMT 10
Hi Al, I wait with baited breathe for each new post. Sounds like a new invention in the backyard coming up. Can't wait for the seamstress lessons; however I'd prefer them from a 'seams-mistress' which is evidently where the word comes from.  |
|
Deleted
Deleted Member
Posts: 0
|
Post by Deleted on Feb 15, 2010 13:51:39 GMT 10
Hi Al,
Or maybe they get 'stress'ed out about all this 'seam'ing?
Seriously though, what type of sewing machine are you using? Would love to see some photos.
Cheers, techron
|
|