|
|
Post by millard1399 on Jan 1, 2010 14:36:21 GMT 10
And so here we are on the first day of 2010! Hope you all had a great time celebrating New Year's Eve in whatever way suits you! ;D ;D Here's the latest with the Millard... Waaaaay back at the start of this restoration, when I was pulling bits and pieces off the van, I discovered a fair bit of corrosion between the steel chassis rails and the aluminium cladding... 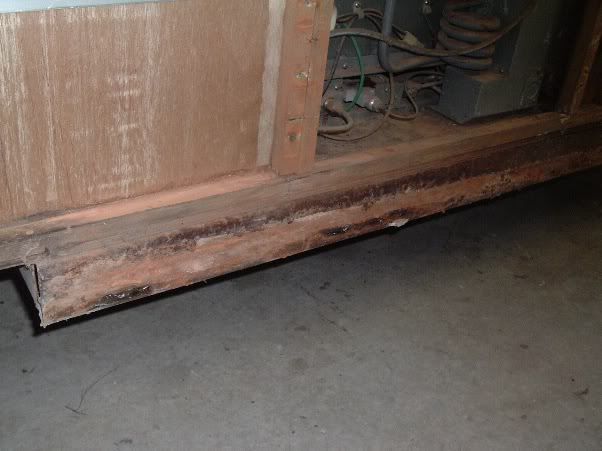 In a couple of spots, the corrosion was so bad that pin-holes had developed in the aluminium... 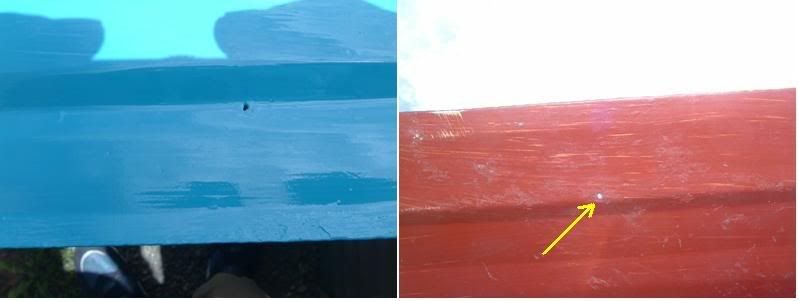 So it was necessary to come up with a different design in the rebuilding, to make sure the steel chassis and aluminium cladding could not come into contact with each other. After doing a bit of searching around, I decided the Laserlite "Noise Stop Tape" would be a suitable option. This tape is normally used under corrugated roofing products to reduce any flapping/creaking noises. A 24 metre roll of this tape is just under $27 from the Bunnings roofing section. Here are photos showing how I applied the tape, and how the cladding now sits over the chassis rail... 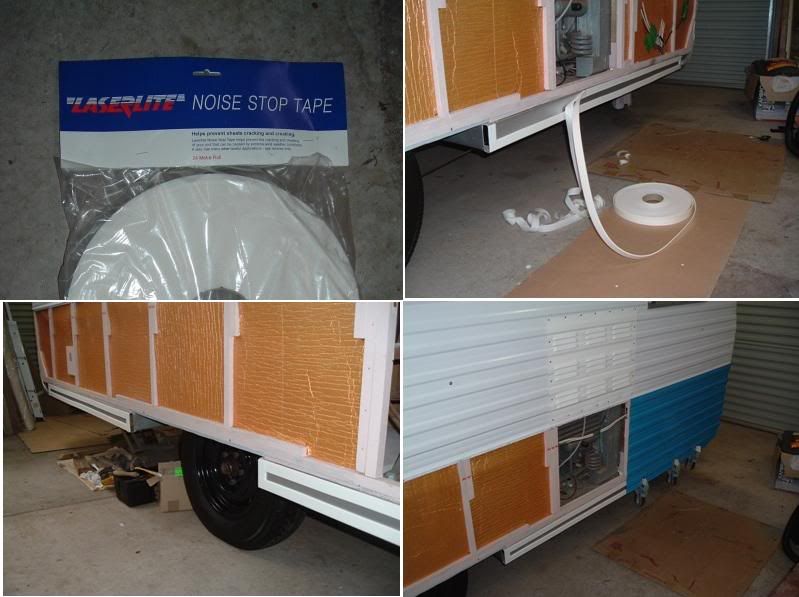 And this photo shows the lower cladding on the nearside (the doorside) after fitting... 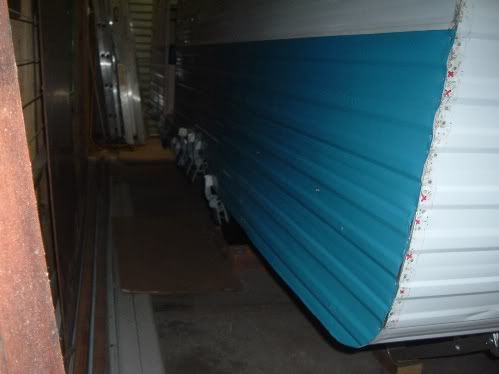 The door: The door:The door frame and the screen/outer doors have now been refitted. They all went back together perfectly, (thank goodness!), and with a bit of grease in the appropriate spots, the doors work real smooth... 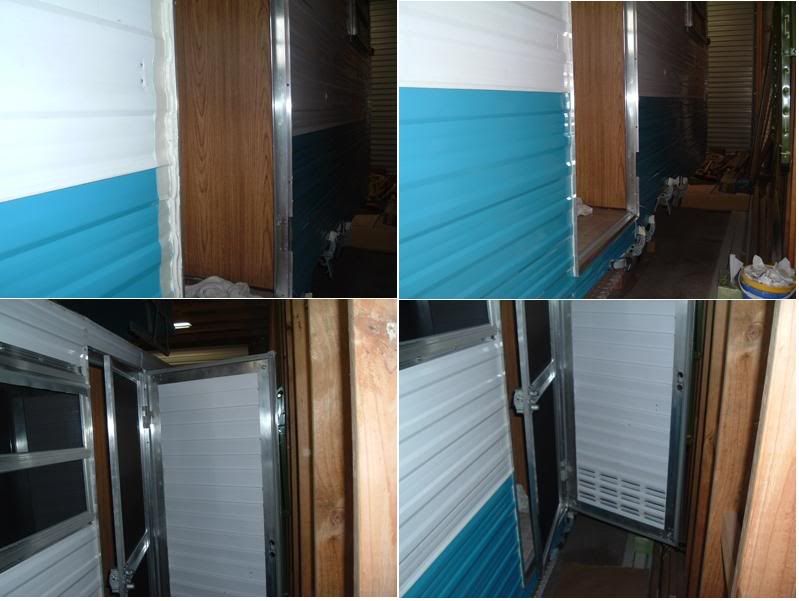 Check out all the shiny aluminium!!   cheers, Al. |
|
Deleted
Deleted Member
Posts: 0
|
Post by Deleted on Jan 1, 2010 17:56:03 GMT 10
 , Looking good Al. Please keep us up to date with progress. Cheers, Rsos. |
|
Deleted
Deleted Member
Posts: 0
|
Post by Deleted on Jan 2, 2010 6:58:10 GMT 10
Great idea with the 'noise tape' Al.  Happy New Year! |
|
|
|
Post by bobt on Jan 2, 2010 20:17:29 GMT 10
Hi there millard1399 That door frame looks nice. Looks better then it would have when it was new. I am impressed with what you did with the door locks. seems everytime I try that the dismantle bit works fine, its the reassemble bit I seem to have trouble with.. Good thinking with the 'stop noise tape'. You would think the the manufacturers would do something similar when theyare constructing them. As for santa... sounds to me like he did you a favour by not substituing you project for something completed. You wouldn't know what to do with yourself with the extra spare time...  bobt |
|
|
|
Post by millard1399 on Jan 3, 2010 13:39:28 GMT 10
Yeah, bobt, I guess sitting around bludgin' when you're retired is not an option, ay?!! If I didn't have the Millard to worry about, what would get me out of bed in the morning??     Yesterday I fitted the water inlet filler... 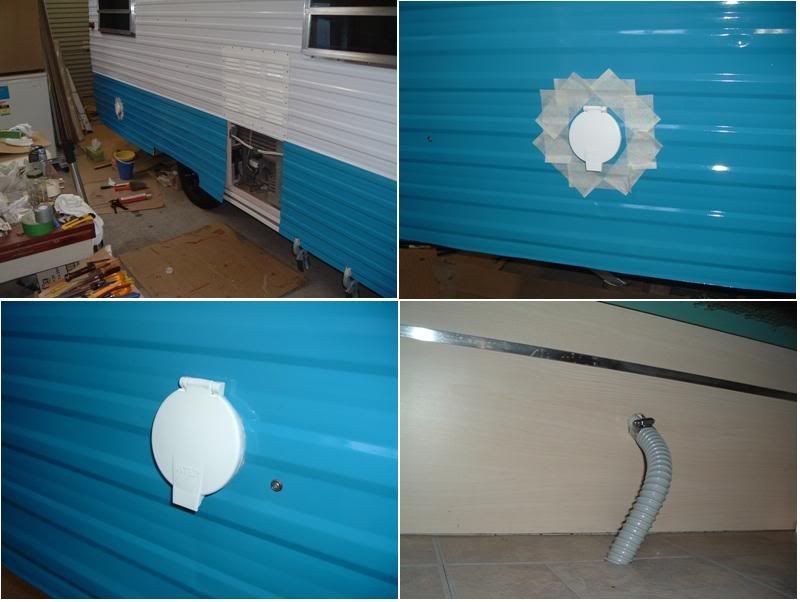 ...but there's a design fault with this particular fitting and how the screws end up being positioned. I've put the information over into the Techo Stuff section, in this thread: Water filler inlet problemcheers, Al. |
|
|
|
Post by millard1399 on Jan 11, 2010 22:14:50 GMT 10
G'day again, Today I started to fit the edge trim back on the van. A rather intricate job, as it turned out, with a couple of curly situations to overcome as I progressed. Here's the start... 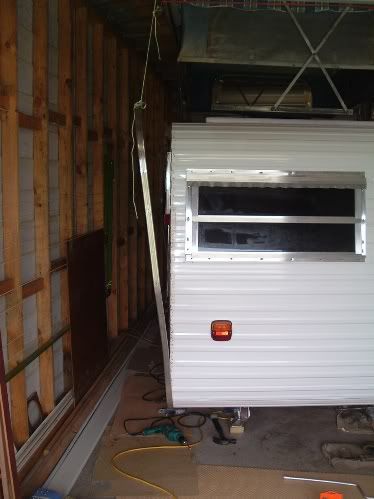 The first problem to overcome was fitting the trim back underneath the chassis rail. Back when I dismantled the van, these trims were pop-rivetted directly onto the underneath of the chassis. Putting steel and aluminium face-to-face is definitely not a good mix, so a redesign was necessary in the rebuild. I decided to use some hex screws with an additional washer between the aluminium trim and the chassis, to create an air gap between the two metals. Here's a photo group showing how corroded the trim was originally, and how I used the hex screws to put the trim back on... 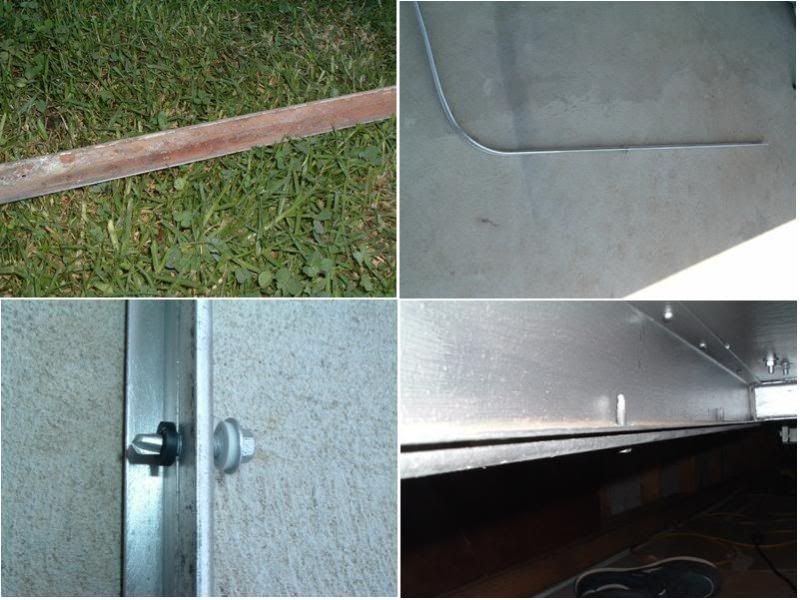 I can either leave the gap as it is, which will allow me to hose any mud or gunk out if it accumulates in there, or I can seal the gap up with sealer to stop any crap getting in there in the first place. Will probably go with some Sika sealer methinks. The other problem I had was on a small section of the cladding, where the cladding didn't extend far enough to be properly covered by the trim. A pretty poor job in the factory originally. These photos show how the trim only just meets the edge of the cladding... 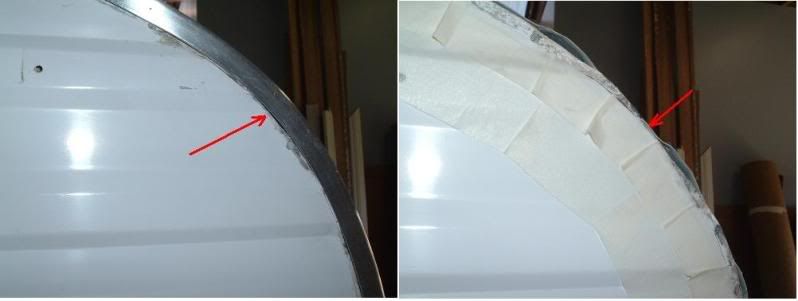 I had to make sure I pumped plenty of sealant in and around this section of the cladding to prevent any water getting in behind the trim. However, after a few hours of mucking around to make sure everything would be sealed properly, I ended up with one section of the van completed... 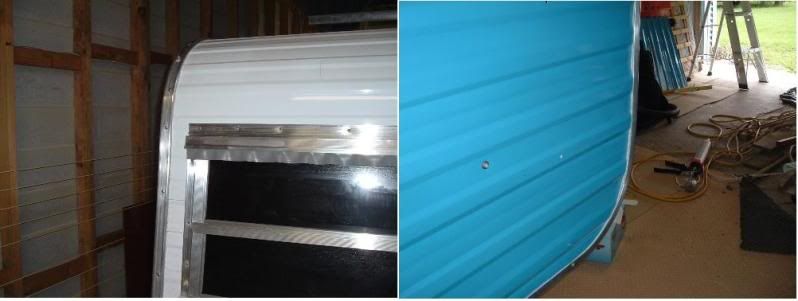 Still got a fair bit to do to complete the rest of the trim on the van, so some heavy "work days" ahead.   cheers, Al. |
|
Deleted
Deleted Member
Posts: 0
|
Post by Deleted on Jan 12, 2010 6:37:04 GMT 10
Did u use new trim or old?
|
|
|
|
Post by bobt on Jan 12, 2010 20:02:45 GMT 10
Hi Ya millard 1399 That inside shot with the water filler hose running from the wall to the floor makes me think your cheating.. taking photos of an installation in a new caravan. not a renovated one.. If that is truly the inside of you caravan, well done looks really good. I do not envy you putting the trim on the edges strikes me to be a 6 person job and requiring some significant patient. The hex screws are a real good idea. I tend to agree with you fill it with a sealant then you will never have to worry about trying to wash the dirt out.. The van with the bright work shining like it is sure looks good.   bobt |
|
|
|
Post by kylarama on Jan 12, 2010 20:23:52 GMT 10
Talk about bling, with all that shiny aluminium.
Alot of the bottom trims on my van had come away.
After reading the above it's best that we not talk about my method of reattaching them.
Your putting all of us to shame with your attention to detail Al!
Second thoughts, your putting most if not all caravan manufacturers to shame with your attention to detail.
|
|
|
|
Post by millard1399 on Jan 13, 2010 0:11:32 GMT 10
G'day All, Thanks for all the positive comments. ;D ;D wahroonga, the trim is the original stuff. I hit the inside of the trim with a rotary wire brush in the drill. Took a fair while to do, but I eventually got all the corrosion and old sealant off the surface. The wire brush leaves a heavy "brushed aluminium" appearance on the surface, but since you can't see this side when it's fitted to the van, how it looks don't matter. The exterior side of the trim was given a rigorous scrub with soapy steel wool to bring it up nice and shiny. The trims still have some gouges and scrapes in the bottom corners from where the van has side-swiped posts in the past, but they just add to the character of the van, ay! bobt, yep it's the genuine water inlet pipe in my van. Darn sight better looking than the original pipe that Millard fitted.  kylarama kylarama, I'm the first to admit that the restoration of this van is overkill to the max.   What started 18 months ago as a "small tidy up" has evolved over time to become an obsessive compulsive disorder!   It seems the more hours I spend on it, the more determined I am to do a good job to justify all the time spent so far (...if you can understand that gobble-de-gook  ) I mentioned somewhere else on this forum recently, that the problem with restorations is that once you make a couple of things looks "new", the rest of the van looks rather crappy. So your brain eggs you on to do a few more things to make them look new, and before you know it, the bluddy van is in a million bits and there you are cleaning this, and renewing that, and replacing those bits over there. Once I've finished this van, I'm going to open up a caravan restoration advisory service. It will operate along the lines of: "DON'T DO IT!!" "DON'T GO THERE!!" "SAVE YOUR SANITY!!!" But then I look at what I've done and think, "Hmmm, not a bad effort for an old timer who's never done anything like this before." There are worse things to do with your life, I guess...   cheers, Al. |
|
|
|
Post by philouise on Jan 13, 2010 12:08:58 GMT 10
WOW!!!!
That is one great example of a restoration.
I think she needs a sign like MAIDEN 77 cause no-one will believe she's not a 2010 model.
all the best with the rest
Phil.
p.s. i suppose putting the trim back over the roof, with all the sealant, wasn't a 1 person job??? surely you didn't just use that rope.
|
|
|
|
Post by bobt on Jan 13, 2010 20:29:11 GMT 10
Mate you will be able to stand back at the end of the day and proudly say "I did that" There are not too many people about that can say that... Time absolutley positivley not wasted...
It will be something you will get a lot of pleasure out of when you get to and use it.
bobt
|
|
|
|
Post by millard1399 on Jan 13, 2010 21:51:36 GMT 10
Phil, the little bit of rope was all I needed to be able to do the job single-handedly. Mostly it's just me at home during the day, so I've had to come up with plenty of "ingenious" ways of getting the job done on my own. I put the sealant on the cladding first, and then suspend the trim so that the bottom rear curved section is just slightly below the chassis and a couple of inches away from the van. Then I start from the wheel arch and put the end of the trim into position, and work my way along and up the trim, pressing it into position, and putting screws in as I go. The challenge is to keep my fingers away from the sealant as I press the trim into position. Not always successful, so I keep a box of tissues and a bottle of turps handy. Good thinking with the "Maiden 77" tag!     Much better than some of the @#$%!! words that I've called it over time!    bobt bobt, I sure am looking forward to taking the van out on its maiden voyage. The light is definitely showing through the end of the tunnel, so hitting the road can't be too far away! cheers, Al.
|
|
Deleted
Deleted Member
Posts: 0
|
Post by Deleted on Jan 13, 2010 22:03:40 GMT 10
Hey Al, She is looking fine that old maiden of yours for sure, Mate a beautiful job being done and also a little solo ingenuity to boot, she's a credit to you. ;D Carl  |
|
|
|
Post by mike on Jan 14, 2010 11:44:39 GMT 10
Hey Al, ;D How ingenious are you!!! The old rope trick to get the trim on progressively!! So good!!     I'm still too much of a scareddie cat to go to your level at repairing my lower cladding to chassis problems... Maybe next year...  And... did I read that you have intentions of "... hitting the road..." in the near future?    (That may be all very well for you, but what about the rest of us??) Let's hope that its not too far away for you.  Cheers mike ;D ;D ;D |
|
|
|
Post by millard1399 on Jan 14, 2010 20:34:19 GMT 10
Hey mike, I'm hoping to have the van ready for a trip in May. I've still got the whole pop-top roof to refurbish, so there's still a fair bit of work to do. Maybe it'll happen, maybe not. However, I keep plodding, and today I finished the edge trim on the nearside front. Here's a couple of photos showing how the masking tape is used to take all the excess sealant... 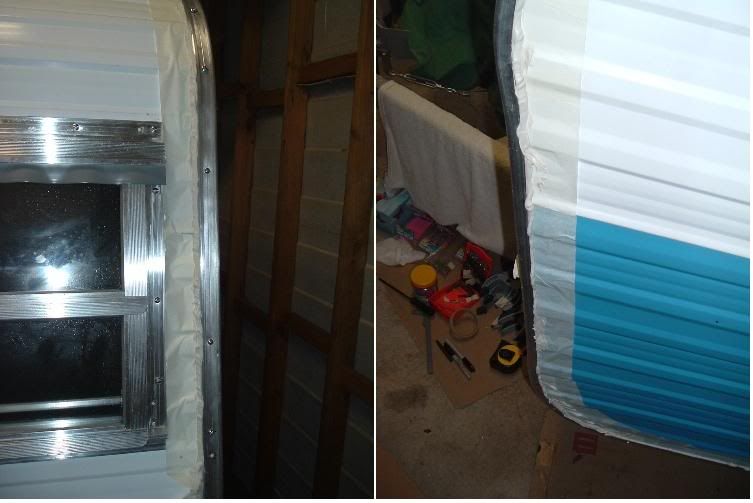 And here's a couple of tips I learnt as I work through this job. After previously wrapping myself up in "contaminated" masking tape when pulling the tape off the job, today I thought "smarter" and used a plastic shopping bag over my hand. As the tape is pulled off, it is fed into the plastic bag. A lot less sealant on my hands! ;D The other discovery I made is that good old dunny paper is better than tissues for cleaning up the excess sealant. Just tear off a 3-sheet length and fold it into a wad, then wet it with turps. The good thing is that the dunny roll also comes in handy if the job is giving you the sh*ts! ;D ;D 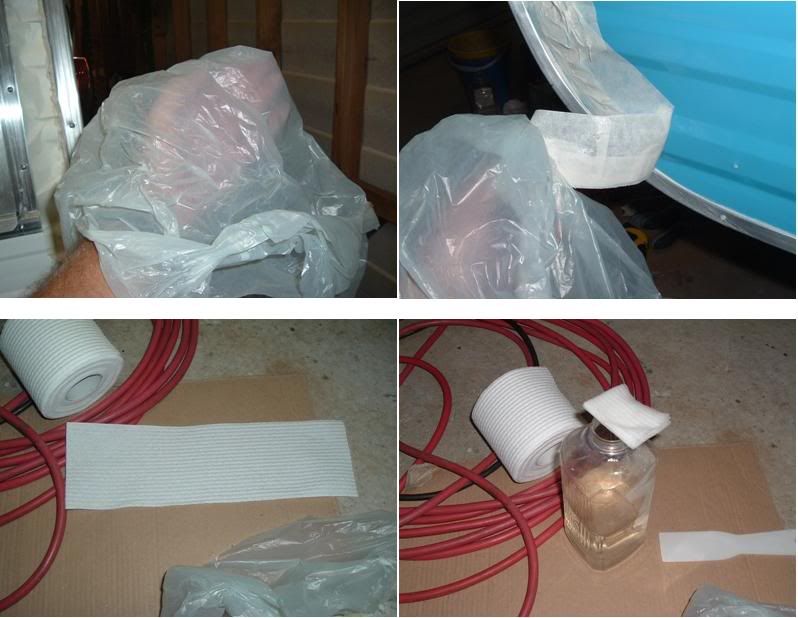 By the end of the day, the front trim was finished!!   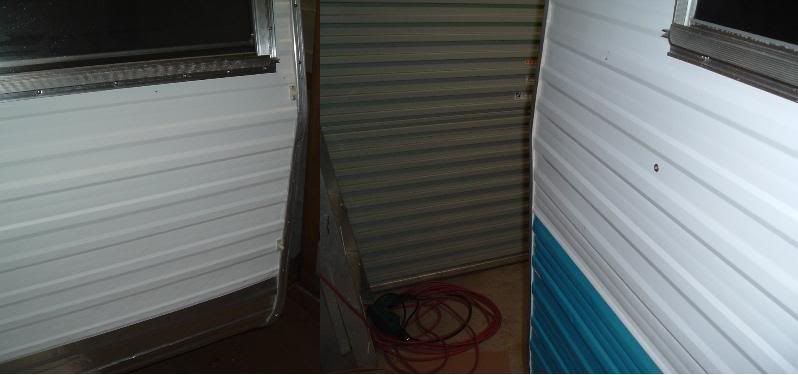 May...and counting down... cheers, Al. |
|
|
|
Post by mike on Jan 16, 2010 10:04:48 GMT 10
Greetings Al, ;D ;D ;D May,2010. Ok, its in the calendar. ;D The front is finished?? Unbelieveable!!    I like your ideas with the masking tape to make a nice clean finish: incl the gloves and plastic bag.. again very neat stuff!    The piss de resistance: dunny paper!!!  I've got a few questions for you.  Are you painting any 'clear' lacquer over the 'bright' aluminium? I did it when we first bought our van but I forgot to continue the practice and it has 'dulled over'. I just wondered if you were going to just use wash and wax to keep it shiny, or some soapy steel wool?  I can't quite see, but did you continue the hex head screws all the way over the top when attaching the al angle capping, or are they phillips head screws? They don't appear to be pop rivets.  Back one page, and the lower al cladding appears to have been a separate panel from the upper wall cladding?? or did you cut the wall cladding along that line? If so, what did you cut it with? How are the two panels joined? Is there a fold in the top panel or is there a joiner strip (doesn't look like it but..)?  The cladding on mine has a fold half way up the wall, and I wondered if you thought it feasible to just remove the lower half and later reseal it, to enable access to lower timber framework for repairs etc. Did your 'join' of the lower panel succeed? Was it relatively simple to do? Is the fold which comes up from the bottom, straight, or does it hook over a turn under from the top panel? 
Thanks
Cheers
mike ;D ;D ;D |
|
|
|
Post by millard1399 on Jan 16, 2010 20:58:24 GMT 10
Hey mike, just to clarify...only the front on one side has been completed.  But the whole of the nearside (the doorside) of the van has now been done, bar fitting the annexe sail-track into position. ;D Next week, I tackle the other side (the offside). Now to your questions: 1. I hadn't planned on putting any lacquer on the trim. I'm going to see what ordinary car polish will do to remove the remaining residue from the sealant clean-up (there's a light, slightly milky, residue left after the turps cleanup), but apart from that I don't plan on doing anything else. Aluminium will eventually go a dull grey from the oxide layer that forms, so as far as I know only regular polishing will maintain the shine. Regular washing will remove the chlorides and salts that get into atmospheric pollution and fall on the van. It's these chlorides and salts that cause the pitting corrosion that usually occurs on aluminium. (Ever seen aluminium windows in houses near the ocean? - now that's corrosion!) 2. The hex screws were only used along the bottom under the chassis rail. Everywhere else, stainless screws are used. I started trying to salvage as many of the original screws as possible, but overzealous operators in the factory had stripped most of the phillips heads. I salvaged a few, but I gave up sorting through them and went to Bunnings and bought packs of 100. The Bunnings screws have both the slot and the phillips head combined, so if you ever strip the phillips head, there's a slot for a blade screwdriver to get you out of trouble... 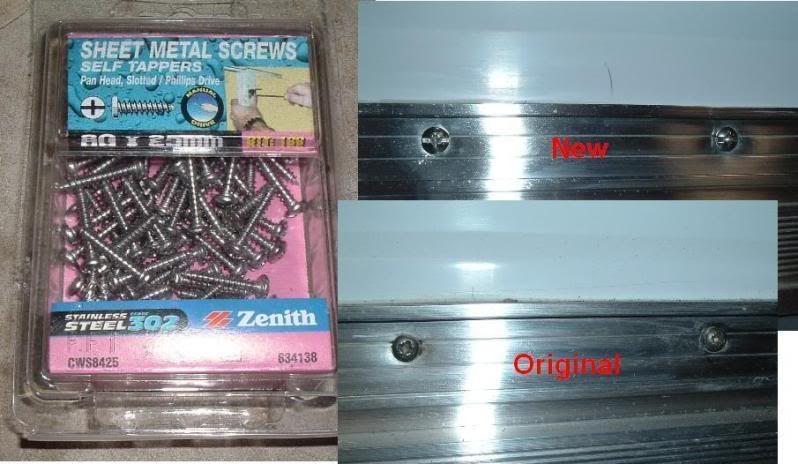 3. The cladding on my Millard is two separate pieces...white and blue. Hopefully these photos show you how the blue is fitted up to the white... 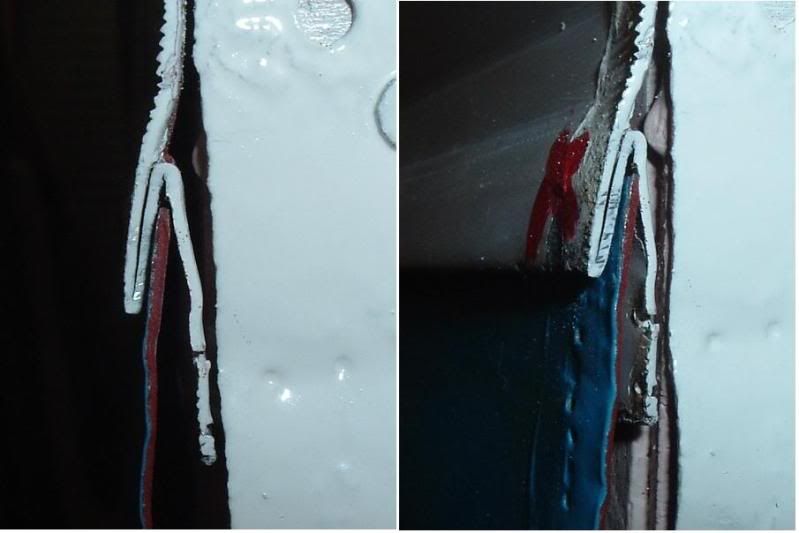 By all means, just take the lower cladding off your van for the repairs. You might not even have to put any sealant in the joint when you refit. Mine didn't have any originally, and I don't think the joint was a source of water leaks over the 30 years. You just have to make sure there's plenty of sealant at the ends where the edge trim fits on. Water might run along the joint "lip" and in behind the trim if it's not sealed up properly. Hope that helps. If not, ask more questions. Only too happy to share information!! ;D ;D cheers, Al. |
|
|
|
Post by kylarama on Jan 16, 2010 21:24:42 GMT 10
|
|
|
|
Post by mike on Jan 19, 2010 13:04:21 GMT 10
Cheers Al, ;D Thanks for all that info: you obviously have a very good camera lens for that close up of the screws and the end of the cladding join. Very clear. The join looks simple enough too.  I had thought that I would need some sort of 'nibbler' to cut the sheet: then what to do when re-joining? Anyhow, not relevant now!!  Its probably a job that I will now have a go at, but not just yet. Our van is not sheltered, and I will need to get stuff ready to go flat out to finish it asap. I have a couple of tarps that can be draped over anything if needed, but the sun can be just as much of a pest as rain when doing these long run jobs. ;D ;D Kylarama thanks for the info on cleaning up bright al.  Cheers mike ;D ;D ;D |
|
|
|
Post by mike on Jan 21, 2010 11:54:37 GMT 10
Hey Al, ;D Hows progress with the 'other side' going? Or is it the pop-top? ;D ;D ;D Just a quick question....  Apart from around the edges, how is the cladding attached to the frames?    There doesn't seem to be any screws, rivets, or whatever from the outside..  Is it just glued on with dobs of glue regularly spaced?? (Not likely, but...)  Cheers mike ;D ;D ;D |
|
|
|
Post by millard1399 on Jan 27, 2010 11:39:22 GMT 10
Hey mike, sorry mate, I didn't realise you'd posted another question here, so apologies for this slow response. The cladding is all fixed to the framework with 20mm length hot-dipped galvanised flat head nails (crikey, that's a mouthfull!   ) In the factory originally, it was all done with staples from a staple gun. So I've just substituted nails for staples. No glue. In a couple of places around the pop-top opening and elsewhere, I used stainless screws, only because of the way the cladding ends up being overlapped and exposed in those places. The biggest problem I had with the nails was around the side wall perimeter where the cladding hadn't been cut large enough to hide behind the edge trim properly. When I put nails around the perimeter, in some places the nail head is not covered properly by the edge trim. Makes the job look a little unsightly, but if I distract your attention with some nude photos of an Olympic (   ), you won't care much!     ...And so to an update of this thread... The fridge compartment: Having previously read all the good ideas you guys had about computer fans and cooling of the fridge compartment, I had to go and lie down with a headache from trying to digest it all.  It all proved to much for me to grasp properly, so I went back to basics and made a "cheap attempt" at something similar. The bottom fridge cladding only has vents at the top of the panel, so I decided to drill four half-inch diameter holes through the floor at the back of the fridge. Then I fashioned a cover from some scrap aluminium angle I found in the shed. Added a strip of fly wire, and screwed the cover up underneath the floor... 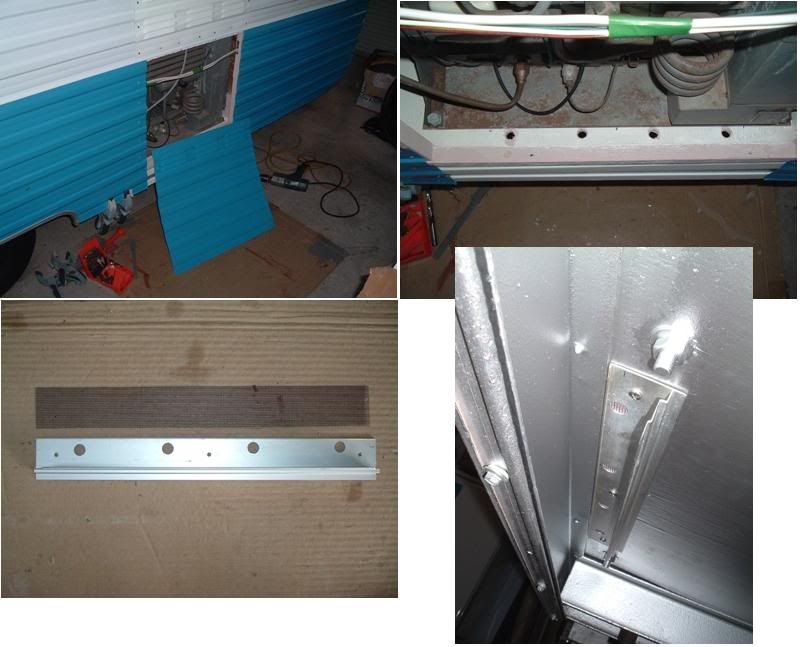 Don't know whether it will make an ounce of difference to the cooling effect, but it sure gave me a warm feeling doing it, heh heh   You'll also notice the black line of Sika sealant I put along the gap between the edge trim and the chassis rail (in the last photo above) to stop any mud/dirt/crud getting into the gap. A funny story about the bottom cladding cover for the fridge is that I fitted it all in position with sealant and screws, etc, and then sat back pretty chuffed with what I'd done. Then I had an "Aaaargh!!" moment when I realised I'd forgotten to put some fly mesh behind the vent opening. I had to pull the cover back off the next day (messy, messy!) and do it all over again.   The gas system: The gas system: I hooked up a temporary bottle and checked all the gas connections for leaks, using a cigarette lighter the soapy water test. All was good, and the stove burst into flames life inside the van. The fridge was also tested on gas and works well... 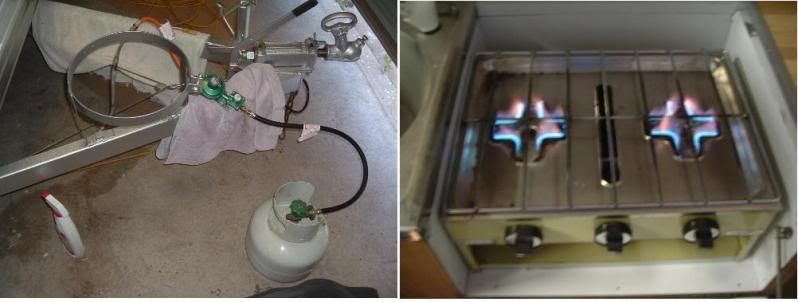 The edge trim on the offside: The edge trim on the offside: Finally she's done!! After using 26 cartridges of Sika sealant around the cabin of the van, this part of the job IS DONE!! ;D ;D ... 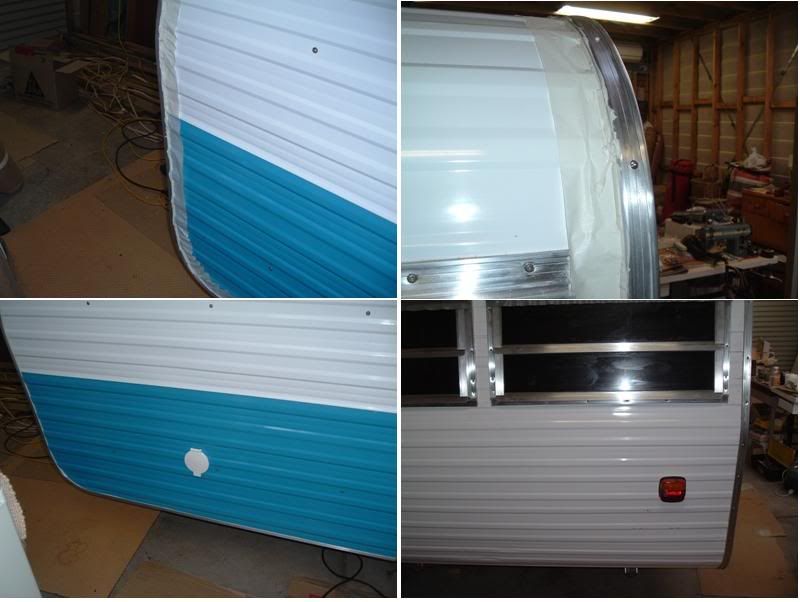 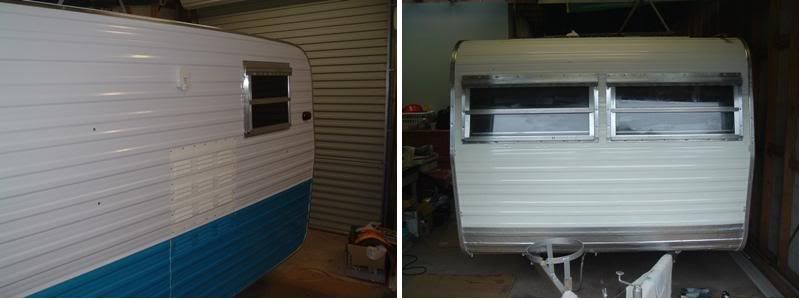 However, there's still the pop-top roof to go...     I have a few fixtures still to fit on the van...the sail tracks, the door stopper, the front weathershield...but I'm getting closer to being able to push the van out into the backyard and lower the pop-top roof down from the rafters and start working on that. Till next time... cheers, Al. |
|
Deleted
Deleted Member
Posts: 0
|
Post by Deleted on Jan 27, 2010 13:18:51 GMT 10
The edge trim on the offside: Finally she's done!! After using 26 cartridges of Sika sealant around the cabin of the van, this part of the job IS DONE!! ;D ;D ... That's a typo, you really meant ... 2.6.  No wonder vans leak! No manufacturer is going to use that quantity. You'll need a new weighbridge certificate. The fridge!I'm less sure about those 4 holes in the bottom; but they'll sure let water escape ... after a flood.  I guess she'll be a black top only tourer from now on. Keep up the good work! |
|
|
|
Post by millard1399 on Jan 27, 2010 14:02:46 GMT 10
Hey wahroonga, funny story about the cartridges of sealant. When I first went to buy them, I had absolutely no idea how far a cartridge would go. So I ordered 3 just to see what would happen. Well, they went nowhere! So I went back and ordered another 6. Those nine allowed me to do the door cladding insert, and maybe four of the the eight windows. So I then had to sit down and try and do some scientific calculations about how many cartridges I'd need for the rest of the van. Looked at the phases of the moon, the tide charts, Einstein's theory of relativity, and went and ordered another 20! So that's 29 all up, and I've got 3 left. Probably a quarter of the 26 I've used has ended up on the masking tape as excess. I found it really hard to judge how much to pump into the joint so the least amount would ooze out, while making sure that everything inside the joint was covered properly. But, yep, I reckon there's a heck of a lot more sealant on the van now than there's EVER been!!   I think I might have misguided you with the holes at the back of the fridge. I meant to type "drainage holes"   [D@mn!...seemed like a good idea at the time... [D@mn!...seemed like a good idea at the time...     ] ]cheers, Al. |
|
|
|
Post by mike on Jan 27, 2010 21:15:38 GMT 10
Greetings Al, ;D ;D ;D What a good looking van you're making there!    I reckon at the rate you're going, May 2010 is a dead-set certainty for a departure date, so you'll need to get the maps out about now and start the dreaming.    Thanks for the cladding detail. On my Franklin, apart from the edges, there doesn't seem to be nails, or staples... So thats going to be interesting when it comes off. No probs for me tho: I'll just nail it back on if needed.  With your fridge lower vent problem, you didn't consider getting a bright stainless vent cover from say Whitworths and pop-rivetting it into the lower panel? www.whitworths.com.au/ecatalogue/current/pages/sm/120-121.asp#anchorI've been considering the same fridge ventilation system as well, probably with fans. ;D Cheers mike ;D ;D ;D |
|