|
|
Post by atouchofglass on Apr 6, 2008 19:19:33 GMT 10
Thought I'd post the 68 Olympic here considering she was ahead of her time ;D ;D Just to give those with glass envy a quick fix This is what I started with 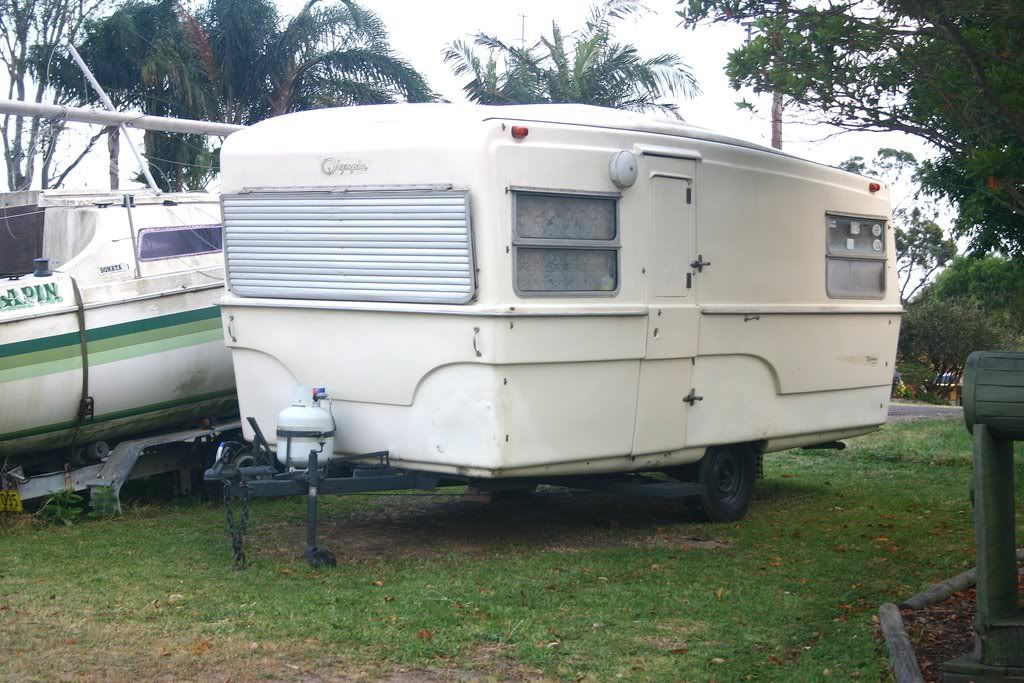 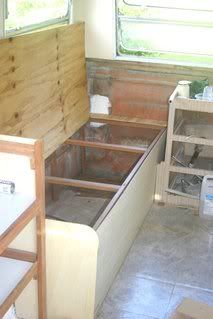 single bed in the making It will open from the top The bed has also been raised making for more storage 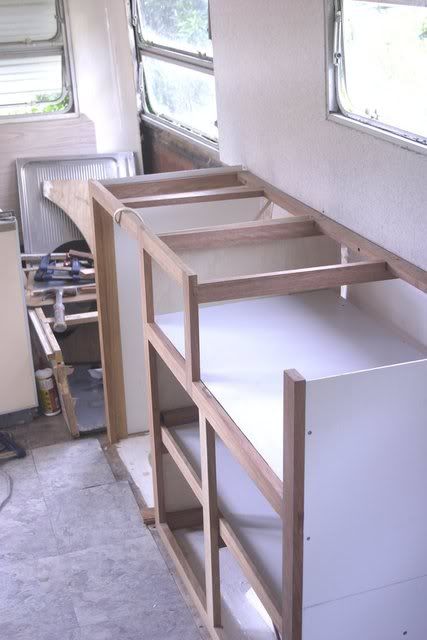 New kitchen carcass New kitchen spashback as well More to do yet.... front windows currently being done as well as the lounge Atog |
|
Deleted
Deleted Member
Posts: 0
|
Post by Deleted on Apr 7, 2008 7:26:56 GMT 10
Nice joinery. But where's the polycore honeycomb?  |
|
|
|
Post by atouchofglass on Apr 25, 2008 12:29:56 GMT 10
I'm waiting until I start the next van..... hopefully a Kennedy Borrowed next doors computer to see how things are going......  So far the front of the van is looking good.... the lounge carcass is finished and now am starting on the cupboard and other single bed.. Still got one window to seal and lots of other bits to finish.... Back to it and see you lot when I do    Atog |
|
|
|
Post by hooligan on Apr 30, 2008 1:34:50 GMT 10
Nice job on the kitchen cabinetry ATOG, what are you planning to do with the doors and benchtops?
Cheers,
Gristy
|
|
|
|
Post by atouchofglass on Apr 30, 2008 6:40:26 GMT 10
Thanks Hooligan
The doors will be in solid rosewood and the bench top will likely be laminex.
While cabinetmaking isn't my trade the simple styles are easy to do with a good drop saw and a bit of patience. the doors will be about 40mm strips all glued together to make the width I need.
Having access to a drum sander is a definite bonus... ;D
Still undecided on the table.
The kitchen splash back cost an arm and a leg as I had to buy a full sheet to get the size I needed.
The left over wasn't big enough to do the table top to match.
So I'm left with a question of what to do it in...
Currently that's in the too hard basket
The door entrance and cupboard are on my current hit list.
Have to buy a half sheet of Beige laminex to cover the outside of the cupboard. again not a cheap exercise so I'm saving my pennies and will do the single bed while waiting..
There will also be a pantry in the cupboard. So this will be a larger cost than just a few sticks of timber.
I'm getting to the end of the interior cabinetmaking build except for the overhead cupboards.
That's another story.
At least doing things slowly cuts out the pain of needing materials fast.
Cheers
Atog
|
|
|
|
Post by atouchofglass on May 20, 2008 17:39:06 GMT 10
greetings all
thought I'd post something for no particular reason except to post something ;D
Looking at my last post I have decided not to use a sheet of laminex in beige for the entrance cost and colour are considerations
Instead I'm going to use laminate liner.....
also known as laminate backing
It only comes in white if you use it as a laminex substitiute.
It is thinner than laminex and only really suitable for non wearing surfaces..
Such as oooohhhh walls
Why use laminate liner?
cost is under $40 a sheet and laminex is over $140 a sheet
so if you can live with white it is ideal
Atog
|
|
|
|
Post by hooligan on May 21, 2008 22:39:05 GMT 10
Thanks for that info ATOG, something I never knew, certainly makes laminex a more $ viable option. I assume in comes in large sheets? Cheers, Gristy  |
|
|
|
Post by atouchofglass on May 22, 2008 6:24:23 GMT 10
Hooligan
Yes very large sheets
off hand approx 3.0 x 1.2 mtres
Those figures probably aren't exactly right but you get the idea
because it is thin it is also very fragile before it goes onto the ply
So you have to have a large bench to cut it up on.
because I'm still friends with the previous employer I use his equipment
the ply face and the laminate back is coated with contact cement When the glue is dry lengths of thin PVC pipe is placed over the ply to separate it from the laminate.
the laminate is aligned over one end and that end is stuck to the ply
There must always be an overlap of laminate that is trimmed off later with a laminate trimmer or a file
one by one the PVC pipes are removed and as each one is removed the laminate is pushed onto the ply
the idea is to get a join that has no bubbles.
a rubber roller is then rubbed over the board to remove any small bubbles and make a firm contact
Try it with small stuff first before going onto full sheets
It's not all that hard just a little nerve racking with larger sheets.
being cheap it is worth a try to save a few dollars by doing it yourself
Cheers
Atog
|
|
|
|
Post by atouchofglass on May 31, 2008 18:02:05 GMT 10
OK here's this weekends start laminate both sides of the cupboard end that also doubles as a doorway and fibreglass it in place.. 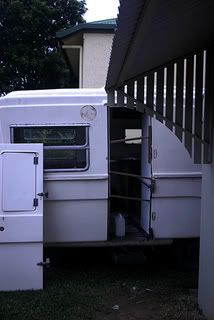 Three clamps and plenty of fibreglass behind it.... tommorrow will tell how well it has worked... the sticks are to make sure of a flush fit. Atog |
|
|
|
Post by atouchofglass on Jun 4, 2008 6:53:23 GMT 10
Hooligan
I forgot to mention that when preparing the ply to fit the laminate
make sure you sand the ply smooth and remove any divots in the ply...
I.E fill any holes as these will show through the laminate
being as thin as it is.
All the best with any laminating you do
Atog
|
|
|
|
Post by atouchofglass on Jun 28, 2008 19:41:14 GMT 10
Just an update The tray to waterproof the doorway, cupboard and lounge It extends to the edge of the cupboard and up the sides about 20mm Will fit it in the future 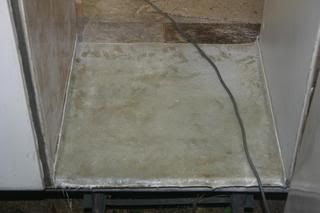 Up Close 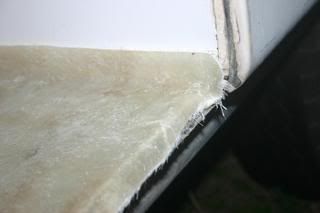 Atog |
|
|
|
Post by atouchofglass on Jul 15, 2008 6:48:42 GMT 10
Greetings All Bit of a challenge of late getting to finish anything on the van The door tray is close to finished... Have glued it to the floor using resin Then matrixed the edge to the cupboard wall creating a watertight barrier on the aft side... eer back side..... still prefer aft side ......... of the doorway and fibreglassed it into the outer shell Came up quite well me thinks Pantry/wardrobeDecided to cut 300mm off the space that was originally a wardrobe to make a slide out pantry and wardrobe side by side. The sliding pantry was an issue as a store bought kitchen pantry would have cost about $480 for the mechanism alone  As the old saying goes "we haven't got the money so now we've got to think" Happened to be in Bunning doing some work and saw a similar set up that was way too small for my needs .... so I bought three of them at $75 each and now I have a pantry that can be separated into three instead of coming out as one Probrem solve-ed Word of warning to anyone that may do similar... don't use the screws provided.. cheap Chinese sh..... you get the idea They snap off easily..   The facing is to be in rosewood By having a groove cut into the timber it covers any rough edge on the plywood end and pulls the ply straight.. The ply being only 7mm it tends to move around a bit, so the extra support is good. Shelving in the wardrobe is also on the list .... most likely also a Bunnings special Other BitsStill working on door hinges and lining the back of the pantry/wardrobe Will strengthen the wall the hinges attach to using aluminium plate (scrap aluminium from a friend) Then there's the painting inside the lounge and beds and..... don't think about it Atog .. just keep moving forward   How does an ant eat an elephant? One bite at a time ;D ;D Kinda like finishing a caravan project   Atog |
|
|
|
Post by atouchofglass on Jul 16, 2008 19:12:34 GMT 10
Here's a photo of the doorway nearly completed... the front edge was ground and glassed into the outer shell One side was matrixed and clamped to the cupboard wall 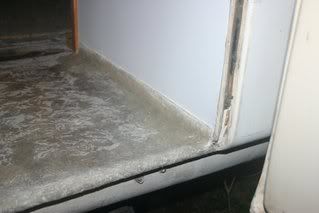 Hope it shows clearly how it stops water entering the floor area and rotting it. You can see the rosewood facing for the cupboard in the photo Atog |
|
|
|
Post by millard1399 on Jul 16, 2008 20:26:26 GMT 10
Gees atog, I'm not really convinced that you've prevented water getting to the floor. Maybe if you could show a photo of you throwing a full bucket of water into the door opening, and then a second photo a few hours later? (heh heh ;D) I'm getting all glassy-eyed just watching your progress...  cheers, Al. |
|
|
|
Post by hooligan on Jul 16, 2008 21:25:10 GMT 10
Great work Atog. Do you have any pics handy of the pantry mechanisms you sourced from Bunnies? Good work around the door step, not to sure about the fibre material your using - funny looking door mat, and are you sure you want to glue it down? What if you need the shake the mat out?  ;D ;D Cheers, gristy  PS from what can see that rosewood is gunna look a million bucks! |
|
|
|
Post by atouchofglass on Jul 17, 2008 6:30:34 GMT 10
Hey everyone Shake the mat out   I forgot about that ;D ;D Actually I glued it down so the wife couldn't sweep dust under it ;D ;D ;D If I get caught saying that I'm in deep doo doo ;D ;D   Tried throwing a bucket of water in the doorway as suggested and taking a photo... unfortunatley the wife was standing outside at the time and a photo of a wet tee shirt wife is not allowed on this forum ;D ;D ;D As for the two hours after that .... well that's none of your d#mn business...  ;D ;D ;D   ..... fun though ;D ;D ;D ;D ;D On a more serious note: The pantry mechanism was found in the kitchen section of Bunnings.. As said previously ....never use the screws provided they are useless... will snap off I'll post a photo of the pantry when it's further along ... Most likely this weekend as Cairns has it's Show Day long weekend on Friday Yeay three days on the van .... much progress to be had Atog |
|
|
|
Post by atouchofglass on Jul 26, 2008 20:04:14 GMT 10
Greetings All Over last weekend the pantry facing was finished... sort of And this weekend the backing and one shelf in the wardrobe.. 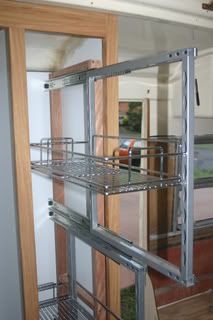 Pictured are the slide out sections of the pantry from Bunnings 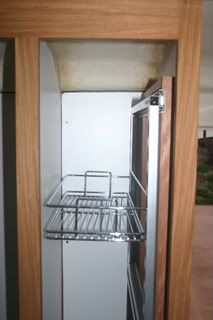 The pantry is only 300mm wide but will fit a heap of stuff in it... 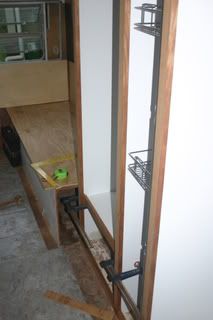 Each of the slide out sections comes with two baskets so in total there will be six in the pantry... only put two in to show how it looks None of the timber work has been coated with danish oil .... that's another job to add to the list   Cheers Atog |
|
|
|
Post by atouchofglass on Aug 22, 2008 6:59:32 GMT 10
Hi Everyone ;D Well the Olympic is progressing slowly... Over the past month some of the work done includes: - Danish oil on all the rosewood facings
- - Make and fibreglass new petitions between sections in overhead cupboards (made from ply and laminate)
- - Sanding and flowcoating the inside of the overhead cupboards
- - Insulating the overhead cupboards
- - Half insulated around the van .... ran out of thermo break

- - Finishing the bed ends and glassing them in place
- - Priming the plywood lounge and beds in pink primer
- - Hinges to the entrance door are off getting repaired
- - Patch up the entrance door with resin ..... lots of holes to fill
- - New s/steel hinges on the small door in the entrance door
- - Run the 240v wiring ready to have all the p/points fitted
- - Matrixed the final window into the shell
You'll notice from the list that there really isn't much to photograph - Mostly boring stuff that will not be seen when finished. Still to go this weekend is -- Top coating the lounge and beds with white paint Cutting in all the holes for the power inlet, power points and switches Fibreglassing the power-board backing plate in place ... Hopefully next weekend the 240v electrics will be in except the lights... haven't bought those yet  If I get through all that this weekend I'll be one happy vanner     Keep on vanning everyone... Atog the busy |
|
|
|
Post by atouchofglass on Aug 30, 2008 8:07:09 GMT 10
Hi Everyone So here we are at the following weekend and the electrics should be in soon All the prep work was done last week so all should flow nicely Just to add to the various posts about the hinges spread through the forum. In the background we have been having discussions about the original Olympic hinges. There was the thought that for all the Olympic owners out there I would go to a foundry and try to get the hinges copied so anyone could have a set Problem with that was the costFirst of all the cost of making a mould then of casting Add to that the hinges then need pinning and lastly they need to be chromed Total cost unknown but not a cheap exercise AlternativeThe fellow doing my hinges up offered to make a set in Stainless Steel    How much I said? Mates Rates he said So they are in the making now This brings on the question if you haven't a mate doing s/steel works is it still cheaper to make in s/s or go original Due to the lack of original hinges around I say it most likely will be cheaper to have a set made up Add to this that you can then go to a ships chandler and buy s/steel hinges that match for your small door if your entrance door needs them..... That's what I've done We'll see how it all turns out in the next week or two Atog PS the bloke making the hinges isn't sure he wants to make any more..... I've asked    |
|
|
|
Post by atouchofglass on Aug 31, 2008 17:55:09 GMT 10
Well here is the progress so far The 240V electrics have been run but still have to be fitted off .... need more bits to finish it.... Next weekend  The bed bases have been painted  the water tank has been removed..  Some of the insulation is also in  More progress though it appears slow it is getting there Atog the impatient |
|
|
|
Post by millard1399 on Sept 1, 2008 19:18:04 GMT 10
Hi atog, slowly slowly making headway  , but looking good! The insulation you are using, is that the type where the aluminium foil is bonded on one side and the rest of the thickness is a spongey type of material? About 8mm thick in total? Reason for asking is that I have some insulation left over from when my shed was built last year, and I'm thinking of using it in the Millard. My stuff is called "air-cell thermal insulation" ( www.air-cell.com.au ) and looks like it will suit the job. Keep the focus mate... cheers, Al. ps. still no response from Ditzy. I'll send another PM. |
|
|
|
Post by atouchofglass on Sept 1, 2008 21:06:58 GMT 10
Hey Millard 1399 The insulation is thermo-break This one is 15mm thick and it has a foil front, grey/black behind it and a sticky back covered in a white plastic. The white plastic is peeled off and the thermo-break can be stuck onto whatever. You can get it in 10mm, 15mm and 25mm ... I think....  It is used by the airconditioning trade to insulate the air handling units. I use 15mm because it is the thickest I can fit in behind the walls without causing any problems fitting the walls This one is $23-$24 a metre Trade price There is a cheaper version I'm told without the sticky backing The 15mm comes in rolls one metre wide and 20? metres long... It takes about 20mtres to do a 16 ft Olympic... Not including the ceiling Atog |
|
|
|
Post by atouchofglass on Sept 6, 2008 17:31:50 GMT 10
So here we go The rear of the drivers side wheel arch had a large hole from before I bought it  Having had some very dry weather recently it seemed perfect timing to repair So by putting some plywood behind the missing fibreglass area and glassing over it it created a flat surface and strengthened the area at the same time  Tomorrow will be grinding and flowcoating The 240V electrics are in and the 12V will be next Cheers Atog |
|
|
|
Post by millard1399 on Sept 6, 2008 20:36:11 GMT 10
Atog, I think a wheel has fallen off your van!? It's not in your first photo above, but suddenly appears in your second photo   Hope the Olympic's not starting to buckle under the pressure!! ;D ;D cheers, Al. |
|
|
|
Post by atouchofglass on Sept 7, 2008 7:03:39 GMT 10
This van is so tough it doesn't need wheels   ;D Floats on fluid..... kinda like its owner      Actually its the angle of the dangle .... eer photo shoot The tyre hasn't moved...... unless it decided to do it on its own   Today its a big grind..... chassis that is. Being the considerate kinda guy I am - the grinding won't start until after 8am... Dad's day and all Then it's onto rust converting and priming and painting and painting..... Gotta love old vans and clear skys......    Tommorrow is a break - up the Atherton Tablelands for the day with the ball and chain.... Must keep the marriage happy    The rest of the week will probably be more on the van to complete the grinding, rust converting, etc etc... The watertank will be put in after that and who knows what else will get done  ? Still have 20mtres of window rubber to fit Yesterday the glassing behind the wheel arch was done and today more grinding of the area before flow coating Also got a new light for the outside and installed it  Marine grade Stainless steel and a 5 watt led..... can't wait to hook that one up and see how it goes .... Won't tell you the cost of that little beauty... but there won't be two in the van that's for sure !!!!!!!!!!! All I need now is about a million miles of cable and ..... lots of other stuff I haven't even thought about yet... Atog The very busy |
|