|
|
Post by tasmillard on Feb 7, 2017 7:05:28 GMT 10
Once I have got the Viscount registered, the next major task for me is to build the bathroom (shower/toilet). This is the main reason for the purchase of the Viscount... and Minister for War and Finance still wants it. So I am after photos/ideas of your shower/toilet setup so I can look at these and try figure out an approach. Currently, the size I have allowed is about 900mm x 800mm (roughly), but this includes the mudguard cutting into the floor space. I was thinking that one approach would be to use marine ply (4mm - my fav material at the moment) and varnishing that to make it water proof, use that for the walls. But again, open to suggestions  Toilet will be a pota-potty type for the moment, this way it can be removed for showering (more room and less water to mop up). Shower is going to be super easy setup, ill be purchasing one of these gas hater water units (not the tank type) and plugging it to the hose inlet and gas bottle outside the van, so its not a permanent fixture. Much in the same way the water inlet is attached to a hose when in a CP. If you could post up pics (and more pics) as I am a visual guy and of course love seeing others creations. Cheers, |
|
|
|
Post by doublechevron on Feb 7, 2017 8:10:58 GMT 10
I always thought I'd keep my eyes open at the auctions for a heavily damaged old pommy 'van .... That way you could pull the whole shower/shitter setup out ... and probably the cental heating furnace and move it to your caravan. This also gives you the toilet access doors etc.
seeya,
Shane L.
|
|
|
|
Post by tasmillard on Feb 7, 2017 8:44:34 GMT 10
Prob here is that we dont get many wreckers here, so not sure ill get to look at one. Also, sometime modifying something takes as long or longer than starting from scratch.
|
|
|
|
Post by Rattles on Feb 7, 2017 9:55:03 GMT 10
Tas I have been Renovating my Hose and when I renovate my bathroom I decided on a simple Fibreglass Enclosure (See Image Below), I also mounted the Flick tap outside the enclosure, I did this so the only hole in the enclosure is in the floor (waste exit), Using a shower curtain the water can be adjusted from within the shower. They look ugly however SWMBO loves it as it is very easy to clean using a spray cleaner. With a Fibreglass enclosure there is no additional waterproofing required.  www.gumtree.com.au/s-ad/melbourne-cbd/building-materials/new-shower-recess-enclosure-bathroom-fibreglass-cubicle-unit/1138021131 www.gumtree.com.au/s-ad/melbourne-cbd/building-materials/new-shower-recess-enclosure-bathroom-fibreglass-cubicle-unit/1138021131There are units made for a Caravan with integrated toilet however a portable toilet would also work in a basic Enclosure as above. Just a thought. Rattles |
|
|
|
Post by doublechevron on Feb 7, 2017 10:09:22 GMT 10
How heavy is it... ? I wonder if you can get a version with a door |
|
|
|
Post by Rattles on Feb 7, 2017 11:27:13 GMT 10
I cannot remember the weight of the one I used, there is a contact number in the link above (not from where I bought mine), However I lifted it into position without difficulty, I was going to get a door, after using a curtain I found as I had the flick tap outside the curtain was easier, a also curtain enable colour co-ordination between Curtain, Mats and towels.
Rattles
|
|
|
|
Post by tasmillard on Feb 7, 2017 12:59:02 GMT 10
I have checked these out but unfortunately for me the flooring (with wheel arch) doesnt allow for a simple install like that. So for me ill have to custom build something, hence im looking at ideas. So far I spoke to my brother who is quite the handyman and he thinks using marine ply on walls and floor will do the job as long as I seal things correctly.
|
|
|
|
Post by Rattles on Feb 7, 2017 15:58:03 GMT 10
Taz if you approach one of the Fibreglass Shower enclosure manufactures they may be able to make you a one off, Or if you contact a Fibreglass Boat builder he may be able to modify a standard one.
I am just suggesting this as it is not easy and a lot of work to make a water tight enclosure even in a House, let alone a Caravan which moves and distorts.
Rattles
|
|
|
|
Post by Mustang on Feb 7, 2017 16:45:22 GMT 10
I have checked these out but unfortunately for me the flooring (with wheel arch) doesnt allow for a simple install like that. So for me ill have to custom build something, hence im looking at ideas. So far I spoke to my brother who is quite the handyman and he thinks using marine ply on walls and floor will do the job as long as I seal things correctly. I'm with Rattles I would avoid wood at all costs. A complete unit in fiberglass would be easier on the nerves. |
|
|
|
Post by tasmillard on Feb 7, 2017 18:51:32 GMT 10
Thanks. I will look at fglass options also.
|
|
|
|
Post by Zippo on Feb 7, 2017 20:20:51 GMT 10
|
|
|
|
Post by 78466noM on Feb 7, 2017 22:41:14 GMT 10
The aqua-panel is a good product but is fairly heavy and in a van will need a very flexible sealer. The remodeled fiberglass enclosure would be lighter and should be easier to install. If you run a hose or pipe from outside with hose fittings then have it go up the outside of enclosure to the top with another female hose fitting you can plug your shower fitting in on outside when not in use get a hose connection that joins two hoses together block one end and plug into outside connection to keep creepy crawlies out of hose.
Just my thoughts. with a step made to sit over wheel arch for porta pottie removable for shower should work. All the best which ever way you decide to go
|
|
|
|
Post by snoops on Feb 8, 2017 19:53:45 GMT 10
If you want super simple and cheap, then the way I did mine may be worth considering. I've lined the whole area with 3mm AA marine ply (fully submergable stuff) sealed the joints with PU which is flexible so the joints won't come apart - I've had mine in service for 2 years now and over 10,000KM without issue - then painted in gloss weatherproof exterior paint. The base is a fibreglass unit from Caravans plus - this is the unit I bought - in white - it has 2 drain points that can be used and I have now plumbed them both in as I've had water collect at one end if I'm not set up right. www.caravansplus.com.au/catalog/product_info.php?products_id=502Water supply is from either the internal tank or with the flick of a valve from an external tank so you can fill it from a river, etc and not chew through your drinking water. This is delivered via a second small pressure pump with pressure cut off switch through a cheap EBay water heater to a shower head that can be turned on or off from the shower head. Adjustment of the water temp takes some practice as these cheap heaters rely on water flow to be varied to change the water temp - less water gets hotter, more water gets cooler basically. If this one dies I'll be spending more money on the next one. I can have a quick shower with under 5 litres of water and a really good one and wash my hair with 10 litres. I'll post some photos tomorrow. |
|
|
|
Post by tasmillard on Feb 9, 2017 10:28:52 GMT 10
This is great to hear snoops, I was thinking the same but of course I also agree with others about being careful with ply. But the ply you talk about should be fine, as my brother states the amount of showering will not be a problem, most problems are the leaking seams. Pics would be great.
|
|
|
|
Post by snoops on Feb 9, 2017 17:00:23 GMT 10
Yeah, I don't see the ply as an issue at all to be honest the way we use it. The shower gets used probably 20 or 30 times a year for a start so even if a seam eventually failed it would see a lot less water than what the roof gets and what most classic vans end up coping with anyway.  Works for me. I'll have some pics shortly. |
|
|
|
Post by snoops on Feb 9, 2017 18:11:57 GMT 10
Ok, a few pics. The shower cubicle shown from the main part of the van - not much privacy but there's only the 2 of us.  The shower base - excuse the dirt, I've been storing stuff in the corner when we're not using it. Still got some painting to finish.  Shower head.  Some plumbing underneath - both drains connected with a hole drilled in the chassis - no towing load in this area so no dramas.  The 3 way valve at the front - allows the water to the hot water service to be switched between the main tank and an external tank.  The external container and pump I use. Like a lot of things, this is just a prototype that's been in service for 2 years... . I fill the 20 litre drum with a smaller obtained that's easier to carry - we can get 4 short showers or 2 long showers out of the 20 litres.  And the cheap EBay special hot water unit - I have moced feelings about this but it does the job - I'll spend a bit more next time.  So, nothing special and all needs finishing, but it's functional and makes for some envious comments when your free camping and say 'I'll just have a shower and freshen up before I crack a beer' |
|
|
|
Post by tasmillard on Feb 9, 2017 18:27:18 GMT 10
I remember now seen some of the pics, but these others you may not have posted... anyway thanks for showing me these. Looks about what I thought mine would turn out to be, except for the floor area. I have been eyeing out the Joolca Hot Tap unit which so far has pretty good reviews. Of course as I mentioned earlier I intend to have a setup where I put it all together for the shower and then take it down, so the unit will be held in place and then stored away after use (thats the plan for the moment anyway).
|
|
|
|
Post by snoops on Feb 9, 2017 20:04:11 GMT 10
My unit only sits there during use as well - the gas is in a quick connect bayonet fitting and the water lines seal when only finger tight so setup only takes a minute.
|
|
|
|
Post by greedy53 on Feb 10, 2017 17:00:45 GMT 10
i started out with an old viscount 17 footer,the fridge was taking up a spot that just waisted space so fridge out stove out only cook outside fridge where stove was now i have space to put the shower here are a few pics to help s54.photobucket.com/user/greedy53/slideshow/taree%20vans%20rebuild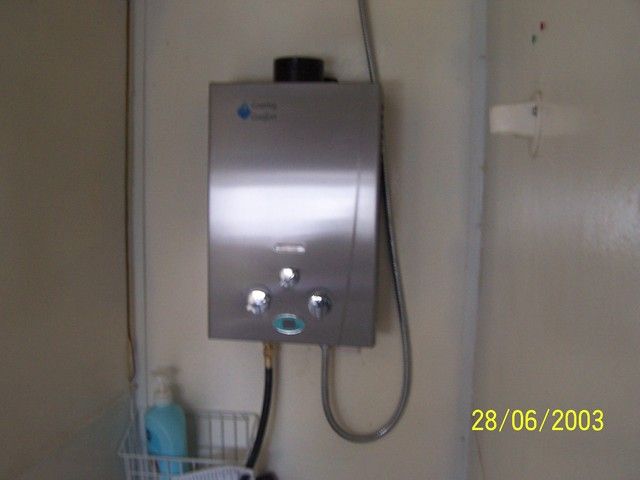  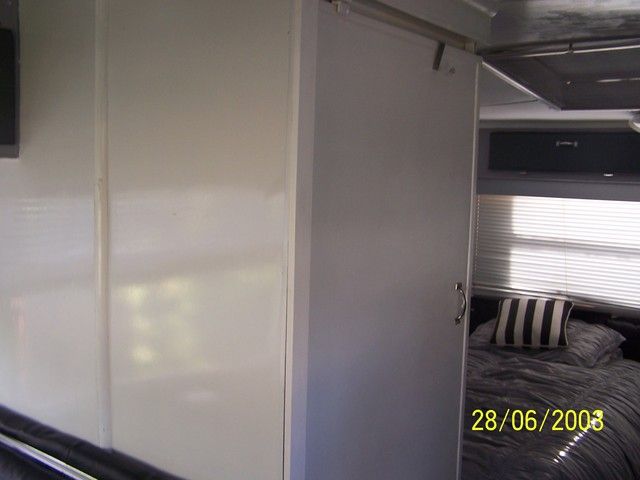 Images courtesy of moderator, due to bad code, displayed. |
|
|
|
Post by bobt on Feb 23, 2017 21:28:23 GMT 10
Kiwijim has done a couple of 'shower' installs over the years. If we can get him to pop up he might be able to provide a couple of tips..
|
|
|
|
Post by kiwijim on Feb 26, 2017 12:23:09 GMT 10
O.K. Who rang my Bell !!! Howdy one n all, I see there has been some great modifications being done in the way of fitting Showers and Toilets to some Classic Caravans, I found that while doing fit-outs, it's very important to remember the extra weight you are adding, a lot of weight can be reduced by not using solid panels in wall construction such as , that horrible Chip board for example, I have always built a partitioning wall by using a Merranti timber frame and then lining it with a suitable wall panel, in the case of the shower I fitted to our present van, I used a plastic over ply sheet , which is sold by Camec, If I recall correctly the cost was around $ 40.00 per 8x6 sheet, that price was of course Mate's Rates. For all plumbing I used 1/2 " grey plastic piping, mainly because I scored a huge roll from the Sunday Markets very cheap . In our present van, there was a rear hanging robe which I removed and this gave me an area of over 900 sq mm to fit the shower, I bought some heavy industrial Vinyl for the shower base, this proved to be a real challenge to fit as I wanted to take it up all wall to a height of 100mm , I managed to fit it after leaving it in the Sun for a day and then using a heat gun while fitting into place. It's a bit hard to see the finished job , but here's the job as best as I could photograph.............. 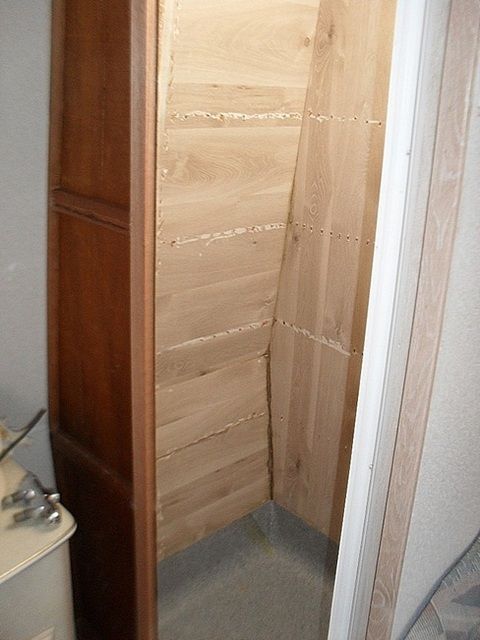 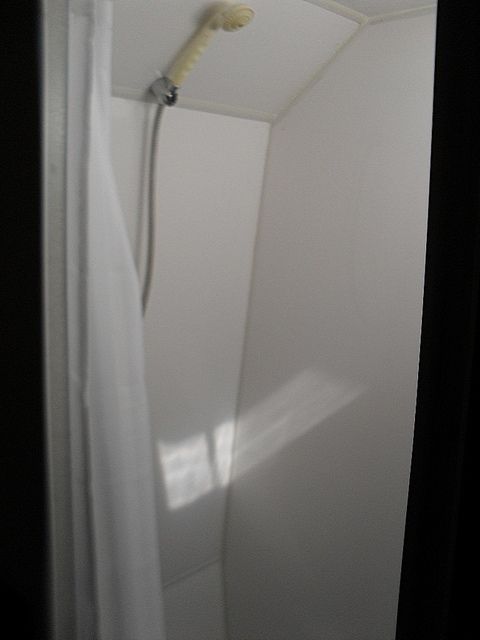 Above the shower ( in the ceiling ) I fitted a roof vent with two 12v Computer fans, these work very well as extractor fans....... 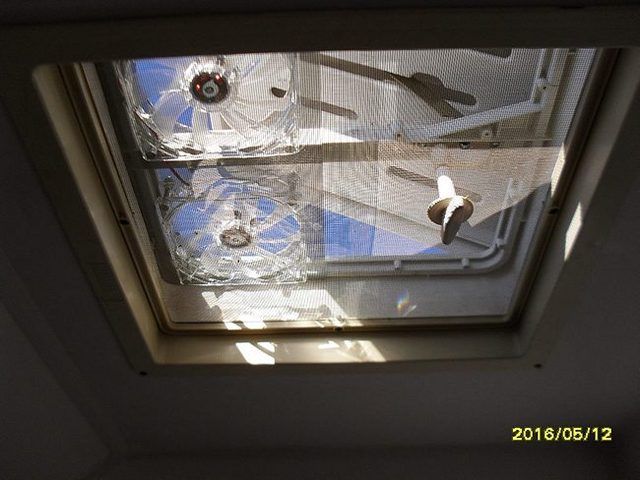 At night they light up with green L.E.D's................  There was also a empty space opposite to where I fitted the shower, so I fitted a Potta Potti in a wooden base just to stop it sliding around........... 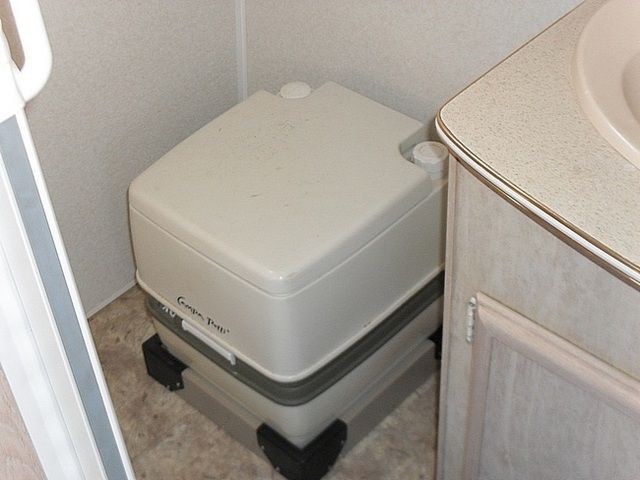 In between the shower and the toilet I have a wash basin......... 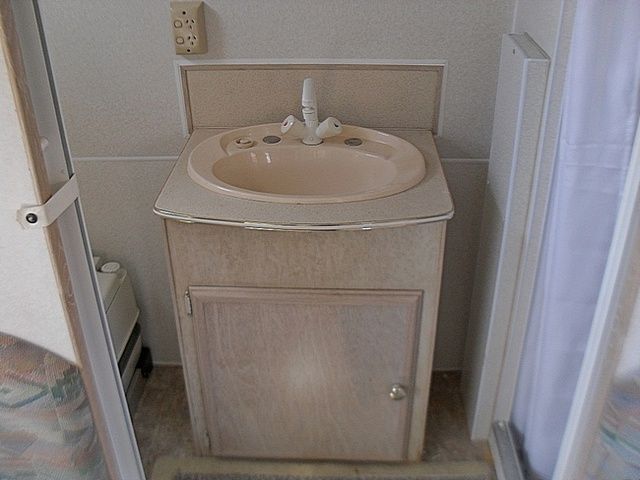 I bought a new H.W.S. off Evil Bay , it's a Gas unit only not a combo Gas/elec, but that's all I wanted........... 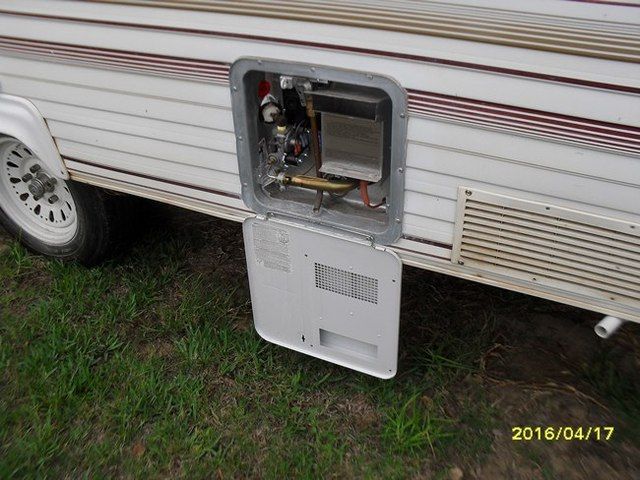 As far as water tanks go, I fitted a 80L tank for the shower, this will give us about 6 showers, surprising how long the water will last when you are thinking of the water running out while nicely soaped up. !! All waste water is sent to a 60L rear holding tank, ......... 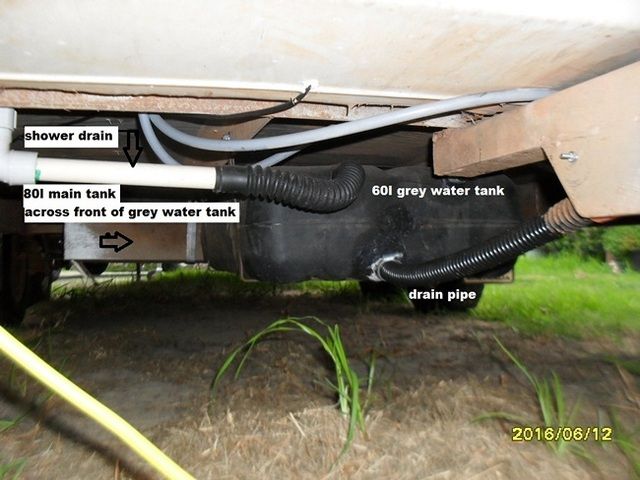 The water from the front sink goes into a 90mm pvc tube under the sink, from there it goes down through the floor to an outlet hose connection, this tube will hold around 40L and is handy when parking in a area where no drainage is allowed....... 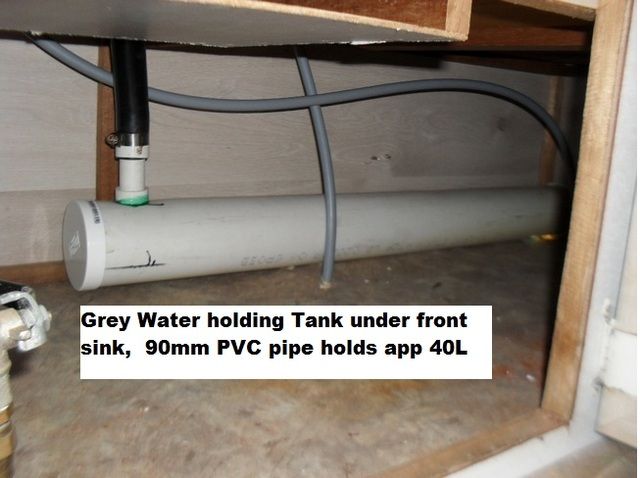 Well that's about all I have to show for present, So happy renovating to you all, any questions will be gladly answered. Kiwijim |
|
|
|
Post by bobt on Feb 27, 2017 13:20:02 GMT 10
thanks KiwiJim Thought you could provide some pics of a previous effort
|
|
|
|
Post by tasmillard on Mar 5, 2017 18:37:38 GMT 10
Excellent post kiwijim, appreciate it. Its probably much more complex than what I am after, in terms of waste tanks and built in unit. But gives me a good indication of what you have done. What is this 'previous effort' bobt speaks of?? |
|
|
|
Post by kiwijim on Mar 5, 2017 23:03:21 GMT 10
Excellent post kiwijim, appreciate it. Its probably much more complex than what I am after, in terms of waste tanks and built in unit. But gives me a good indication of what you have done. What is this 'previous effort' bobt speaks of?? I don't know which previous effort Bobt refers to, It may have been my 5 year rebuild of the Scottish Thomson Glen eagle, which I completed and towed right around Aussie about 8 years ago, Would that be correct Bobt  Kiwijim |
|
|
|
Post by tasmillard on Mar 6, 2017 7:17:42 GMT 10
I really like the idea of using the thick lino, I think ill go with that for the floors and even walls. Only tricky bit is the damn wheel arch.
|
|


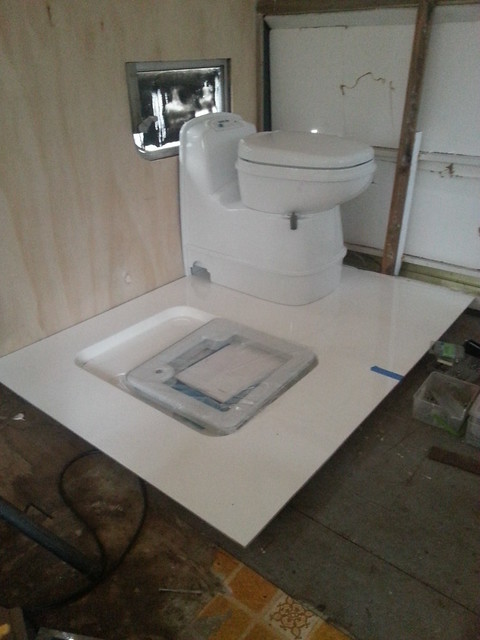
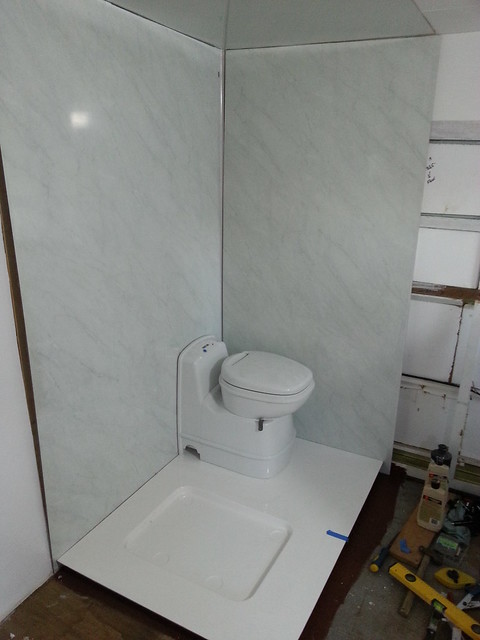
 ) and I've yet to install the swing out door to keep everything dry. My wheelarch is in the left bottom corner of the second picture so it doesn't get in the way of the shower walls. Getting there, slowly, slowly.