|
|
Post by peter92 on May 7, 2014 21:36:41 GMT 10
Hi DEDE, What do you think of the timber, should i cut the ply and replace the timber and would you have any ideas on this job, have you done anything like this before
Regards Peter
|
|
|
|
Post by peter92 on May 7, 2014 21:41:15 GMT 10
Color matching ply is a nightmare. I'm completely rebuilding my caravan so I am changing the color all the way through. The only thing I can think of for you is to replace the damaged ply with raw ply and stain it a color as close as possible to the old ply. Not idea but if you can't match it then makes it really hard. On the rear of that pic, up by the window its really spongy and it travells around to the side window Im thinking i would have to take out that hole corner and take out the cupboard thats there Would also have to use water base liquid nails or some thing similar Regards Peter |
|
|
|
Post by peter92 on May 8, 2014 18:57:06 GMT 10
Hi Guys Just an update of todays work, decided to take the ply off the back by the window and have a look before replacing some more ply off the van which i saved from somewhere else while looking at it ,it started raining and then i noticed water running down in the corner, not happy 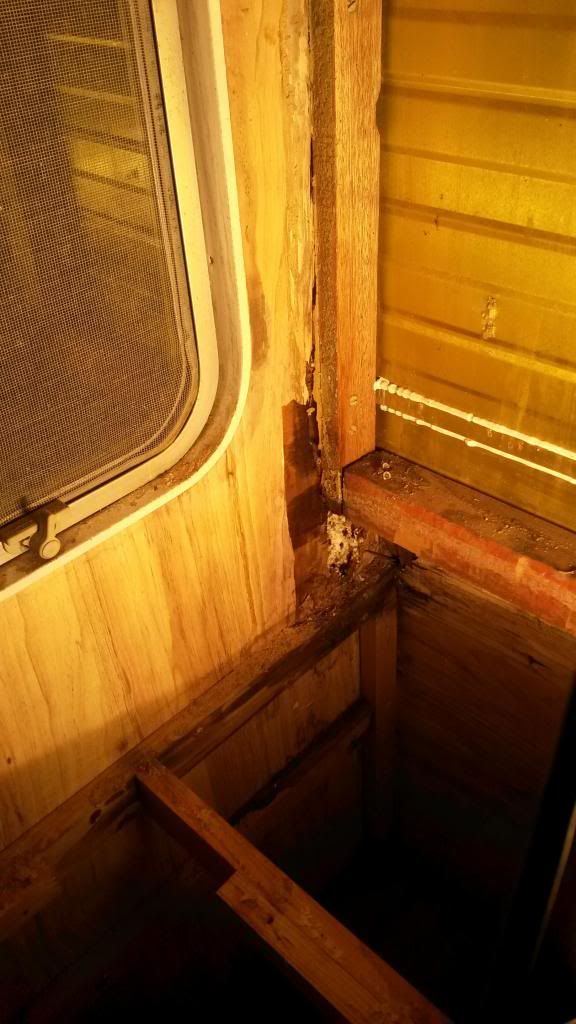 So got out there and sealed the rear end and now hopefully it doesnt leak Thoughts on this would be good Now next thing, i sealed the rear window after taking it out and cleaning up both areas but while it was raining water is coming in down the piece of wood alog side the window, quite alot of water, 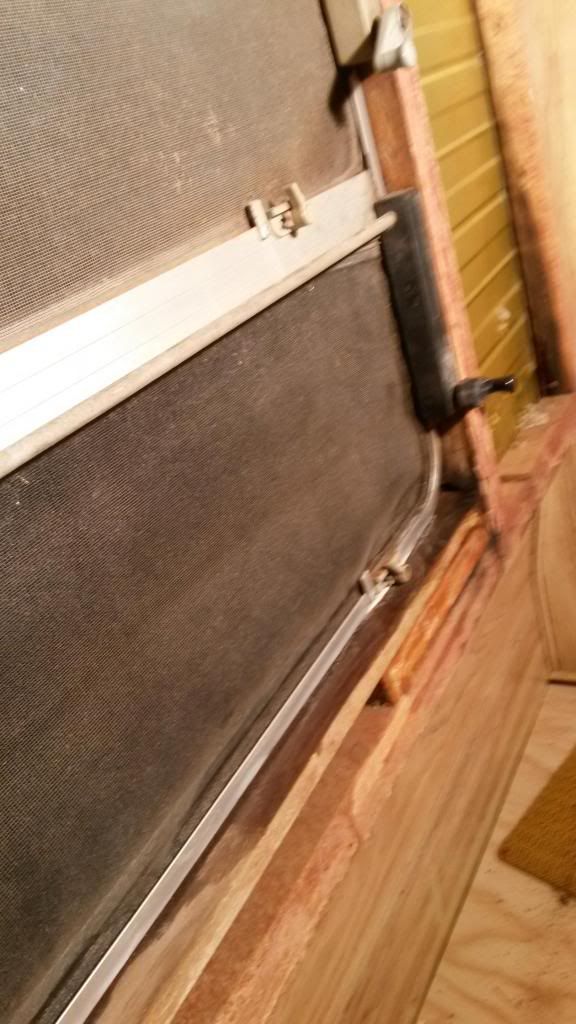 The only thing i can see is that its coming from the BLACK WINDER, as the top one is grey, which i would think is origanal, the black one looks like its been replaced at some time Any thoughts on how to fix this as its holding up my work at trying to get the van right Can i buy a new winder or can it be fixed Regards Peter |
|
|
|
Post by supreme78 on May 10, 2014 19:10:11 GMT 10
Hi there nice van you have there. I have a van same model just it's 20 ft and has been on site most of its life. The inside is is good condition has rear bunks x 4 and centre kitchen. The problem is they have cut a hole in the side as it had an annex on the side. The hole is 1500mm wide and height of the door. These vans were very advanced for 1970's. They used glued side panels. 25mm polystyrene foam with outer panel glued to the foam then tracks routed into the foam to run wires ect and then inner ply glued to the foam. The front rear and roof was a wooden frame with ply and roofing attached to that. They were well insulated as a result. I intend to convert it to rear ensuite toilet and shower. Front mounted bed facing rearward and a rear door. Like modern vans have. I will post some pics when I get the van home. I have a 16 1/2 foot viscount I restored and I live in it a lot of the time. It's not quite long enough for comfortable living so I will do up the franklin for my future van and sell on my viscount.
I realy enjoy renovating caravans as they are easy to work on and therapeutic to me when fixing them. Good luck with the renovation and if you have a question I will do my best to answer it for you.
|
|
|
|
Post by ForumMod on May 11, 2014 20:56:59 GMT 10
G'day Peter, you look like you've been a pretty busy boy lately!   I've changed the heading of this thread to include the year of your van - 1974. From what I understand of the Franklin history, the Statesman model was the top of the range in those early 1970s years. You'd be fairly close to the mark if you called your van "Peter's Palace".   Hope you're getting all those messy bits sorted out. cheers, Al. |
|
|
|
Post by peter92 on May 21, 2014 19:08:40 GMT 10
Thanks Al, yeah ive been away seeing my grand daughter so only got home tonight
I dont think im going to get much done on the van in the new 2 weeks as she,s clued to my side, she,s also only 18mths, Also thanks supreme78 and if i do have some qs will certainly get in touch
Buy the way every one im still after a complete window for the rear of my van if any one knows of any around
Regards Peter
|
|
|
|
Post by peter92 on May 21, 2014 19:11:42 GMT 10
Al, got a question for ya
Ive looked on the net but cant find any Franklin Statesman in my size, can find them in 20ft, any ideas why please
Regards Peter
|
|
|
|
Post by ForumMod on May 21, 2014 22:42:41 GMT 10
Forum member hughdeani is the best person to answer your question. I don't know why you wouldn't see many of the shorter ones for sale. I have pictures I got from ebay a few years ago of an 18ft Franklin Statesman.
cheers,
Al.
|
|
Deleted
Deleted Member
Posts: 0
|
Post by Deleted on May 22, 2014 8:53:48 GMT 10
Hi Peter,
Franklin statesman was an up market version of the Arrow,had a few little trim differences inside and out,and on the earlier ones had wrap around windows front and back.
But as with all caravan manufacturers of that era,if there was trim parts left over they used em on anything!
As today you will see limited edition caravans with all sorts of bits on them!
Cheers
Hughdeani
|
|
|
|
Post by peter92 on May 22, 2014 13:15:14 GMT 10
Thanks Al and Hughdeani
Was trying to find picks of mine with the dressing table in the rear, along side where i put the shower
Ive seen the ones on ebay in the 18's, mine should look nice when its all finished
Regards eter
|
|
|
|
Post by peter92 on May 23, 2014 19:14:42 GMT 10
Hi Every one
I think i have had a win with my rear window, Found out that there is a company here in Maryborough called Fraser Caravans, 0741210133
Grant there has been so helpful and very will to help poeple with older vans
He has told me to remove the double windows and keep the frame and he will put in a new tinted glass or perspecs or what ever i wish
If the frame is no good he can make a new one if i wanted to
It great to still have people that enjoy there work and are willing to do any thing they can to help
Will let you know on monday what i have decided to do
Regards Peter
|
|
|
|
Post by peter92 on May 25, 2014 20:35:57 GMT 10
Bit of an update of today
Managed to get the left hand side cleaned up ready to reseal and i must say, the mastic they used on there has gone that hard it was very dusty even using the wire brush
Will clean the ali strips tomoro and hopefully have that side finished tomoro night
Went and had another look at the rear window that i took buck out
And wonder why some one would cut the top of the frame
After looking at the frame, im wondering how the new glass will be put back into the frame,what will hold the glass in, will the glass sit on the raised part of the frame and how does one put an out side rubber on the window when theres nothing there for the rubber to go on
These qs i hope will be answered tomoro but will let you all no tomoro some time
Regards Peter
|
|
|
|
Post by ForumMod on May 25, 2014 21:09:24 GMT 10
Keep in mind the old sealant is likely to contain a percentage of asbestos (see this thread ) You don't want to be turning the old sealant to powder as you try to remove it. cheers, Al. |
|
|
|
Post by peter92 on May 27, 2014 19:17:17 GMT 10
Thanks Al.
Unfortunately i didnt know that and today i got all the sealant of today, yeah you are right about it being powder
Hopefully tomoro i will have the right hand side of the van all sealed , ive replaced the rear window rubbers and the left rear side window
I dont know if this price is right but the window rubber was quite dear i thought $10.00 p/mtr, thats the rubber that goes on to hold the lass in
Will take some pics soon and post up, cant wait to get back inside the van and finish it off
Regards Peter
|
|
|
|
Post by peter92 on Jun 1, 2014 19:48:33 GMT 10
Well great news every one, my rear window and frame does not leak nor does the van, finally got it all sealled and put the sprinkler on the roof for an hour, im so over that window frame
One thing i did do was put a small piece of plastic angle, 75mm long, at the end of the window frame at each end and that takes the water away from the end of the window, I can now breathe
One qustion though, on the window where the arm goes for the window on the out side of the window, theres a grey piece which as to have a pin or some thing in it to attach the arm to the window, what can i use to hold the arm in the window, its a winding out window, as i didnt get any pins when i got the window frame
Regards Peter
|
|
|
|
Post by ForumMod on Jun 1, 2014 21:53:59 GMT 10
G'day Peter, A rivet. Looks like this... 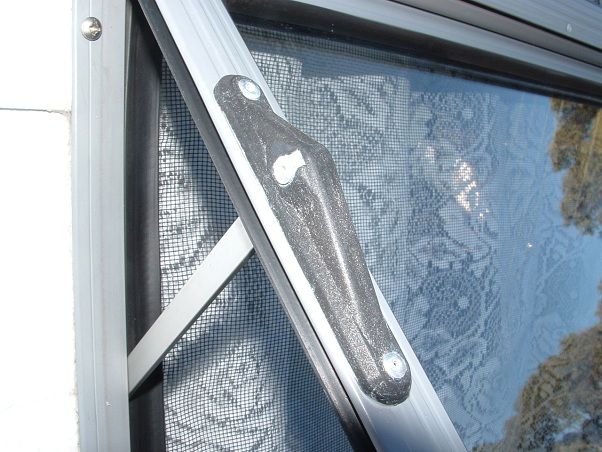 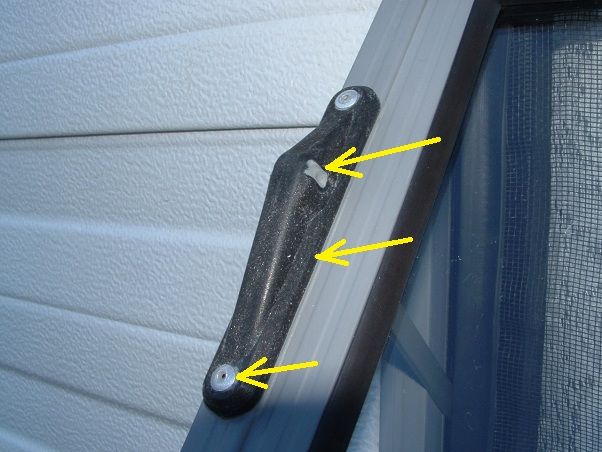 Just make sure you put sealant around the rivet to block up any holes there, otherwise water will find its way into the "link box" and run down the winder arm into the caravan. The link box is the black plastic thing in my photos. Yours will probably be grey. cheers, Al. |
|
|
|
Post by peter92 on Jun 2, 2014 18:30:03 GMT 10
Thanks Al.
For the info and pics, great pics you have there.
The Rivet, is it a std one, or is there a special one to buy, what size would the rivet be if its std please
Regards Peter
|
|
|
|
Post by ForumMod on Jun 2, 2014 20:27:13 GMT 10
Peter, if my memory is correct, the replacement rivet is 3mm diameter, and the length is the same as the width of the link box where the rivet goes through (it's about 9mm from memory). Make sure you buy "sealed aluminium" rivets and not blind rivets, and fit the rivet into the hole from the outside of the link box. If you have a winder arm at both ends of the window, one rivet is put in from the left and the other is put in from the right, when looking at the window from the outside. It makes it easy if you ever have to drill the rivets out again in the future.
The rivet clamps the winder arm to only one side of the link box. When you tighten the rivet, you'll pull the sealed end into the inside of the link box. That's why you need to put a bit of sealant on the holes to cover them back up after you've set the rivet.
cheers,
Al.
|
|
|
|
Post by peter92 on Jun 2, 2014 20:34:11 GMT 10
Thanks Al. would i get them from Bunnings or would it be a caravan place,
While im on here, was looking at the stripe on the side of the van and wondering what to paint first , the stripe or the van
Also what sort of paint would be needed and how much
The paint thats on there now is powery and leaves white paint dust on my hand after i wipe it
Help on this would be very much app
Regards Peter
|
|
|
|
Post by ForumMod on Jun 2, 2014 21:13:43 GMT 10
Peter, I buy all my rivets from Bunnings. Depending on how many you need, you can get the small packs with about 20 rivets in them, or a larger pack with about 100.
|
|
|
|
Post by peter92 on Jun 2, 2014 21:18:27 GMT 10
Thanks Al.
Ill grab some tomoro, is there a need to put sealant under the link boxes like some others have done
I think they were talking about filling it up to stop leaking
Im going to take them off and replace the old revits
Regards Peter
|
|
|
|
Post by ForumMod on Jun 2, 2014 22:16:44 GMT 10
Yeah, I took my link boxes completely off and put a small amount of sealant around the base, plus I put sealant into the holes the rivets go into, plus also into the rivet heads after popping the rivets. I work on the basis that if there is even the slightest hint of a gap, water will find its way into that gap eventually.
You need a different length rivet for riveting the link boxes to the window frame. Same 3mm diameter but shorter length. Drill the rivet out and then stick a 3mm drill bit down the hole and measure how much of the drill bit is covered. Add another 3 or 4mm to that and that's the actual length you need. I can't remember exactly what I used. Keep in mind that when I say "length" I mean the actual length of the rivet casing. The packet will have a "grip length" stated on it, which is less than the actual length. A rivet with a casing 9mm actual length will have a grip length of about 6.5mm (it means it will grip 6.5mm thickness of material).
cheers,
Al.
|
|
|
|
Post by peter92 on Jun 3, 2014 15:30:10 GMT 10
|
|
|
|
Post by peter92 on Jun 3, 2014 15:32:41 GMT 10
|
|
|
|
Post by peter92 on Jun 3, 2014 15:41:59 GMT 10
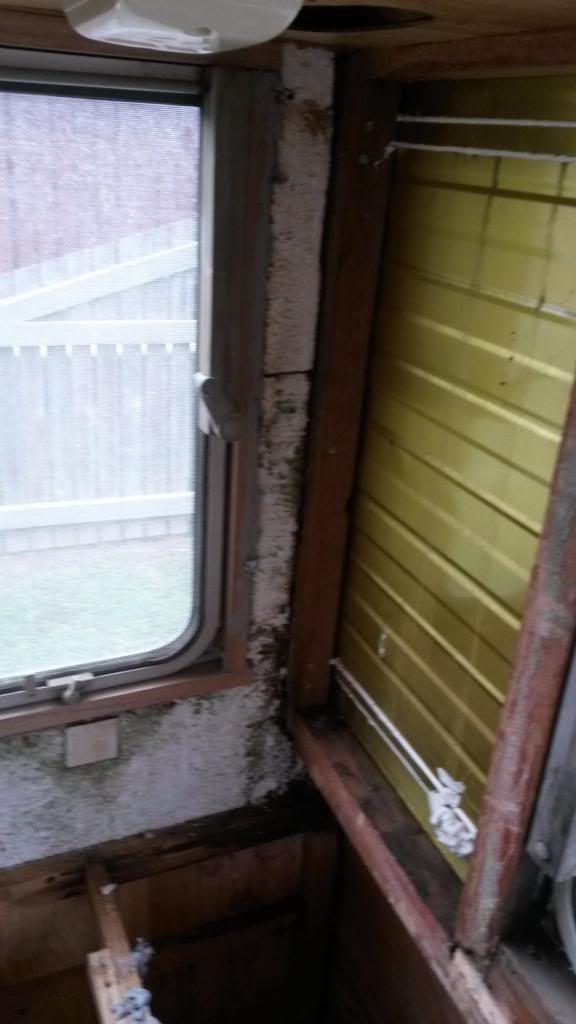 I started doing the window frame and was just about to put the white ali piece on the frame work but it STARTED TO RAIN, why is it that every time i take a window out it rains, oh well I went to bunnings and bought a dremal renavator for $39.00, great buy, it cut the ply nicely with no dramas and with the help of a 100mm paint crapper the ply came off really easy Now hopefully tomoro i can cut the ply in one piece and put it back on the wall Ive been told to use water base liquid nails to glue the ply back on I was going to use maranty for the frame but cant get it here so the local bloke cut to size VIC ASH which he said will handle any water and that sort of thing If any one has any suggestions while im doing this job please feel free to jump in Regards Peter |
|