Deleted
Deleted Member
Posts: 0
|
Post by Deleted on May 3, 2013 16:48:00 GMT 10
Thanks Gav
|
|
|
|
Post by Matt on May 5, 2013 23:23:27 GMT 10
Hey Gravo,
Can you please tell me where you managed to get the plastic hatch winder housings please ? I bought a 74 Viscount ,It has the same housing but it is busted.
Cheers
Matty
|
|
|
|
Post by gavo on May 6, 2013 17:34:19 GMT 10
I got them from these people suncoastcaravanservice.com.au/zen/ January 2012 and they only had 3 and I bought two. It would seem that I bought the last two of three in Australia at the time. Not the news you were lokking for I am sure. I have one old spare but I probably have to sell it for $500  . |
|
|
|
Post by Caprinut on May 6, 2013 20:17:08 GMT 10
Gavo ( and Caboodle)
Is the white ply you bought from Bunnings at $14 a sheet not described as foil lined mdf? Real ply has layers of wood at cross grain to each other to give it stability. If your ply had no grain but smooth mdf on the back you cannot expect it to perform. It really is useless- only good for back of wardrobes and even then it does not hold nails. I have lined complete inside of my van with 3mm ply veneer ( Bought from timber suppliers) not Bunnings as they really only have formply for construction and it is stored and handled badly.
If glued using proper wood glue and braced overnight it will dry tight as a drum. Seal with a nice matt or semi-matt clear varnish ( several coats builds up a beautifull depth) and you will have a job you will be proud of.
Pete
|
|
|
|
Post by gavo on May 7, 2013 17:24:36 GMT 10
Caprinut,
Definalty the white ply. Where I have used it on the overhead cabinets it is fine, however not so fine on the wall linings.
|
|
|
|
Post by gavo on Dec 30, 2014 9:11:40 GMT 10
Well Back in the land of the living again, well classic caravan work anyway. I have not been working on the van since my last post as we were in the process of selling our house in 2013 and transferring to live and work in Toowoomba QLD. We have spent the year settling in while doing the rest of the regular stuff. One of the best things is the house we bought included a 10 x 17.5m shed so now plenty of room for the Viscount and the rest of my stuff. I had the Viscount stored on a mates farm for the last 12+ months until yesterday when I finally went out and towed it back for the 260k journey to its new home. No problems on the road, it behaved well with the Sheppard’s hooks weight distribution bars, although the odd crosswind did want to push the van and the car around a bit. I did install and seal all of the windows before putting it on the farm for storage and so have posted a pic after the trip and a wash (20k was on very wet dirt road. Plans for now include revisiting the our plans for the floor plan and then getting started on the cabinetry.  |
|
|
|
Post by The Winnie on Jan 11, 2015 21:42:13 GMT 10
Hi Gavo,
We are about to paint out 1970 Viscount and was wondering what type of paint you used and what colour?
Thanks
Elisa
|
|
Deleted
Deleted Member
Posts: 0
|
Post by Deleted on Mar 3, 2015 21:12:54 GMT 10
Hi. I am about to buy a Duralvan from a friend that is striped out. I was wondering what material you have used to line the Roof and how you attached it.
|
|
|
|
Post by Mustang on Mar 7, 2015 15:39:57 GMT 10
|
|
|
|
Post by bobt on Mar 7, 2015 19:25:46 GMT 10
It sure looks nice Gavo
|
|
|
|
Post by gavo on Oct 8, 2015 18:53:43 GMT 10
Well been away from working on the van for a while but recently got back into it a little. Pics another day. Have started the shower/toilet cubicle and built the queen bed base.
About to start on the front bunks, if anyone can help by telling me the height and size of the original front bunks these things had, that would be great as this van never had any as it had a front dinette instead.
Mustang, if your still wondering abou the ceiling material, it's the whiteface Masonite board from bunnings, not the best stuff but it seems to work ok.
|
|
|
|
Post by gavo on Oct 8, 2015 18:56:35 GMT 10
Oh and wombat if your still not painted your van yet, I used wattle solar guard.
|
|
|
|
Post by Mustang on Oct 9, 2015 19:26:35 GMT 10
Good to see you back, I love the van colours ,so fresh.
We started painting this week but the weather has turned to s**it.
Keep posting
|
|
Deleted
Deleted Member
Posts: 0
|
Post by Deleted on Oct 13, 2015 21:17:58 GMT 10
Gavo, The van looks fantastic. You've certainly put some time in. One quick question. Where did you get the aluminium trim to cover the joins on the van exterior panels? Does it have a particular code?
Cheers
Trav
|
|
|
|
Post by gavo on Oct 18, 2015 22:38:57 GMT 10
Thanks for the kind words Trav. The trim was the original just carefully removed and cleaned and polished, so probably no help. Try Capril Aluninium as they have a massive range of profiles and you should be able to find something similar.
|
|
|
|
Post by SarahS on Feb 7, 2016 13:14:52 GMT 10
Hi Gav,
I gave just read your whole journey to date. We are rebuilding a 1978 viscount.
I just wondered how you built the base for bunks into the curve of the caravan?
Sarah
|
|
|
|
Post by tasmillard on Feb 10, 2016 11:05:05 GMT 10
Very nice build, fantastic finish. I gotta say, I LOVE the edge windows on caravans, wish my Millard had them also!
|
|
|
|
Post by gavo on Jun 14, 2016 19:03:40 GMT 10
Well doesn't this rebuild go in spits and spurts  . Anyway I have done some work of late and thought I would add a few photo's of the progress, and in order of the progress. It has been a matter of just get something done and let the Viscount lead the way. Added toilet/shower cubicle still to be lined and drained. At this stage it will make use of a port-apotty and one of those gas on demand hot water systems. 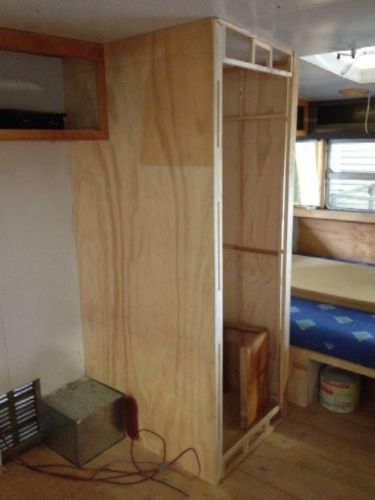 Added the lower bunks and dinette lounge. The cavity under the right hand side in the photo will house the battery and chargers. This area is just forward of the axle and has an external vent. This photo is looking from the door entry. 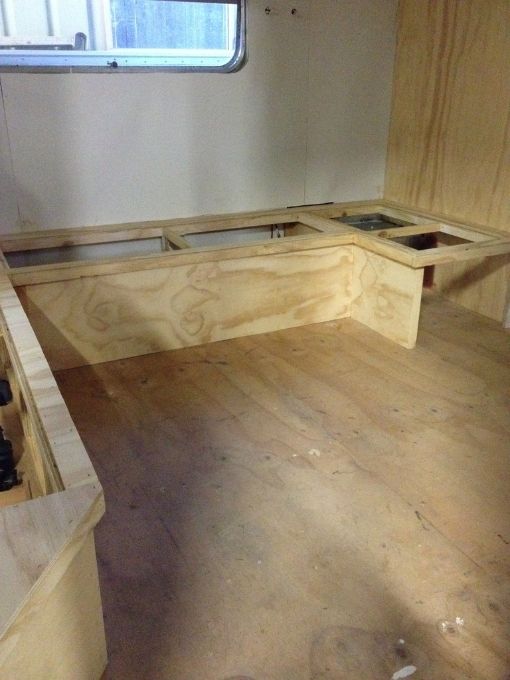 Finally the Kitchen carpentry. The drawer panel is so far the only original carpentry from the Viscount and makes use of the original drawers with some mild modification. These were originally wardrobe drawers. The original sink will also be used but sunk into the bench for a cleaner look. In this photo you can also see a cupboard which will be hanging space and also serves to strengthen the roof. At the rear is an east west queen bed platform with way too much storage underneath.  Still to go int he way of cabinetry is the kitchen overhead cabinet and there will also be a full set of overheads over the queen bed. Also need to make the fold down front bunk to create the second single bed. Funny how plans change over time, I was originally going with the stained interior and now have decided on a black and white interior theme with a third colour for contrast. Cheers, Gavin. |
|
|
|
Post by gavo on Jun 14, 2016 19:49:12 GMT 10
Hi Gav, I gave just read your whole journey to date. We are rebuilding a 1978 viscount. I just wondered how you built the base for bunks into the curve of the caravan? Sarah My reply may be a little late for you, the bunks are just built into the van by buliding in timber frames to the walls and cutting in and then sheeting with the required ply. All non-load bearing ply is 3mm the upper surfaces such as the top of the bunks are 8mm and 12mm ply. The curved sheet is formed by creating a curved frame and fixing to the sides of the van; there is a photo in page 2 of the thread. |
|
|
|
Post by gavo on Jan 6, 2017 20:06:07 GMT 10
Well back in the land of the Forum, is it just me or is PhotoBucket real slow due to advertising?
Anyway I have just got back to the most amount of work on the old Viscount since winter and Spring. The most I had done since winter to date was to start on replacing the window stays, only five more individual windows to go and these will be done. I will need to buy a few new stays as I don't have enough to finish the job, man I wish I had stripped a few out of another van when I had the chance a few years back. Now that makes me think about how stretched out this project has been. When I look back over this thread though it is good to see where the project started out and where it is now.
I have just put a few days in and managed to paint and replace all the aluminum window trims, I painted them as they were too far stained with corrosion to bring back to life by simple scrubbing. I have managed to replace the fly screens in the rear and kitchen windows with the original frames, also repainted. All of the cupboard doors and drawers are now fitted, Painted and latched. These I fully built and rebuilt over winter and custom fitted.
When I can figure out why PhotoBucket wont let me copy the code I will upload some photos of the progress.
|
|
|
|
Post by gavo on Jan 6, 2017 21:44:12 GMT 10
Photo-bucket seems to now be smiling at me so here are some photos of the progress The shower/toilet cubicle, to have a portable shower and porta-potty. Built over the wheel arch box.  The overhead kitchen cabinets from the rear of the van. The cabinets utilise the original hinges and button latches. 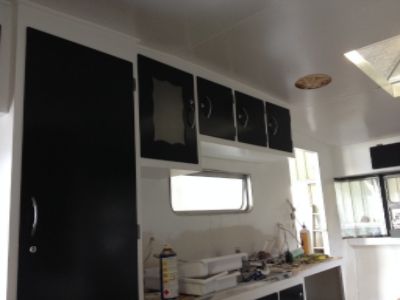 Looking in from the front door. 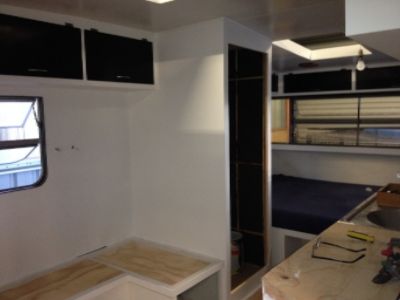 The kitchen looking from the front. The drawers are original including the key locks for when on the road to stop them from sliding out. They came from the old bedroom wardrobe, now re-purposed as kitchen drawers. 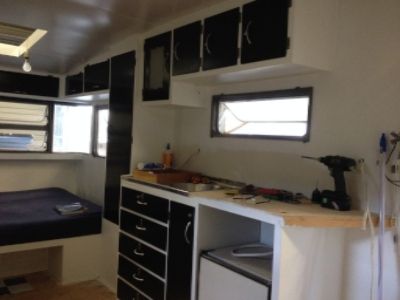 Soon will come the electrics and soft furnishings, remaining fly-screens and floor coverings, then the running gear and painting the underside. |
|
|
|
Post by tasmillard on Jan 7, 2017 5:40:29 GMT 10
Fantastic result, you gotta be pleased with this! As for time, I am convinced that rebuilding old vans is a time sink x 1000 lol
|
|
|
|
Post by Mustang on Jan 7, 2017 8:11:56 GMT 10
Well back in the land of the Forum, is it just me or is PhotoBucket real slow due to advertising? Anyway I have just got back to the most amount of work on the old Viscount since winter and Spring. The most I had done since winter to date was to start on replacing the window stays, only five more individual windows to go and these will be done. I will need to buy a few new stays as I don't have enough to finish the job, man I wish I had stripped a few out of another van when I had the chance a few years back. Now that makes me think about how stretched out this project has been. When I look back over this thread though it is good to see where the project started out and where it is now. I have just put a few days in and managed to paint and replace all the aluminum window trims, I painted them as they were too far stained with corrosion to bring back to life by simple scrubbing. I have managed to replace the fly screens in the rear and kitchen windows with the original frames, also repainted. All of the cupboard doors and drawers are now fitted, Painted and latched. These I fully built and rebuilt over winter and custom fitted. When I can figure out why PhotoBucket wont let me copy the code I will upload some photos of the progress. The invasion of crap on PB is astonishing, seems like they are forcing you into paying for "ad free" . I don't want to leave & loose the images to the forum. But you only have to log in every 3 months, apparently. Think I will have a look at Tinypic, Flika, image shack etc. |
|
|
|
Post by tasmillard on Jan 7, 2017 18:25:41 GMT 10
I am using flickr for the images on my threads, not sure if that would be a problem long term.
|
|