|
|
Post by doublechevron on Oct 8, 2015 13:03:07 GMT 10
WOW I think my rusty old Jobbies were simple compared to yours!!!!! Very good sealing as usual!!! There quite simple.... It just confused matters as the sucker was assembled incorrectly. The flaps that open had been assembled into the hinge gutters below the slot they should have hinged into. I couldn't see a caravan repairer ever doing any of this. It's too time consuming .... so far to expensive to even consider doing. I was looking at the new caravans today when I grabbed a new water tank filler from the local caravan place. Wow .. talk about silicon. EVERYTHING on the modern 'van was assembled with silicon.... Lots and lots and lots of silicon. All the windows were glued in with silicon, the tru-molds were glued on with it ... every vent, flap, accessory was glued on with silicon. The suckers would be impossible to repair in the future as you would destroy it trying to get anything apart. I couldn't see the windows coming out of it without destroying the walls. On the bright side, it sure did appear to be nicely sealed up. 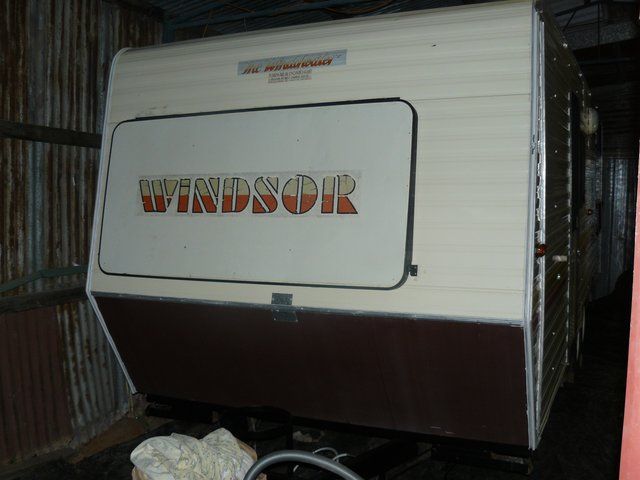 Fronts all back together. All the windows are in, tru-molds are done.  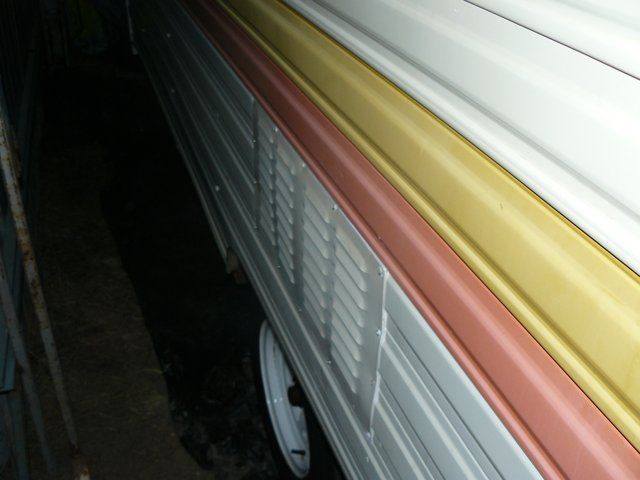 fridge vents are done.... ![]()  roof and gutter silicon "squeezed out" just like the other side. The aeriel plug is sealed, but not attached. I'll finalise what is done with it when I get decide how to setup the aerial. I'll probably use a screw on fitting on the caravan wall (the domestic fitting there is rusted, leaky no good junk). 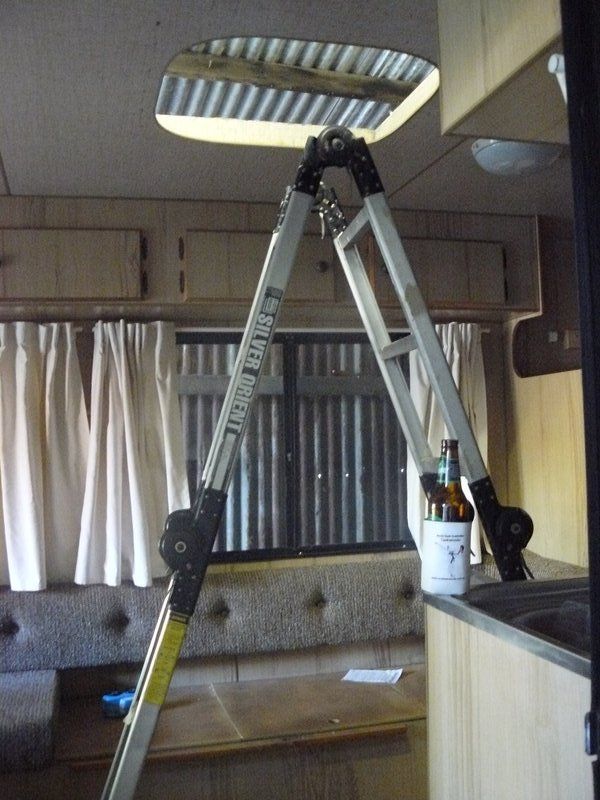 cleaning 4 seasons hatch was made easy ...... just by moving the ladder into the caravan. 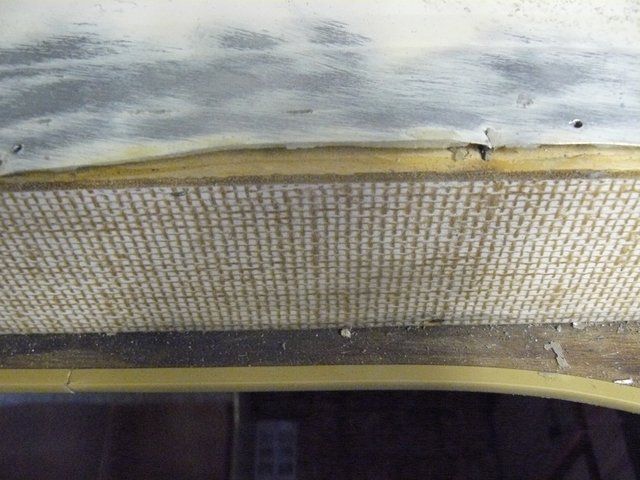 the area just beneath the hatches that have slight water staining .... are just decorative strips of ply. The frame behind them is like new.  Up here isn't visible, so I can give it a good clean and key is nicely with a wire brush. 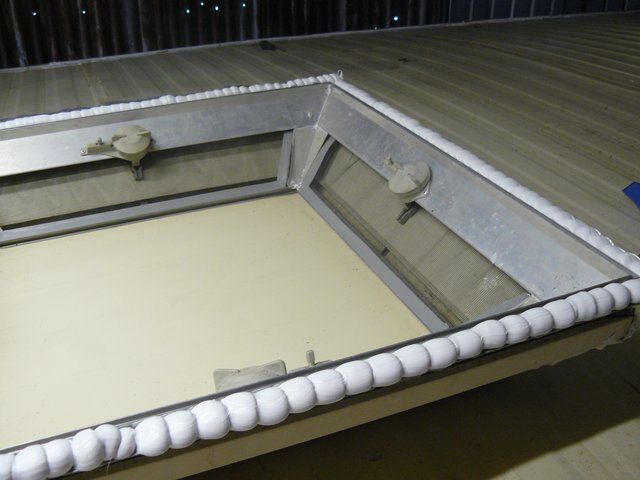 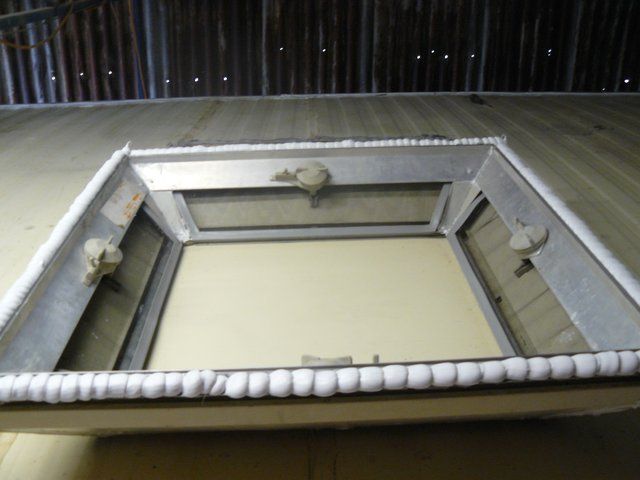 I hope I don't need to move either of these in the future. They will come back out, but it'll be a big job, 'cos I decided in the end, silicon was the go. using mastic and foam I didn't reckon was going to suffice long term up here in the direct sun. 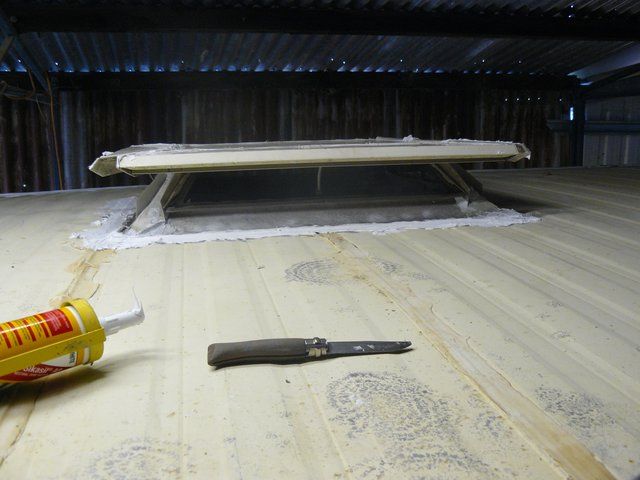 Once again, a quick wipe over with the finger to level the sealer ..... 'Cos this is invisible... and if I did this right it should have squeezed through to inside the caravan ............ where it's very visible to the wife.... so needs to look acceptable!  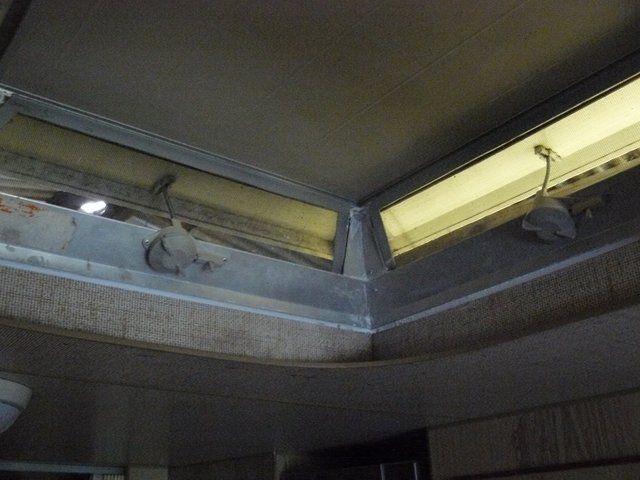 Lovely, it's squeezed right through.... lots of cleanup. Yes I'd taped this up to make cleanup easier prior to fitting the hatch. I'm pretty sure none of the stuff like the 4seasons hatches that I've resealed will ever leak again.... Unless they are broken I have no doubt they will now be leak free for the life of the caravan. Just better ensure we keep this caravan for enough decades to make all this work worthwhile  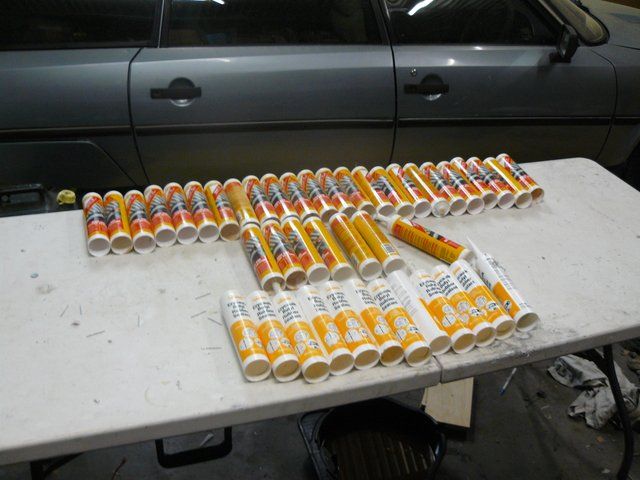 I've been busily cleaning up around the caravan.... That's 31 tubes of silicon and 13 tubes of mastic so far (no including the tubes I chucked into the bin as I went... I did buy 15tubes of mastic and it's all used ). I'll move the caravan out of the shed and give it a really good clean to wash off dirt and old sealer sanded/thrown everywhere and see what it looks like now I can safely get it wet I'll clean all the old crap off with a clay bar ( there not aggresive like cuttters and polish so won't cut through the paint). I might even treat it to a coat of a sealer if it's finish is ok. Something like NuFinish. As it should last for years if kept in a shed out of the sun and weather. seeya Shane L. |
|
|
|
Post by Mustang on Oct 9, 2015 19:39:28 GMT 10
I dont think there would be a Classic Van in Aus with 44 tubes of sealer, amazing, did I say amazing, bloo*y unreal!!!!!!  |
|
|
|
Post by snoops on Oct 10, 2015 8:55:53 GMT 10
Imagine how pissed off you'll be when it leaks.... Just kidding, that's a phenomenal effort mate - a lot more effort than I've managed or will manage I think. I've only pumped about 4 sausages of sealant into mine so far, but I do have the windows to do yet. Great work |
|
|
|
Post by doublechevron on Oct 10, 2015 9:50:00 GMT 10
Don't laugh ... I was thinking "I bet it still bloody leaks from somewhere" ........ It seems like a lot of sealer, remember that's all the sidelights, two 4 seasons hatches, 5 vent hatches, 9 windows, 1 window cover and a door frame. It's 22 1/2 foot longs, so there will also be 90foot of tru-mold corner pieces there too :eek:  I played around a bit last night with a cheap clay bar ...... and tried some micro-fine cutters on the stripe down the back of the caravan ... expecting to wipe the colour straight off the caravan. 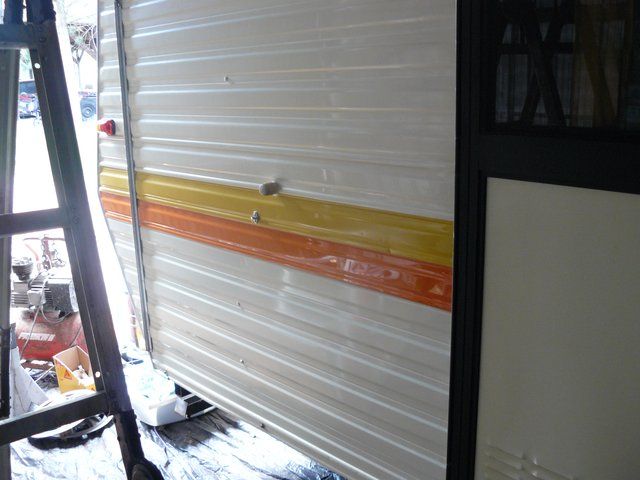 Lots of hard work 'cos you could risk using a rotary buffer with all of those edges. 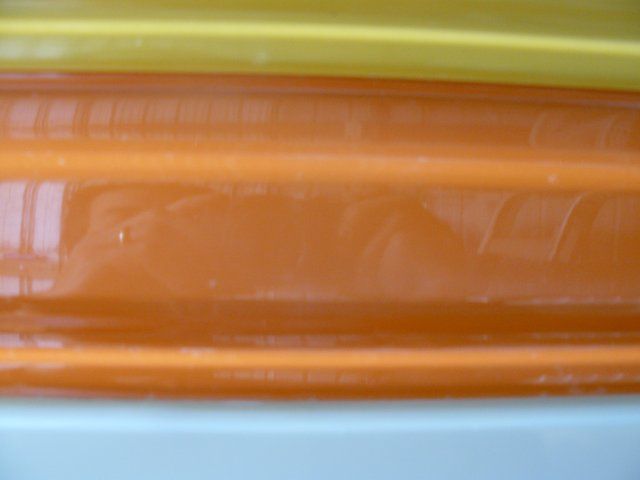 That ugly burnt orange comes up like new, with no signs of breaking through. I wonder if I can be bother putting all that effort into all the stripes on the caravan. It'll certainly brighten it up a lot. seeya, Shane L. |
|
|
|
Post by Mustang on Oct 10, 2015 17:08:56 GMT 10
|
|
|
|
Post by Rattles on Oct 10, 2015 17:19:33 GMT 10
doublechevron - A few years ago I had a 1980 Viscount and it had one yellow and one dark brown, both went chalky but the brown was the most noticeable and I found non cut Car polish every six months kept the panels nice and bright and also no sign of rubbing through. Only the first time did I have to put any effort in removing the chalky surface.
Rattles
|
|
|
|
Post by supreme78 on Oct 10, 2015 19:11:34 GMT 10
I fixed my leaking 4 seasons hatches by throwing them in the tip. I had removed them cleaned them re riveted everything and revealed them as per a discussion on here somewhere and reinstalled them. Two days rain than ouch water leaking in everywhere. So out the came and to the tip the went. I put alloy plates over the hole for 3 months until I could afford Heki hatches to fit the van. They are great lets n the light lets in heaps of air and if you lock yourself in you can climb out of the front one.
I have never looked back.
|
|
|
|
Post by doublechevron on Oct 10, 2015 21:43:24 GMT 10
I don't think these ones will leak. Did you use sealer and "squeeze" it out to fill all the voids like I did Smearing silicon over the shop with your finger won't seal anything sadly  Yeah the coloured cladding seems to be particularly good quality with a VERY thick coating of colour on it These days it would be 1micron thick and wipe off if you sneezed near it! seeya, Shane L. |
|
|
|
Post by supreme78 on Oct 11, 2015 8:51:55 GMT 10
Shane thanks for the reply. i had the hatches out twice and the second time i used that much ski flex it wasn't funny.
i coud see where the water was coming in but could not work out how it came in there. when i fitted alloy sheeting over the holes no leaks. i just gave up as i never liked them anyway. i have just removed them from a mates Roma van his never stopped leaking. he called them his waterfalls. i fitted smaller fiamma hatches and never a hint of water since.
|
|
|
|
Post by doublechevron on Oct 11, 2015 17:51:45 GMT 10
Shane thanks for the reply. i had the hatches out twice and the second time i used that much ski flex it wasn't funny. i coud see where the water was coming in but could not work out how it came in there. when i fitted alloy sheeting over the holes no leaks. i just gave up as i never liked them anyway. i have just removed them from a mates Roma van his never stopped leaking. he called them his waterfalls. i fitted smaller fiamma hatches and never a hint of water since. Did you remove the plastic corner pieces and seal them? Then way it's designed is any water that gets past the flap hinges drains to the corners, the plastic corners drain to the bottom. Unless you pull the plastic corners off and seal behind them it'll always leak (weep at a minimum IMO ). I'm pretty sure the 4 seasons hatches in this caravan will be 100% leak proof for the life of the caravan now I've sealed them. You also need to seal up all the pop rivets, water can run through the pop rivet itself. If you fitted hatches onto a bed of sikaflex and squeezed it through.... You would NEVER have removed those hatches. that stuff holds windscreen into cars as a structural member in the event of an accident. Once you have glued something to a caravan with it if prep'd right ................ it's there forever seeya, Shane L. |
|
|
|
Post by supreme78 on Oct 13, 2015 9:53:27 GMT 10
I had to cut out the hatches with a knife. very well sealed.
I wish you luck with your hatches it sounds like you have yours sorted out.
I think i just wanted to replace them with something newer and that would let in light.
I really don't like the whole idea of them and thats not having a go at anyone just my opinion and choice.
Happy Restorations
Paul
|
|
|
|
Post by doublechevron on Oct 17, 2015 17:23:33 GMT 10
I finally got around to fitting the brake controller to the car, so hooked up the caravan wiring .... and got "N-C" on the controller unit .... hmmmm.... not connected. 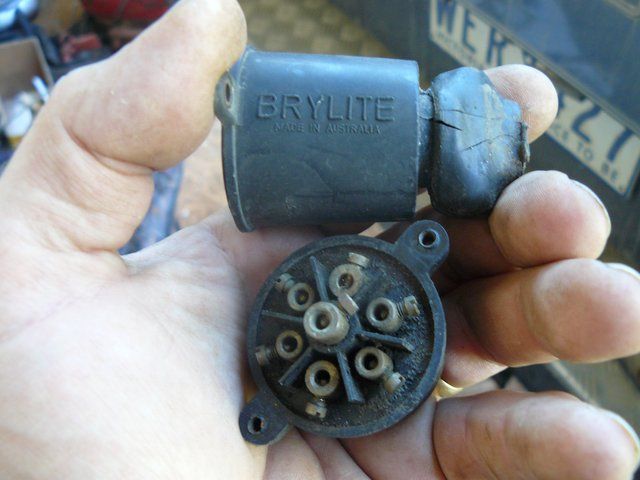 One of the wires in the coupling was broken .... check this out ... Made in Australia. You'll never see that on anything again. It still looks usable too (other than tarnishing to the brass connectors). 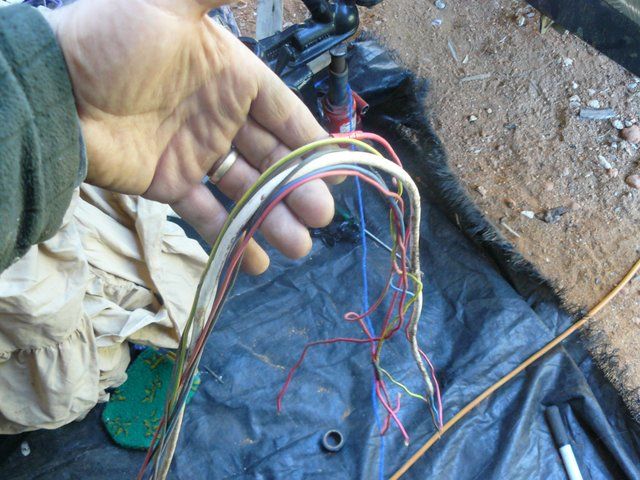 I've been caught out in the past with dodgy wiring, so I simply removed the plug, tape a draw cable to the wiring and pulled it back through the 'A' frame. Yep, crimp on connectors and and that looks like 240volt twin core 10amp light cable ?? and a 240volt earth wire ( yellow with a green strip). It had continuity to earth, so I hooked it up as the earth and found all sorts of weird crap when I tried to sort the wiring. I couldn't find which was the earth wire  So I hooked a jump lead over to the car to earth it to the car .... figuring throwing 12volts to the wires would find all the lights by illuminating them. Anyway, first, WTF is that 240volt twin core household cable. I crawled under and follwed it back ....  Bloody hell... it's heading to the brakes..... between the front suspension units.... crappy screw on connectors...  This is really shithouse... Amazingly the factory did this. Look at that 240volt wiring looping over to the brakes. 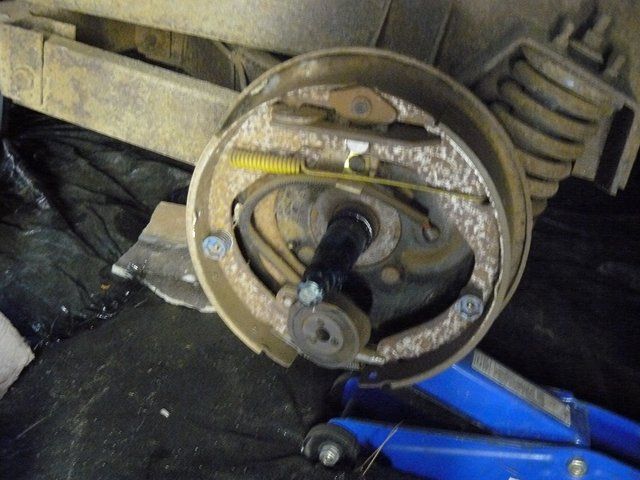  Maybe it earths through the brakes? So I pulled a brake drum..... Wow, the safety check the caravan place did ........... They fitted new bearings, greased correctly, new split pin and what looks like new nuts. the brake pads look new .... but that's not the 240volt wiring in there.... 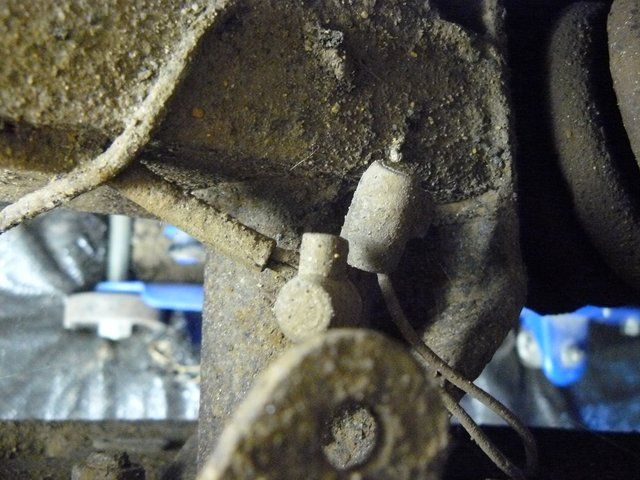 Bloody hell.... more crappy 240volt screw on wire joiners .... urgghhh.... Ok, the wiring looks quite sound so I'll snip out all the crappy wiring joiners and solder all the joins and cover with heat shrink. The wiring I finally have figured out ...... The factory hasn't earth the caravan  All of the lighting relies on any earth connection that may happen through the hitch assembly. All of the lighting relies on any earth connection that may happen through the hitch assembly.
So I need to earth the van and I reckon I can just fix up what's there. I dont' need to worry about wheel bearings etc either seeya Shane L. |
|
|
|
Post by supreme78 on Oct 18, 2015 6:16:53 GMT 10
Those crappy 240v joiners are a very reliable way of joining brake wires together. They are a good tight connection and great when you need to remove the brakes for service.
|
|
|
|
Post by doublechevron on Oct 18, 2015 8:52:56 GMT 10
Those crappy 240v joiners are a very reliable way of joining brake wires together. They are a good tight connection and great when you need to remove the brakes for service. It'll be all full of copper rot though. I bet if I pull them off i'll find the wiring there extensively rotten and black They aren't water proof! seeya, Shane L. |
|
|
|
Post by doublechevron on Oct 21, 2015 22:00:08 GMT 10
I thought I'd take a couple of piccies of the wiring .... it's not as bad as I've found in my cars that have been imported from the UK where they salt the roads..... But it's still what I expected.  this is why you need to use weatherproof connectors. Copper rot is amazing the way it tracks up the length of the wiring. 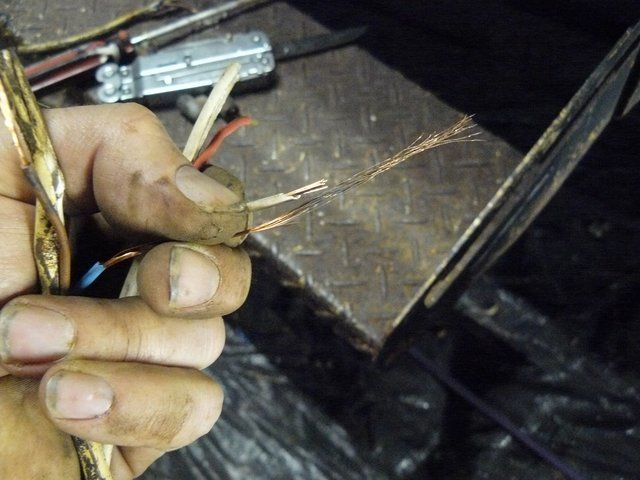 This is a good 30cm back into one of the wires .... (I've chased similar rott in my cars wiring harnesses back the length of the engine bay, all the way to the firewall). As you could imagine.... this would could massive voltage drop to the brakes. I imagine they would have worked very poorly. 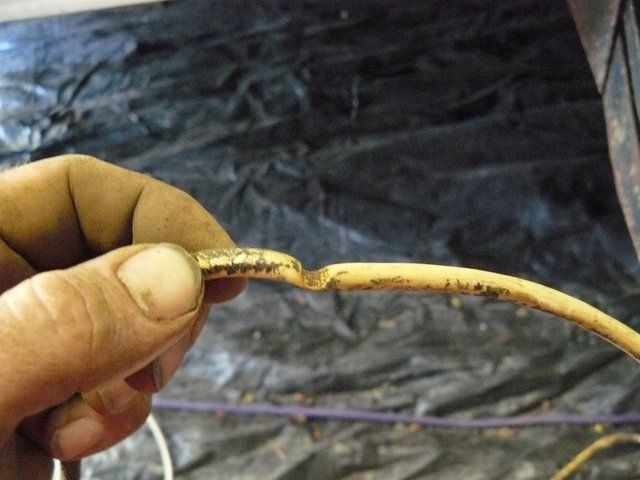 It's like this where it's tied back to the chassis. It looks terrible. I chopped it open to have a look, and the wire inside is remarkably un-effected by the compression of the outer insulator. seeya, Shane L. |
|
Deleted
Deleted Member
Posts: 0
|
Post by Deleted on Oct 22, 2015 6:32:27 GMT 10
9/10 times the wire will be fine
1/10 times the wire wont be, but odds on that the kink/crush is hidden where you can't find it!
I had a machine here that wasn't working right. It has a little 4cyl cummins diesel in it and just would not start. I found out it had been like it for a while when one of the guys put a reimbursment claim in for 3 weeks worth of buying aerostart to get it going. Anyway once I spat the chewie about them not letting me know it wouldn't start I had a bit of a play with it and once running it was waaaay down on power as well. Changing filters made no difference and the fuel supply to the injector pump was OK.
I had basically resigned myself to needing a new injector pump (at about 1/4 the cost of buying a new motor) and sent it into a workshop to get checked over first.
Turns out that when our guys had been doing a bit of minor repair work they had unplugged a wiring harness - it had to be unplugged to do what the job card said they had done, there was no way to get in there otherwise. When they plugged it back in they didn't click it into place properly, it just looked done up.
An unscrupulous workshop could have easily taken us for a ride on that one, luckily they just charged me an hour for checking it over and told me to slap the guy that had done it on the back of the head.
Anyway I have completely derailed this conversation but suffice to say I hate dodgy wiring with a passion, keep up the good work getting rid of it all!
|
|
|
|
Post by doublechevron on Oct 22, 2015 8:39:57 GMT 10
Yeah, I think I must have a fettish for rotten dodgy wiring and oil leaks .................... Why else would I own Citroens and Land Rovers. That is why as soon as I spotted the screw on connectors I was positive the wiring would be all rotten. Been there and one that too many times now I'm soldering in new wiring and covering it with heat shrink to protect it from moisture. The only possible issue I can think of is if the brakes get hot enough to melt the soldered connections (that are behind the backing plate, in the breeze). I'm guessing this should never happen . seeya, Shane L. |
|
|
|
Post by Rattles on Oct 22, 2015 11:05:46 GMT 10
When checking your wiring and as you found the -ve Return circuit was a bodge, All -ve Return wires on Tug and Van should be connected together ie Anderson and 7/12pin plugs, on the Van end they should have their own Chassis Connection separate from the 240v Chassis connection. By having all -ve's connected even if one fails hopefully one of the others will carry the load, Also the -ve Return wires should be the maximum X sectional area that will fit into the connector.
Rattles
|
|
|
|
Post by doublechevron on Oct 22, 2015 13:01:44 GMT 10
The earth pin of the caravan plug was hooked up... however it was to the 240volt flex going straight to the brake magnets..... Which don't earth anywhere. SO you had brakes, but the caravan itself isn't earthed. It's plain bizzare. This appears to be the original factory wiring, and how the factory did it. I'm going to add an anderson plug (though it's not at all required) and earth it at the drawbar, and back at the chassis where the electric brakes branch out to the individual wheels. I'll run the wiring back for a 12volt power point inside the caravan too (so we can run a 12volt tv in there and charge accessories).
seeya,
Shane L.
|
|
|
|
Post by tim on Oct 23, 2015 16:21:04 GMT 10
Well stuff me, I owe the previous owner of my parents mid-80s Windsor an apology. I'm doing some work on it at the moment and discovered that the lights and brakes are all wired with extension leads. I just assumed the old guy had done it himself, now I know the factory did it!
We're having similar problems. The brake and side lights operate erratically, the wrong filament lights up (which usually means dud earths) and the brakes are really weak, even though they look OK mechanically.
Is there a decent 7 core trailer wire available that has a nice thick blue wire in it, or will I have to wire the brakes separately from the plug back?
Tim
|
|
|
|
Post by doublechevron on Oct 23, 2015 18:13:19 GMT 10
Well stuff me, I owe the previous owner of my parents mid-80s Windsor an apology. I'm doing some work on it at the moment and discovered that the lights and brakes are all wired with extension leads. I just assumed the old guy had done it himself, now I know the factory did it! We're having similar problems. The brake and side lights operate erratically, the wrong filament lights up (which usually means dud earths) and the brakes are really weak, even though they look OK mechanically. Is there a decent 7 core trailer wire available that has a nice thick blue wire in it, or will I have to wire the brakes separately from the plug back? Tim See if the caravan has an earth. This one hasn't. The earth wire is connector inside the 7pin plug, but it's going straight to the brake magnets and doesn't actually earth the caravan anywhere. I'd suggest adding your own earth down to the drawbar. seeya, Shane L. |
|
|
|
Post by doublechevron on Nov 2, 2015 10:33:53 GMT 10
Gee's I'm good at this stuff. I ran all the new wiring, soldered all the connections, back in the "A" frame I snipped off all the factory wiring and added standard colour coded wiring to run the length of the 'A' frame, so in the future whenever anyone unscrewed the connector, you could tell what the hell is what by wire colour. I earthed the caravan in two places on the drawbar. I googled electric brakes... Magnets should be 3.5 -> 4.0 ohms. So I measured the resistance of all magnets ( all 3.5 -> 3.8ohms) as I soldered and heat shrinked all of the connectors. On one of the backing plates I sure did struggle to get it soldered. I worked out later the element in my soldering iron had died ( Those SuperScope irons sure are absolutely brilliant tools ... They came with 2 spare elements so it's no big deal). Anyway, finally all done, I plug onto the car .... Wow the caravan lights are BRIGHT now...... But why does the newly fitted brake controller flash "Sh" ...... Short right  Bullshit, I'd just spend every spare minute for two weeks trying to get that brake wiring done. So I whipped off the connector and measured the resistance .... 3.8ohms....... The can NOT be right. It's a parallel circuit so... 1/r = 1/4ohm + 1/4ohm + 1/4oh + 1/4ohm .... Resistance = 1ohm right ?? I could even work that out (probably wrong) in my head. Certainly not a short, but sure as nuts way wrong ?? So I joined the leads of my multi-meter together and got 3.8 ohms ........ AAAAARRRRRRhhhhhhhhhhhhhhhhhhhh, damn it, my multi-meter has died on the resistance setting and I hadn't realised. Everything is 3.8 ohms .... I figured I must have a shorted brake magnet, but how can I tell given my multi-meter is obviously cactus. So I snipped the wiring back at the axles, and "Sh" dissapeared from the controller.... Then hooked up the right side caravan brakes and got "c"onnected on the controller.... Hmm... Hooked up the left side and got "Sh" again. Eventually I found just the right front wheel caused the "Sh" setting on the brake controller. I cut the two layers of heat shrink away and found the soldered connection the iron had died on .... Had a "solder spike" on it. As the heat shrink .... well shrunk ... this poked through two layers of heat shrink into the other wire shorting it. I'm really good at this stuff right? There really is nothing I can't bugger up if I put my mind to it  seeya, Shane L. |
|
|
|
Post by Rattles on Nov 2, 2015 12:08:56 GMT 10
Shane - At least you know that the Brake controller diagnostics are reasonably accurate, and the Go/no go method of fault finding works, Well Done.
Rattles
|
|
|
|
Post by tasmillard on Nov 3, 2015 6:41:36 GMT 10
Wowsers, work is really coming along. Love the sika tube shot, and the hatch will never leak again! By the time you seal her up, I recon you could try using it as a boat house and it wont sink  |
|
|
|
Post by tasmillard on Nov 3, 2015 6:43:23 GMT 10
Shane - At least you know that the Brake controller diagnostics are reasonably accurate, and the Go/no go method of fault finding works, Well Done. Rattles Mate - your really good with this stuff in my eyes, when it comes to electrics its all black magic voodoo stuff... |
|


 So I hooked a jump lead over to the car to earth it to the car .... figuring throwing 12volts to the wires would find all the lights by illuminating them.

 Bullshit, I'd just spend every spare minute for two weeks trying to get that brake wiring done. So I whipped off the connector and measured the resistance .... 3.8ohms....... The can NOT be right. It's a parallel circuit so...
