|
|
Walls
Apr 15, 2020 11:51:26 GMT 10
via mobile
Post by franklin1972 on Apr 15, 2020 11:51:26 GMT 10
Hey.
So franklin arrow has no wall studs. What is holding up the alloy sheeting on the outside.??
Currently starting to rip off the wall panels and polystiro foam stuff,
Cheers
|
|
|
|
Walls
Apr 15, 2020 11:52:28 GMT 10
via mobile
Post by franklin1972 on Apr 15, 2020 11:52:28 GMT 10
What is everyone recommending when foing these type off renos, i mean i need to screw ply sheets back onto something ?
|
|
|
|
Post by twocutekelpies on Apr 15, 2020 20:30:35 GMT 10
Hey there, I notice on another thread that you have V1185, I have V4981 a 10ft Franklin Regent, the V represents 1974 according to this threadI'm doing a full, ground up, rebuild on mine if that helps any. I've posted a few photos on this thread and more on this thread If you have a look through this forum, I'm sure you'll find other Franklin renovations that are very informative, they helped me a lot before I took the plunge on mine  |
|
|
|
Walls
Apr 15, 2020 21:18:26 GMT 10
via mobile
Post by franklin1972 on Apr 15, 2020 21:18:26 GMT 10
Thanks twocutekelpies.
What did u do with the walls and removing them and the foam? Ive started removing ply and foam. Whole things saggy 😁
|
|
|
|
Walls
Apr 15, 2020 21:26:59 GMT 10
via mobile
Post by franklin1972 on Apr 15, 2020 21:26:59 GMT 10
Was hoping to remove all polystiro stuff and put in some timber studs then put some adhesive behind stud to the alloy to stop it from bouncy??
|
|
|
|
Walls
Apr 16, 2020 7:03:27 GMT 10
Post by twocutekelpies on Apr 16, 2020 7:03:27 GMT 10
Do you have any photos? The styrofoam forms part of the structure of the walls along with the ply and cladding, with even just the ply off, the walls can bow out, if you remove the styrofoam, there's really nothing holding the roof up and it will collapse. I've taken mine apart and laid the walls out flat on the ground to avoid any bowing and to be able to replace the minimal frame.
I used a bigger piece of timber for my bottom rail so needed to cut some of the foam out, I found a sharp carving knife sliced through it well, then I just used a scraper to pull the offcut out. Maybe if you brace your ceiling with uprights, you can slice out channels to accommodate frame and leave the styrofoam as insulation.
|
|
|
|
Walls
Apr 16, 2020 10:13:37 GMT 10
via mobile
Post by franklin1972 on Apr 16, 2020 10:13:37 GMT 10
Oh ok. Yeh ive been gutting the whole thing, oly is off, fiam is hqcked in areas. Was going to try support the roof, remove all foam, build light weight timber frame then put new foam panels back in (new rigit insulation) then new ply, then i have something to screw new sheets to. What are your thoughts?
Its becoming bigger than ben her
|
|
|
|
Walls
Apr 16, 2020 10:14:20 GMT 10
via mobile
Post by franklin1972 on Apr 16, 2020 10:14:20 GMT 10
Spelling.
Ply*
Foam*
|
|
|
|
Walls
Apr 16, 2020 10:16:33 GMT 10
via mobile
Post by franklin1972 on Apr 16, 2020 10:16:33 GMT 10
Also looks like an alloy chanel running around the top sides and bottom if the van.
|
|
|
|
Walls
Apr 16, 2020 19:47:17 GMT 10
Post by twocutekelpies on Apr 16, 2020 19:47:17 GMT 10
You might get some useful information from this thread - ditzygypsy.proboards.com/thread/3403/franklin-regent-renovationWhile I disagree with the type and size of the framing used, there are details in that thread that could be helpful. There is an alloy channel that runs the full perimeter of my walls, I'm guessing yours too. It's nailed and stapled into the timber sections. |
|
|
|
Walls
Apr 16, 2020 21:13:38 GMT 10
via mobile
Post by franklin1972 on Apr 16, 2020 21:13:38 GMT 10
Thanks for that kelpies
Great info.
Does the roof come off first or the side panels?
If i put new ply back of styrofoam what glue would u recommend? And will it brace it back the same as it was ?
Cheers
|
|
|
|
Walls
Apr 17, 2020 6:50:32 GMT 10
Post by twocutekelpies on Apr 17, 2020 6:50:32 GMT 10
I'm not an expert and definitely learning as I go but we completely disassembled it by bracing the walls and removing the ends and roof first. The brace was clamped to the walls and screwed to the floor so it didn't tip. We also had tent poles with timber on top inside so the roof didn't sag in the middle as we removed all the nails from along the edge.  In the last link I gave you, they left the roof in place and removed one wall at a time to reframe. My Franklin is only 10ft so pretty easy to pull apart and rebuild by comparison. Everything is bigger and probably more prone to sagging on a 16ft. There is a bigger Franklin on this thread where they've left the walls in place and replaced frame sections in situ. Sika do a foam construction adhesive that I know someone else used on theirs. Link I don't know what the coverage is on that. Edit I just found this video which says it covers 10m 2 There's also Sika bond white which I've used before but the surface has to be super clean or it won't adhere (same with any surface being glued really) Link Make sure it's the white one, not the brown as I think the brown will eat the styrofoam. Cheers Shelley |
|
|
|
Walls
Apr 17, 2020 12:27:06 GMT 10
via mobile
Post by franklin1972 on Apr 17, 2020 12:27:06 GMT 10
Thanks kelpie, very good info, and great learning off the back off your learning.
So on the weekend im hoping to disassemble more,
So u reckon in order, remove j rails first? Windows external fitttings etc.
Then roof ?
Front panels, walls being braced to floor, as yours look in photo then a wall at a time?
|
|
|
|
Walls
Apr 17, 2020 13:04:58 GMT 10
Post by twocutekelpies on Apr 17, 2020 13:04:58 GMT 10
I'm not qualified to tell you what order to do things in but I did the windows then j rails etc first, then front and rear panels, then roof.
As I said before, 10ft is far easier to work with than your 16ft so I recommend having a few people working with you at the same time to prevent it collapsing. We had 3 people when taking off the walls, one at either end and one releasing the clamps when ready to go.
|
|
|
|
Walls
Apr 17, 2020 23:16:05 GMT 10
Post by bobt on Apr 17, 2020 23:16:05 GMT 10
When they built these vans the last thing they thought of was renovating them some time into the future. A number of the modern manufacturers use a similar building technology to that which was used to build yours. Jayco and a number of imported European vans. Makes for a strong light van, easy to manufacture. I do know when they have to repair a decent sort of wack in a wall it can be very expensive, the entire wall has to be replaced.
Good luck with your reno.. Do post some pics.
bobt
|
|
|
|
Walls
Apr 18, 2020 5:07:14 GMT 10
via mobile
Post by franklin1972 on Apr 18, 2020 5:07:14 GMT 10
Thanks for the info 2kelpies.
Cheers Bobt. 👍
|
|
|
|
Walls
Apr 18, 2020 5:09:10 GMT 10
via mobile
Post by franklin1972 on Apr 18, 2020 5:09:10 GMT 10
Were is best place to look at cladding/roof sheet replacing. Online shops? In sydney
Cheers
Will try work out how to load some pics.of the old girl
|
|
|
|
Walls
Apr 18, 2020 6:06:17 GMT 10
Post by twocutekelpies on Apr 18, 2020 6:06:17 GMT 10
Were is best place to look at cladding/roof sheet replacing. Online shops? In sydney I hear Barnes Caravans in Lansvale is a good place to get cladding. |
|
|
|
Walls
Apr 18, 2020 18:03:14 GMT 10
via mobile
Post by franklin1972 on Apr 18, 2020 18:03:14 GMT 10
Great!
Whats the talk on silicones and types for windows, and use that tape stuff (?) Plus silicone or
Like sika or selleys roof and gutter being an external uv grade? Or is there better.
Same as the j rails what to use there?
|
|
|
|
Walls
Apr 20, 2020 7:59:26 GMT 10
Post by snoops on Apr 20, 2020 7:59:26 GMT 10
The windows were sealed with mastic tape - this can be bought at a few places, but I got mine from Vintage Caravan Spares. DON'T use silicone for anything, it won't work long term - for sealing and gluing stuff permanently, use polyurathane - like Sikaflex, or similar - be aware that this is a permanent bond and usually requires destroying what was glued with it, but it's great stuff. I've used it extensively on my rebuilds and I wouldn't be without it. My latest build is a bit new for this site, so there are no details on it here, but I've used polyurathane extensively to glue panelling, etc in the RV I'm building (2007 Mercedes Sprinter Van) All the best. |
|
|
|
Walls
May 6, 2020 12:14:50 GMT 10
via mobile
Post by franklin1972 on May 6, 2020 12:14:50 GMT 10
Kelpie, that trunking your using, are u going to run that through your whole van/walls for the cable? Then ply over the top of the truncking?
Cheers
|
|
|
|
Walls
May 6, 2020 18:35:18 GMT 10
Post by twocutekelpies on May 6, 2020 18:35:18 GMT 10
Kelpie, that trunking your using, are u going to run that through your whole van/walls for the cable? Then ply over the top of the truncking? Cheers I've only used it to get down low inside the wall, the rest will be run through the cupboards, not much 240v, mainly 12v. This shows the wall with the trunking taking the 240v down to behind the fridge as well as the earth wire. 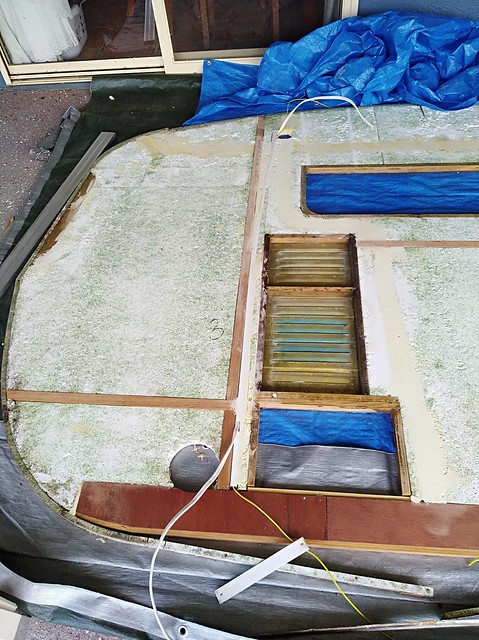 And the ply fixed in place over the top (I've painted new joiners gold to replicate original) -  |
|
|
|
Walls
May 6, 2020 19:46:42 GMT 10
via mobile
Post by franklin1972 on May 6, 2020 19:46:42 GMT 10
Very nice job.
So did you use that adhisive youwere talking about before to glur ply back?
And what joiners you end up getting for joining ply?
|
|
|
|
Walls
May 6, 2020 19:48:44 GMT 10
via mobile
Post by franklin1972 on May 6, 2020 19:48:44 GMT 10
And did the sturdyness come back after ply was glue back?
|
|
|
|
Walls
May 6, 2020 20:03:18 GMT 10
Post by twocutekelpies on May 6, 2020 20:03:18 GMT 10
I did use that rapid fixing foam and went a bit overboard with it on the first sheet, it expanded and it took everything I had including me to smooth it out and get the sheet to sit flat, the wall looked like a garage sale with all the stuff I loaded on it to weight it down! Before we glued the panels on, we carried this wall to the other end of the house to get it closer to the compressor, even with the framing added, it felt a lot more solid. We carried it back with the ply on it and while it was heavier (obviously with 3 sheets of ply on it now), it was very solid. I needed the compressor to use the staple gun into the frame (hidden behind cabinetry and window trim once it goes on) and for my rivet gun for around the edge. The joiners are 3mm wall art joiners from Bunnings and I've painted them gold for a bit of originality. This is the link for the joiners, corner, capping etc. www.bunnings.com.au/search/products?q=wall%20art%20joiner |
|