|
|
Post by snoops on Sept 24, 2015 6:32:41 GMT 10
As mentioned above, all the end panelling is coming off before the new stuff goes on so I'm not increasing the weight needlessly. The side wall in front of the sink is the exception as this is bonded to the foam core and I don't want to disturb this, so I'll be panelling straight over that - and the 2 windows that were for each of the bunks. I have to reseal and rebuild both those windows before I shut them permanently - I've got some part of the way for this from Caravans Plus.
Getting the ply I want is turning out to be difficult. I had some on order from Gunnersens but Bunnings now tell me that is on back order as the colours I want aren't in stock and no one can tell me how long, so I'll head over to Plyco today to see if their thin marine ply will be suitable - it is rated for outdoor use so it should be fine, and I'll waterproof and paint it anyway - it should also be a lot cheaper. Biggest problem is that it only comes in 1.5mm then jumps to 4mm thick, which will be a bit heavy. Buying plywood used to be so simple but no one seems to stock it any more...
|
|
|
|
Post by myarrow1 on Sept 24, 2015 6:36:57 GMT 10
Hi Snoops. Thanks heaps for the info. Gives me better idea what im in for, lol. I'll have to pull out cupboard in mine as i reckon i have rot behind it aswell as LHS. Still trying to find time to seal the roof etc. Started on RH rear last weekend. Renoved trim scaped out old concrete.... and re sealed. Main roof on weekend im hoping. Then i will finish inside rear ply work....
|
|
|
|
Post by snoops on Sept 24, 2015 7:05:55 GMT 10
Sounds like you have some work ahead of you, but that's half the fun.  I'm lucky that the corner behind the cupboard is the only one that is still pristine and uneffected by water damage, so I don't need to play around there at all. I have resealed the J moulds on the front and the roof is now water tight so hopefully that will never be an issue for mine. |
|
|
|
Post by myarrow1 on Sept 24, 2015 8:06:03 GMT 10
Yes was hoping that the cupboard didnt have to come out, but shouldn't be toi bad. What type of sealer did u use on the J moulds?
|
|
|
|
Post by snoops on Sept 24, 2015 9:06:42 GMT 10
I did my moulds with the 'it's never coming off again' method using a Poly Urathane - like Sikaflex, but another brand. I get it by the sausage and use a sausage gun as it's much easier. It helps that I get it all for 'the right price'...
|
|
|
|
Post by myarrow1 on Sept 24, 2015 11:29:36 GMT 10
Hi Snoops. Fixtech15 which i decided on is a UV, flexible adhesive sealant which is fully elastic once dry. Its white an paintable. Only drawback is that it starts to skin after approx 15-20mins, so i have to move quick. I got a heap of different suggestions what \what not to use. Very confusing
|
|
|
|
Post by tedalley on Sept 24, 2015 12:28:28 GMT 10
Getting the ply I want is turning out to be difficult. I had some on order from Gunnersens but Bunnings now tell me that is on back order as the colours I want aren't in stock and no one can tell me how long,
Snoops Hi.
I'm not sure where you are located but.......
When I needed to match my plywood I went directly to Gunnersons near Liverpool (they don't deal with the public).
The sales rep got out all his samples to show me what is available. when I showed what I needed he was able to pick the type of wood etc.
He gave me the codes & told me to place an order through my local hardware putting his name on the order & he organised it all.
I was surprised how close he got to what I wanted.
Ted
|
|
|
|
Post by snoops on Sept 24, 2015 19:30:53 GMT 10
Thanks, but I don't even need to match the panelling, I'm just trying to get get some marine ply or similar - it's Turing out to be bloody difficult. Gunnersens have what I want, but trying to get my local supplier to order it is impossible. They are useless, and refuse to order what I want - even though I showed them that the product existed on the Gunnersens website. I also wanted some 2100 x 900mm panels - again, clearly shown on the Gunnersens website, and confirmed with them that they have that in stock, but my local stockist only want to sell me 2440 x 1220mm panels that cost nearly double the price and I would waste most of it.
So, I decided to just try and get some good old fashioned 3 ply - even that is bloody near impossible to get - everyone wants to sell me 3mm MDF...
So, I've given up for the time being, and moved onto other things until I get my strength back to try again...
If anyone knows where I can get 3 ply in Melbourne - A or B grade, then I'm all ears....
|
|
|
|
Post by myarrow1 on Sept 24, 2015 20:32:50 GMT 10
Hey Snoops, give Bernie Leens in Geelong a call. They've got all sorts of ply there. They even have a rack full of 2nd hand and stuff (I never looked at that, though). I got my ply from there at $25 a sheet. I also bought the bolts/nuts, screws, edge trim, and even the liquid nails from there.
|
|
|
|
Post by snoops on Sept 24, 2015 21:11:17 GMT 10
Thanks for that - I'll call them in the morning.  |
|
|
|
Post by snoops on Sept 26, 2015 7:36:26 GMT 10
Yep, they had some that would have been suitable but I found a supplier closer to home - Plyco in Fairfield. Got some sheets of BB (exterior grade) hoop pine that will do the job nicely. It has a very smooth finish on it (furniture grade) so it will take paint well and look good when finished. I should have a bit installed by tonight so I'll post some pics then.  |
|
|
|
Post by snoops on Sept 26, 2015 15:52:40 GMT 10
So, got quite a lot done today.  Started by knocking out a dent that a PO had put in the front - it was bogged up from the outside as there was no way of getting to the inside until I ripped all the panelling out. I knocked out the dent 90%'and all the hard old bog fell out. 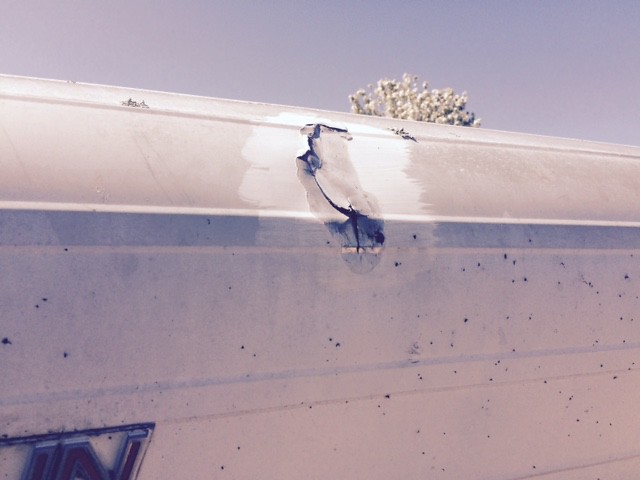 image image by Gavin Gregory, on Flickr Got a good whack of PU inside to seal it and I'll sort out he outside when I get around to paint and panel. It will always be a bit rough there, but it's heaps better than before. 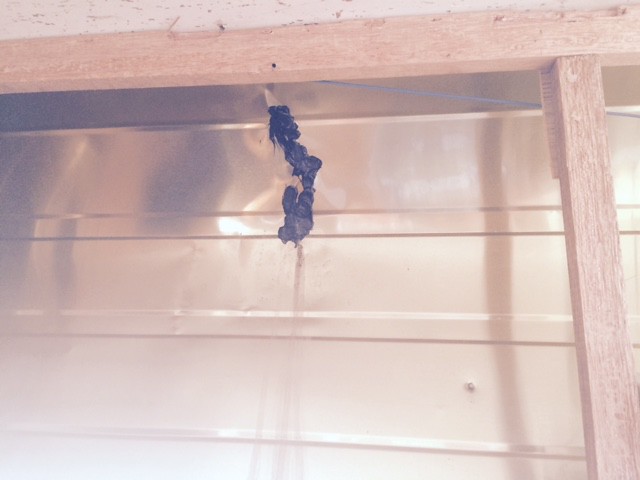 image image by Gavin Gregory, on Flickr Then onto prepping the inside structure for the new waterproof ply. I 'stitched' the cladding and frame together with short runs of PU - I did this up in the overhead cupboards when I restored them, and it made a huge difference - they are tight as now and make the whole van more rigid so I did the same here, and down where the new support for the bottom panel will be going. Will need to leave the bottom bit overnight now before I put the bottom panel in, but the front top panel is up. I put 2 coats of paint on the panel before putting it up, and one more should see it done. 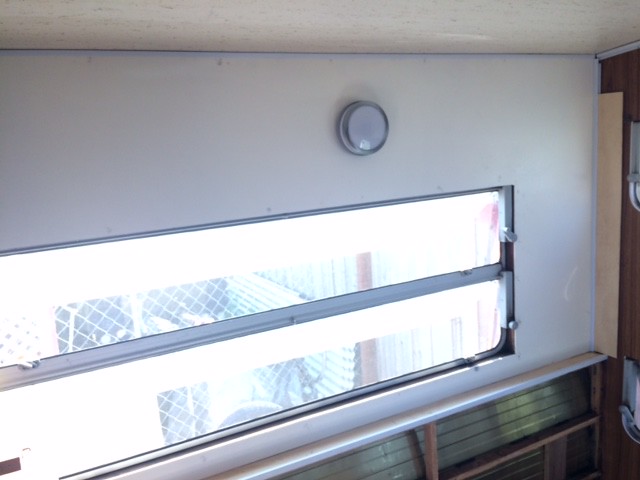 image image by Gavin Gregory, on Flickr Despite what the pic looks like, the new light fitting is in the middle of the panel, and looks quite good. The window frame will get a full waterproof treatment and flashing when I pull the front window to restore it. I'll change the glass out to obscure Perspex while I at it as the whole front of the van becomes the ensuite. All the other glass will get changed to Perspex also as I fix the windows. Figure I can save a few Kg's along the way. The 2 bunk windows will be removed, rebuilt, have obscure Perspex installed, then sealed shut as the inside will be one whole panel, and the windows will no longer be required to see out of or need to open and close. Hopefully tomorrow the side panel and the lower front panel go in, then I can start on the returns. It's the most I've done in ages and has really got me enthusiastic again to finish everything off.  |
|
|
|
Post by myarrow1 on Sept 26, 2015 16:44:45 GMT 10
Mate, that looks fantastic ! It's been a day for it... I've spent the whole day on mine too. Removed the RHS J Moulds (did the rear one last weekend) but removed the rest of them today, so the entire right side is sealed up now. What a mongrel of a job cleaning all the old concrete off the van !!!! Will start on the LHS tomorrow. Has got the rail track on it, a little more work there. Beer o'clock now, I'm knackered, and sunburnt, lol
|
|
|
|
Post by myarrow1 on Sept 26, 2015 17:14:17 GMT 10
 Hey Snoops, did abit of poking around before. Reckon I might be in for some fun when I take the ply off, lol |
|
|
|
Post by snoops on Sept 26, 2015 19:33:57 GMT 10
Yep, looks like that's been damp for some time. My arms are a bit burnt, but I've been in the van mostly so avoided the worst of it. I'm on beer number 4 now.  |
|
|
|
Post by snoops on Sept 27, 2015 18:16:49 GMT 10
Ok, finished a big weekend on the van, and in really happy with the results. Got the lower front sheet for the ensuite cut, painted and installed. The screws will be countersunk and skimmed over once the adhesive has cured a bit more - I've used a high strength, waterproof adhesive but it takes a week to cure. The gap you can see between the wall and floor will become a long channel style drain with an outlet at each end. I'm having a mate fold up some stainless for me, then TIG in a couple of ends and outlets. To ensure the water runs that way will just require a small adjustment of the jockey wheel before using it.  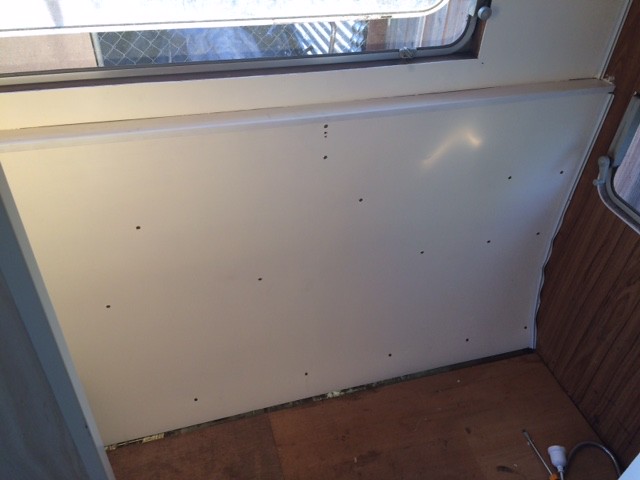 image image by Gavin Gregory, on Flickr Got one of the returns up - this one is for the toilet. Nice and light, yet quite strong. Might hang a picture or something there once it's painted. 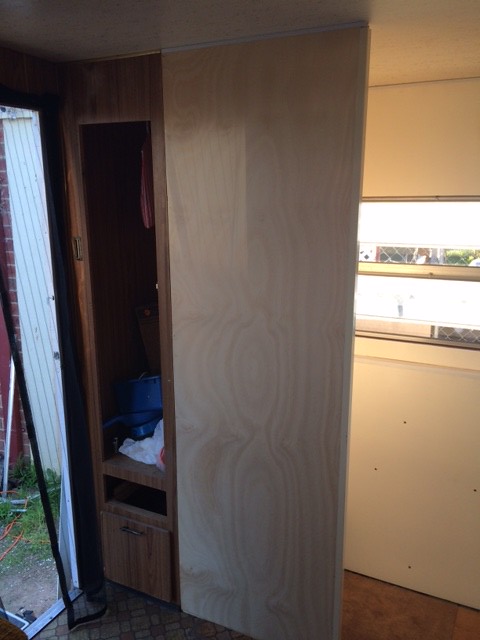 image image by Gavin Gregory, on Flickr So now, we officially have a dunny, rather than a toilet sitting in the corner of the van.  Although there doesn't look like there's much room there, it is actually more than enough, even for a big lad like myself. 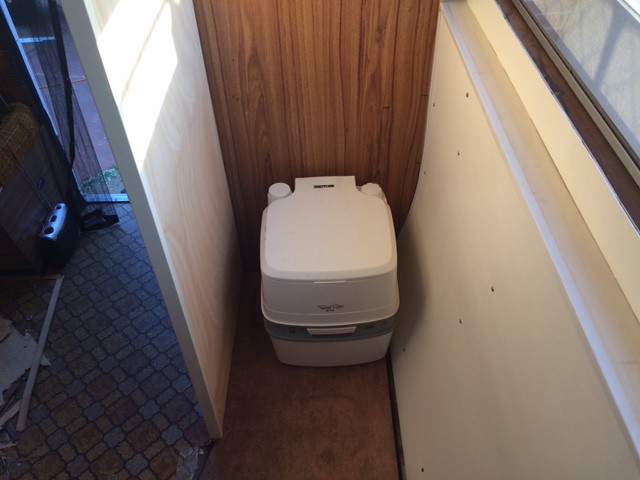 image image by Gavin Gregory, on Flickr Also got the gas plumbed up at the front for the hot water service - more on that after I mount it and get it working. |
|
|
|
Post by Mustang on Sept 27, 2015 18:53:52 GMT 10
Good few days work there Snoops, looks to be a different fitout inside to the old!!
|
|
|
|
Post by myarrow1 on Sept 27, 2015 19:25:29 GMT 10
Wow... You have been busy, Snoops. Looks great
|
|
|
|
Post by snoops on Sept 27, 2015 20:16:49 GMT 10
Good few days work there Snoops, looks to be a different fitout inside to the old!! Yep, with there only being 2 of us (and the Pugs) then the front bunks were superfluous. An ensuite makes much more sense.  . With everything removed and new stuff going in, im keen to find out what it all weighs now. Im heading out for 4 or 5 days later this week, so will run it over the weigh bridge on the way. |
|
|
|
Post by myarrow1 on Sept 27, 2015 20:52:24 GMT 10
Cute little 'fur babies' there Snoops...Awesome !
|
|
|
|
Post by snoops on Sept 27, 2015 21:26:01 GMT 10
Thanks, they go everywhere with us. Now our 2 kids have grown up and flown the coop, these 2 fluff balls keeps SWMBO occupied.  . They are damn adorable....  Pugs aren't for everyone, but if you can put up with the shedding, snoring, their need for constant attention and the fact they sleep on the bed, then they may be just the right dog for you.  |
|
|
|
Post by snoops on Sept 28, 2015 18:24:03 GMT 10
Got the HWS mount complete this arvo, and all the plumbing roughed in - just secured with zip ties at the moment to make sure I'm happy with where everything is. This shows how it mounts to the drawbar. 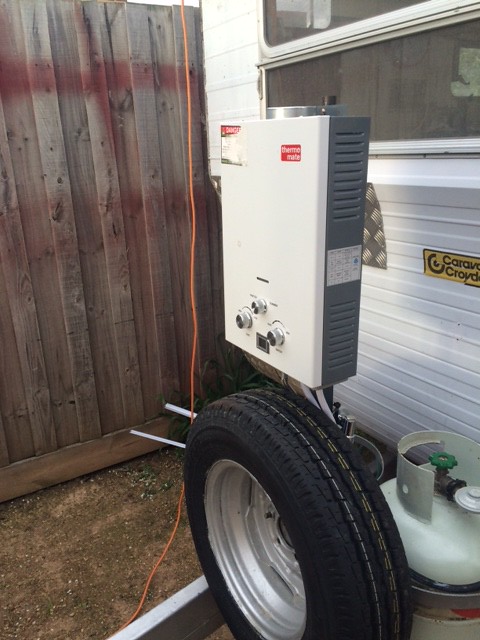 image image by Gavin Gregory, on Flickr Close up of the Dodgy Brothers plumbing. Gas connection is on a standard bayonet fitting. 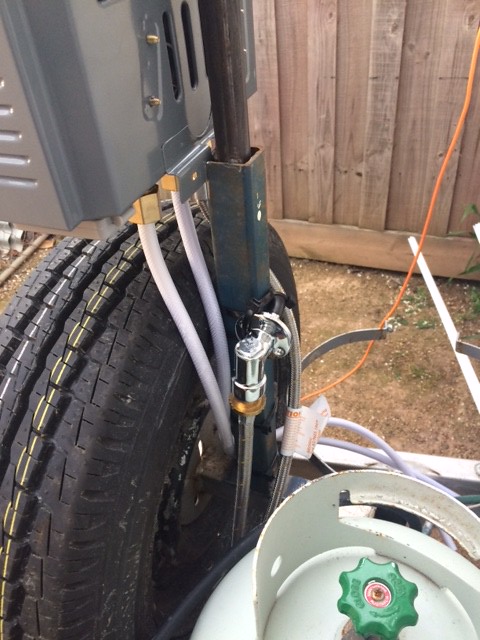 image image by Gavin Gregory, on Flickr How it looks for transport. 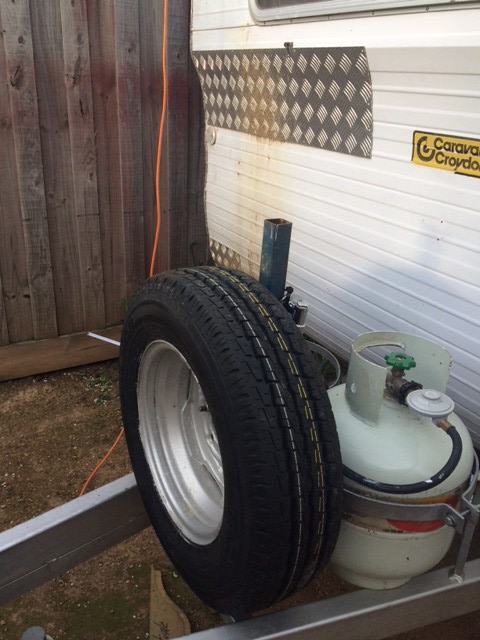 image image by Gavin Gregory, on Flickr |
|
|
|
Post by planner on Sept 29, 2015 10:43:34 GMT 10
Started by knocking out a dent that a PO had put in the front - it was bogged up from the outside as there was no way of getting to the inside until I ripped all the panelling out. I knocked out the dent 90%'and all the hard old bog fell out.  Got a good whack of PU inside to seal it and I'll sort out he outside when I get around to paint and panel. It will always be a bit rough there, but it's heaps better than before.  Snoops I've got the same crack/dent just to the right of the badge. I've used sikaflex a couple of times to fix it, with no success. First truck that we pass and it opens up again. At present it's sealed with 100mph tape. I'm reluctant to remove panelling inside so I might source a small peice of cladding and sikaflex and rivet from the outside. Planner |
|
|
|
Post by planner on Sept 29, 2015 10:47:10 GMT 10
Pugs aren't for everyone, but if you can put up with the shedding, snoring, their need for constant attention and the fact they sleep on the bed, then they may be just the right dog for you.  Are you sure you've got pugs, sounds a lot like miniature dachshunds,  |
|
|
|
Post by snoops on Sept 29, 2015 19:30:10 GMT 10
Started by knocking out a dent that a PO had put in the front - it was bogged up from the outside as there was no way of getting to the inside until I ripped all the panelling out. I knocked out the dent 90%'and all the hard old bog fell out. Got a good whack of PU inside to seal it and I'll sort out he outside when I get around to paint and panel. It will always be a bit rough there, but it's heaps better than before. Snoops I've got the same crack/dent just to the right of the badge. I've used sikaflex a couple of times to fix it, with no success. First truck that we pass and it opens up again. At present it's sealed with 100mph tape. I'm reluctant to remove panelling inside so I might source a small peice of cladding and sikaflex and rivet from the outside. Planner Thanks, I've been contemplating the best way to go about how I repair this on the outside. For now it will get a skim of PU, but I've been thinking a plate over the top might be best. As it will be noticed no matter what I do, I'm thinking of highlighting it by making the plate look 'stitched' on by painting some marks across between the repair and the roof - it will show it's got some character.  Paint is still a fair way off though. |
|