|
|
Post by snoops on May 12, 2015 20:24:16 GMT 10
The step was long gone when I got it, and after lifting mine about 3" having just one step caused problems for my short legged Wifey, so I now have a separate 2 step folding aluminium job I just pop inside when travelling, works well. The fridge works a treat and now I have the flue plumbed outside, it is great.  There is no way I can lift the front off the ground, even with SWMBO sitting tight up the back on the bed. I have removed a bit of weight from the front now, and repositioned the batteries and my big arse inverter behind the axle. Hoping that's done the trick. |
|
|
|
Post by atefooterz on May 13, 2015 0:37:11 GMT 10
Mine had no step when i bought it, so thought i may pick one up along the way somewhere, however when travelling the footpath height makes a great step then in travells have noticed be it a Classic or white box almost 90% of folks use the portable steps. Hope your ballancing act is successful snoops.  |
|
|
|
Post by Mustang on May 13, 2015 18:03:49 GMT 10
The step was long gone when I got it, and after lifting mine about 3" having just one step caused problems for my short legged Wifey, so I now have a separate 2 step folding aluminium job I just pop inside when travelling, works well. The fridge works a treat and now I have the flue plumbed outside, it is great.  There is no way I can lift the front off the ground, even with SWMBO sitting tight up the back on the bed. I have removed a bit of weight from the front now, and repositioned the batteries and my big arse inverter behind the axle. Hoping that's done the trick. Do you have any pic's of the flue? |
|
|
|
Post by snoops on May 15, 2015 22:45:09 GMT 10
|
|
|
|
Post by myarrow1 on Aug 7, 2015 20:14:37 GMT 10
A couple of pics of the lower timber on the front RH side that I replaced recently.   |
|
|
|
Post by myarrow1 on Aug 7, 2015 20:17:53 GMT 10
A couple of pics of the lower timber on the front RH side that I replaced recently.   |
|
|
|
Post by myarrow1 on Aug 7, 2015 20:21:45 GMT 10
A couple of pics of the lower timber on the front RH side that I replaced recently. Hi Snoops. How much of a drama is it to replace the lower wood ? Mine is shot LH rear and unsure where to start. Pete   H |
|
|
|
Post by myarrow1 on Aug 7, 2015 20:28:59 GMT 10
Hi Snoops. Is it much of a drama to replace the lower wood section ? Mine is rotten LH rear, and am concerned to ignore it. Pete
|
|
|
|
Post by snoops on Aug 21, 2015 11:06:36 GMT 10
Hi there - sorry for the late reply, the timber isn't too hard to replace, but it is a bit fiddly is all. I used some KD hardwood to replace the original softwood that was rotted out - it is significantly heavier, but there isn't much there and it should last for the life of the van now. The biggest thing is to fix the vents behind the fridge as this is what was leaking and caused all the damage in the first place, so on the back where yours is rotten, you will need to find and fix the leak that caused the damage. As you can see, I have fitted new style Dometic vents and sealed everything up so it stays dry inside now. To remove the timber, undo - or grind if they are rusted like mine were - the long screws that bolt right through the skin, timber and the frame, pull off the bottom trim, then seperate the cladding and what is left of the internal ply wood off the timber - most of this on mine was already unstuck, I just had to do this up one end where it wasn't rotten. The cladding pulls out enough to slide the timber out and the new stuff in onto the chassis. You may need to jack up the corner of the van if it drops when you do this - it is the main support for the van after all. Any other questions, just sing out - there aren't too many places on my van I haven't ventured into or pulled apart.  |
|
|
|
Post by snoops on Aug 25, 2015 6:47:11 GMT 10
Quick update just in case you thought I'd stopped doing stuff. There is still heaps to do, but as it is at a usable stage, we tend to go out in it a fair bit, so finding time to actually work on it is a bit hard. I have got the electrics to a stage I'm now happy with though. After a few false starts using cheaper inverters, I finally bit the bullet and found a good secondhand Selectronic LD600 inverter - huge overkill for what I need, but this thing is the ducks guts - Australian made, big toroid, plenty of punch, and most of all reliable. It also has an adjustable sleep mode so when the load drops below 4 watts, it shuts down and draws almost zero current. When you flick a light on, it comes back to life - perfect for my application. This is running off 2 x 100 amp hour Full River deep cycle batteries, so now I can go out and set up for a long weekend without having to even worry about a solar panel. All lighting is 240 volt running 5 watt Phillips LED globes, and the system also runs the small TV, radio and microwave. Will get some pics of all this when I remember.  Oh, and I've solved my heavy nose weight issue now. The batteries and inverter now live just behind the axle, the spare tyre lives in the tow vehicle and I've ditched the second gas bottle. I also put the table on the bed in the back, and a few more bits and pieces under the bed. Nose weight is now 130Kg which I can live with and it has made a big difference in how the 101 behaves when it's hanging off the back. It doesn't buck as much over uneven roads now, and when I'm towing it with the Captiva, it is a dream - I can easily sit on 100 with it now, and although it also seems fine at 110 on the freeway, I still stick to 95 to 100 where ever I go. One problem I have found is that people pull out in front of you thinking you will be going slowly with an old van on the back, then they sit on 90 and hold me up...! I've surprised a couple of people when I've overtaken them after they did this to me... Now it's comfy and usable, I really need to get all new rubbers for the windows and do them, so I can paint the outside and get it looking decent. Then, it's just the interior to finish, the wet area to do and I'm done,,,,  |
|
|
|
Post by snoops on Sept 2, 2015 7:37:48 GMT 10
Well, I just can't help myself - I've ordered a cheapy eBay hot water service for it... I'll make a bracket up so I can pop it on the draw bar when I pull up. I'll keep it in the tow vehicle and I've also ordered a 110 litre water bladder to keep in the tow vehicle, so I can now have enough water for a shower.  . I'll use some quick connect fittings so I can set it all up in a couple of minutes, screw in the gas connector and I'll be done. I'll need to run a hot water pipe and get a hot water tap fitted to the sink. So much for roughing it....  |
|
|
|
Post by planner on Sept 2, 2015 16:26:17 GMT 10
I've also ordered a 110 litre water bladder to keep in the tow vehicle, Snoops Let us know how the bladder performs, I'm keen on one as a water tank for the ute. You can be the guinea pig before i buy. |
|
|
|
Post by snoops on Sept 2, 2015 18:01:52 GMT 10
Will do - I'll let you know, but it will be a month or so I would think before I take it out anywhere. So, my new hot water service arrived today - $200 delivered, so I opened it up, and I was pretty surprised it has everything I need to make it work - gas hose, fittings, a bit of water hose, and even a hand held shower thingy. It's when I came to the instructions that I then understood what the catch is with this thing.... It is an outdoor unit - with big warnings to not use it inside at all due to carbon monoxide poisoning - yep, I was expecting that one, no big deal, I always intended to attach it to a post on the draw bar or something, easy. Then I read the other warnings - DO NOT use in the rain. This unit must not get wet. Protect unit from getting wet. So, it's an outdoor unit that you can't have outdoors...  . Obviously the internals are made of tin foil or something and it will probably rust away in a few months, but it does mean I'll have to figure out a cover for it that is non flammable, etc. more weight to carry, but it will be in the tow vehicle. If it's too much bother, I'll stick it on the wall outside at home next to where the van parks so my visitors that sleep out in the van can have hot water...  I'll post some pics when I figure out how I'm going to do it,  Cheers - Snoops. |
|
|
|
Post by snoops on Sept 3, 2015 8:52:18 GMT 10
So, mulling over the hot water service situation last night, I had a thought that may work. Where I'm building the 'ensuite' at the front where the bunks used to be, there will be enough room in there to mount the unit. I'm going to run some tests on it to see how hot it gets with some solid use, but if I mount it basically in the centre on the front wall, over the window there and vent the flue outside I should be ok. The unit only weighs 5.5Kg so not a huge weight issue for the van - I still have a few Kg left before I get to its GVM...  I'll post the results once I run some tests. I'll use my IR thermometer to measure surface temps, etc. |
|
|
|
Post by snoops on Sept 3, 2015 9:42:56 GMT 10
Ok, just ran some tests. First up IGNORE MY LAST POST - DO NOT MOUNT A UNIT LIKE THIS IN YOUR VAN UNDER ANY CIRCUMSTANCES! The unit does not vent 100% of the flue gasses through the flue vent, but out the sides too, making it dangerous to use inside. Apart from that, it goes pretty well - more than enough hot water to have a shower with, so just have to figure out where to mount it. Next test will be running it out of a bucket with a small 12 volt diaphragm pump (I have a spare one somewhere in the garage) and see what sort of water usage a shower may use. The supplied shower head has an on/off switch so it's easy to control the water usage while having a shower. Get wet, switch off, lather up, rinse.  The test setup -  |
|
|
|
Post by doublechevron on Sept 3, 2015 14:55:16 GMT 10
That back of the 101 is open isn't ?? Why don't you make up a frame for it that bolts down to one of the seat/tie down areas in the back of the 101  seeya Shane L. |
|
|
|
Post by snoops on Sept 3, 2015 19:07:32 GMT 10
Yep, but what about when I got out with it behind the Captiva....?  Ive already got got most of it sorted. I've made a bracket up that sits in the spare wheel bracket on the drawbar. I've ordered a hose, tee piece and quick connect for it, so I can just pop it out the front, click in the gas line and the supply and delivery hoses. I'll also make up a hose and tap that I can drop in a bucket of water so I can use river water, etc to shower with. |
|
|
|
Post by tedalley on Sept 12, 2015 23:43:38 GMT 10
Snoops Hi.
I got a similar unit to yours. If you look at my site you will see photos where I've got 4 x stainless bolts coming out the side of my van.
While driving I have the unit mounted inside the van. When camping I then mount it to the outside using wing nuts. I've got quick release plumbing as well as a bayonet fitting for the gas. I then made a cover using thin alloy sheeting for when it rains.
I hope this helps
Ted
|
|
|
|
Post by snoops on Sept 13, 2015 19:57:53 GMT 10
Thanks Ted, just been back to have a look at what you did - I remembered seeing this some time back, but I couldn't find it when I wanted it.  I have ordered some quick connect fittings for the water - a red and blue brass TIG air/water connections set which should work fine I think - I'll post pics when they arrive. I have also mounted a bayonet fitting - near the gas bottle - that I can use for the hot water, or a BBQ if I want.  . I'm thinking of mounting the unit on a pole off the drawbar - again, I'll post pics when I'm done, Do you have a pic of the cover you've made up to go over yours? Cheers. |
|
|
|
Post by tedalley on Sept 17, 2015 16:48:08 GMT 10
Snoops hi. I don't have any photos with the cover on the HWS and the HWS is bolted inside as we are planning on a camping trip next eight days. I pulled out the cover and took some photos - its just some .5mm aluminium that ive bend to fit around the HWS when camped. It has a removable cap so that I can place the chimney when having a shower.  Its open at the back to let the heat out.  I hope this helps & I'll try to take some photos with it on. Although I do need to cut a hole for the chimney. Ted |
|
|
|
Post by snoops on Sept 22, 2015 19:04:27 GMT 10
Ok, got a bit done today. Started on the plumbing for the hot water service and also started the strip out for the ensuite. I'm still waiting on a couple of quick connect fittings from fleabay for where the HWS will plug in out the front of the van, but got almost all the other stuff done. I basically replumbed the whole lot, starting from the tank. I now have cold water that can be switched between the tank and the mains, with a hose fitting under the van. That runs through a 3 way valve, then to the flick mixer and there is a T with a stop valve that runs down to the front of the van - I'll stick an outside tap on a T where the HWS inlet quick connect will be. From there, where the quick connect outlet for the hot water will be, that runs to the flick mixer with a T in the line and a stop valve that runs to the shower head. Oh, also where the cold inlet is to the HWS, I have another 3 way valve so I can pull water straight from a bucket or container using another pump that I'll carry in the bucket, so when I'm camped near a river, I can grab a bucket of water to shower with rather than using my tank water. The pump will plug straight into the 50 amp anderson plug at the front of the draw bar, and has its own pressure switch in it. I think I have covered all bases now.  So a few pics.... The hot and cold stop valves mounted under the sink, so I can remove the sink top and flick mixer easily if needed. 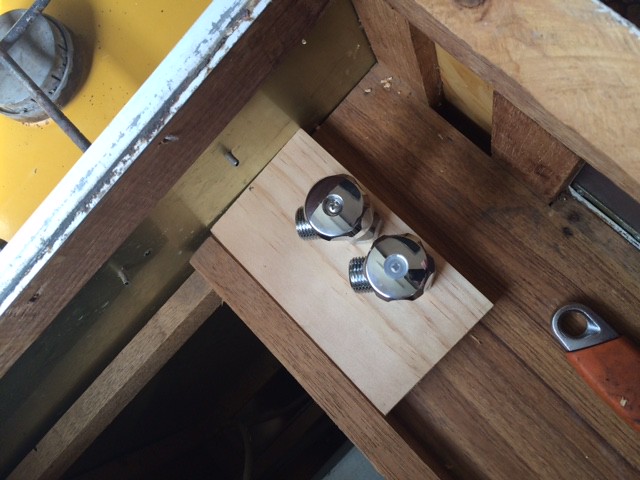 image image by Gavin Gregory, on Flickr Showing how the flick mixer connects to it. 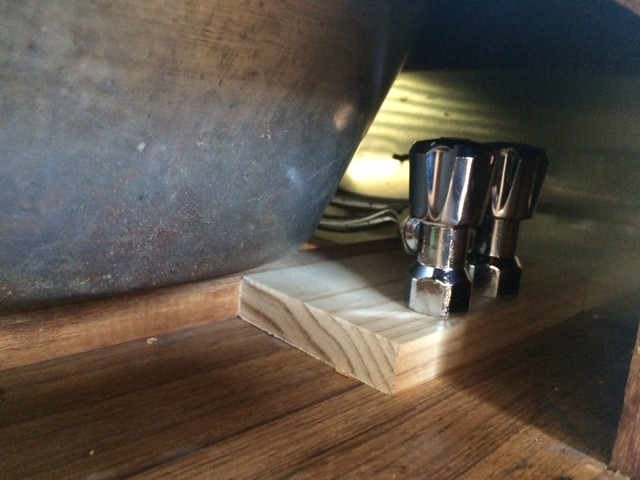 image image by Gavin Gregory, on Flickr Hmmm, not exactly 70's looking, but it works beautifully. $46 from fleabay.  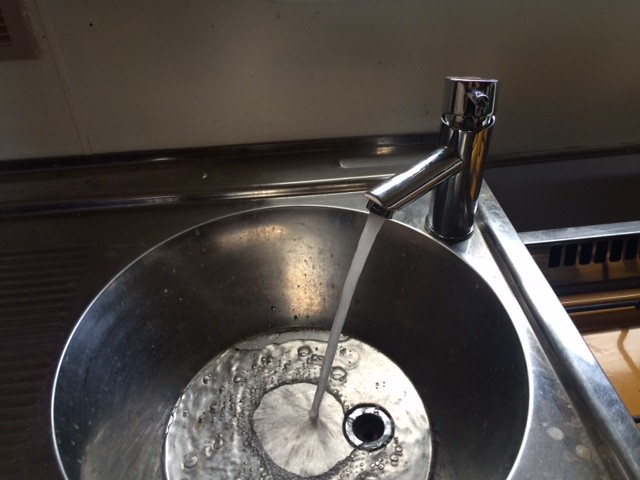 image image by Gavin Gregory, on Flickr And the strip out of where the ensuite is going. The frame is in very good condition and the old panelling was stuck to it like nuts to a blanket. I've ordered some wet area panelling, and some lighter wall panelling from Gunnersens that should look the part.  image image by Gavin Gregory, on Flickr |
|
|
|
Post by myarrow1 on Sept 23, 2015 21:47:31 GMT 10
Hi Snoops. Great pics. I was wondering what sort of a frame they have to hold up the front bunks. Not a lot to em, it seems. I know I've got rot in the bunk frame ( very soft ply in the corners) but still sorting out the rear. You wouldn't have a pic above the front windows  I've got a couple of dents in the cladding up the top (near Franklin emblem), and was wondering if I can see what sort of frame they have at the top. Hoping to somehow push the dents back from the inside, maybe a spacer between frame and cladding ?? Don't wanna have to replace the cladding section....... |
|
|
|
Post by snoops on Sept 23, 2015 22:22:11 GMT 10
There was a decent lump of timber that ran across about the middle of the lower window. This was bolted in 2 places at each end and would have held my weight easily (I'm a fatty). I have since cut this out, but I'll see if I can find a pic showing it. It had the hinges still hanging off it.
|
|
|
|
Post by myarrow1 on Sept 23, 2015 22:49:19 GMT 10
Cool thatd be great Snoops. Is there any frame above the windows or is it just cladding ?
|
|
|
|
Post by snoops on Sept 24, 2015 6:20:08 GMT 10
Hi myarrow1, see below for a bit of detail on the bunk mounts. This is the frame below the window - made from meranti, the ply was stuck well to this making the structure quite strong - it is screwed into the side frame with 8 screws either side. There was also panelling between this frame and under the window on the flat forming a ledge that made the whole lot rigid. This is all going back in with the new water proof paneling. 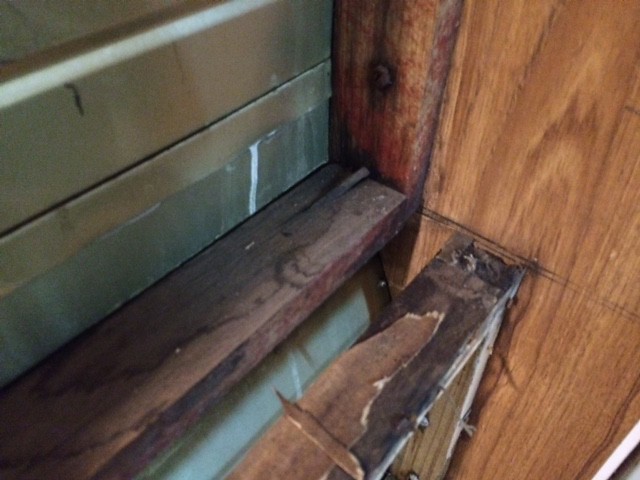 image image by Gavin Gregory, on Flickr This is how the main bunk frame sat - I'm just holding it here for the pic. It was bolted through the spacer piece through the panelling and into a sheet of ply that sat between the window and side frame. It was put together like this before the exterior cladding went on as the nut end of the bolts were in the cavity and no access was available to remove them - I had to use a grinder. <<<Photo no longer available due to photbuckets crap policies.>>>And this is a shot down the back of the cupboard showing the other end - I'm assuming it is attached the same way. 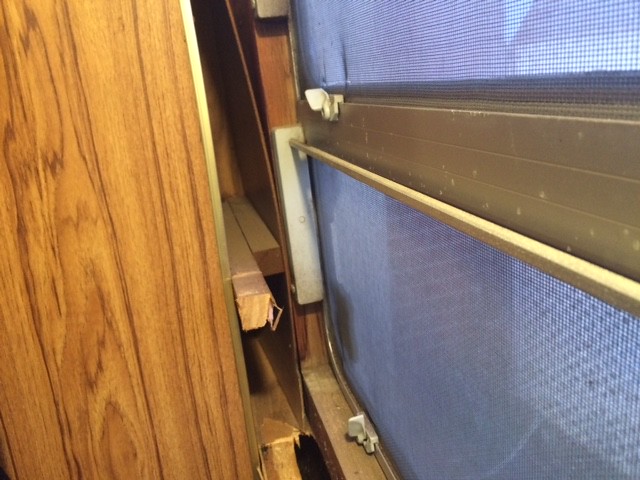 image image by Gavin Gregory, on Flickr The timber used is 1 1/8" hardwood. <<<Photo no longer available due to photbuckets crap policies.>>>Above the window is a decent chunk of meranti, and above that is just a lightweight frame with the paneling on it. <<<Photo no longer available due to photbuckets crap policies.>>> |
|