|
|
Post by ForumMod on Feb 9, 2014 21:27:46 GMT 10
G'day supreme78, A lot of good ideas have gone into the work you've done.  A real custom-made interior to suit exactly the sort of lifestyle you want. Well done. Great idea with the soap dispenser, too.  cheers, Al. |
|
|
|
Post by drylander on Feb 9, 2014 23:17:13 GMT 10
A small tip for what its worth. The fridges tend to struggle at anything over 35C unless they are properly set up and there's a great article here somewhere and I think Al can find it. Once I did it the fridge worked well even in 40C+ and didn't need a 12v fan. you can get a small unit for inside the fridge to move the air around or make something similar for the bottom shelf.
Pete
|
|
|
|
Post by youngdazza on Feb 10, 2014 7:41:06 GMT 10
G'day
Those drawers are definitely a handy addition to your van! I have replaced my wardrobe with shelves which is handy, but those drawers are even better! With all the extra storage spage just keep an eye on the total weight of the van to make sure you don't overload it on your upcoming trip.
Re the aircon - I have always wondered whether a window unit inside a cupboard (wented to the outside) would work. I had assumed that the heat buildup in the cupboard might overload the unit, or cause too much heat to radiate back inside the van. Perhaps that could be resolved if you put the unit on some heady duty drawer runners and slid it outside when in use and back inside for travel?
Cheers
|
|
|
|
Post by ForumMod on Feb 10, 2014 13:05:19 GMT 10
|
|
|
|
Post by drylander on Feb 10, 2014 22:27:12 GMT 10
That's the one Al. Works a treat and no fan needed. I also fitted a T piece on the top of the fridge exhaust pipe which helps a lot as well. Caravan plus had them but can't seem to find them now???
Pete
|
|
|
|
Post by supreme78 on Feb 12, 2014 7:39:51 GMT 10
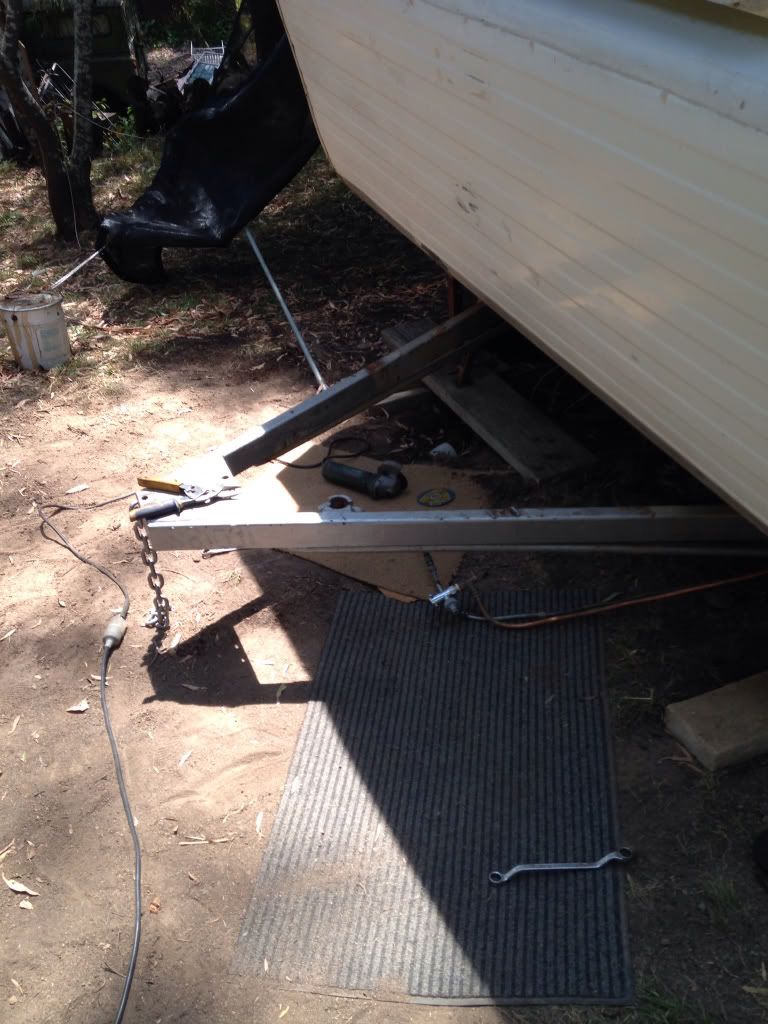
Thanks for your reply's and for the info. Today I removed the old draw bar and started the new extended one. +400mm. I am using 50x75 rhs with bracing underneath. I could have gone 100x50 but don't want to make the whole thing to heavy. It was a biatch to back before I hope this helps. i also wanted to add a storage box to the front for little bits and pieces. Also my spare on the pajero almost hits the van at full lock and when going through a driveway so this should make it better. Next job is to replace springs and axle. I might increase gross capacity a little in the process.  after pics to come |
|
Deleted
Deleted Member
Posts: 0
|
Post by Deleted on Apr 2, 2014 8:37:14 GMT 10
Nice shampoo holder.
|
|
Deleted
Deleted Member
Posts: 0
|
Post by Deleted on Apr 2, 2014 8:38:54 GMT 10
I don't suppose you have any photos of how you made your bed with the gas lifters? That is my next project on my van…in fact I wanted to go to Bunnings today to see what I might need for the job…:-)
|
|
|
|
Post by supreme78 on Apr 5, 2014 20:36:12 GMT 10
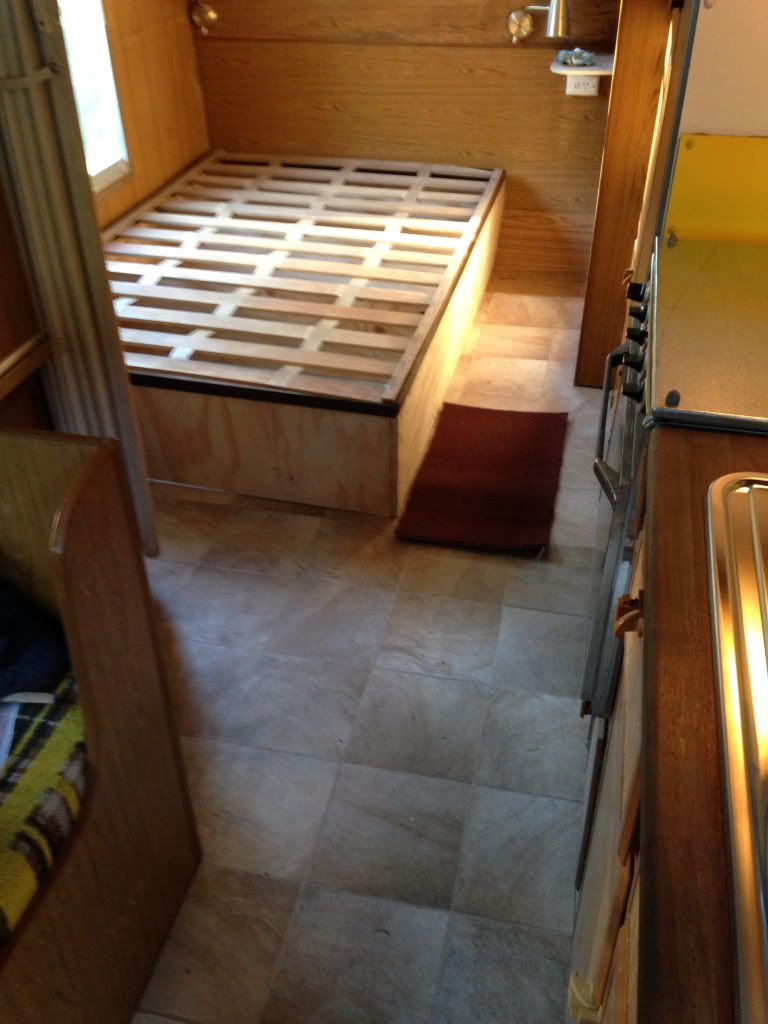
My van had a steel frame that slid sideways with a wooden frame screwed to it. I removed the steel sliding frame and built a frame from 18mm ply. For storage. I then removed the legs from the old frame and screwed it to the ply cupboards. I than strengthened the wooden panel under frame hinged it and added a couple of struts. I purchased a new mattress from a place in Epping Melbourne. They were great and quite cheep..
|
|
|
|
Post by supreme78 on Apr 5, 2014 20:41:53 GMT 10
 The bed frame after rebuild. |
|
Deleted
Deleted Member
Posts: 0
|
Post by Deleted on Apr 7, 2014 8:44:52 GMT 10
Thankyou for posting your information on the back bed build. I have started the bottom frame in my van and will be going along similar lines as you and Gav's and Yellow subbies. I have to get it done by next weekend! I need the van for some events coming up! Again, I truly appreciate your posts Kind regards.
|
|
Deleted
Deleted Member
Posts: 0
|
Post by Deleted on May 11, 2014 17:28:47 GMT 10
Thanks for all the excellent info in this post supreme78, I realised that I had read your thread a few weeks ago but it all makes more sense to me now I am two weeks into my own Supreme reno! The way you fixed the ceiling is great. Brilliant idea to leave an inch around the edge to fix the new lining to, what I am wondering is if you pack out the framing to keep it level, how did you go getting it into the groove around the edge of the roof hatch? I suppose it is only 3mm so you didn't pack too close to the hatch and it just bent into place anyway? I have the same vinyl flooring as you which I strongly suspect is asbestos backed. Going to recover mine with new plywood tomorrow hopefully as it is the next logical step before attempting to rebuild cabinets and seating. thanks again
Karen
|
|
Deleted
Deleted Member
Posts: 0
|
Post by Deleted on May 11, 2014 17:34:51 GMT 10
sorry one more question (for now at least lol)...how did you get the panel off the front of your fridge? I have a similar fridge and the turkey I bought the van off painted it poop brown, all of it, including the aluminium surround and the control knobs on the bottom. I attacked it with paint stripped the other day and it is coming off ok but I did notice that the front was just a ply panel so I am thinking it would be easier to just replace it. But I couldn't figure how to get it out, do I need to undo the aluminium surround and if so, how? thanks!
|
|
|
|
Post by supreme78 on May 30, 2014 8:12:42 GMT 10
Yeah just remove a couple screws at the top panel will lift off and you can slide out the ply.
Regards
Paul
|
|
Deleted
Deleted Member
Posts: 0
|
Post by Deleted on May 30, 2014 17:30:36 GMT 10
thanks Paul, I couldn't find a head on the screws (probably just full of gunk) so I ended up bending the ply and getting it out. Will have to find a better solution to put it back in though...like somehow undoing the screws! cheers Karen  |
|
|
|
Post by supreme78 on Jun 12, 2014 0:04:38 GMT 10
Hi Karen
The ceiling in the bedroom i replaced was easy. The surround from the hatch just slips into the hatch so it allows for a difference in thickness.
I have now removed the hatches as I was frustrated with them and seeking some light into the van from the roof. I fitted a zeki hatch in my old van and was impressed by its ability to let in light and the way you can close off the fly screen and block out shutter. I am going to fit a small one in the rear and a larger one in the front. The 4seasons hatches work but they are so 70's and I have done everything to stop water leaks from them but can't seem to stop them dripping water when it rains.
I am also giving the shower recess a birthday as the base was cracked. I then removed the wall panels. They were strips of plastic slotted together. Not sure what I will use to replace it with yet but have some ideas. Happy for others advise also. I am going to add checkerplate to the lower section of the van as that partof the van is very tacky. Should tidy that bottom section of the van and stop further damage to the van.
I am also going to do a rebuild on the plumbing as the copper pipes are all squashed and kinked on the bends so I will upgrade to PVC tubing with push in fittings. I am also fitting a mixer tap to the shower. To bring it up to the 20th century.
I am also going to fit tandem suspension under the van. I have the suspension from a franklin van I dismantled so it won't cost very much and the increased caring capacity will be handy. I intend to travel around oz in the future so I want to make it sturdy and reliable for extensive travel. I will be towing it with my landcruiser 60 series turbo diesel I am currently building also.
I will posts some pics as I get more done.
|
|
Deleted
Deleted Member
Posts: 0
|
Post by Deleted on Jun 14, 2014 18:21:12 GMT 10
Thanks for the answer to my ceiling question Paul, I've decided to leave my ceiling as is for now and just bog up the patches that I peeled off where they were water damaged. Perhaps in the future I will reline it. I've still yet to pay any attention to my four seasons hatch and I'm kind of dreading it to be honest, I hate to think of my van leaking after all the work I'm putting in so hopefully I can get it sealed well.
|
|
|
|
Post by supreme78 on Jun 15, 2014 16:00:57 GMT 10
People say the 4seasons hatches are a very reliable unit. I have only had a couple of caravans and the only one I have ever had water leaks with was the one fitted with 4 seasons hatches. As I also said I would rather some light from the roof as well. That's why I was keen to replace them with new hatches that would allow better air flow and light to enter. I also get frustrated with the way you have to open each separate hatch on the 4seasons hatch. Also the fact that they don't stop the cold air from coming into the caravan. The Heiki hatch is designed to let heat and gas fumes out of the van but don't let cold in when shut.
I am restoring my van to take on a trip around Australia so it needs to be functional and reliable is I am spending the money wisely to get a comfortable van that will also be reliable and usable. It will be traveling around the country in a few years time.
|
|
|
|
Post by Dean on Jun 26, 2014 22:21:46 GMT 10
Hi Paul we have the same van that we are fixing up as well and it seems as though the water pumps have been taken out so if you can would you be able to put pics of the pumps are located Thanks
|
|
|
|
Post by supreme78 on Jun 27, 2014 6:47:54 GMT 10
Well my old original water pump was in the kitchen cabinet in the lower section under the sink. It also had a charger and battery under there as well to run the pump and 12 v lights. I don't have pics as I have now removed all the plumbing to replace it with the new plastic stuff. You should see a pipe coming from the water tank into the cabin near that area. Then the outlet should tap into the copper near the front of the cupboard. I have now rebuilt the whole cupboard as it was damaged by water and battery acid from the old battery. I have moved all the charger and battery stuff to under the fridge in that cupboard and I might mount my pump under the van to retain max storage space. I am also replacing the instant HWS. It was working fine but they don't comply to modern standards and you have to wait a while for it to heat up and it wastes water waiting to warm it.
I would love to see some pics of the van. I haven't seen to many like mine with a shower. I lived in it for 6 months and it was very comfy.
I am making my old girl into a van to travel oz in the next 12 months so it's a full restoration/ upgrade.
Things like new roof hatches, new stove/oven new upholstery and floor coverings. New HWS and plumbing new shower walls and shower base. Solar and big batteries. New springs, axle and brakes. All new lights to led. Chassis strengthening. Full paint job in and out.
The list is quite large but I think she should be a good thing when finished. It will be modern classic theme.
|
|
|
|
Post by supreme78 on Jun 27, 2014 7:14:34 GMT 10
I have come across some serious engineering faults that require work on my old can. I will try to explain and add some drawings to show where the faults are.
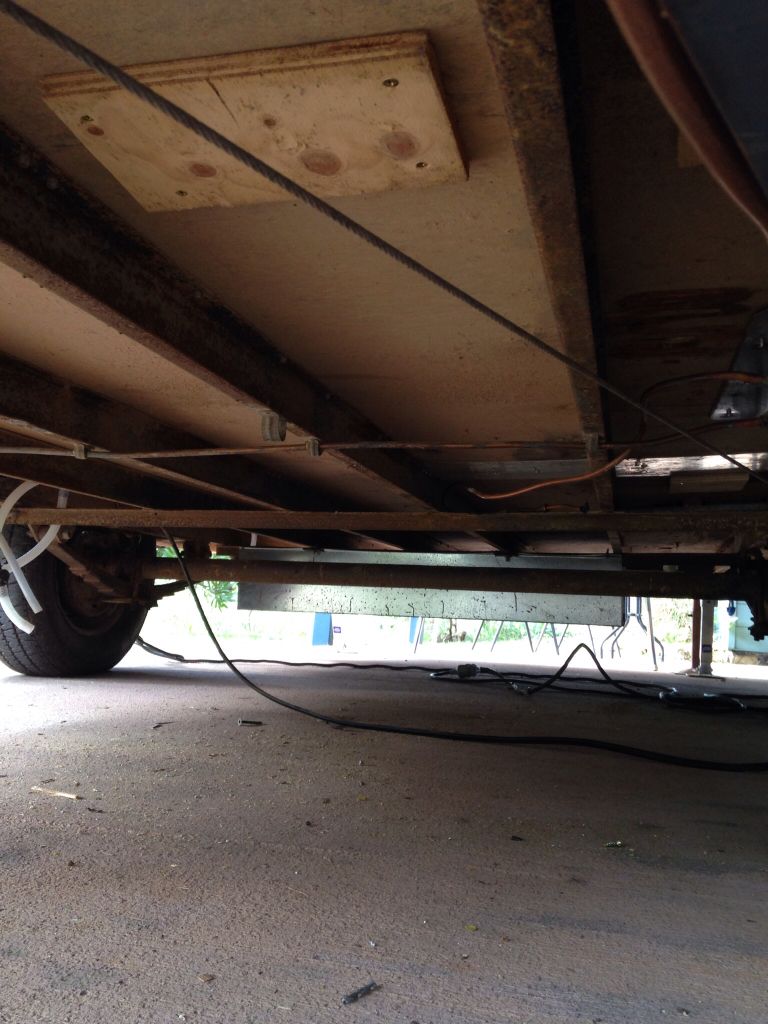
Firstly the chassis is made from 75x45x3mm c section the length of the van but the only cross braces are 2 small bits of angle near the water tanks and of course front and rear end. So where the springs attach to the chassis the rail has deformed upwards from all the road use. This caused the cupboards to be pushed upward in that area causing malformation in the lower sections of the cupboards. Still following? I will post a drawing to help explain in a minute. Then where the cupboards are mounted to the floor it's between the chassis rails so they have dropped down and sagged the ply in that area. I guess the roof and all sits on the cupboards so the whole top of the van is loaded on the ply between the chassis rails.
To repair I need to add strength where the suspension joins the chassis. To do thus I an adding another rhs along side the original one to add strength before a fit new suspension. I Will be adding cross members to the chassis in 2 or 3 sections to increase rigidity in the middle section. I will be stitching the draw bar into the chassis rails where possible to add strength. I will need to add steel cross rails under where cabinets mount to the floor to stop sagging of the ply.
I will post some pics tomorrow to explain. Some silly design faults here but I guess we had no cad software or the like back then.
|
|
|
|
Post by supreme78 on Jun 28, 2014 13:57:19 GMT 10
|
|
|
|
Post by supreme78 on Jun 28, 2014 14:02:44 GMT 10
 As you can see in this pic the rails go from front to rear with 2 small 30mm angle iron rails across near where the springs join the outer rail. The outer rail has deformed upwards due to road vibration it's only 6 mm but that has a serious affect on the internal cupboards condition and fittings. |
|
|
|
Post by ForumMod on Jun 28, 2014 17:41:32 GMT 10
Hmmm...interesting info. What is the actual tare weight of your van, do you know? I'm just wondering if the ensuite at the rear has a significant effect on the weight of the van, being at the rear end. Maybe your van should have had tandem wheels fitted, do you think? Or maybe the van has just covered some pretty hard miles during it's lifetime over rough roads??
cheers,
Al.
|
|
|
|
Post by supreme78 on Jun 29, 2014 3:25:59 GMT 10
It's a 16 1/2 ft van and I have never weighed it. I was thinking of fitting dual axles to it as I was going to trip around oz in it next year. I may have had a hard life but I think the engineering of the thing leaves a bit to be desired. Also if it's gross is 1300 kg then that's a lot on a single axle all the time anyway especially with unknown loads added to it in it's life. Plus 2 water tanks and 2x 9 kg bottles it would be on the limit or over most of it's working life.
It's a bit of a job to add dual axles but it would be a much better van to tow once complete. It could also carry more without any trouble. I have the suspension and chassis from a 18ft franklin I could fit to the old girl but it would take a bit of work. Not scared of the work or the changing of the suspension I just wasn't sure it was worth that much work.
|
|