|
|
Post by bobt on Sept 4, 2012 22:00:11 GMT 10
Gidday Al
Love the mounting brackets for the TV Antenna.
That spare wheel mount is not gunna move in a hurry. Real nice to have a brother that can weld well.
When is the next trip? Ya gotta test that new set of wheels properly
bobt
|
|
|
|
Post by kiwijim on Sept 4, 2012 22:03:52 GMT 10
Looking better every day Al, At least it appears to be fine weather over your side, We're copping Rain, Wind, Hail, Thunder and even Snow down on the Rangers, that's why there has been nothing done on the Coromal, I don't suppose we can expect anything flash for the 3rd Day of Spring but, this weather sure has knobs on it  The new aerial looks great Al, one suggestion I would like to make if poss, I would be using a Tie Wire ( PVC strap ) around the top of the aerial lead just below the aerial if I was you, just to stop it waving around in the breeze. I had a similar aerial a while back and the wind actually broke the cable at the connection point of the aerial through movement in the wind. Great spare tire mount there, that should help with the Ball weight, no end, it will be interesting to hear what the next test on the weight comes up with. kiwijim ;D |
|
|
|
Post by millard1399 on Sept 4, 2012 22:41:52 GMT 10
Thanks for the comments guys. ;D Yeah, kiwijim, I just had the cable flapping in the breeze for the photo, but when we're on the road (hopefully in October), I'll be using some velcro fasteners I've got, to tie the cable to the support pole in about four places down the pole. I'm aiming to make the whole kit reasonably easy for set-up and pull-down during our travels. Both my brother and I gave the spare wheel brace a good boot in both directions, and she ain't gonna move in any great hurry. Solid as a rock it is.  And yep, great weather here at the moment, but next two days are high winds and warmer temps, so any painting tomorrow will be a quick and nasty job.  cheers, Al. |
|
Deleted
Deleted Member
Posts: 0
|
Post by Deleted on Sept 5, 2012 7:27:21 GMT 10
hi AL. it is amazing the amount of work you have done on a van that did not need much, as it looked great from the start. you have to love some peoples idea of maintenance!! love the antenna job. cheers Gav
|
|
|
|
Post by millard1399 on Sept 10, 2012 16:47:04 GMT 10
G'day All, Got the spare wheel bracket all painted up... 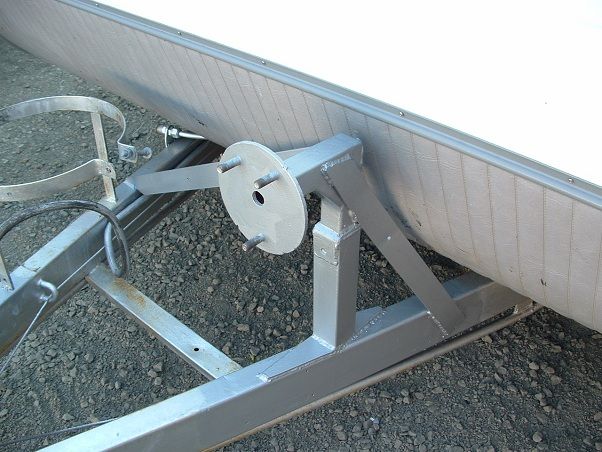 Next job was to fit a reversing camera on the rear of the van... 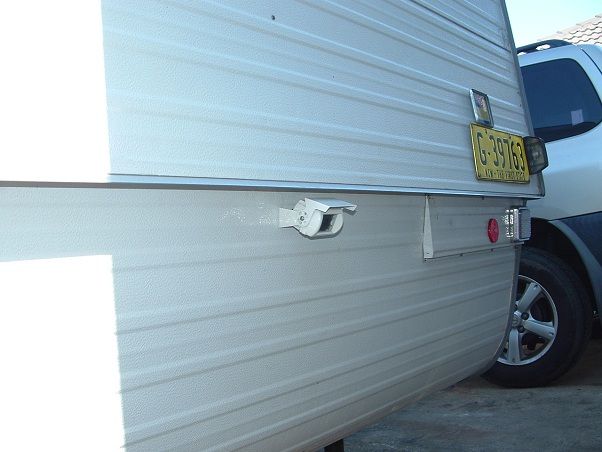 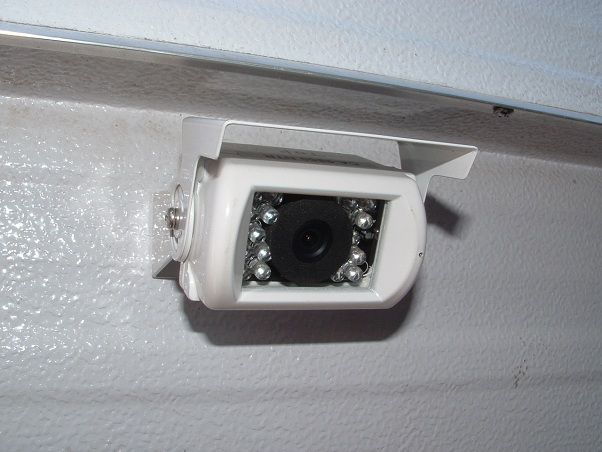 The rear camera that is on the Prado has made me real soft in my old age. "Can't understand how I ever did without one."  Makes hooking up the van a breeze compared with hooking the Millard up to the Mazda. So I figured a camera on the van would make reversing into park sites much easier as well. Only hassle was trying to get the camera cable down through the wall cavity at the back. Lying on your belly under an island bed with only 300mm of height is not real fun. I had to cut a "hatch" opening in the rear panelling, and then glue a small frame around the inside, so I could screw the "cover" back into position... 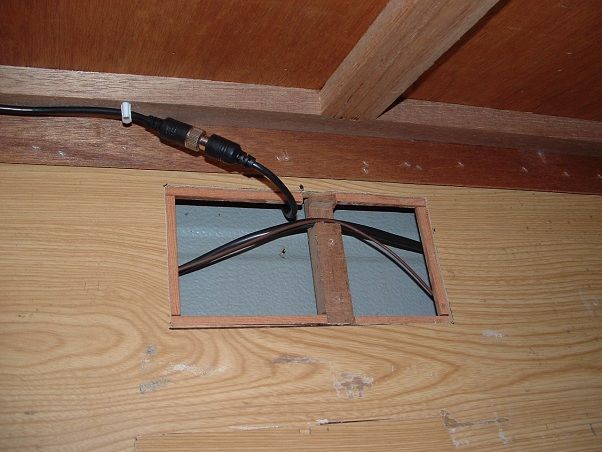 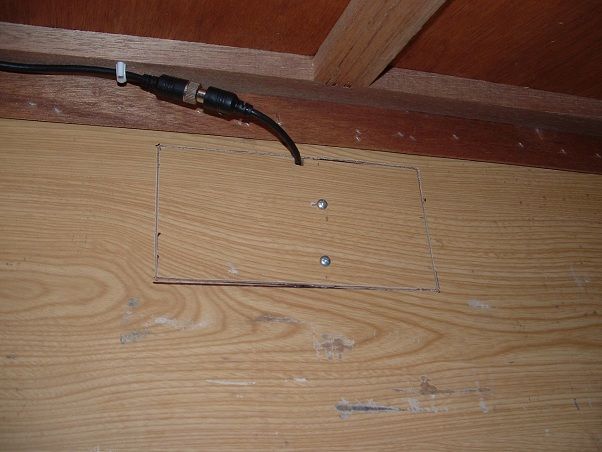 Then the joys of crawling along under the chassis to fix the cable. Reminds me of when I was under the Millard for weeks, painting the chassis ... 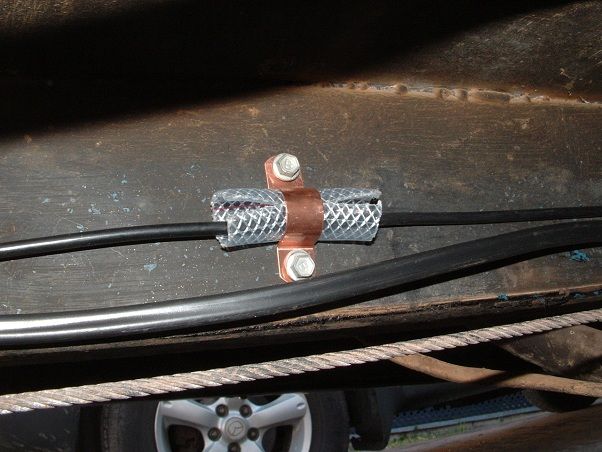 The last bit of fun was getting the camera cable through the drawbar arm. No easy way to do this, except take all the other wiring back out of the drawbar, and bring the whole lot through again. Big problem was that the hole below the coupling wasn't big enough for everything now, so a bit of time was spent filing the hole larger. The split conduit you can buy wasn't big enough to cope with all the wiring, so I cheated and used a metre of some waste water piping which is 27mm OD. I "split" it with a hacksaw along its length and it did the job perfectly ... 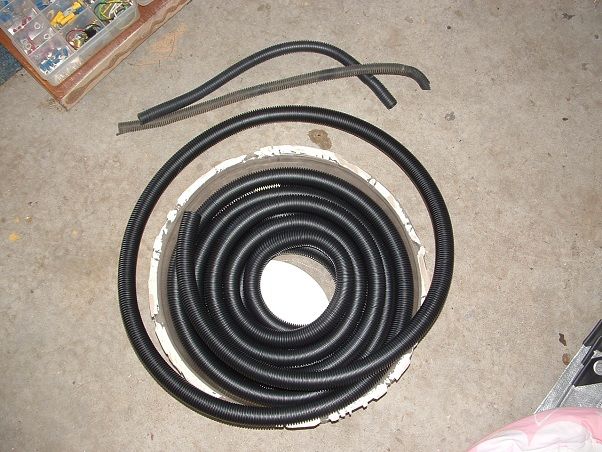 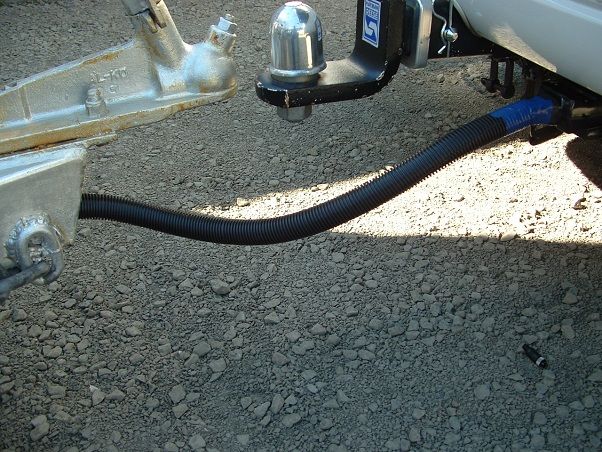 Now I gotta do something about relocating that blinkin' regulator for the gas bottle, to meet the new regulations. cheers, Al. |
|
|
|
Post by Caprinut on Sept 10, 2012 19:24:02 GMT 10
Al, C'mon show us the connectors for the rear camera as it worries me how to deal with all the plug-ins each time one camps out. Do you have power as well as video plugs and how do you waterproof them.
Pete
PS. you dropped the connector under the back bumper- where's the persian carpet?
|
|
|
|
Post by millard1399 on Sept 10, 2012 23:02:11 GMT 10
G'day Peter, The camera came from Brash Imports (you can Google them ). When I bought the Prado off my brother, it came with a 2-channel monitor, and a camera fitted above the rear numberplate, plus the cabling to the rear of the car for the second camera on a van (he kept the second camera since it was already fitted to his van ). When he bought the latest-greatest Prado diesel model, he had to go through the whole process of fitting the new car out like the old Prado was. This meant he needed a new monitor, car camera, etc. I piggybacked on his order and got a second camera, and the cabling, for the Windsor (and got a bit of a discount that way as well ). The cable is different to most you'll see listed on ebay, in that it's four wires all in the one cable/connector. The connectors screw together. The fitting on the ground in my last photo above is a spare end piece which screws on the end of the car cable when the van is unhitched. It protects the end of the car cable from dust/dirt, and this tucks inside the rear bumper bar housing for safekeeping. I'm aiming to make up a waterproof bag (probably out of canvas on the jumbo sewing machine) to house the 12-pin plug and van camera cable in, when the van is unhooked, and hook the bag over the quick-release lever on the coupling. (I'll post a photo when I get around to doing it.) My brother said he was talking to David Brash (of Brash Imports), and they are exploring ways of getting the camera cable through the 12-pin plug, so you don't have to disconnect the camera cable separately. Not sure when/if that will ever come to pass. cheers, Al. |
|
|
|
Post by Caprinut on Sept 11, 2012 18:02:23 GMT 10
Yep, that will make most peoples lives easier as cameras are a good thing and here to stay. I did purchase a camera for my Navman sat nav and that will plug in the back of the van but I pulled thru two lots of 2-core cable and have not fitted anything else as I am too busy dealing with the big picture ie towball weight and tow hitch. I saw an interesting post on some forum re wireless cameras which someday will be the norm but people kept picking up passing wi-fi spots and security camera images as they drove pass- boggles the mind.
Also they warn on my camera that it is not for continual operation, only occasional as when reverse is engaged so implies camera cant take constant power - still need to look into that, as I think a camera should be on all the time when one travels. Might fit a 12v on/off switch to dash to use camera when something at rear needs it whilst driving. What do you think, Big Bro
|
|
|
|
Post by Caprinut on Sept 11, 2012 18:15:05 GMT 10
Al, thought crossed my mind (rare thing he-he ) What about pin 8 -battery charger- which everyone rather uses a anderson plug to charge due to current drain, plus pin 9 aux- unused, plus pin 10 Fog lights , and pin 12- aux. That gives four pins to power and connect camera- only issue is taking the wiring on into the dash and camera screen under the tow vehicle. All do-able I think
Pete
|
|
|
|
Post by millard1399 on Sept 11, 2012 21:28:09 GMT 10
G'day Pete, Firstly the 12-pin plug... I think these need to be redesigned a bit to allow larger diameter wires to fit more easily into the terminals where necessary. I've got the electric brake wires now going through the plug (on the Mazda I fitted a separate Anderson plug), and the wire diameter just misses out fitting easily into the terminal. After soldering the end of the wires, I had to file them down slightly in diameter until they'd just fit in, and then there's very little screw thread available to screw down the holding screw. But I see your point in using some of the positions 8 to 12 for camera cables. I guess that would work if people didn't need those terminals for other things. We seem to be finding ways of adding more and more electrical stuff into our vans, so a 12-pin plug mightn't be enough in the years to come. And just by the by...I was reading an article recently that said car performance would be better suited if the electrics were a 48 volt system (see here ), so we might have to chuck all our 12V stuff away and buy new stuff in the years to come. The cameras...Yes, I'd also read about the poor performance of wireless cameras, but the reasons I read related to the large amount of metal (the caravan cladding between the camera and the monitor) interferring with the signal. Whatever the problems actually are, I do think there needs to be a significant improvement in their performance before they'll become accepted. I hadn't read anything about the length of time that cameras can stay on. The two different cameras I've got came with very little information about their operation. Basically you get a wiring diagram, and that's about it. I'll have to check out whether there's a time limit on leaving them on for. My brother wired the monitor up so it gets power when the ignition switch is turned on, and then he fitted an ON/OFF switch to the dash to activate the monitor picture. The monitor works irrespective of whether the transmission is in Reverse or not. I have a query about whether the "road rules" would allow a monitor to be on all the time while I'm driving. Is it like using a mobile phone while driving? (illegal here in NSW.) Is using a GPS while I'm driving illegal? All of them will distract my attention from the road at times, so I wonder whether the highway patrols will take a dim view of these in-car technologies.  cheers, Al. |
|
Deleted
Deleted Member
Posts: 0
|
Post by Deleted on Sept 12, 2012 6:54:28 GMT 10
hi AL. the boss just saw this post on the camera , great work . why can't we do that she asked ? guess who wins AL. cheers Gav |
|
|
|
Post by millard1399 on Sept 12, 2012 12:25:58 GMT 10
Sorry gav, didn't mean to create more work for you, ha ha! The new thread in the Techo Stuff section on cameras might be of interest to you. cheers, Al. |
|
|
|
Post by millard1399 on Sept 21, 2012 18:17:02 GMT 10
Another "improvement" job finished today... There was no light over the kitchen workbench, so the Boss wanted some extra lighting there. Managed to score a suitable light fitting from Bunnings on clearance. Step 1 was to glue some timber bases to the wall panelling, and feed some cable down to the existing power points... 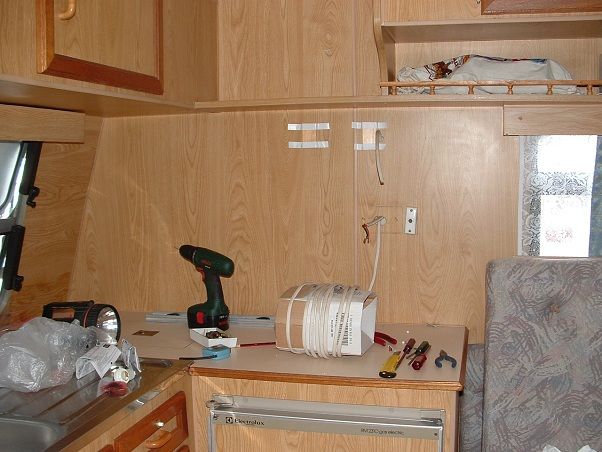 With a bit of lateral thinking, the redundant TV socket next to the power points was converted to a light switch. That saved a heap of mucking around trying to fit another switch in position... 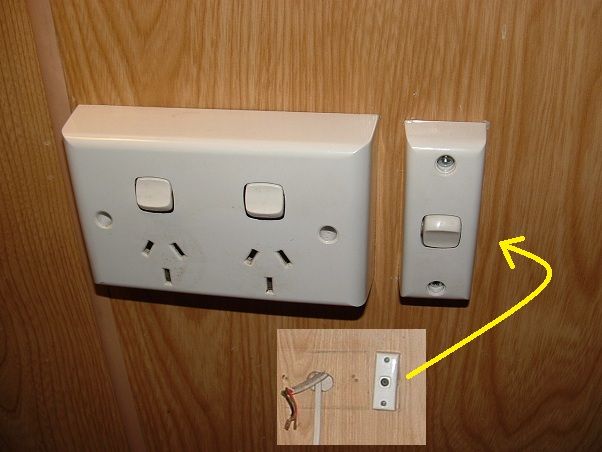 Light fitting in position... 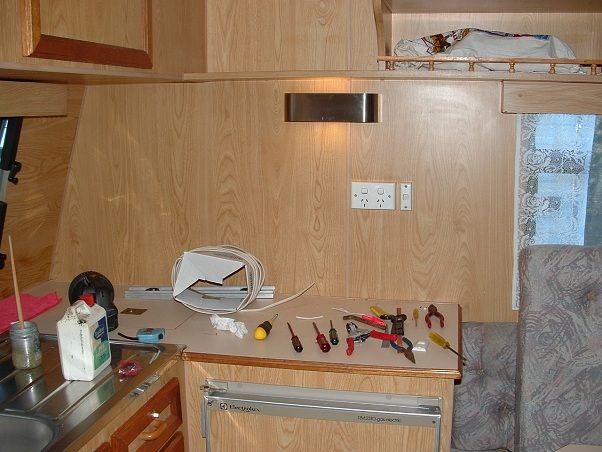 ...and tested...  Got 10 more brownie points from the Boss. ;D ;D cheers, Al. |
|
|
|
Post by drylander on Sept 21, 2012 23:16:58 GMT 10
Its started I see. Complete rebuild under the guise of improvements. Your goose is cooked Al
Pete
|
|
|
|
Post by kiwijim on Sept 22, 2012 2:41:56 GMT 10
Very nice Al, That van must be almost ready for the road by now.  Hey Pete, He will probably try to cook the goose and find the oven isn't big enough. You can guess what will then be the next improvement in his van, Can't Ya. ;D kiwijim ;D |
|
|
|
Post by millard1399 on Sept 22, 2012 16:41:36 GMT 10
G'day fellas, Speaking of getting your goose cooked ... I spent a bit of time today checking some of the electrical circuit in the van. There were a couple of discoveries that concerned me: #1. The light and fan switches on the rangehood... 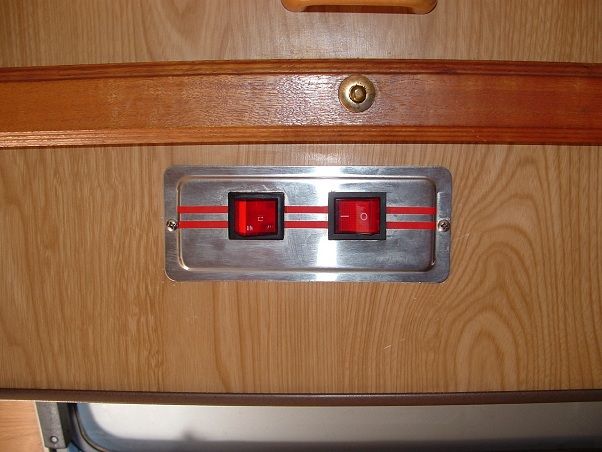 ...are fed from a master switch on the wall... 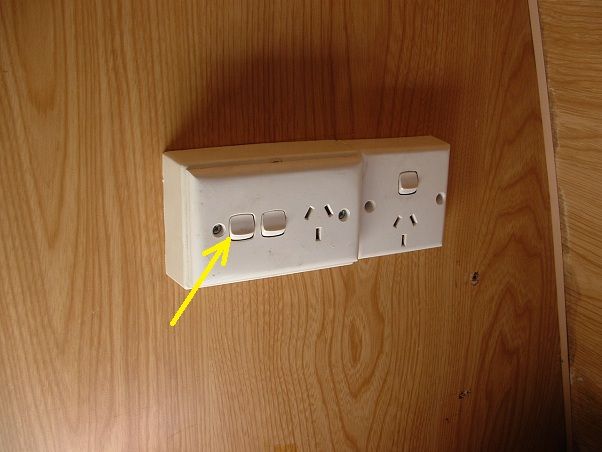 This powerpoint isn't original, and has been fitted by somebody since the van was built. The wiring in the master switch had been connected so the rangehood switches were getting power all the time, even though the master switch was in the OFF position. Problem was that if I activated the rocker on the switch, the electricals were short-circuited and the safety switch in the van was popped. Needless to say, the master switch had to be rewired the correct way. #2. The second problem found was the 240V outlet on the awning side of the van... 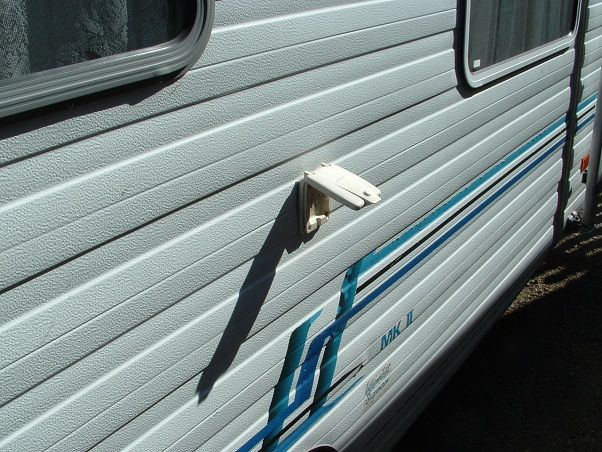 This outlet was found to be permanently LIVE when power was connected to the van. It's just at the right height for kiddies to reach, not to mention anybody plugging something into it and discovering it's already "live". I couldn't find any switch around the van to isolate the outlet, so I set about trying to find where it got power from, and traced it to the power point down beside the bed inside the van...  Again, needless to say, something has to be done about this, and a double-pole isolating switch will be installed next to that bedside powerpoint. Ain't no way this goose is gonna be cooked! cheers, Al. |
|
|
|
Post by kiwijim on Sept 22, 2012 19:48:47 GMT 10
Howdy Al, That is a bit of a worry about the way the range hood lights were done, sure must have been a Back Yard amateur. That is the usual position for the isolating switch but, it is meant to isolate the Range Hood completely. As far as the external power point goes, I agree, it can be a danger to little People. These Power Points have been wired up straight to a live wire for years and are permanently live if the van is connected to a Power sauce. I have often wondered how this set-up ever got approval with-out some internal isolating switch. You are doing a wise thing by killing to power to the plug, you just can't be too safe with any small kids around, or stupid adults for that matter. Keep going Mate, you've covered 99% of the van now, can't be much more, except a quick polish on the inside of the wheel trims. ;D ;D ;D kiwijim |
|
|
|
Post by millard1399 on Sept 22, 2012 21:42:22 GMT 10
kiwijim, the power point with the rangehood isolating switch is just a standard household single-pole one. Somebody has fitted a mounting block to the wall, and then put the powerpoint onto it. I can see the outline of the original factory powerpoint behind the mounting block. I'll have to see if I can pinch a proper double-pole one out of another Windsor van when the owner is not looking. It doesn't seem like the level of quality in caravans made any huge leap from the 1970s to the 1990s. I can't see any evidence of insulation in the wall cavity around any of the power points I've taken out. There was none in the lower rear section when I had to feed the camera cable down there. But there is fibreglass insulation in the ceiling, right up to and around the ceiling light fittings when I took them out for a check-up, so at least they didn't skimp on that. The other difference I've noticed between the Millard and the Windsor is the use of laminex protective coverings in the wall cavity at the back of all power points or switches. In the Millard, everywhere the cable went through the wall panelling, there was a laminex cover to protect the exposed wiring. It was there originally, and I made replacements for the restoration... 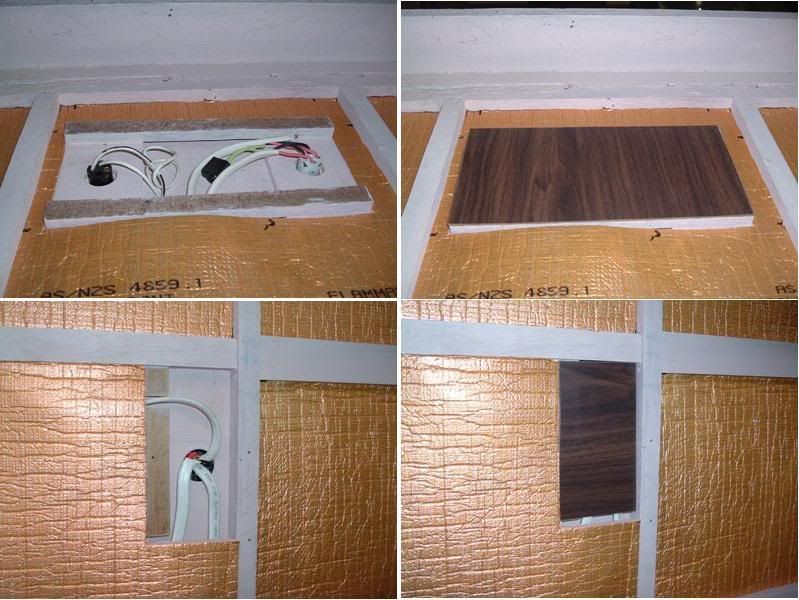 No such attention to electrical safety detail is evident in the Windsor, although now knowing the outside 240V outlet is not able to be isolated, it doesn't surprise me to see the lack of attention to detail. And yep, 99% of "fix-up" jobs have been completed. Just waiting for my brother to fabricate the new support stand for the gas regulator, to locate it higher than the bottle outlet. Then he has to weld the stand on the drawbar, and I get to paint it up. We're aiming for a decent road test of the Prado/Windsor combo over a couple of weeks during October, so all these fiddly little jobs I'm currently doing have to be completed in the next week or so. cheers, Al. |
|
|
|
Post by bobt on Sept 23, 2012 21:50:55 GMT 10
Hey Al someone sure has been a tampering with them powerpoints . The little white plugs that cover the screws are missing.. That powerpoint with the switch at the top, the one next to the power point with the master switch, is an after thought. My Windsor did not have one, just the power point with the master switch. (was that confusing enough?? ) Yep the power point outside.. its live.. even on new vans.. Pleased to say none of my kids ( can I reconsider the pleased bit) or my grand kids have ever stuck anything inside that power point.. It would be nice to have a switch inside to be able to turn it off without turning everything else off. Love the light.. just perfect for you when your doing the cleaning up after dinner. When I was poking wires inside the wall of mine I don't rightly recall any insulation in the wall but I certainly remember the roof was insulated. bobt |
|
|
|
Post by kiwijim on Sept 24, 2012 3:16:48 GMT 10
I wonder if anyone realises the reason why they no longer have conducted tours through the Caravan assembly plants. The official reason is...... safety. I think a lot of us know better ;D ;D ;D kiwijim |
|
|
|
Post by millard1399 on Sept 24, 2012 21:23:46 GMT 10
Righto...big day today! We now have a double-pole isolation switch fitted, to operate the 240V outlet on the awning wall... 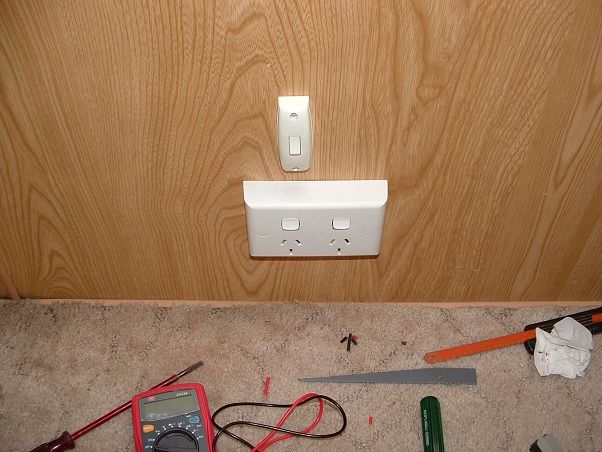 A new water tap fitting has been put on the drawbar. The original galvanised fitting was showing signs of rusting... 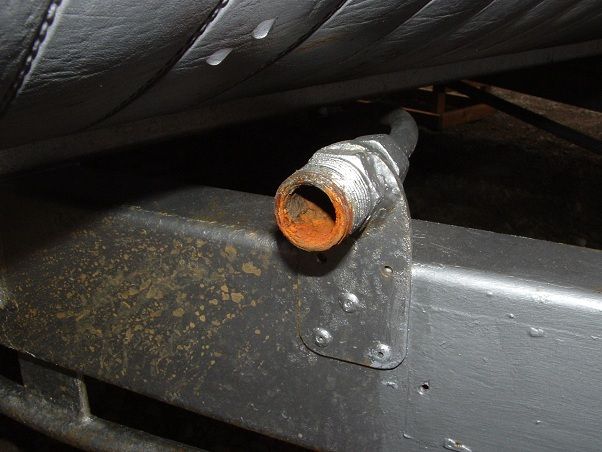 ...so that was all taken off and a new bracket fitted... 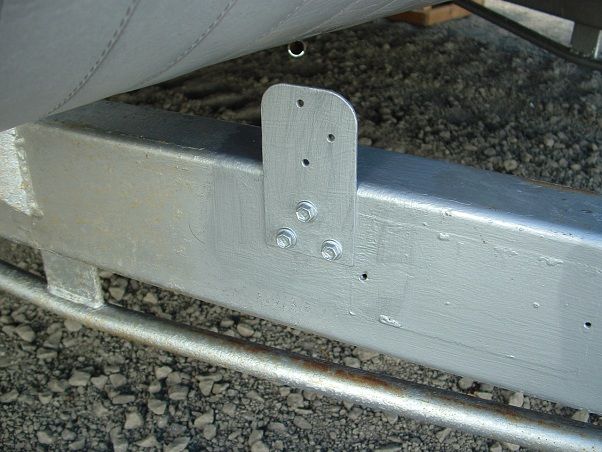 Then I got to play with my old pipe-bender again. Haven't played with it for yonks... 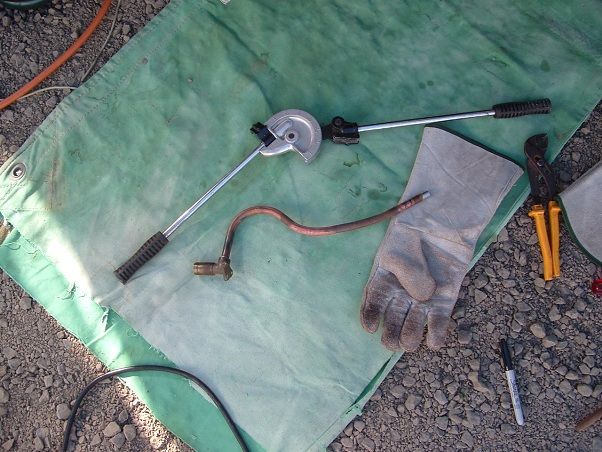 Now we have a good quality brass fitting to attach the hose to... 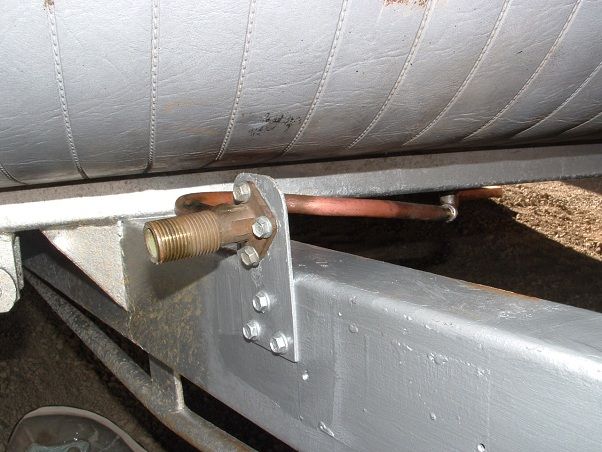 And then to round off the day, my brother appeared late this arvo with the gas regulator stand, and welded it into position... 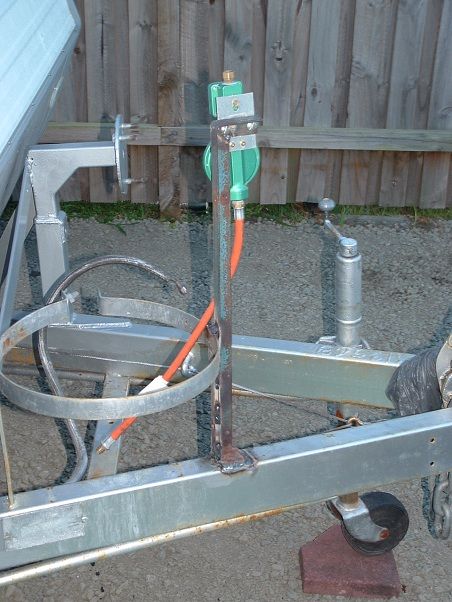 Looks like I'm back on the paint brush again tomorrow  cheers, Al. |
|
|
|
Post by millard1399 on Sept 25, 2012 16:52:00 GMT 10
Painting, painting, painting... Followed by another little job... When we bought the van, the original TV cable socket on the outside wall was missing... 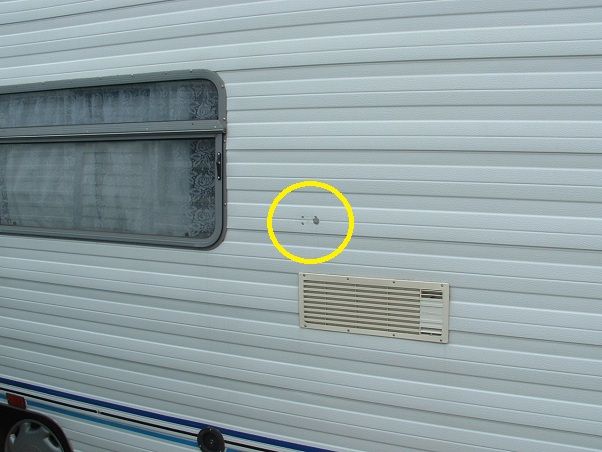 ...so I just plugged the holes up with mastic sealant, until I worked out what to do about it... 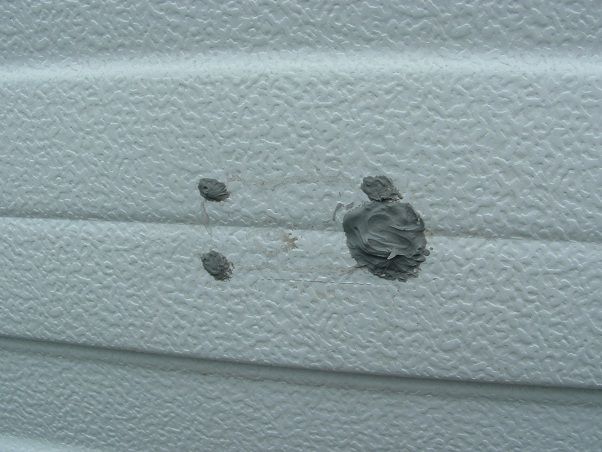 Yesterday in Bunnings, I found a white aluminium louvre (or vent) that was just the right size to cover the holes... 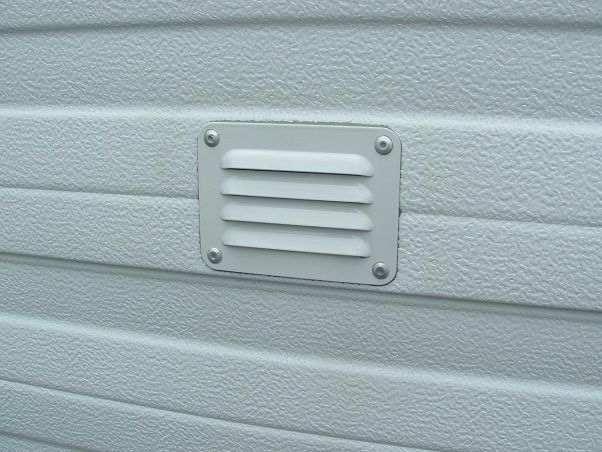 You would think it's been there ever since Day1, yeah?... 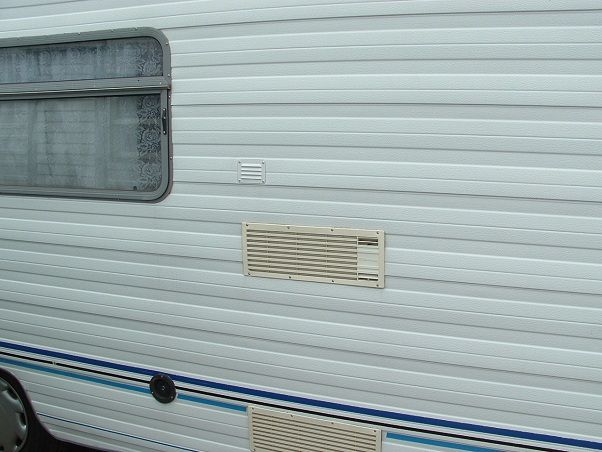 I meant to add some photos in last week when I was talking about fitting the rear camera on the van. I pulled all the rusty staples out of the bottom of the rear cladding, hoping to get the camera cable up into the wall cavity. No such luck, because the van floor extended right to the cladding at the rear. Bummer! So I nailed the cladding back into position with galvanised nails. But before I did the nailing, I put a strip of polyethylene flashing between the cladding and the timber strip, with half of the flashing hanging out... 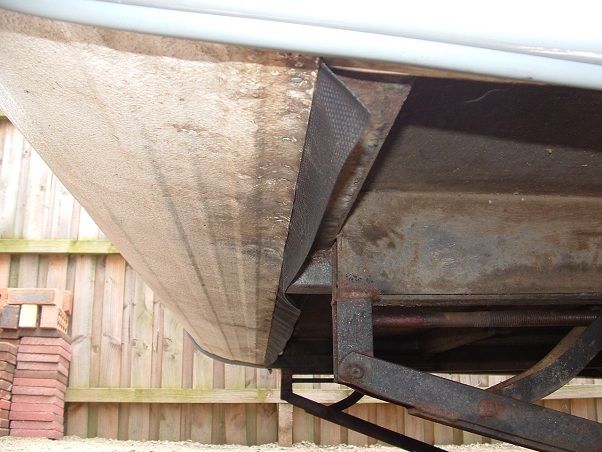 My logic is that water running down the back of the van will be deflected by the flashing onto the ground, rather than onto the steel chassis at the end of the cladding. Hopefully it will help stop rusting of the chassis over the years. This polyethylene flashing is available for about $10 for a ten metre roll, from good hardware stores... 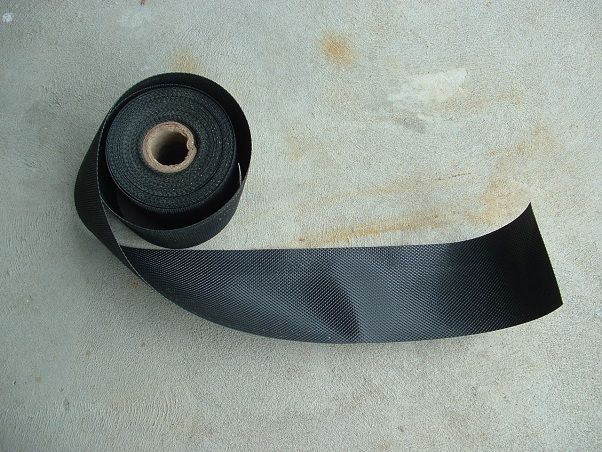 cheers, Al. |
|
Deleted
Deleted Member
Posts: 0
|
Post by Deleted on Sept 25, 2012 21:16:13 GMT 10
Hi Al No question or doubt in my mind ;D Your an ideas man.  Great work on the van. Kindest Regards Steve |
|
|
|
Post by kiwijim on Sept 26, 2012 10:38:04 GMT 10
Say Al, If you find that you have run out of things to do on your van, I reckon those Jack Legs, would look good if they were wire brushed and given a couple of coats of Spray Crome. A bit like a "Bird" wearing a Mini Skirt in a Caravan Park, Everyone will notice good legs and they stand out for everyone to Google. ;D ;D ;D Cheers kiwijim |
|
|
|
Post by bobt on Sept 26, 2012 21:33:37 GMT 10
WOW and so the improvements continue.
When does it hit the road for its maiden voyage?
|
|