|
|
Post by viscountofmydomain on Jan 20, 2012 21:25:00 GMT 10
Hi all, I'm new to your site, I've just purchased my first caravan, an early 70's Viscount Ambassador, Dauralvan. I don't have the exact detail of it's year so if anyone can help pin it down it would be helpfull. I'm planning on a resto/refurb of it, mainly trying to make it comfy and add some modern conveniences. Here is a pick. 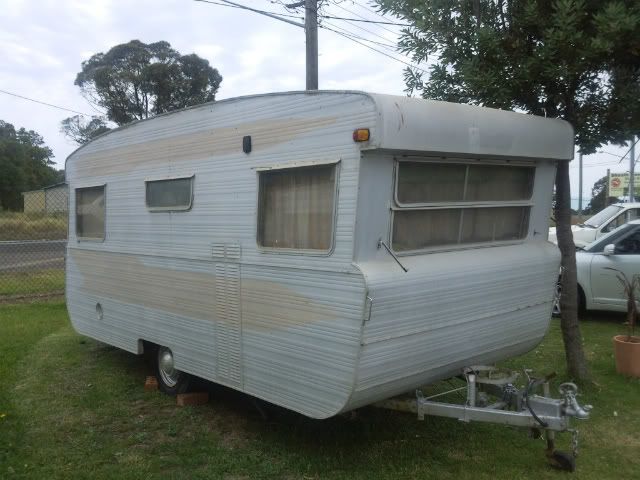 Does anyone have an ideaon how to pin down what year it was made? |
|
|
|
Post by viscountofmydomain on Jan 20, 2012 21:27:40 GMT 10
Also it is a Duraliminium van that was in a raw ally finish, does anyone have experience or reference to someone that does in restoring (polishing) the duraliminium? I am trying to decide on whether to paint it or polish it.
|
|
Deleted
Deleted Member
Posts: 0
|
Post by Deleted on Jan 21, 2012 8:04:09 GMT 10
|
|
|
|
Post by millard1399 on Jan 21, 2012 21:30:32 GMT 10
G'day v-o-m-d, and welcome to the forum! ;D Your Ambassador is approximately a 1966 model. On the front drawbar, just beside the jockey wheel clamp, there should be a chassis number welded there. Can you tell me what that complete number is please? It will be the letter "E" followed by some numbers. The numbers will tell me for sure whether the van is a '66 model. I wouldn't bother painting or polishing the outside of the van. You could try cleaning a small area of the cladding to see how easy it is to get the oxidised layer off, which will make it look considerably brighter, particularly on what's left of the painted stripe on the side. Just use soap and water and a nylon scourer, or maybe some of that cream cleanser and a nylon scourer. Polishing a van once means polishing it on a regular basis forever after. No real gain in having a shiny van, unless you like the look of sparkly things. Spend all your time and dollars making the inside like a "palace", and leave the outside looking like it's a 50 years old van (which it almost is). You'll fool everybody that pulls you up for a look.     cheers, Al. |
|
|
|
Post by viscountofmydomain on Jan 22, 2012 9:35:51 GMT 10
Thanks for the welcome, I'll check it out. G'day v-o-m-d, and welcome to the forum! ;D Your Ambassador is approximately a 1966 model. On the front draw bar, just beside the jockey wheel clamp, there should be a chassis number welded there. Can you tell me what that complete number is please? It will be the letter "E" followed by some numbers. The numbers will tell me for sure whether the van is a '66 model. I wouldn't bother painting or polishing the outside of the van. You could try cleaning a small area of the cladding to see how easy it is to get the oxidised layer off, which will make it look considerably brighter, particularly on what's left of the painted stripe on the side. Just use soap and water and a nylon scourer, or maybe some of that cream cleanser and a nylon scourer. Polishing a van once means polishing it on a regular basis forever after. No real gain in having a shiny van, unless you like the look of sparkly things. Spend all your time and dollars making the inside like a "palace", and leave the outside looking like it's a 50 years old van (which it almost is). You'll fool everybody that pulls you up for a look.     cheers, Al. Thanks Al, you are very good on the id of it's year, sounds like you are on the right track, the ID number on the draw bar is E1308. What year do the numbers indicate? Thanks for the advice on the resto of the exterior, I agree with the polishing, it will be constant maintenance. It will depend on how well the exterior cleans up. I am not after something that is a true or classic resto, just something that looks smart, so paint might be the answer. |
|
|
|
Post by greedy53 on Jan 22, 2012 16:10:37 GMT 10
there is a van cleaner that is available at barnes caravan parts at lansdown sydney i have used it great for old aiium vabs takes the power of and leaves it shiny don't ask me the name can't remember
|
|
|
|
Post by millard1399 on Jan 22, 2012 18:25:54 GMT 10
G'day again v-o-m-d, Is your chassis number definitely E1308, and not E 2308?? I've got photos in my collection of an Ambassador with the chassis number that's supposedly E2302, and it's got the 1965 side stripe design on it. Maybe the first number should have read '1'. The Ambassador model was first launched in late 1964. For about the first six months, they apparently were given a 'D' series chassis number, then for some reason Viscount changed and started giving them an 'E' series chassis number. All the Ambassadors from 1965 up to the start of the 1970s have a chassis number starting with E, and the numbers just kept ticking over consecutively as each chassis was built. I've got photos of a very early 1970s Ambassador, and its chassis number is up at E10033. Here is a photo taken at the Sydney Caravan Show in 1966, and it shows the same painted side-stripe design as is on your van... 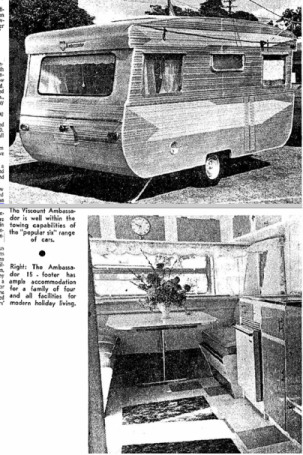 Viscount tended to introduce a new model each year to coincide with the Caravan Show, which means a particular model would be built from one show to the next. Therefore a 1966 model would have been built anytime between the Caravan Shows in 1966 and 1967. To correctly identify your van, you have to talk in terms of it being a "1966 model", rather than say it is a 1967 model if it was built in early 1967, for example. It's the design of the painted side-stripe pattern that distinguishes the model years, not the actual date of build. Can you double-check your chassis number for me please? If yours is correct, then the other one in my collection must be an error. cheers, Al. |
|
|
|
Post by viscountofmydomain on Jan 23, 2012 7:39:28 GMT 10
Hi Al
You are obviously a font of knowledge, your scanned catalogue pages have helped me answer another question, I was surprised the rear window has a rubber seal and the rest are aluminium, i thought it was an aftermarket replacement. I now know it is standard from factory. Our interior is also the same as in the brochure. Fantastic thank you, any more factory info you have would be great to see.
I am not able to confirm the number for you at present, I am storing the van 1/2 hour south while i wait for my wife's birthday (I'm going to surprise her with a rather shabby looking van). The chassis number I am using is from the purchase receipt.
|
|
|
|
Post by viscountofmydomain on Mar 6, 2012 22:44:48 GMT 10
I have surprised my wife with her new van, she was very impressed, now she wants to use it. The van isn't registered so It will need a blue slip, the work begins.
The van interior is in surprisingly good condition, everything is original looking and in reasonable condition, our plans are to replace all the soft furnishings, cushions and blinds, get the van road worthy and then use it, which will involve weekend trips down the NSW southcoast. Further work on the exterior and interior can be done on the vans down time.
The interior on the day I purchased the van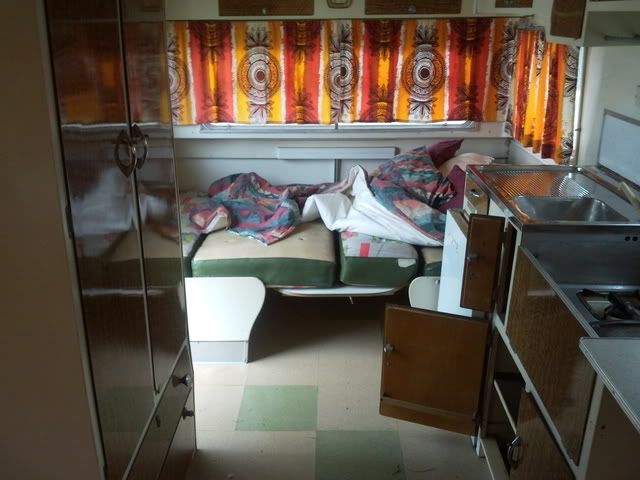 and and 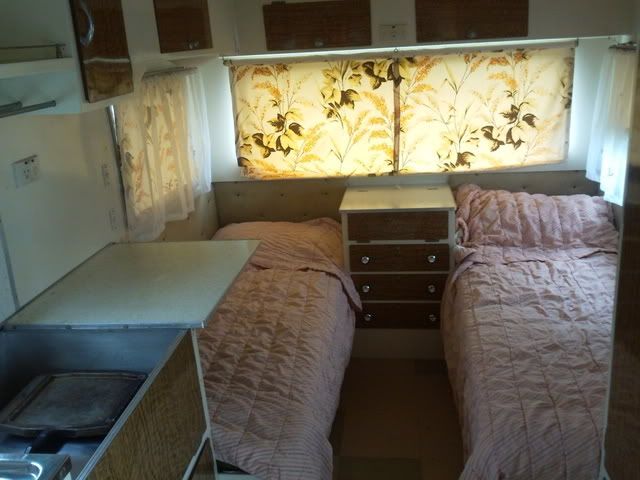 Here is a pic for for Al (millard1399) of the serial number Here is a pic for for Al (millard1399) of the serial number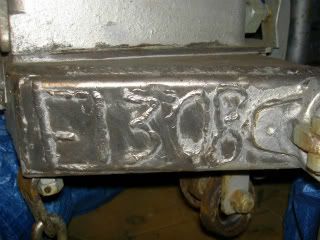 Job number #1 Job number #1
Clean up the chassis, axle, brake backing plate and drum and leaf springs. Everything is covered in surface rustBefore: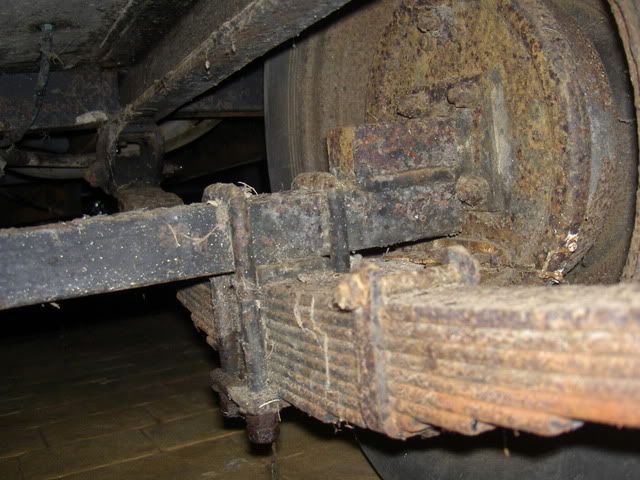 After: After: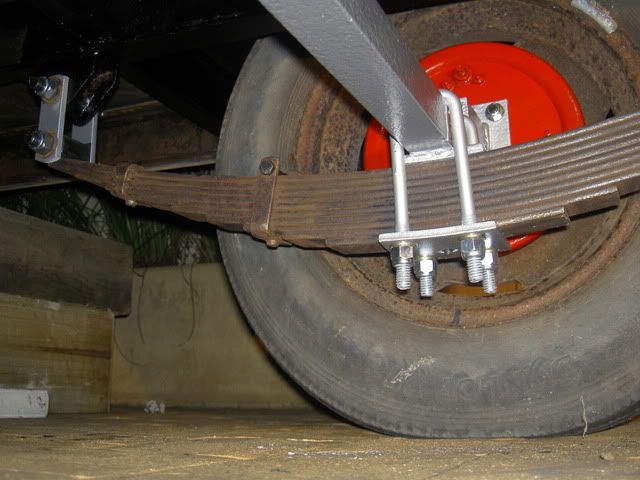 I have new Sunraysia rims and tyres on order. I have new Sunraysia rims and tyres on order.
Job #2
Get the tail lights working. When I pulled the lens cover off, the bulbs were floating around in there. New LED tail lights are on order. For now the side lights are working so they can stay as is until I have finished spending money on the necessities.
Job #3
Remove the gas plumbing. The van came with a 2 way fridge (gas and 240v) it doesn't work so it's out. Whilst the cooker is in very good condition we can't see ourselves using it, we have a microwave for that spot and a BBQ for outside cooking. With no gas it's one less thing to worry about for the blue slip. We are in the market for a 240v fridge if anyone has any suggestion it would be a great help, it seems on my searches they are either too tall or that small that I feel like I will be wasting valuable space.
Job #4
Replace the buggered jockey wheel. A new one is on order.Job #5
Remove the perished water tank. The tank had a few bodgy looking repairs where someone had tried to reseal it around the fittings, a slight push on them and it was in pieces. So the water tank is gone also. For now we don't think we will need the tank, we will be staying on powred camp sites so will use the supplied mains water. The plan here is to fit a mains pressure hoses to the van and replace the hand pump tap with a conventional mains pressure tap.
So far thats where we are up to.
|
|
Deleted
Deleted Member
Posts: 0
|
Post by Deleted on Mar 7, 2012 7:56:20 GMT 10
 Al! Is that a clock I see?  |
|
|
|
Post by viscountofmydomain on Mar 7, 2012 17:46:27 GMT 10
Do you like clocks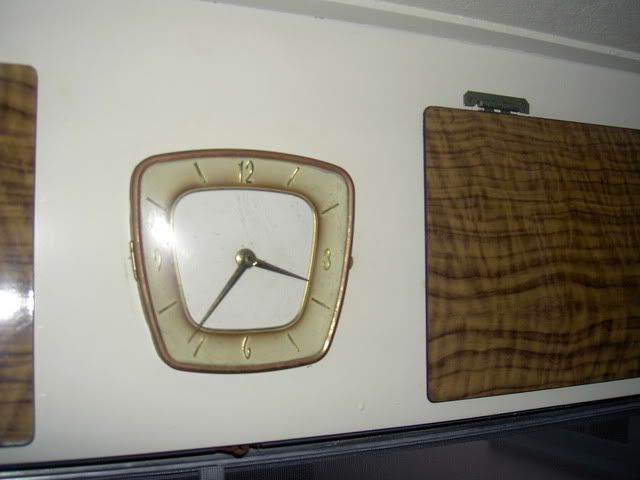
|
|
|
|
Post by viscountofmydomain on Mar 7, 2012 17:53:15 GMT 10
Had a minor set back today, the Sunraysia rims turned up. The tyre mob I was using measured my original rims and ordered early holden pitch rims. They didn't fit, after giving them another go at measuring the old rim they have realised they got it wrong, they are an early Valiant rim and they say no one makes a rim with the early valiant PCD.
I might be changing my hubs. Has anyone found a replacement wheel with the early Valiant pitch, it's something like 102mm 5 stud.
It's a pity because those Sunraysia's looked good.
|
|
|
|
Post by greedy53 on Mar 7, 2012 18:03:20 GMT 10
nice yep nice
|
|
Deleted
Deleted Member
Posts: 0
|
Post by Deleted on Mar 7, 2012 20:00:44 GMT 10
G'day VOMD, A little while ago, inthis thread, we were having a discussion of wether Ambassadors had clocks fitted or not ...     Yours is the SECOND example of one fitted to an Ambassaodor ... congratulations!!!! ;D ;D ;D ;D ;D ;D ;D ;D ;D ;D ;D ;D ;D ;D ;D ;D ;D Same clock in the same postion too Al! Cheers Doug |
|
|
|
Post by viscountofmydomain on Mar 7, 2012 20:35:07 GMT 10
G'day VOMD, A little while ago, inthis thread, we were having a discussion of wether Ambassadors had clocks fitted or not ...     Yours is the SECOND example of one fitted to an Ambassaodor ... congratulations!!!! ;D ;D ;D ;D ;D ;D ;D ;D ;D ;D ;D ;D ;D ;D ;D ;D ;D Same clock in the same postion too Al! Cheers Doug Ok I was wondering what it was about. The guy at the caravan place That I bought it from reckoned that he could identify the year of the van by the style of the clock, he thought it was an early 70's so he was way off track. |
|
|
|
Post by millard1399 on Mar 7, 2012 20:44:57 GMT 10
Yeah, well, that's it...case dismissed! Ambassadors DID have clocks in the 1960s. (And phooey to all those people out there that doubted it!   ). |
|
|
|
Post by Caprinut on Mar 8, 2012 21:07:59 GMT 10
VOMD,
Your leaf springs look very robust, 10 leaves plus the stub axle on top of the 45m bar.
This is similar to my Capricorn75 and apparently bigger than the norm. I was thinking of turning the axle 180 degrees to gain more height as the clearance in the wheel wells is not very generous. What do you think? Can brakes operate at any angle. Also I cant see your hydraulic lines , are they missing?
Good spruce up job you did.
Peter
|
|
|
|
Post by viscountofmydomain on Mar 8, 2012 21:43:58 GMT 10
VOMD, Your leaf springs look very robust, 10 leaves plus the stub axle on top of the 45m bar. This is similar to my Capricorn75 and apparently bigger than the norm. I was thinking of turning the axle 180 degrees to gain more height as the clearance in the wheel wells is not very generous. What do you think? Can brakes operate at any angle. Also I cant see your hydraulic lines , are they missing? Good spruce up job you did. Peter Hi Peter According to my local trailer shop the springs are longer than usual too, it will be interesting to see how it tows. I'm no expert on brakes so wouldn't like to advise on whether they will work upside down. On my stub axle the mounting holes are symmetrical so if you rotated the axle 180 degrees you would still be able to mount the brakes the original way up. If yours is the same you might not need worry about them being upside down. My hydraulic lines aren't missing cause they aren't hydraulic brakes, just cable operated. That said they are about to be replaced with new baking plate and drum because of the valiant stud pattern and lack of availability of wheels. Stu |
|
|
|
Post by Caprinut on Mar 8, 2012 22:10:10 GMT 10
Yep I dont know how good cable brakes can be. Ive decided to replace with electric brakes but ironically I also am using Sunrasia rims which I bought as the first item of my restoration 3 rims and new tires so I am stuck with using drums to fit the rims. Five stud 65mm between studs which I think is Ford rims, still need to check my specs on that before I order new drums and backing plates.
Fun and games!
|
|
|
|
Post by Rattles on Mar 9, 2012 10:09:00 GMT 10
Are you sure about the distance between the studs, Ford has a PCD of 4.5" converting 4.5" comes to 114.3mm
|
|
|
|
Post by Caprinut on Mar 9, 2012 22:19:33 GMT 10
Now I am totally rattled- Heh heh.
According to Marshall Engineering site 65mm stud to stud is Holden HT with 7/16" studs. Ford is 68mm stud to stud with 1/2" unf studs. Will have to check with thread guage in morning.
So where does 114mm come from?
Peter
|
|
Deleted
Deleted Member
Posts: 0
|
Post by Deleted on Mar 10, 2012 9:15:46 GMT 10
Peter PCD stands for Pitch Circle Diameter which refers to the diameter of a circle drawn through the centre of all the studs... This site might helpCheers Doug |
|
|
|
Post by viscountofmydomain on Mar 25, 2012 10:56:03 GMT 10
I am in the middle of changing the trailer plug from a six pin plug to a 7 pin flat. And have a question on the earth.
I have found that the 6 pin round had the following wires. (by checking continuity of the wires to there locations)
Lh indicator
RH indicator
Stop
Tail
12v positive (for interior lights)
earth (this earth only goes to the interior lights. there is no continuity from this earth to the caravan chassis which is the earth that the remaining lights use).
So I if the chassis is the earth for the tail lights and the earth wire coming from the 6 pin plug doesn't go to the chassis, how does the chassis get its earth?
And, when I wire in my 7 pin plug can I simply jump my earth wire to both the 12v interior light earth and the chassis?
The thing about this is the earth for the 12v interior lights will then be the chassis of the van and I am not sure if this is the done thing, that said the source of both earths will be the car battery so I don't see how it will make any difference.
To add to the confusion all the wires are white in colour.
Stu
|
|
|
|
Post by millard1399 on Mar 25, 2012 13:31:21 GMT 10
G'day VOMD, Manufacturers would typically run the (white) earth lead from the coupling plug to the nearest light, usually a clearance light at the front either side. Then the rest of the lights would rely on the aluminium cladding to be the earth. Since the cladding is fixed to the chassis along the bottom, eventually all the lights would be earthed to the chassis. The problem with this set-up is that the connections between light fittings and the cladding, plus the cladding and the chassis, can become a bit dodgy with corrosion over the years. Screws rust; rivets bust; connections become a bit "iffy". I think there's a lot of merit in having a dedicated earth lead to each individual light, which is then wired back to the earth lead in the tow plug. I was able to do that during the restoration of my Millard poptop, but only because I stripped all the cladding off it anyway, and could access all the wiring. It's rather unusual to find all the wires in white plastic. Sounds like somebody did a bit of slack workmanship at the time of building. Maybe you got a "Friday van" when they were all rushing to finish up to go to the pub.   cheers, Al. |
|
|
|
Post by viscountofmydomain on Mar 25, 2012 13:49:57 GMT 10
Thanks Al
I'm not sure where the van body is earthed from as there seems to be no connection between the earth wire that goes to the 12v interior lights and the body. I have found an earthing wire to the chassis but it has no continuity to the wires of the 6 pin plug. My six pin wiring loom disappears into the wall cavity which I have no intention of dismantling.
I plan on splitting the earth wire from my new 7 pin plug to go to both the 12v interior lights and a new chassis earth that I will run.
|
|