Deleted
Deleted Member
Posts: 0
|
Post by Deleted on Oct 21, 2011 11:49:00 GMT 10
Hi M43322,
Thanks for the info on prestik sealing strips - looks like it will be just the shot - and less messy than liquid sealant. I've downloaded the product sheets and will look into it.
Regards
bobbie
|
|
Deleted
Deleted Member
Posts: 0
|
Post by Deleted on Nov 1, 2011 19:40:34 GMT 10
Hi Al, I decided to attack the van windows on the weekend and ran into the problems you warned about earlier. As the window frame seals to the body appeared OK, I wanted to save some time so I decided to replace the glazing wedges and clean up the glass. As the two bottom self tapping screws were seized on most of the sashes - I went for the top two screws and removed the glass. This seemed logical as most of the pop rivets were shot. 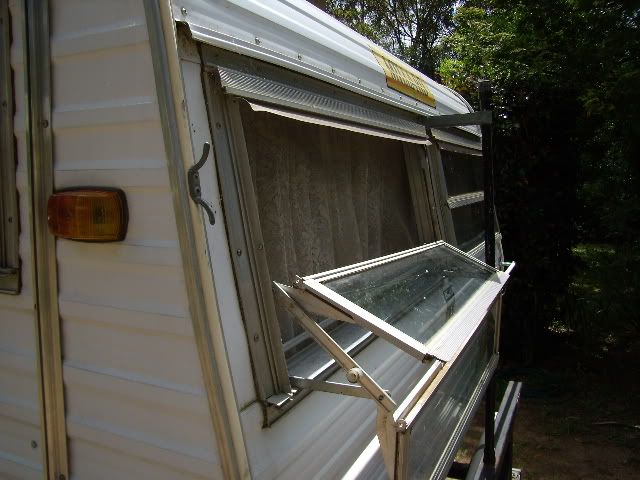 the pop rivet gun was a tight fit as was the last pop rivet which I kept missing - but after four tries... 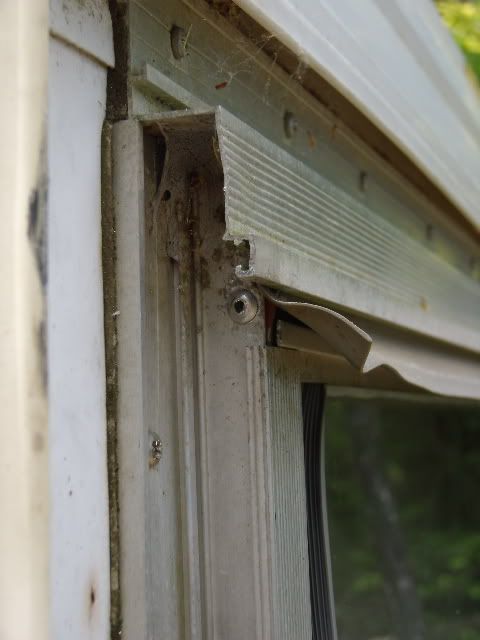 One back window sealed from the rain after 3 hours 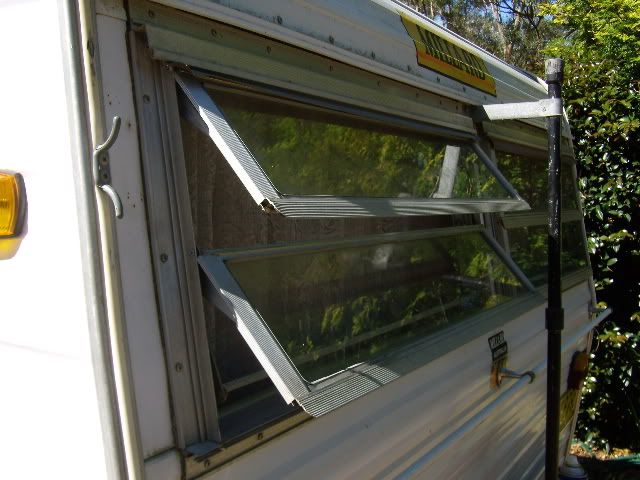 The olive oil trick helped when installing the new glazing wedge. regards bobbie |
|
|
|
Post by millard1399 on Nov 2, 2011 11:37:47 GMT 10
G'day bobbie, Congratulations on mastering the art of Millard window repairs. ;D ;D Once you've done one, all the rest seem like a 'breeze', heh heh (NOT!!). Looking at your second photo above, is that the sealant I can see that's separated away from the frame?? (the red arrow in this photo)... 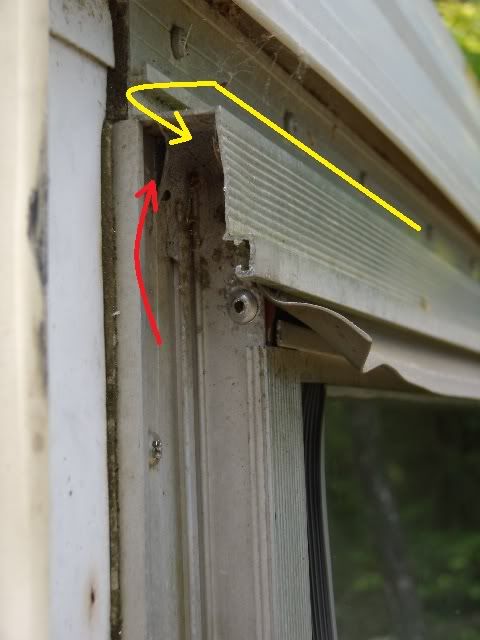 These Millard windows are not the greatest design, I reckon, and can have numerous areas where water can leak in. I've noticed on my windows that any water on the top frame can want to travel to the ends and then go back underneath (the yellow arrow in my picture). I think it's worthwhile to ensure there is good sealant at the top and bottom of these side frames so water doesn't weep through any gaps. I ended up also putting a little "hump" of sealant on the underside of the top frame (just above the yellow arrow-head) to act as a 'deflector' for any water wanting to go back in on the underside. ps. I also meant to say how much better it is to have flat cladding on the van for the windows to attach to. Lucky you!! You won't have anywhere near the hassle that I had, if you ever decide to remove the windows and reseal them. cheers, Al. |
|
Deleted
Deleted Member
Posts: 0
|
Post by Deleted on Nov 15, 2011 11:36:42 GMT 10
Hi Al, Thanks for your keen set of eyes - It is an adhesive I think as it has no elasticity - rock hard!. I don't want to look as Millard windows any more, I finished all that required repair on the weekend. I finished up using a hacksaw blade to cut a standard screwdriver slot in the raced philip head screws at the base of the louvre frames and used the longest possible screwdriver to get some purchase. Paint Finish: The bottom third of the van has a printed wood grain effect which would be very hard to reproduce - the paint has become powdery - so I talked to the cheese and kisses about it and she suggested a coating of Penatrol. We have had a can of it in the tool room for around 20 years. Well I applied the first coat using an old pair of underdaks and a finger - it set dry in around 6 hours - took around 2 hours to apply. - looked very blotchy - When I finished applying the second coat and WOW!!! - I'll send photos next week - I have ended up with what looks like a new paint job thanks to Penatrol! 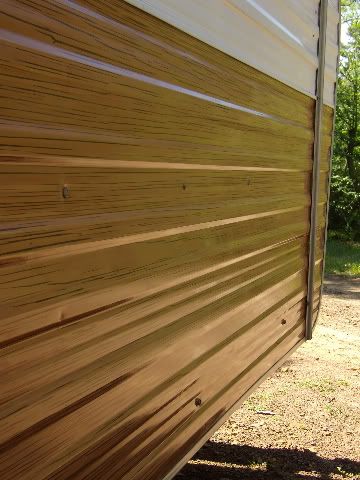 Regards bobbie |
|
Deleted
Deleted Member
Posts: 0
|
Post by Deleted on Nov 29, 2011 16:26:24 GMT 10
Hi All, Now the rain has eased I inspected for additional water damage and there was a lot. I have no undercover parking for the Millard so I decided to clean the roof and the pop-top, and put a tarp over it. They say you can find out the faults by washing it. 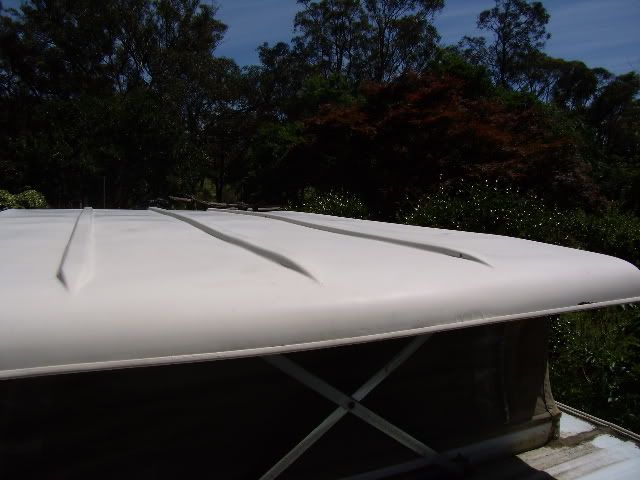 The pop-top needs patching in a few places, has some crazing, but came up a treat after a few hours with four buckets of sugar soap, a scourer and a sponge. 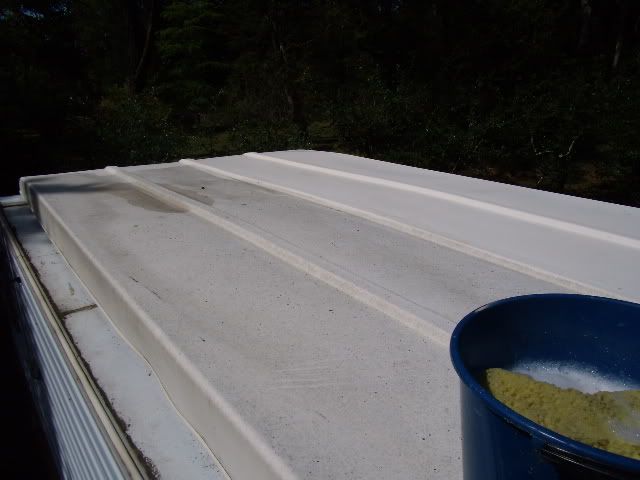 The next shot shows what I'm up against: 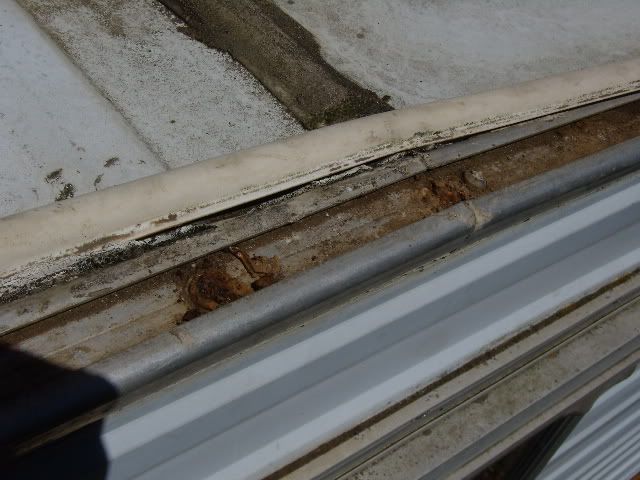 This is the left rear joint area where the channel is screwed to the frame - Can anyone advise me how to remove and replace these screws?  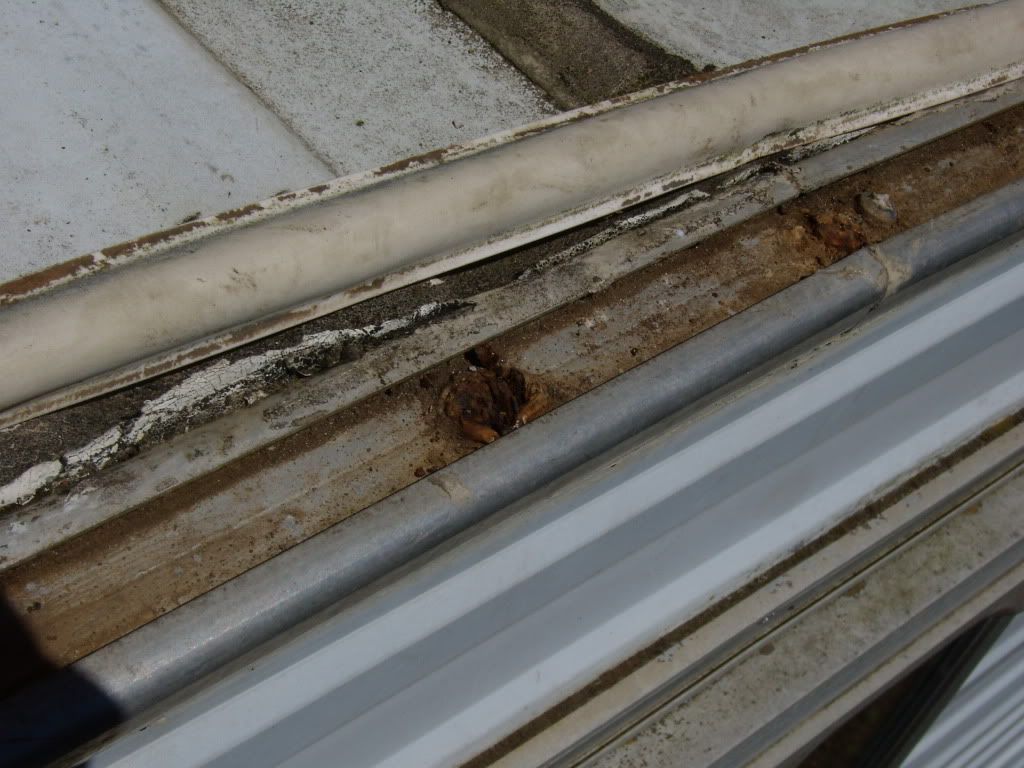 I have the same problem in all four join areas and the channel is lifting from the frame causing breaks in the sealant - hmmmmmm - will this van ever get going? Regards bobbie |
|
Deleted
Deleted Member
Posts: 0
|
Post by Deleted on Nov 29, 2011 17:46:52 GMT 10
Gday Bobbie
One little trick I have found helps with tight / rusted screws into sheet metal is to hit them with a cold chisel or screwdriver sideways on the head before trying to unscrew them. Failing that, maybe the simplest way to dismantle is to grind the heads off with an angle grinder and drill new holes adjacent to them to re-fix?
Cheers
Doug.
|
|
|
|
Post by millard1399 on Nov 30, 2011 8:22:50 GMT 10
G'day bobbie,
That rusted screw can't be a stainless steel screw, surely?! Looks like somebody has put a normal steel screw in there?
I'd be following cruisindoug's ideas for removing it. If you've got a pin-point burner in the shed, you can heat the screw head with a flame to heat the screw up to expand it's diameter. Then when it's cooled and contracted, it will sometimes free up.
Good luck with your attempts. Never easy to remove rusted screws.
If you need to buy some more stainless screws, the stainless steel screws sold in Bunnings are slightly larger in diameter than the original screws in your van. Even though the pack says 8 guage or 10 gauge screws, the actual diameter is greater than the diameter should be for the gauge. If you get some replacements from Bunnings, you'll probably need to drill slightly larger holes for them. I do like the Bunnings screws because they have both the phillips head and slot head machined together. Quite a number of the phillips head screws in my Millard had been stripped out in the factory production process, so the combination screws will help to overcome that.
cheers,
Al.
|
|
Deleted
Deleted Member
Posts: 0
|
Post by Deleted on Nov 30, 2011 12:44:35 GMT 10
Paint Finish: The bottom third of the van has a printed wood grain effect which would be very hard to reproduce - the paint has become powdery - so I talked to the cheese and kisses about it and she suggested a coating of Penatrol. Hi Bobbie Regarding the Penetrol - did you do any sort of prep to your van before painting or did you use the Penetrol straight over the chalky paint? regards Jean |
|
Deleted
Deleted Member
Posts: 0
|
Post by Deleted on Nov 30, 2011 13:53:56 GMT 10
Hi Jean, I washed the area first with a mild detergent. The paint was powdery and flat looking, the pic below may give you some idea: 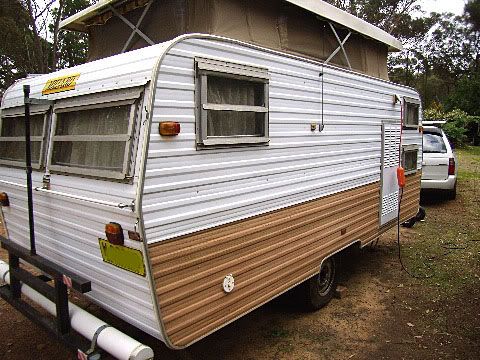 Just use the Penatrol on an old rag and apply a little pressure. You will notice a small amount of paint transfers to the rag. The first coat will be dry in 6 hours. It will look blotchy, some shiny bits - some dull. Apply the second coat in the same manner - there will be little or no transfer of paint to the rag. Wait another 6 hours for it to dry then put on your sunnies and take a look. 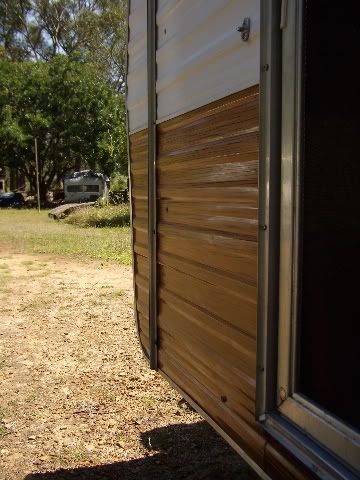  The water just beads off it now! ;D regards bobbie |
|
Deleted
Deleted Member
Posts: 0
|
Post by Deleted on Nov 30, 2011 14:15:59 GMT 10
G'Day Al, Screws look like gal and seem over size to the normal Millard hardware. I put a tarp on the Van for now and will do the trip to Bunnings next weekend. Thanks for the information - I'm pondering on my next step, to take the channel off completely or just try and correct whats happening on the four join areas.  Regards Bobbie |
|
Deleted
Deleted Member
Posts: 0
|
Post by Deleted on Nov 30, 2011 16:09:44 GMT 10
thanks Bobbie,
That sound great, much easier than any of the other ways we've looked in to. We want to put colour on the top coat and looking at the info on Penetrol, that works well. Strange how I found that info on the internet but not the prep info!
Can't wait now till we can give Katy a fresh new look. Might be a little way off yet but at least now we know what to do. thanks again.
regards Jean
|
|
Deleted
Deleted Member
Posts: 0
|
Post by Deleted on Dec 2, 2011 9:22:53 GMT 10
Thanks Doug,
Had a pleasant 30 mins looking at your reno - AMAZING!
Thanks for the tip - I'm on it tomorrow!
Regards
Bobbie
|
|
Deleted
Deleted Member
Posts: 0
|
Post by Deleted on Dec 6, 2011 15:33:16 GMT 10
Hi Al, I opened Pandora's box on Sunday and removed the top left section of the roof channelling to source the leaks. I removed the 2x bodgie screws by hacksawing a slot into what was left of the rogue screw heads. The Millard factory screws were easy to get out - then I realised why. 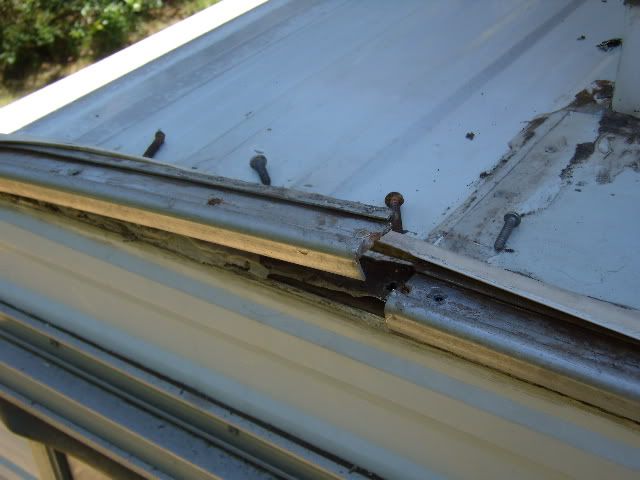 Although I was confident that I had an aluminium frame (which it is), Millard had kept a little surprise for us - a piece of 2 x 1 approx. maple I think, untreated and partially rotted which had been screwed or bolted to the top of the metal frame over the top of the edge of the ply wood interior lining. This in turn has had the roof sheeting stapled to it - covered with now rock hard cream mastic, a layer of white silicone then the channel screwed through to the wood - much the same as your Millard Al. 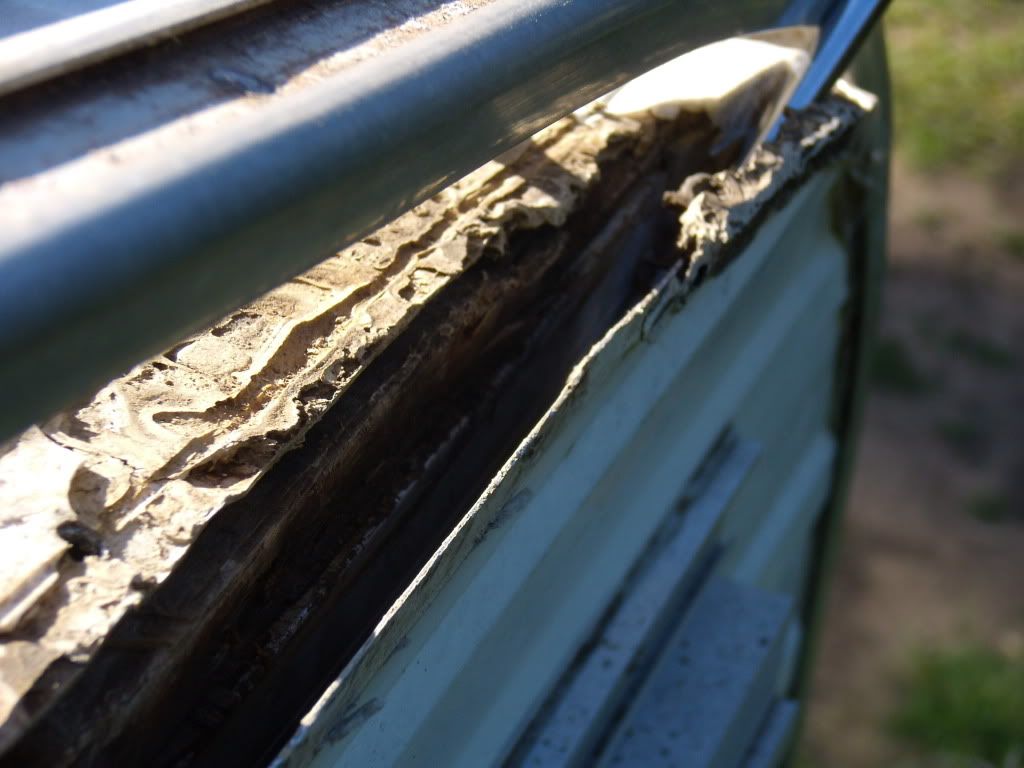 After calming myself down with a quick walk with the doggies and a coffee with the Wife, I came to the realisation that I may be working on this project for longer than expected. So I went up the ladder again and put it all back together 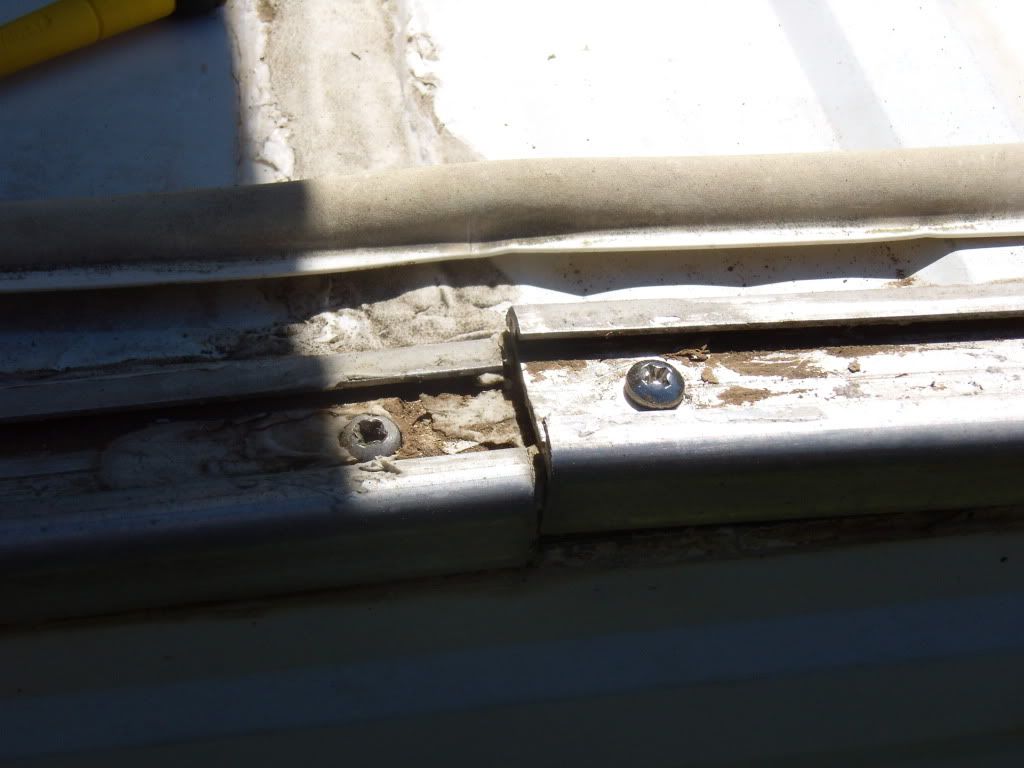 (sort of like I was in denial and wanting to punch someone out - all at the same time - the idiot who designed this thing with no allowance for leaks - like Flashing for example).  All the screws along a 40 cm from both ends were free wheeling in the rotted timber 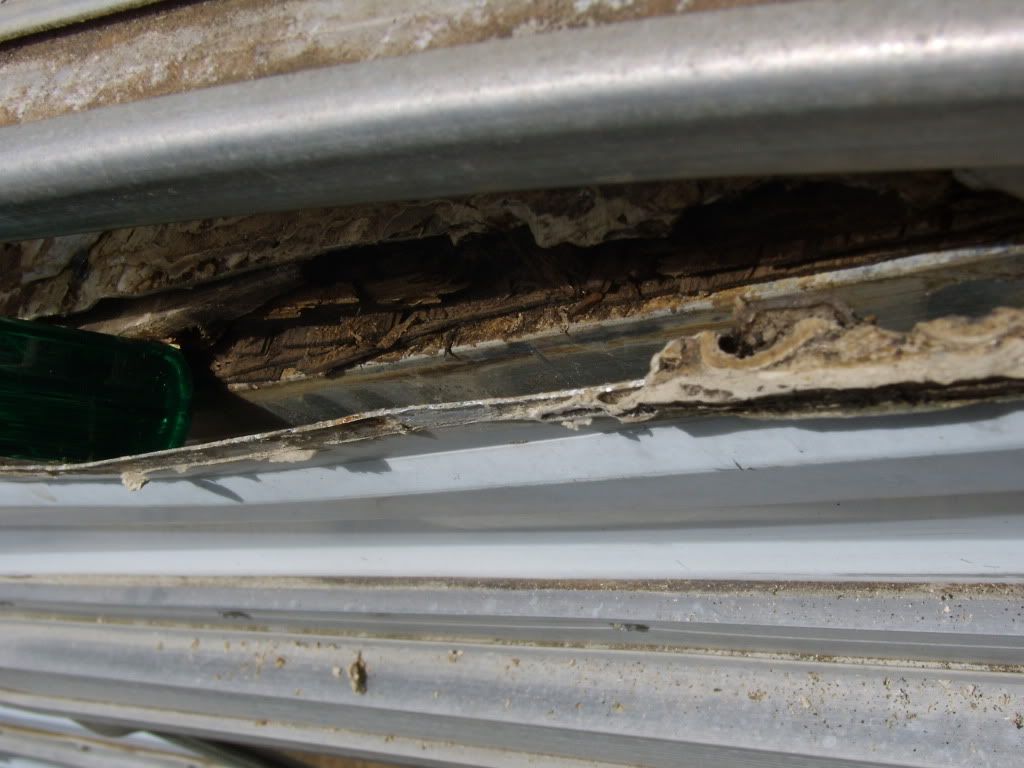 I have a few options. 1) Get a quote from a professional repairer. 2) Do a temporary fix then do the full Monty once I am fully retired. 3) Turn it into a chook house. Point 2 Wins! So I will remove the first 40 cm of rotted wood and replace it with short lengths of what ever I can find, after I clean all the cured mastic off everything and removed all the rusted staples (that should take a year) Screw these to the metal frame at two points. re-pin the side of the van with 20 mm gal brads Run a length of 'Stop Leak Flashing Tape' along the full length and overlap it 25 mm down the side of the van. Coat the inside of the channel with Sikaflex Automotive with 252 or 227. Screw the 'C' channel through to the metal frames with 10 g Stainless Steel 40 mm screws. Seal the full channel edging length on the top with a bituminous rubber automotive sealer.  Then take off for a weeks holiday.  Any constructive advise will be welcomed. Regards Bobbie |
|
|
|
Post by millard1399 on Dec 6, 2011 21:06:07 GMT 10
G'day bobbie, Oh dear...   I think you'd be justified in adding a fourth option onto your list, which involves dynamite.   But I do agree that your option 2 is the most sensible choice. I guess to make the future restoration a lot easier for you (if there is such a thing as "easy" in restorations  ), any sealant you use as a temporary measure should be able to be removed fairly easy at a later date. I often think that using one of the acrylic gap fillers (eg. No More Gaps) would give a couple of years of protection before it started to pull apart. And I think these acrylic gap fillers would be a lot easier to remove later than the silicone-type sealants, or the Sika-type sealants. Good luck with however you decide to tackle the present problem. It's not something you can do in one afternoon, so I empathise with your frustrations at discovering the mess hidden underneath. The only consolation I can offer is that you'll be a "lot smarter" when/if you ever decide to buy another old van. You'll know exactly what to look for and which vans to dismiss quickly. No great comfort for you at the moment, though.  cheers, Al. |
|
Deleted
Deleted Member
Posts: 0
|
Post by Deleted on Dec 6, 2011 21:45:49 GMT 10
Oh Bugger!   Bobbie, its always the way, what looks to be a minor issue turns bigger the minute you touch it! I am dreading the back end (and front end too, for that matter!) of our van, I just know it will be bigger than Ben Hur when I finally get to it! But ... these things must be attended to eventually to prevent further deterioration. While you may need to spend a lot more time on it now than you wanted to, attending to it will save you far more time in the long run. Sounds like you have a good plan; heres hoping the van is on the same page as you and doesn't throw another curly one at you. I reckon once you get a 'system' happening it will go faster than you think. Looking at the pics and from what you have said the timber is just a way of connecting the sheet aluminium to the frame by screws instead of rivets, ie, nothing structural. So as long as you make a good connection to the frame with the new timber your plan sounds pretyy fair. It might be worth considering chucking a couple of coats of paint on the replacement timber as you go though ... And don't forget a dab of sealant under the screw heads as you put them in. Cheers and good luck. Doug |
|
Deleted
Deleted Member
Posts: 0
|
Post by Deleted on Dec 6, 2011 22:08:30 GMT 10
Thanks guys!
My mate Nev, a retired plumber reckons you should always think of where the water goes to - not where it comes from!
That way you will work out a solution to your problem.
Wise words!
Regards
Bobbie
|
|
Deleted
Deleted Member
Posts: 0
|
Post by Deleted on Apr 10, 2012 16:19:29 GMT 10
Hi All, Now the rain has stopped I can start on the temporary repairs to the roof. I figure it will take me around three full days to complete one side, judging by the time taken to strip the rock hard putty used on the original construction. 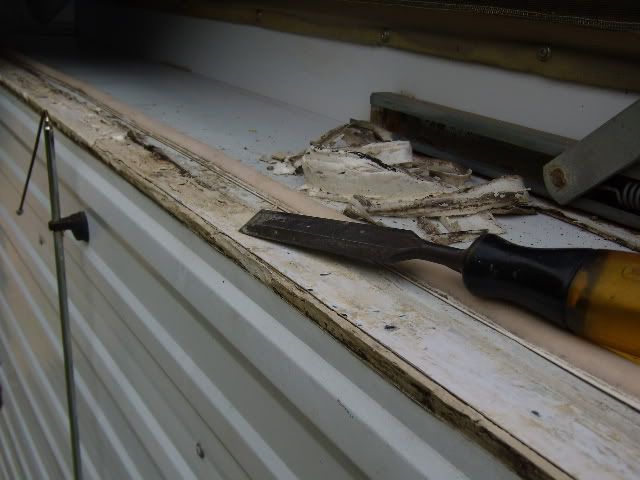 I am using a blunt chisel to remove what reminds me of the dried putty you see when you repair an old timber window sash - but this is harder work! It took me three hours to get this far (below). 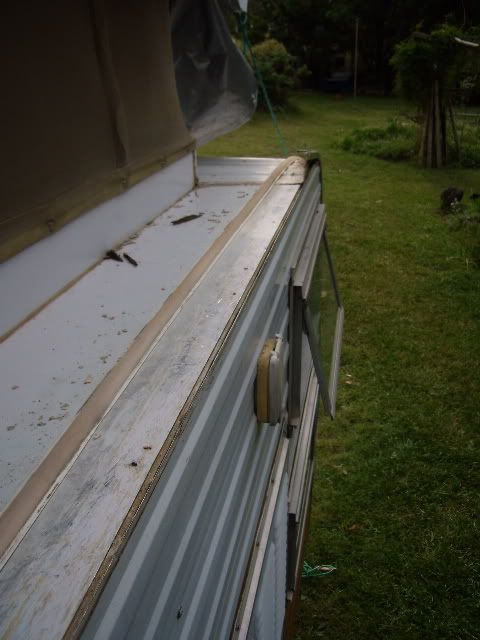 I'll still need to go over it with a nylon scourer and mineral turps once all the hard putty is removed. Rego happens next month so I want to be watertight for the safety check. Does anyone have any tips on what is required at a safety check, and who does the check, the local mechanic?  Regards Bobbie |
|
|
|
Post by greedy53 on Apr 10, 2012 19:26:16 GMT 10
i have a mate that has found a product that sprays on and turns wood rot into a firm timber again i have seen it work and it is black magic you can drill it nail it and it feels like wood wish i could remember the name
it comes in a pump spray applicator
sorrynot much help
steve
|
|
Deleted
Deleted Member
Posts: 0
|
Post by Deleted on Apr 10, 2012 19:43:37 GMT 10
Hi Steve,
Thanks for your input - sounds too good to be true!
Unfortunately the first 40 cm of wood is beyond help at both the front and back end of the van.
If you remember what the product is ...let us know 'cause there are a lot of leaky, rotting Millards out there that need help!
Regards
Bobbie
|
|
Deleted
Deleted Member
Posts: 0
|
Post by Deleted on Apr 10, 2012 22:37:51 GMT 10
|
|
Deleted
Deleted Member
Posts: 0
|
Post by Deleted on Apr 11, 2012 10:30:50 GMT 10
Hi melscott28,
Thank you for posting the PC-Rot terminator site link.
Off to Bunnings during the week to check it out!
Regards
Bobbie.
|
|
Deleted
Deleted Member
Posts: 0
|
Post by Deleted on Apr 14, 2012 7:17:03 GMT 10
Good to see your into it Bobbie, as they say its all in the prep so the time spent now will pay dividends down the track! I have got into our van too and am on the home stretch now (I think  ); its good when things start to come together. Hope the plan pans out! Cheers Doug  |
|
Deleted
Deleted Member
Posts: 0
|
Post by Deleted on Apr 14, 2012 8:00:03 GMT 10
Hi Doug,
Thanks for the encouragement - my main problem is time, secondary to that is the weather of late and thirdly, I'm totally void of practical handcrafts except for cleaning bricks!. I'll be semi-retired by September and hope to have it totally roadworthy by then. I'm heading back home today to work on the 'duck' amongst other chores for SWMBO - and more coin spent at Bunnings!
This site is a great resource of knowledge - thanks again to everyone!
Regards
Bobbie
|
|
Deleted
Deleted Member
Posts: 0
|
Post by Deleted on Apr 14, 2012 16:06:44 GMT 10
The certificate is interesting with the power outlets rated at 1000watts.
The power socket for the power in is normally 15 amps. So they must expect an equal load on every outlet. But that would work out to 5 amps each or 1200 watts.
|
|
Deleted
Deleted Member
Posts: 0
|
Post by Deleted on Apr 17, 2012 18:10:50 GMT 10
Hi Les,
You just about lost me on 1,000watts - I've forgotten most of my LC physics. The power set up lacks a circuit breaker which I'm sure it needs but the installation appears to be professional. I ran the 12V system for the first time yesterday via a cheap Aldi Jump starter which ran the outside light plus 2 interior incandescent; kitchen fluro and stereo car radio cassette player. Now I get to play all those old '70s tapes I collected. All worked - but I will switch to LEDs to save on the battery as the draw is substantial on the incandescent lamps compared to just having the radio on. I intend running a 6V LCD TV as well off the jump start with an idea to have it charged via solar.
Regards
Bobbie
|
|