|
|
Post by gavo on Dec 28, 2011 8:58:00 GMT 10
Hi all We have just recently picked up our new/old Viscount caravan 16’6’ x 7’6”, which we bought it off a mate at the princely sum of $500. I am guessing Valiant as I have found some coding on panels that show what is possibly a job number 1005, build date around the 9th month of the year and the letters VAL.They had bought it as a room for their son who quickly found he could not easily put his bed in it to suit his six foot plus height and so it sat, undercover, for about five years. Before that the van can be traced to two of the previous owners, no idea of time yet, both of which were in western QLD. So the good news is that the van had spent a lot of its life in drier areas of QLD. From what I have read on this site I believe it is of 1969-1970 vintage, chassis number A4910. It has the Viscount Duralvan stickers front and rear. Some photo’s I know ya all like photo’s Outside front view 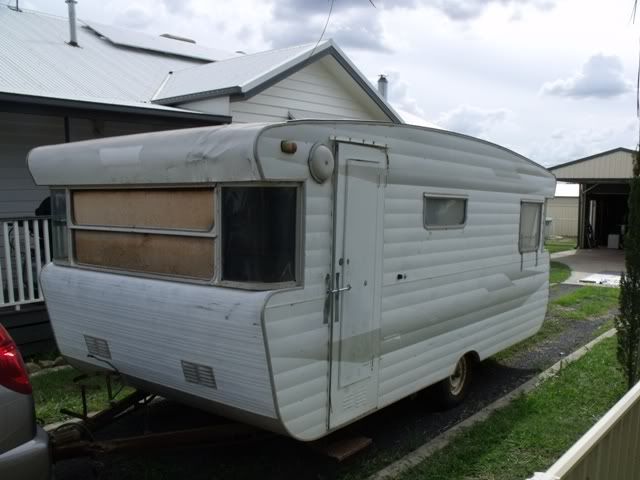 Outside rear view 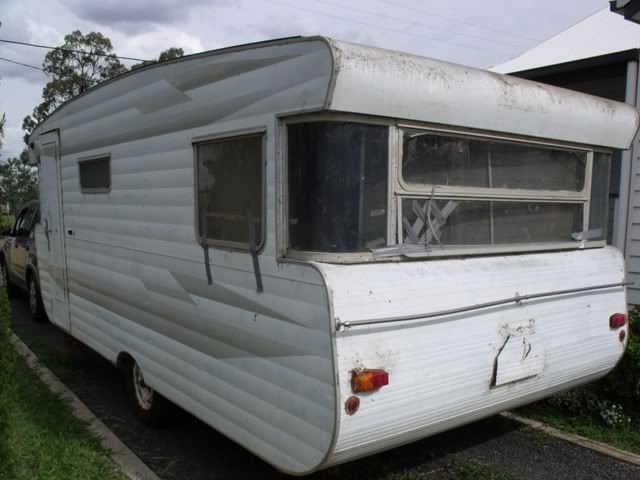 Chassis number 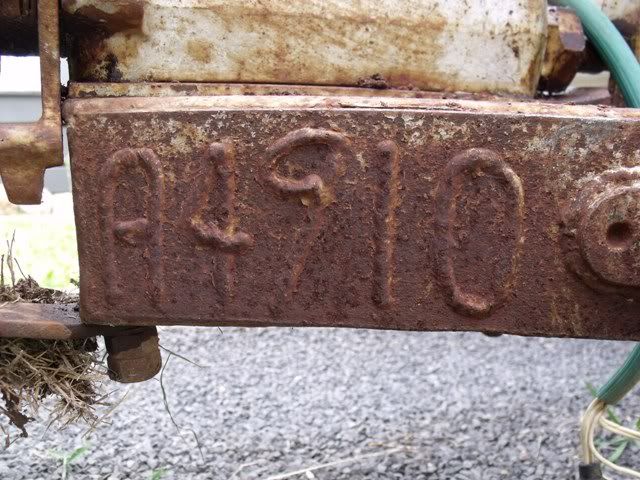 Drawer bar 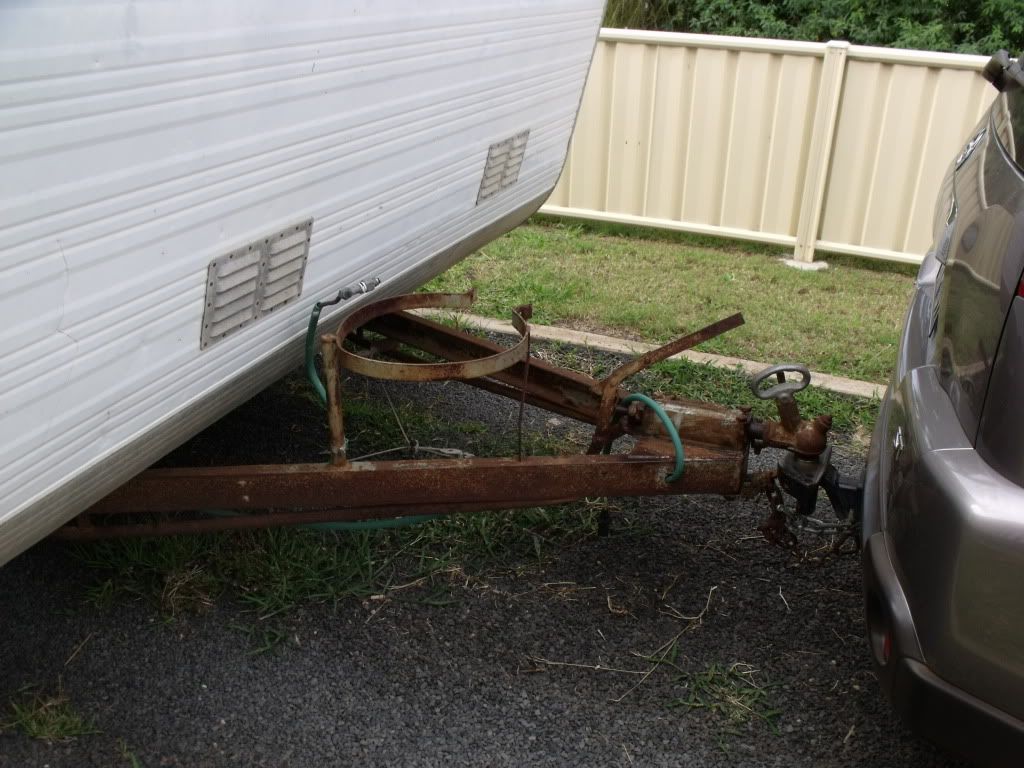 Chassis 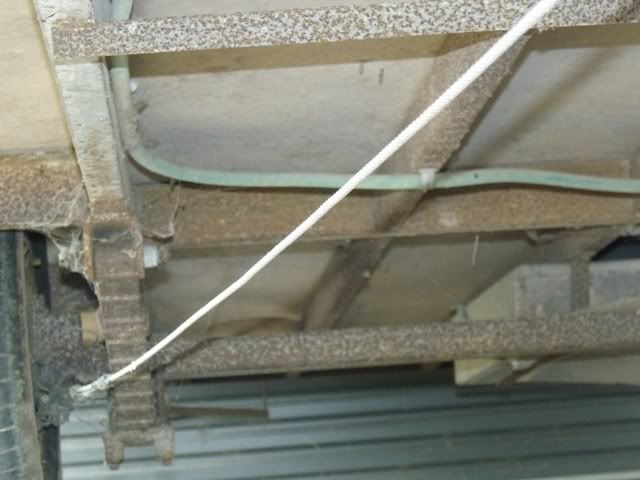 Has a little panel damage on the OS 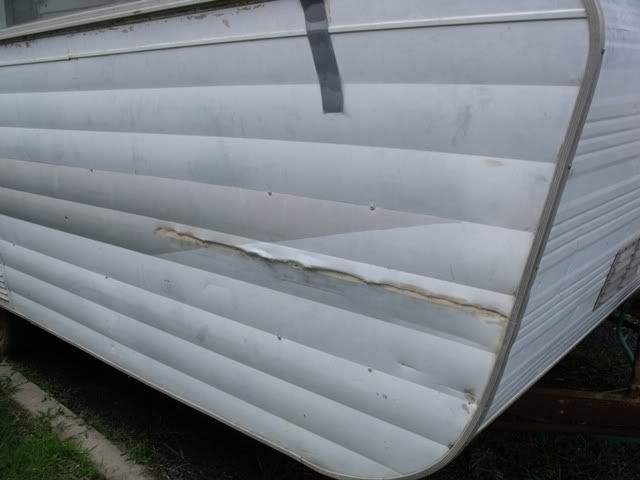 Original rear bedroom 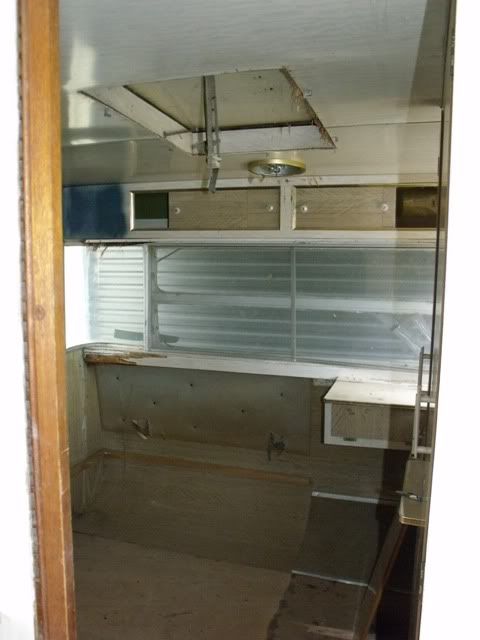 Looking from the door at the cafe dinette seat, not the fridge installation non-vented to the outside. 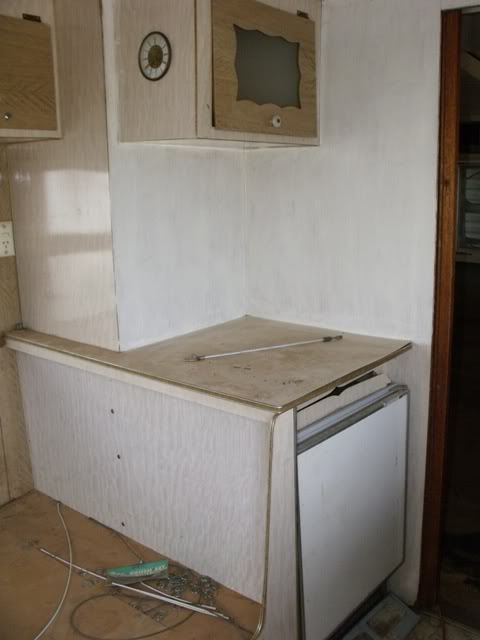 The chassis is in very good condition even where the ally meets the frame and will only need a light hand wire brush and a repaint as it still has original paint on it in many places. Much of the cabinet work was in good shape until I got at it with a hammer, I have kept all of the doors and drawers and some framing for future use. The wall lining shows many signs of water damage particularly under the windows and one area from the roof, the roof panels were/are-but not for much longer in good condition. Our plan is to strip (the caravan that is) and refit it for touring with our family, and as such I will need to shoehorn in double bunks, QB, shower/toilet cubicle, kitchen and a club lounge all in 16’ internal. Initial measurements show it can be done and we have already got ideas for two possible layouts. Cheers all. Gavo. |
|
|
|
Post by atouchofglass on Dec 28, 2011 11:59:24 GMT 10
Hey Gavo
That my friend is what I call...... "a project"
;D ;D ;D
Looks like you will have a fair bit of next year taken up with repair, replace, refit and renovate.
Looking forward to the photos.
Cheers
Atog
|
|
|
|
Post by gavo on Dec 28, 2011 12:40:38 GMT 10
Just modified the title to show the actual build date. I was tearing out the rear curved interior panel to find a date written, 23-9-69.
Will post some more photo's tonight.
Yes thanks Atog I do believe it is a "Project", oh well I was wondering what I was going to do with all of my "spare" time next year. ;D
Cheers
Gavo
|
|
|
|
Post by millard1399 on Dec 28, 2011 19:53:16 GMT 10
G'day gavo, I too have modified your heading and deleted the reference to Valiant. Your van is simply a Viscount Duralvan. The Valiants were a different design to your van. Maybe the VAL reference you found was related to Viscount aluminium or something like that.  It's great that you've found a date on the inside of the wall panelling. Viscount started offering the option of the painted cladding in the second half of 1969, so it looks like your van would have been one of the early ones to get the white cladding. Thanks also for the chassis number. That helps enormously with trying to put a date on the Viscounts from the late 1960s or very early 1970s. Hope you enjoy working on the restoration. I'm sure once you've finished, your mate will be pestering you to buy it back!   cheers, Al. |
|
|
|
Post by gavo on Dec 28, 2011 20:50:01 GMT 10
Thanks Al, I had wondered about the VAL written in the panel and now I think of it I only found that written on the kitchen panelling and framing in about 3 places. There were dates written in a few places but for the most part day and month only for each component and these would seem to appear well within the order that you would expect each item to be manufactured when you think of how a van is built. That main date is pretty clear though. Well progress today included testing the gas side of the Electrolux fridge and after cleaning out the mesh on the burner it worked like a champ, so that will be worth getting back into good condition. I have also torn out most of the interior, just the front and rear bulkheads to go and cutting the ply right back to the edges. Next is to work on re-water proofing including fixing all of the windows and finding two replacements, at least the siliconator has never visited this Caravan so that should make the task easier. A few more photo’s The dated panel 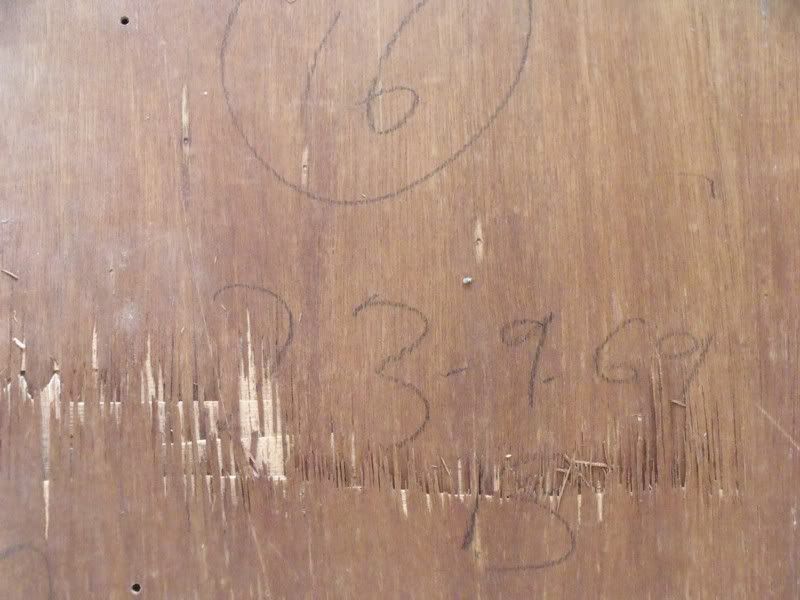 Some other coding, possibly paint coding, oh and maybe they considered this as a 8’ wide caravan although that would have included the clearance lights also. 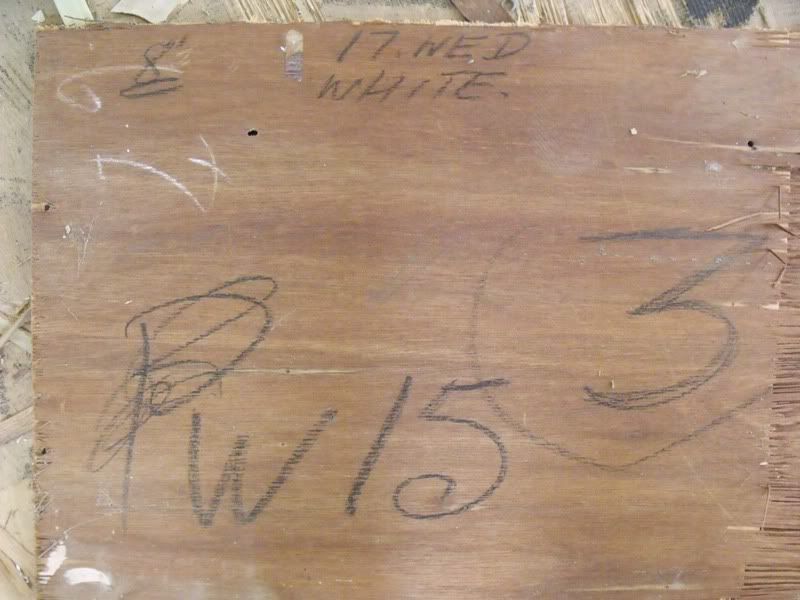 Reckon it was built in no 3 shop 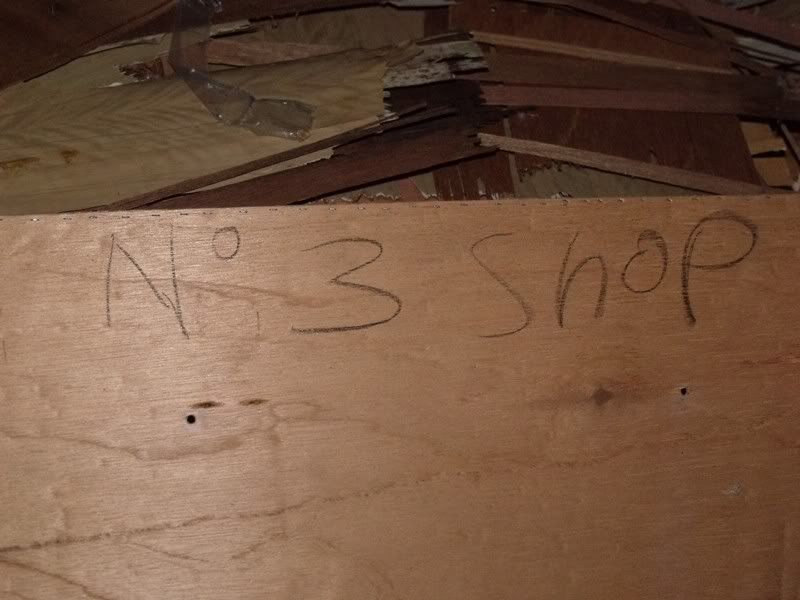 Interior cabinets stripped 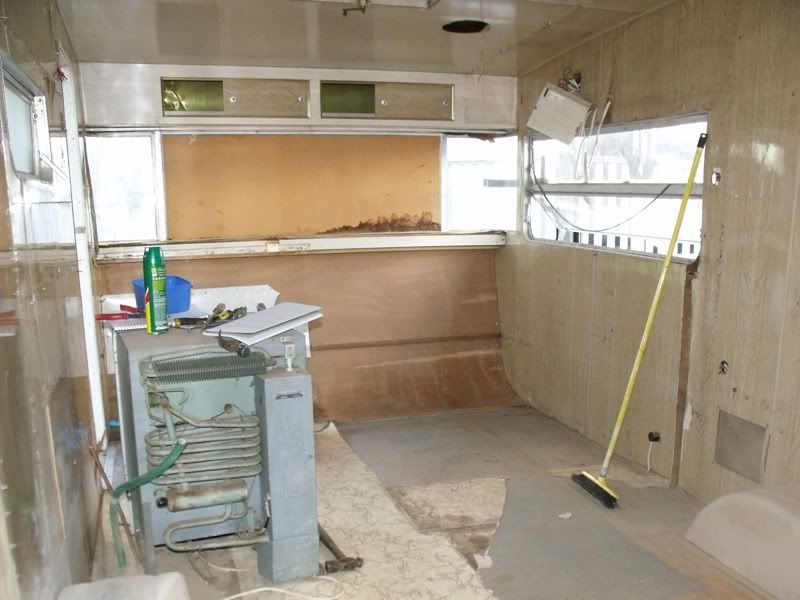 Nearly stripped, note at this stage that Viscount was still using timber in the roof frame as well as including aluminium. 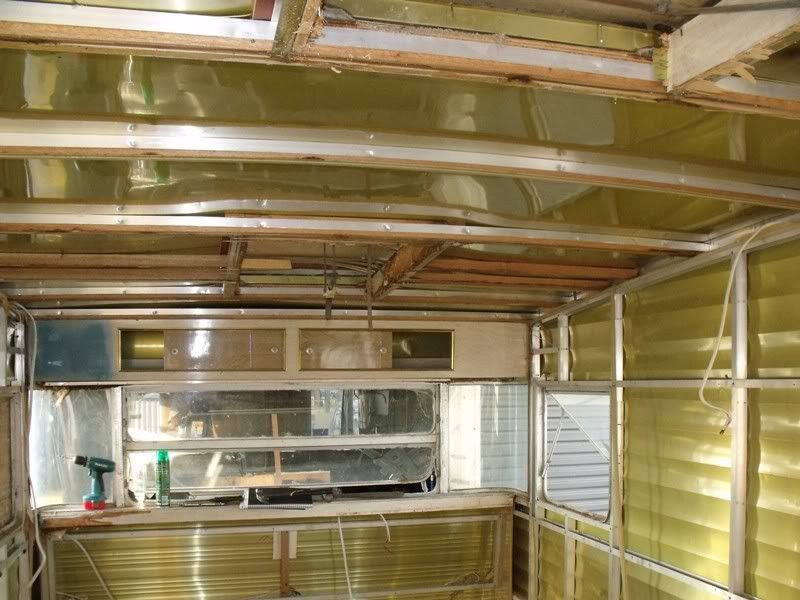 Cheers Gavo. |
|
|
|
Post by millard1399 on Dec 28, 2011 21:11:11 GMT 10
Great photos, gavo! Gives us a clear picture of how these vans were put together in the factory!   |
|
Deleted
Deleted Member
Posts: 0
|
Post by Deleted on Dec 29, 2011 16:45:26 GMT 10
oh I do love to see photos...they are great and so like ours. Looking forward to seeing lots more and will follow your progress with interest.
Good luck
Jean & Alex
|
|
|
|
Post by bobt on Dec 29, 2011 20:04:38 GMT 10
Now that is what I call being serious about a project.
Look forward to the progress photos.
|
|
|
|
Post by gavo on Dec 29, 2011 21:35:54 GMT 10
Yeah Jean and Alex I have had a good look at your project looking at what I could be getting myself into,  fortunately for me my floor is still in good condition as is my chassis, on of the benefits of finding a van in western QLD. (lots of dry and not much wet stuff). Bobt, well I have some time ATM so may as well do something hey. Well today I was going to rip out the end bulkheads, but.... when I looked at them and how they formed part of the window frames and the fact that they are in quite good condition still, I decided that they will live a linger life yet. They will be laminated with new ply and receive hinged doors rather than the sliding ones. The sliding door frames and doors were pulled out though. I also started to cut away the leftover bits of ply around the edges, what a PITA. While in the van and wondering what the heck I was doing trying to do something with a van almost as old as me I got the vac out and cleaned up mess. After that I taped out two different floor plans. Got the cheese and kisses out to show her which one I liked best ask her which she liked best. The floor plan we decided on includes the QB in a N/S orientation on the OS with a shower with a cassette toilet in the rear N/S, the window on the N/S rear window will become a false window sikaflexed into place. Permanent double bunks will go across the front, the top to be designed to partially hinge upwards so the bottom can be used as a seat when needed for meals without all the bedding falling off. A club style lounge will be opposite the door with a removable swivel table and kitchen next to the door. We will be making the most of overhead storage and what other storage we can create. When we realised that we are not planning a layout to suit the next caravanning show but rather us it became quite easy to figure out how to fit in what we wanted with good use of space. Well that is the plan so far, so now we can concentrate on getting the shell into a state where the water won’t get in so we can get started on the rest. Oh I almost forgot... pics of the approved floor plan. Rear, the portaloo is there to give an idea of space. 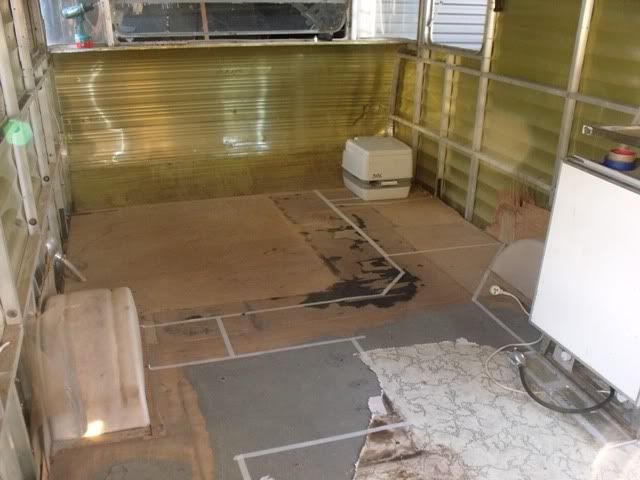 Front 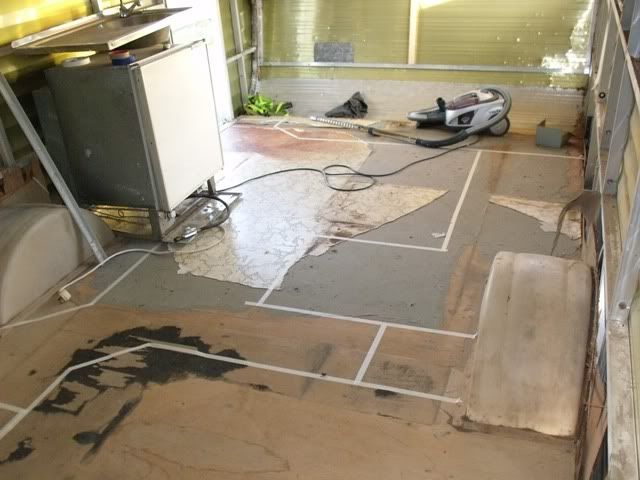 Cheers Gavo. |
|
|
|
Post by atouchofglass on Dec 31, 2011 8:07:47 GMT 10
Hey Gavo Love the masking tape on the floor idea. Brilliant Gives you a really good idea of how everything fits and what it would be like. Top marks      Cheers Atog |
|
|
|
Post by gavo on Dec 31, 2011 9:36:35 GMT 10
Thanks ATOG, I had to do it in order to convince myself it could be done. Now that I have done that I can confidently go on with the project knowing it will suit our purposes. I am at the point now where I need to remove the windows and re-condition them so they will actually keep the rain out and decide what to do with the current roof hatches. Once it gets watertight I will then begin the interior. Good part is that I have already been given the green light to purchase some of the items needed to get the ball rolling.  Cheers Gavo. |
|
|
|
Post by millard1399 on Dec 31, 2011 9:42:29 GMT 10
G'day Gavo, Yep, I like the way you're doing the floor plan as well.  It's exactly what I did, which then allowed me to realise a Capricorn van I bought wasn't going to suit the layout we wanted. Sold the van pretty soon after. I'd like to throw in a modification to your plan. Just me imposing my preferences on you, so ignore them as you see fit.  I'd put the bed on the other side (the doorside or 'nearside' of the van). I'd also keep it six inches away from the wall. Reasons are: - that an island bed is heaps easier to make than a bed against the wall. - a bed away from the wall means the person on the wall side doesn't get the cold wall in their face. (It's usually ME! Brrrrr!! Even with the insulation I put in the walls!!) - a bed on the nearside means you can keep a window open on the annexe/awning side during dark and stormy nights This is the sort of layout that I'm still searching for in our 'ideal' van, after experiencing the layout in our Millard poptop and thinking what would be better for us. cheers, Al.l |
|
|
|
Post by gavo on Dec 31, 2011 13:17:52 GMT 10
Thanks for the ideas Al, I had hoped others like yourself would share their thoughts as it all helps with the planning. I had thought of each of the ideas you have mentioned and after reading your post I went out and looked at the suggestions. Key conflicts are; -We want to fit in a queen bed 5' wide which when combined with the width of the shower toilet cubicle allows no more space, so the bed between two walls it is. A double would allow a little space but we would prefer a queen bed. (oh and in our camper trailer I am the one against the outside canvass, yes I can get cold hey.) Making the bed is not really an issue for as as we are usually a bit lazy and just pull up the Dooner to make it look good; may God bless the inventor of the Doona. -We had looked at an east west config for the bed and allowing the said 6" and shower between the bed and dinette, but this left a small dinette. -Switching the bed and shower so the bed is on the N/S will cut out a small full height cabinet we have planned and make access to the shower a little harder. Consolations are that the van does have two roof hatches, one of which is over the bed. Solutions to having a window open when raining may include fitting a window shade to the rear window as well as fitting one to the rear. Here is a photo with some explanations of the lines. 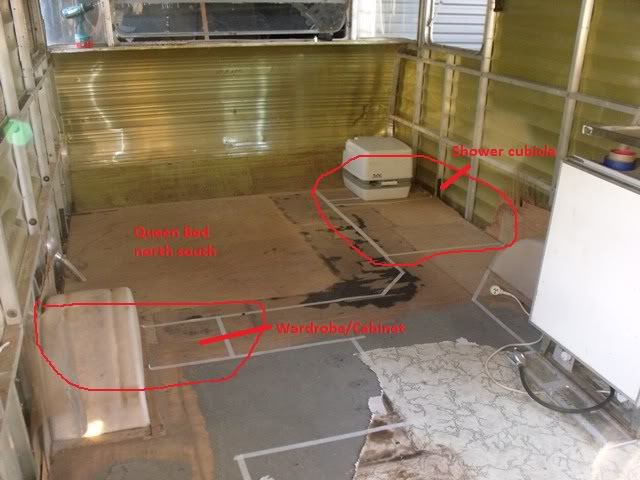 One thing I have learned is that everything is a compromise; we want a shower in a 16' van so a island bed is out. Cheers Gavo. |
|
|
|
Post by gavo on Jan 4, 2012 20:55:27 GMT 10
Have continued working on the Viscount, and have a few updates to share. I thought I would have a look at the brakes to see the condition of them and then I would decide whether to keep the original override brakes or upgrade to electric. This is what I found. 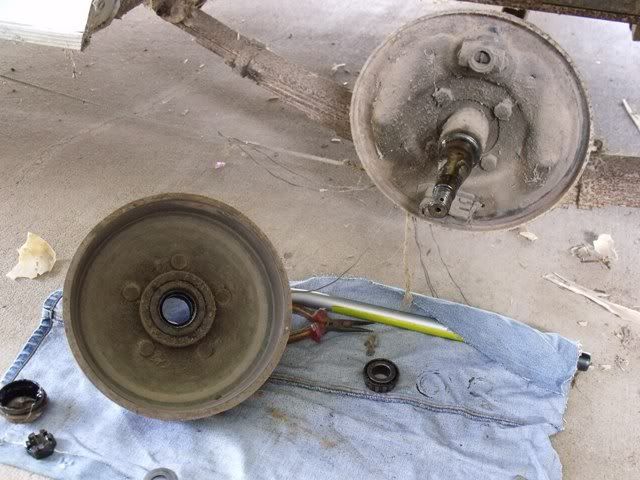 No springs, no retainers, no shoes. Oh well decision made 10” electric brake upgrade it will be. The rest of my time has been spent on working on removing the mouldings and sealant ready to reseal and paint. I will be aiming at painting the roof first so started to remove the associated trims. One thing led to another and next I knew this had happened. 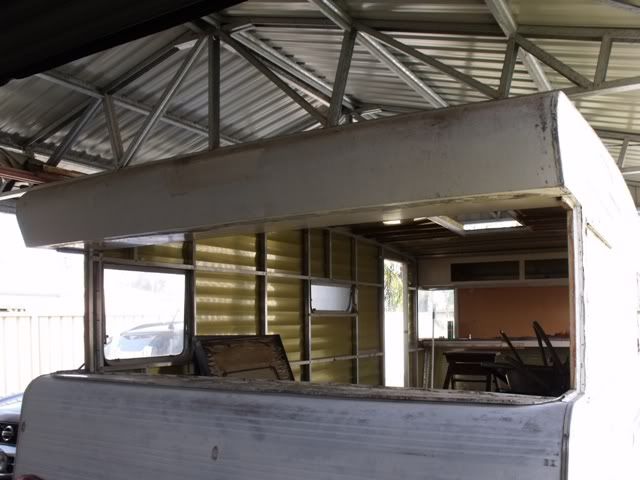 Top trims off, roof hatches removed, then the front and rear windows out. The most fun by far has been removing the old sealant, particularly where it has dried rock hard.  The sealant appears to remain softer where it has been put on thicker and less exposed to heat. Anyway onto showing some areas of water leak issues, and their causes. Here you can see how the fitting of the corners around the roof hatches which depends on the sealant to fill gaps. You can see where the flange does not cover the roof cut-out in the middle of the photo. 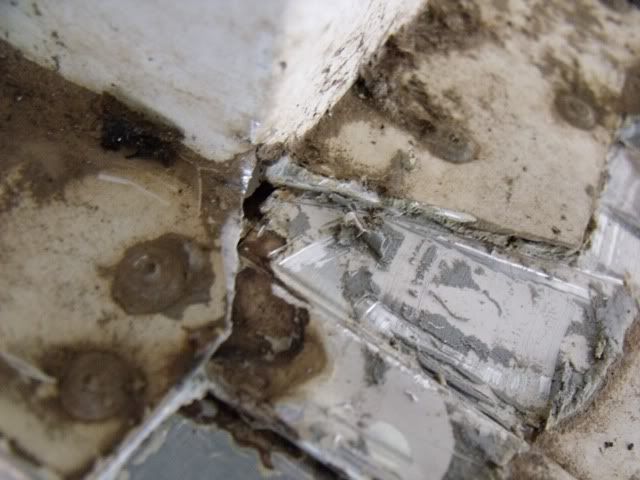 And the sealant application to cover the hole, note the inclusion of the rivet tail in the sealant; there were quite a few of these. That cracked sealant is an invitation for water to track through. 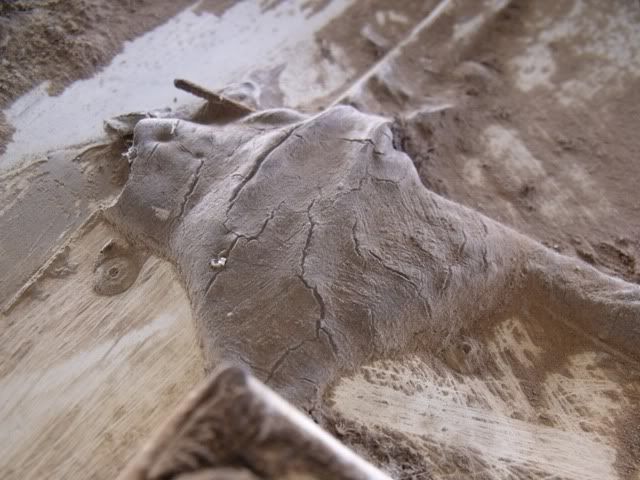 Here is a photo of the sealant job done on the corner mould on the roof, I am sure that the person applying the sealant thought they were paying for it  . Note the lack of sealant to cover the rivet and the screw hole. The water will just pool under the trim and weep in through the screw. 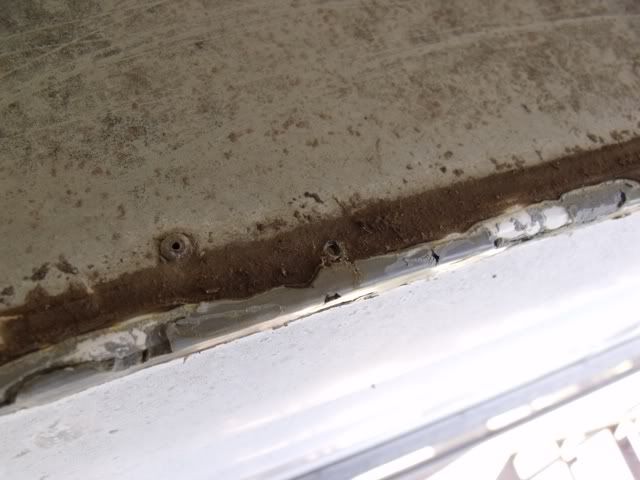 Here is a picture of the of the sealant on the top corner window, note how it has dried and cracked at the transition between the sheet aluminium and the chipboard window flange. This is a sure place for the water to get in. 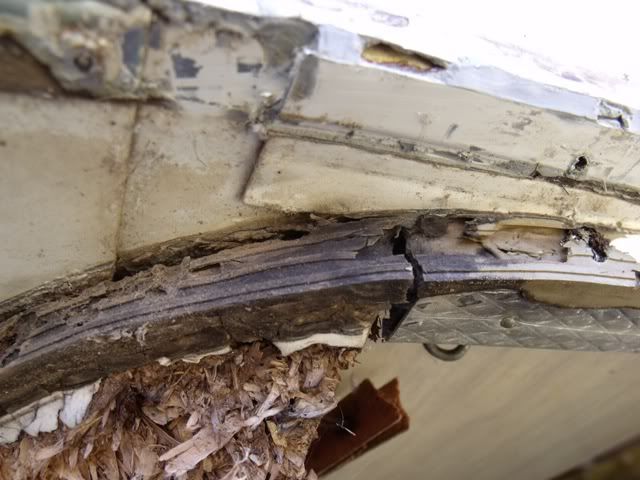 This photo shows the complex jointing of sheets, any failure of the sealant here will result in water leaks. 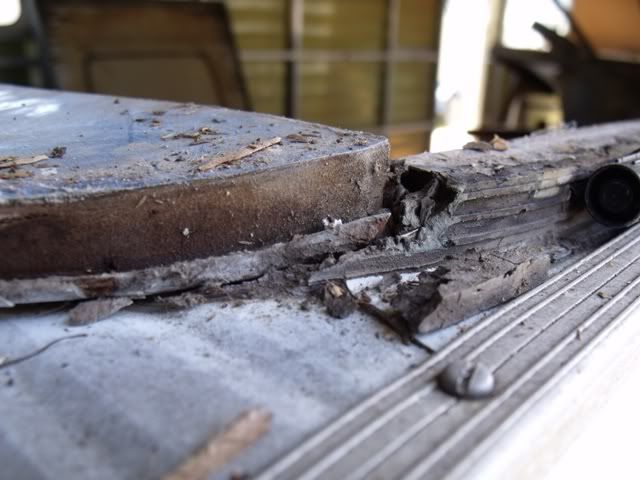 Here is the same section with the sealant scraped out, note how the top panel has lifted and would certainly allow the water to move inside. The timber that was pulled out of here was still damp. 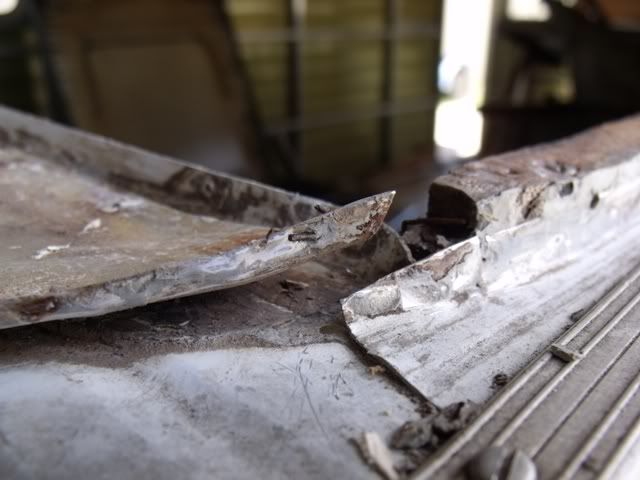 Any of these areas will cause further issues with water leaks if left unattended. The only real way of fixing these water leaks is to pull the parts off, clean the old sealant off and reseal. I will be resealing the roof hatch panels and corner trims and possibly the windows (not the corner windows) with sikaflex. I would love to seal the corner windows with sikaflex also but will need something that does not set in case they need replacing as their location would make it impossible to cut the sealant out. I will however pre-seal the transitions between flanges before using a non- setting sealant in these areas. Now next batch of work will include the exitment of scraping out old sealant, yay  , and then surface prepping the roof for paint. Cheers Gavo. |
|
Deleted
Deleted Member
Posts: 0
|
Post by Deleted on Jan 4, 2012 22:48:17 GMT 10
Gavo, you really are getting back to basics! What a mess, just as well you found it or else you would have been holidaying in a sieve. I'm scared to think what we might find now when we take out our windows!!
It is going to look awesome when you are done, well worth all the work I am sure.
regards
Jean
|
|
|
|
Post by millard1399 on Jan 5, 2012 6:51:21 GMT 10
G'day Gavo, I can see this thread stretching out to be one of the most interesting and informative threads about the restoration of a Viscount. Well done on the photos you've posted so far. Other readers can see the nitty-gritty detail of the problems you are facing, and will no doubt be able to relate those problems to their own restorations. I'm looking forward to ongoing updates about the job, even if it is so I can snigger and say "Been there, done that!".    cheers, Al. |
|
|
|
Post by gavo on Jan 5, 2012 7:20:58 GMT 10
"I'm looking forward to ongoing updates about the job, even if it is so I can snigger and say "Been there, done that!".    " Yeah good onya Al ;D. I keep thinking "at least I don't have Millard windows".  I was inspired by your thread on the Millard, so thought that while I am torturing myself I may as well try and show some of the challenges and solutions to these great caravans. Cheers Gavo. |
|
|
|
Post by gavo on Jan 7, 2012 9:34:36 GMT 10
Hi All In my preparation for re-sealing and painting the roof of the Viscount I decided to remove the hatch flanges so I could fully reseal them. When I put them back on the roof I will be sealing them with sikaflex and using sealed rivets. A few pics below. Here are two of the hatch flanges removed, they will need cleaning up and re-shaping before replacing. 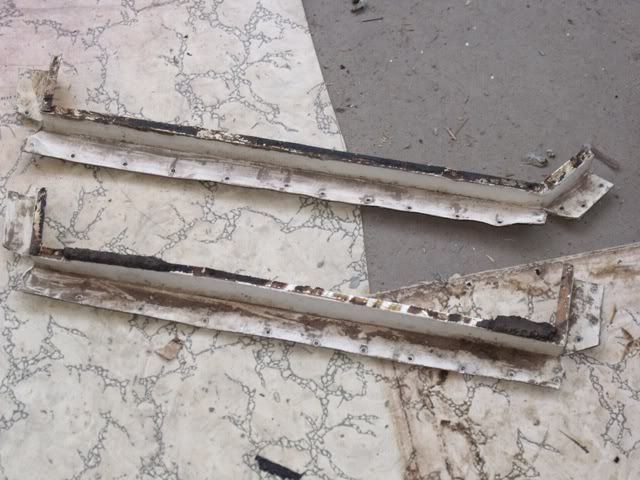 Here is a pic of what the hatch opening looks like with the extra flanges removed. The original seal job worked and only had a couple of leaks on the corners - a couple to many though. 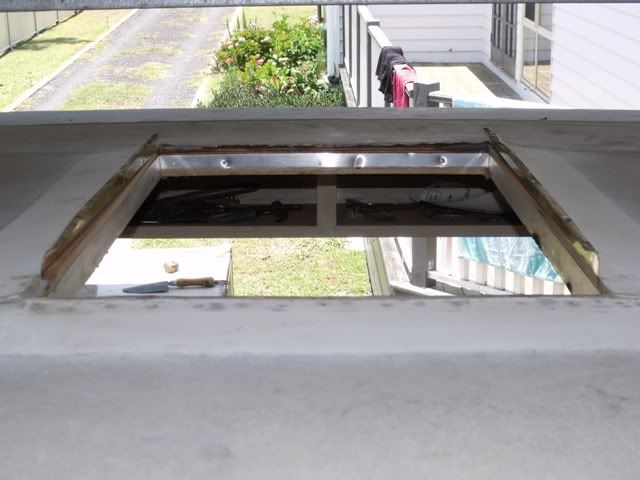 This pic shows the surface ready for re-installing the flanges. I will prime the surfaces before re-sealing though. 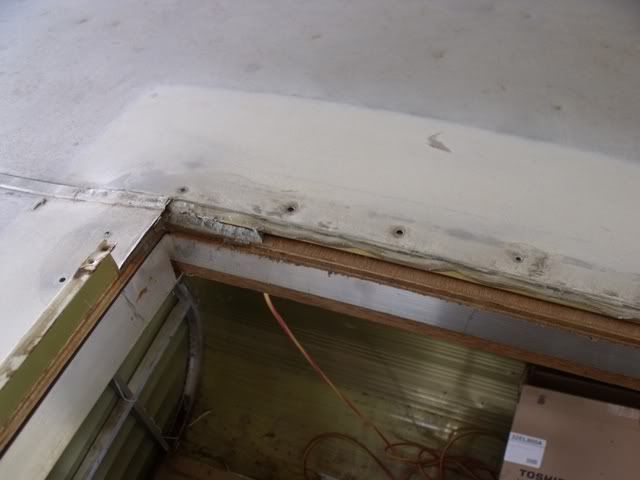 With all that done hopefully there will be no more leaks around the hatches. Cheers Gavo. |
|
|
|
Post by bobt on Jan 9, 2012 21:25:40 GMT 10
Hi Gavo I have been a bit slow on the up take of late. Like your layout plans. Yes your correct it is always a compromise. Good on you for giving it a go. Love the detailed photos I get to watch the pain your suffering..  keep em coming Bobt |
|
|
|
Post by gavo on Jan 29, 2012 8:18:56 GMT 10
HI all, time for an update to prove that I haven’t been slacking off lately. Well we did have a week on the coast just before all the rain. I have continued on the exterior of the van as my plan is to get the outside body to a finished state or mostly finished state before starting on the interior. Last posts showed that I had just sanded the roof and was getting it ready for painting. Since then I have massaged the large dents in the front with my panel hammer and then did a little filling and sanding them into shape. The photos in the start of this thread show the original condition. Yesterday I started wet-sanding the sides and rear getting ready to repaint, there are no plans try and fill small dents apart from where necessary and just paint it warts and all. Have also taken detailed dimensions of all the side flashings as I intend to go with the same design, they will be completed in a sky to dark blue. Other progress has been that I was able to get new roof hatch winder bodies (saved a lot of fiddly work there  , probably the last two of three left available in Australia. I have also made new spindles and will need to change the nuts in the barrels. Will post pics of the winders when done. Now for the pictures. Front of the roof massaged and re-painted, looks better in the picture than what it actually is though looks good from ten feet away.  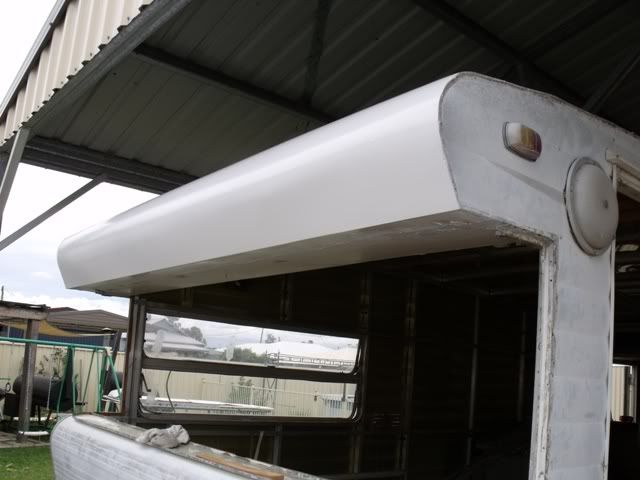 NS sanded, will be removing door and windows before painting. 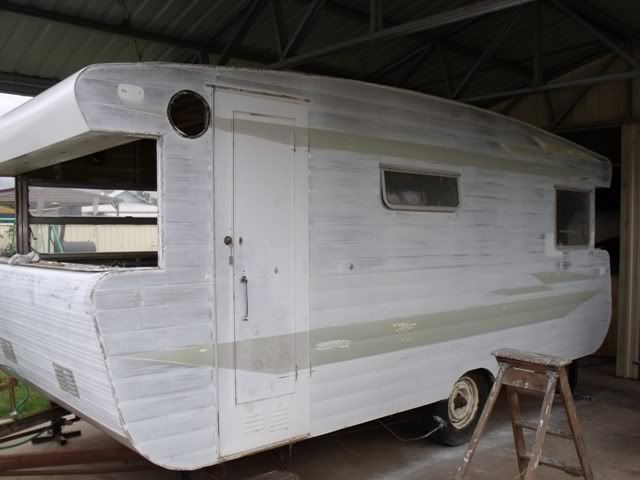 Rear sanded, the panels look like a pepper shaker where the various screw holes are from aftermarket tail lights. 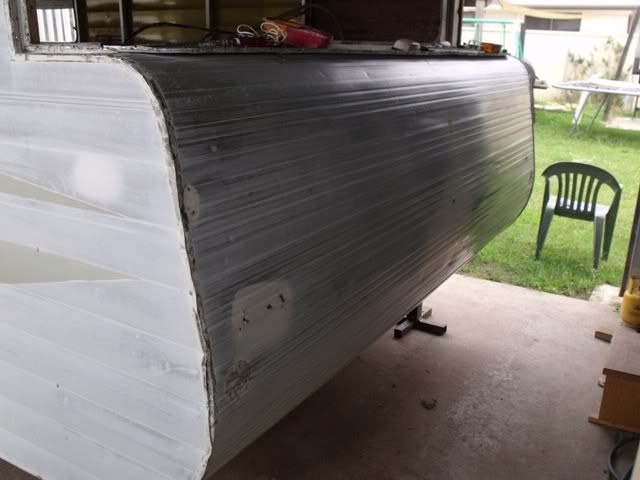 Cheers Gav. |
|
|
|
Post by gavo on Jan 29, 2012 18:26:01 GMT 10
A little more progress on the van this afternoon starting to get the O/S ready for paint by removing the rest of the trims and sealant. One of the problems is that in some time in the past, the rear window sash has been removed and a sheet of colourbond screwed to the surrounding aluminium panel. In order to begin remedying the situation I have removed the panel, buffed the holes with a sanding disk, punched the holes with a centre-punch and filled the holes with fibreglass reinforced filler. The filler will be sanded back to shape and painted with the rest of the side. The holes need to be punched in order to give the filler some thickness over the holes. Rear window with the quality fitment of a water proofing panel.  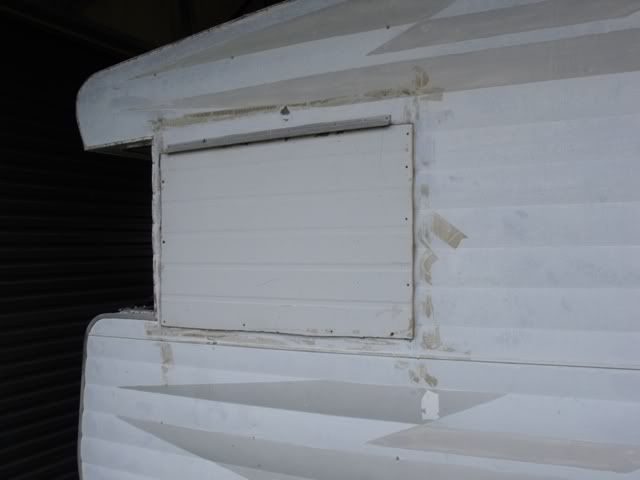 Screw holes buffed and punched. 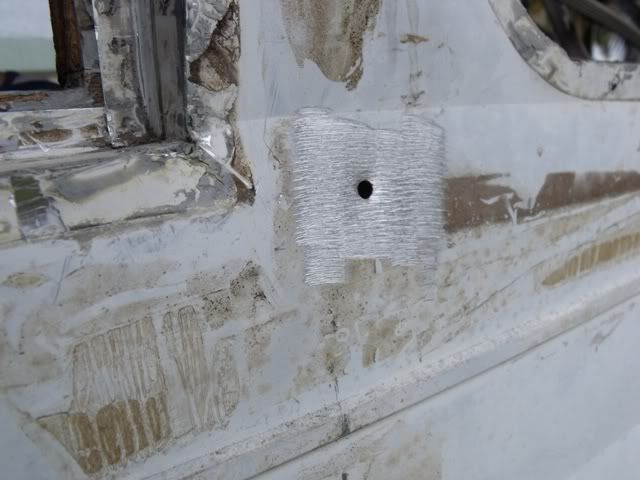 Holes filled with fibreglass reinforced filler. 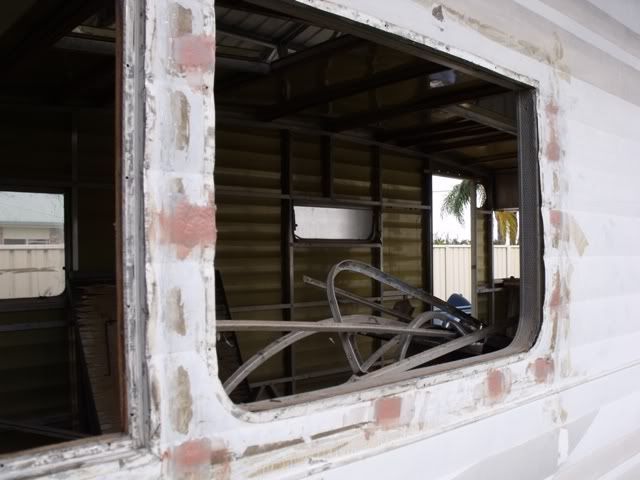 Report to be continued. Cheers Gav. |
|
|
|
Post by gavo on Apr 18, 2012 19:59:06 GMT 10
Well it’s been a long time since my last post and there have been a few things happen between. Here is a list of what has been done: • Fixed the slash in the OS front by removing the damaged material and riveting a sheet on the inside, then filling with glass reinforced filler and finishing with regular automotive filler. • Finished wet sanding the entire outside. • Drilled out all of the outside rivets, not under a mould, and replaced them with new while also sealing the rivets with Sikaflex. All of the old rivets leaked. • Removed all of the windows. • Removed the door. • Fitted a larger window in place of the smaller OS rear window. • Fitted a smaller window to the OS front in place of the larger window and panelled of the gap. • Painted the outside of the van and the door with a coat of etch primer then three coats of Wattyl Solarguard. So now for some pics OS after fitting new windows. They came from a large old van literally falling apart, all of the old timber frame was considerably rotted out. 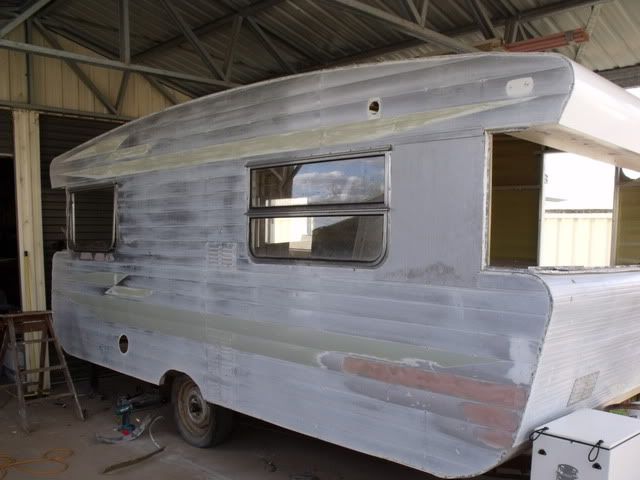 NS after repainting. 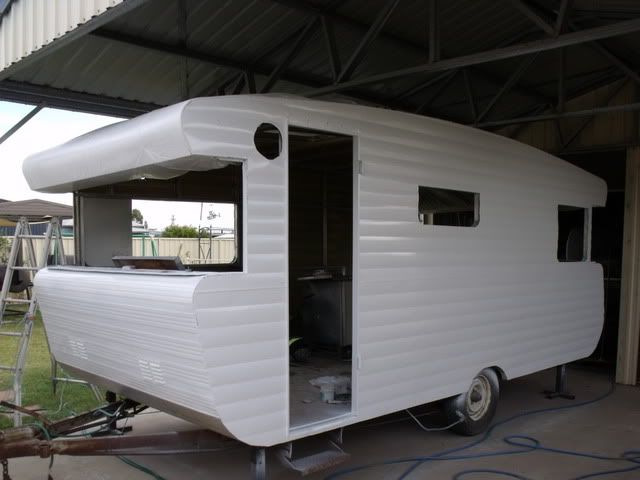 OS after repainting, the old slash in the front OS came up quite well, even the flat panel looks ok when the window is fitted up. 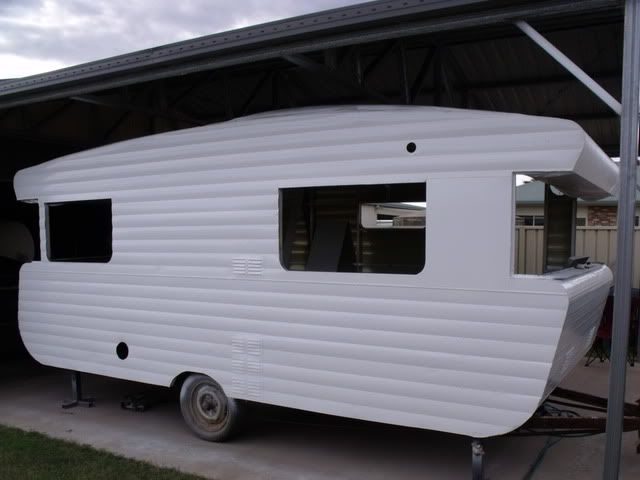 Next on the agenda is to paint the stripes on which will be the old pattern then on to fitting the windows back in and replacing the old trims after cleaning and polishing. Cheers Gav. |
|
Deleted
Deleted Member
Posts: 0
|
Post by Deleted on Apr 21, 2012 8:32:13 GMT 10
Looking Good, Get some colour on with the stripes and its gunna look pretty cool, nice job
Regards
cameron
|
|
Deleted
Deleted Member
Posts: 0
|
Post by Deleted on Apr 21, 2012 10:43:37 GMT 10
you have been busy - its looking awesome.
|
|
|
|
Post by millard1399 on Apr 21, 2012 20:44:37 GMT 10
Holy mackeral, gav! Some really amazing work being done there!!   Wattyl Solagard, eh? You'd swear it was some sort of fancy 2-pak type paint!   This van is gonna be a bottler once it's fully completed! ;D ;D cheers, Al. |
|




 fortunately for me my floor is still in good condition as is my chassis, on of the benefits of finding a van in western QLD. (lots of dry and not much wet stuff).


 The sealant appears to remain softer where it has been put on thicker and less exposed to heat.

 . Note the lack of sealant to cover the rivet and the screw hole. The water will just pool under the trim and weep in through the screw.


 , and then surface prepping the roof for paint.


