Deleted
Deleted Member
Posts: 0
|
Post by Deleted on Aug 31, 2011 15:03:09 GMT 10
G'day All,
I/We, are first time caravan users - purchased a '77 Millard Mini pop-top which needs a bit of attention and appreciate your experiences and knowledge - we have been trawling this site for information and hopefully can contribute to it in the future.
I'm looking for glazing wedging appox 11.5 m of 3 mm X 5 mm - The profile is a 'T', the 3 mm is the top of the 'T'. All the wedging and dust seals have weathered and need replacing any assistance as to where to source these materials will be much appreciated .
For its age, the van is in very good shape except for the pop-top screens and some water damage in all four corners and the window seals.
We are looking forward to getting watertight then hitting the road.
Regards
Bobbie
|
|
|
|
Post by millard1399 on Aug 31, 2011 16:27:27 GMT 10
G'day Bobbie, and welcome to the forum! ;D By coincidence, I also have a 1977 Millard Mini poptop, so I can help you with most questions about the van. The number on the chassis of mine is MM1399 ...what's the number on yours? The window rubbers are still available from the internet caravan parts supplier known as "CaravansPlus". If you click on this link, it will take you to the page on their website showing the rubber as the fourth item down. You'll also see the other Millard items listed there, some of which you may require for your van depending on its condition. There is a minimum postage for orders, which I think is about $8, so if you think you'll need any of the other things for your van, it's best to put them all together into the one order at the same time. I've dealt with this supplier on a few occasions, and I can vouch for their prices, service, and delivery. If you want to spend a fair bit of time reading through the thread on the restoration of my van, it may provide answers to any questions you might have. Click on this link: 1977 Millard pop-top 14ft MM1399Feel free to ask any other questions you may have. cheers, Al. |
|
Deleted
Deleted Member
Posts: 0
|
Post by Deleted on Sept 1, 2011 15:55:35 GMT 10
Hi Al, Thanks for your reply. I have read your renovation post - most impressive! took a while to read as well - guess I'm lucky we have the aluminium frame version. I'll get back to you later on the chassis number as I'm in the big smoke at the moment. Is it a problem or a benefit that the replacement glazing wedge is a few mm larger than what I assume is the original?  Thanks for your expertise - I guess I'll be learning a lot from you guys over time  Regards Bobbie |
|
|
|
Post by millard1399 on Sept 1, 2011 18:14:17 GMT 10
G'day again Bobbie, I'm pretty sure the new glazing rubber was the same size as the old stuff. It sure fitted into the window channel pretty easy, and it hasn't leaked since it was fitted. It's 5mm width across the top of the T-shape, and 6mm length in the T-stem...  As the photo shows, I used WD40 as the lubricant to push the rubber into the frame, but then somebody on the forum a few months back said they'd used olive oil when doing the same thing. I had one of the louvre panels crack on me during winter last year, so when I eventually replaced that glass I used olive oil for the repair. Heaps easier and less messy than using WD40. Just a smear of olive oil along the channel, and the window rubber slid in real easy! You say your van has the aluminium frame, which means it will be a later model than mine, and your chassis number will be higher. Is the poptop roof on yours made of fibreglass or is it aluminium clad? If it's fibreglass, your van might actually be from 1978. cheers, Al. |
|
Deleted
Deleted Member
Posts: 0
|
Post by Deleted on Sept 1, 2011 19:02:49 GMT 10
Hi Al,
Thanks for the 'Olive Oil' tip.
The previous owner mentioned it was a '77 as the Fridge and Roden (is Roden missing a T on the end of the word? ;D) oven have the original books with warranty dates from the first owner which indicate '77 as the purchase date. I'll get the chassis number when I'm home. The Pop-top is fibreglass - the siding is pop riveted.
As soon as I work out photo bucket I'll post some shots.
Can I use Flickr?
Regards & Thanks
Bobbie
|
|
|
|
Post by millard1399 on Sept 1, 2011 20:20:23 GMT 10
Yes, I think you can use Flickr (or at least you should give it a go and see). The Proboards forum hosting system only tolerates Photobucket and one other photo hosting website, which I think is Flickr, but might not be.
|
|
Deleted
Deleted Member
Posts: 0
|
Post by Deleted on Sept 2, 2011 11:48:21 GMT 10
|
|
|
|
Post by millard1399 on Sept 2, 2011 13:01:26 GMT 10
G'day Bobbie, Nice tidy little van there.  Obviously Flickr is not the other website that allows direct linking of photos to the Proboards forums. I couldn't see any photo coding on your photos, that you would copy and paste into the text box for this forum. I would have always thought a van with your chassis number and the fibreglass poptop roof was a '78 model, but if you have the paperwork saying the Warranty started in 1977, then obviously Millard had made the change to aluminium frames and fibreglass roofs sometime during 1977. ( Or maybe my poptop is actually from 1976, the year they first started making them? I never was able to work out how many were made each year, so it's hard to know which chassis numbers belong to which year.  ) It's interesting to see your rego label on the side window. A few years ago, the RTA came out with some new recommendations (legal requirements??) about the placement of rego labels. For trailers (including caravans), they changed the location so that the label had to be showing at the rear. If you click on this RTA link, and scroll down to the Labels heading, you'll see the recommendations shown there. I put mine in one of those metal holders, and then screwed it in on a corner of the number plate...  I've never heard of anybody getting "pinched" for having the rego label in a different position though. cheers, Al. |
|
Deleted
Deleted Member
Posts: 0
|
Post by Deleted on Sept 7, 2011 16:09:09 GMT 10
G'day Al, Thanks for the tip on the rego placement. I'm having trouble with the left Rear window - it seems to have broken pop rivets on the support mechanism - is this an item easy fix?  The annex is in very good condition apart from missing one roof support, a cross member, pegs and ropes which are all available on the caravans plus site.  Also, I uploaded to photobucket so I have that working.  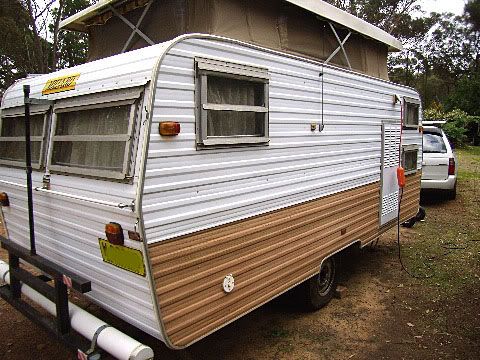 regards bobbie |
|
|
|
Post by millard1399 on Sept 7, 2011 19:00:36 GMT 10
G'day bobbie, Broken rivets in the windows? Yep, had a "million" of 'em when I restored the windows in my van. I ended up replacing just about EVERY rivet in the whole of the windows. Many were broken. Many were on their last legs. I figured if I was going to replace half the rivets, I might as well go the whole hog and do the lot! Replacing a broken rivet is an "easy fix" if you can get clear access to the rivet to pull the old shank out, and clear access with the pop-rivetter to put the new rivet in. I dunno whether it's an easy fix with the windows still in the van, because when I did mine they'd been removed and were on the shed floor when I worked on them. You could do a bit of a "dry run" to see if the repairs can be done with the window in position. You'd be checking to see if you've got room for a drill and drill bit, and also a pop-rivetter. If you need to drill the old rivet head out, I used a 1/4" drill bit in the drill. You drill down into the rivet head, and you'll reach a point where the remaining head starts spinning around. That's all you need to do. Then I punched the remaining shank through the hole with a nail punch. (see my second picture below) One word of caution before you start though... I remember that SOME of the rivets HAD to be placed into the joint from one particular side. If the new rivet was placed in from the other side, the shank would foul the linkages when the louvres were wound out. I think it was mainly with the linkage on the end of the winder rod at the bottom. But to be safe, for each rivet that needs replacing, check which side the head of the rivet is on, and make sure you put the head of the new rivet back on that same side. I also remember there were about 5 different size rivets used throughout the window parts. Some were the same diameter but slightly different lengths needed. Some were different diameter. Depending on which rivets need replacing, you might have to go buy a couple of different size packs. I bought the packs of "open aluminium rivets" from Bunnings, which come in packs of 100 or smaller packs of 25. The other thing I did was to replace the fibre washers in the rivet joints. I bought packs of them (about 25 in a pack from memory) from my local Supacheap Auto shop. These following photos show a bit of the work I did in drilling out the old rivets and dismantling the window parts... 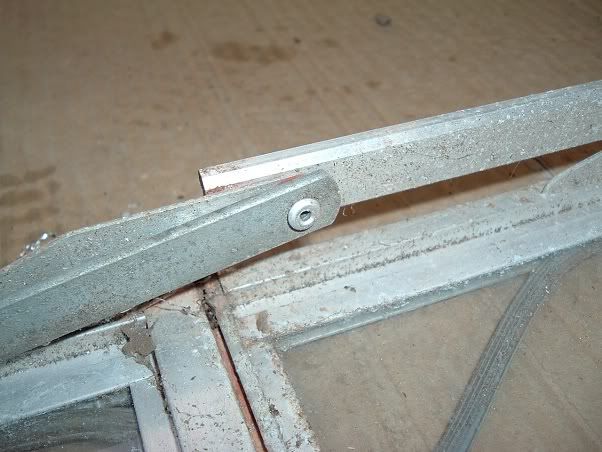 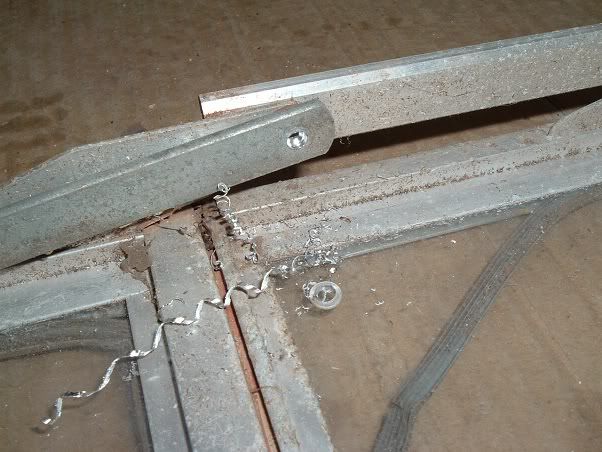 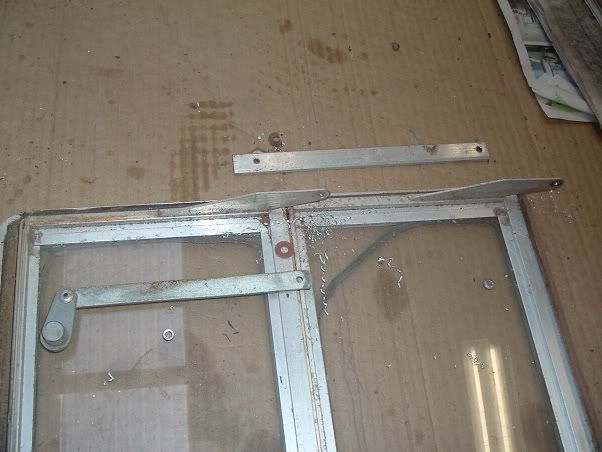 You can see the fibre washer there in one of the photos. When I reassembled the pieces together, I squirted a bit of WD40 onto both sides of the washer before I put the new rivet back in and pop-rivetted all the bits together again. That provided a bit of lubrication to the joint, and made it work smoothly when it was all back together. The other handy hint is to take lots of photos of the window parts before you start to do the repair. Nothing like a close-up photo to remind you how all the bits went together originally.   Feel free to ask more questions if anything is still not clear to you. cheers, Al. |
|
|
|
Post by millard1399 on Sept 7, 2011 19:04:43 GMT 10
G'day again, bobbie
I meant to ask if you could tell me the date(s) on the warranty paperwork? That'll give me a better idea of the actual build date for your van, and help me to get a more accurate picture of which year the various Millard poptops actually belonged to. That'll also help with our history section.
Thanks mate,
Al.
|
|
|
|
Post by bobt on Sept 7, 2011 22:54:40 GMT 10
thanks Al.. On my trip this time, I noticed a lot of NSW caravans with rego labels on the rear of the van, thought it a bit odd.. Now I know why.. I don't think we have that obligation way down 'ere. hmm best I check.
|
|
Deleted
Deleted Member
Posts: 0
|
Post by Deleted on Sept 9, 2011 18:13:40 GMT 10
Hi Bobbie, by the look of the external photo's our van's could be twins. Mine was advertised as a 78 model when I bought it and also has the fibreglass pop top and rivetted sides with an aluminium frame. They appear to be the same size as well. You can check mine in the thread, chassis number MM2102. Don't know if I'm ready for the work yet, but one day I would like to get my van up to being half as good as Al's. Buddo
|
|
Deleted
Deleted Member
Posts: 0
|
Post by Deleted on Sept 13, 2011 15:36:07 GMT 10
Hi Buddo,
I'm guessing, but expect you have similar problems to mine - keep in touch!
Regards
bobbie
|
|
Deleted
Deleted Member
Posts: 0
|
Post by Deleted on Sept 13, 2011 15:43:09 GMT 10
Hi Al, The paper work below is the electricians certificate:  Regards bobbie |
|
Deleted
Deleted Member
Posts: 0
|
Post by Deleted on Sept 13, 2011 17:20:05 GMT 10
Hi Al, OK, here are the shots of the rear window the top two rivets on both the louvers are shot. I also checked the other windows closly and found one other missing from the LHS window. You're right - it would make sense to change them all and removing the frame from the body seems to be the correct way to solve a few more problems. 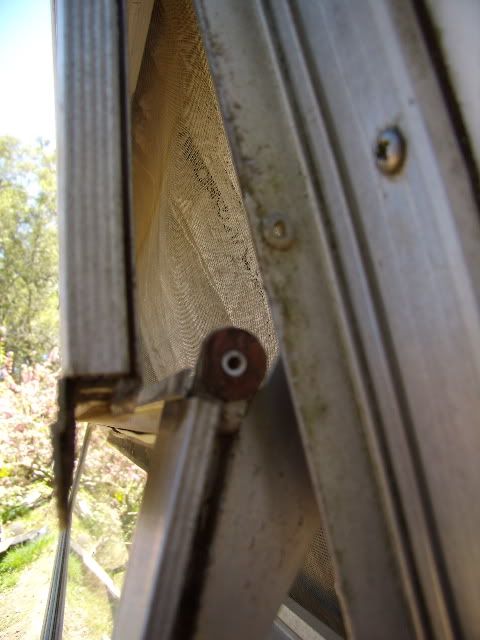  Springs: Below is a photo of RHS spring - is this a job that I can do, or would you recommend I get a mechanic?  Note the wires running along the axle - looks like I have electric brake control as well!  Regards bobbie |
|
|
|
Post by millard1399 on Sept 13, 2011 19:11:13 GMT 10
G'day bobbie, Firstly, thanks for posting the electrical certificate. That certainly confirms your chassis number was built in 1977 eh?! Now I wish someone would come on the forum with chassis number MM1400 (one number after mine) with the same certificate!  I guess if yours was built in mid October, then we could probably make a bit of a guess and say all numbers up to about MM2500 were likely to be built before Jan 1978?? Springs... I wonder how those two leaves have twisted like that? If you just hit them with a large hammer, would they go back into position? Hopefully there'll be somebody on the forum with a lot more knowledge about how to fix it than I have. What I can tell you is that if you undo the U-bolts to make the fix, you shouldn't use the same U-bolts again (stretched threads, etc). I discovered early this year on my other project, that U-bolts these days come in 9/16" diameter, and not the old 1/2" diameter. So, you have to get fish plates with the right size holes as well. Windows...good photographs!! I can see what you are faced with, and it should be a "fairly easy" fix. About the only thing I can caution you about is that if you are like me and want to fix things up properly when you pull them apart, the job ends up taking a heap longer than you first thought!   I found another photo that shows more clearly how the head of a rivet separates when you use a 1/4" drill bit... 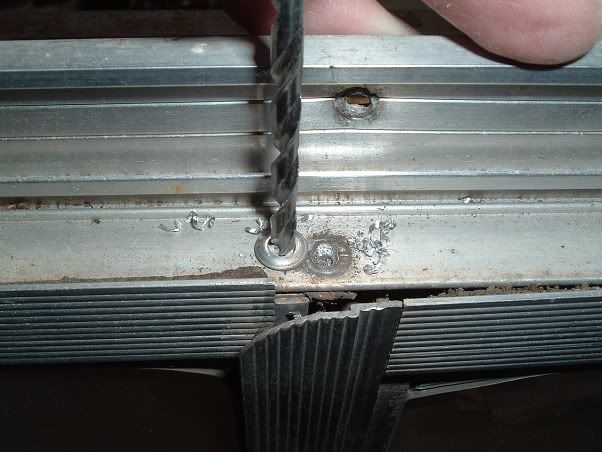 The other problem I found when dismantling the window frames is that the stainless steel screws in each corner of every frame can become stuck solid because of corrosion between the aluminium and the stainless steel... These are the corner screws in the main window frame:  ...and these are the corner screws in each louvre window frame:  I had three of these screws snap on me when I tried to screw them out. The heads snapped off, leaving the thread in the aluminium channel. It's a real bummer to have to get a small hacksaw blade into the channel slot to cut the screw shank out. If you ever have to dismantle a frame (such as replacing a broken glass), see if you can free up the screws somehow before you exert too much grunt on the screwdriver. cheers, Al. |
|
Deleted
Deleted Member
Posts: 0
|
Post by Deleted on Sept 13, 2011 20:09:27 GMT 10
Hi Al,
Thanks for all the advise - glad someone has experienced these problems before me!
My next problem is to get a shed so I can work under cover - I can probably do a couple of windows in a day, weekends only - so this is going to be a long haul.
Next weekend I whack the RHS spring with a club hammer and see what gives - must have hit a huge pot hole I guess?
Regards
Bobbie
|
|
Deleted
Deleted Member
Posts: 0
|
Post by Deleted on Sept 29, 2011 17:23:17 GMT 10
Hi Al, Here is my latest problem - The door lock. We discovered that we could lock the van door from the outside but 30 minutes later it would be unlocked. 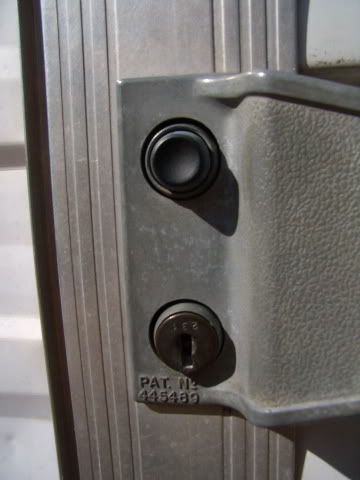 I dismantled the lock and discovered that part of the black plastic sliding plate was fractured. 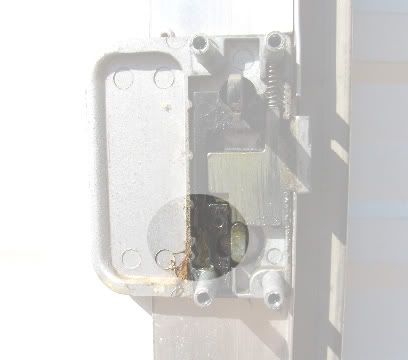  Does any one know where I can get a replacement slider plate? Also, the lock was greased which seemed a bit unusual as locks are usually lubricated with dry carbon? Yesterday, I thought I would have another crack at fixing the door lock for security reasons. I removed and stripped the unit down and removed all grease and accumulated dirt then 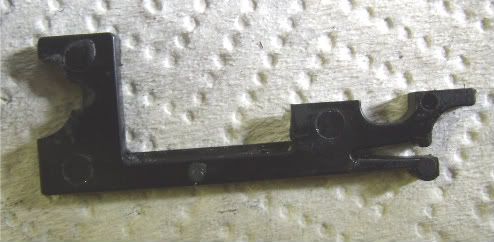  used super glue to attach the locking tab to the black plastic slider plate - waited for the glue to cure for 6 hours then re-assembled. Locked the van. Still locked this morning. Regards bobbie |
|
Deleted
Deleted Member
Posts: 0
|
Post by Deleted on Oct 18, 2011 16:40:17 GMT 10
G'day Al, I gave the spring leaves about 10 whacks with a Club hammer 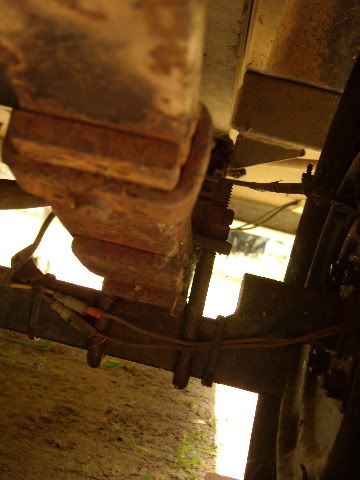 Had to do it from the other side as there is no room to swing due to the position of the hub - I'll do the 5 mm compensation the next time the wheel is off. Again, thanks for the advice!  Regards bobbie |
|
|
|
Post by millard1399 on Oct 18, 2011 21:21:10 GMT 10
G'day bobbie, I'm please it looks like you've been able to sort out the spring leaves.   Somehow or other, I've missed your other post about the door lock, but it looks like you've been able to sort that one out as well, so that's two wins in a row. ;D Trying to glue some of the plastics these days is a real challenge. There's certainly some "tricks of the trade" that can help, but you have to search around internet forums to find out what they are. Hopefully the super glue holds the broken bit on for a long time. cheers, Al. |
|
Deleted
Deleted Member
Posts: 0
|
Post by Deleted on Oct 19, 2011 15:43:44 GMT 10
G'day Al, Is there a sealant used between the window frames and the van or just rubber strips  Regards bobbie |
|
|
|
Post by millard1399 on Oct 19, 2011 21:01:46 GMT 10
G'day bobbie, If you're talking about the gap between the frames and the aluminium cladding, then yes a sealant is normally used. And the profile of the cladding used on these Millards means that LOTS of sealant ends up being used. Not only do you have to try and get a thin layer of sealant staying between the peaks of the cladding and the frame, but you also have to pump a heap of sealant onto the valleys to ensure the valleys in the cladding are filled properly as well. That's where the majority of the sealant ends up being used. Some other manufacturers actually crimped their cladding flat around all the windows and perimeter of the walls. That makes it heaps easier to apply a uniform thickness of sealant around all the edges. Not so easy for the Millards I'm afraid. If you click on this link, it will take you to Page 14 of my poptop thread. Scroll down to Reply #202, and start reading down from there to see how I did the job. I'm reluctant to recommend the Sika sealant I used. Now 18 months later, and it has a number of cracks in it, whereas the product information said it would always stay soft and pliable. I honestly don't know whether the cracks extend all the way down through the sealant layer, but I shudder to think how much water might be seeping into any of the cracks if they do. cheers, Al. |
|
Deleted
Deleted Member
Posts: 0
|
Post by Deleted on Oct 19, 2011 21:26:38 GMT 10
Hi Al,
Struth! - sounds like we should find out what the original sealant was,
'cause what ever was used on mine looks like it's still holding out - Well I think it is!
I have read a bit about the sealant problem here and on other sites and expect a marine solution (Flexible, UV and salt water repellant) should be the answer.
I do have some friends with chemical engineering backgrounds who may help, so I will get back to you if I get some feedback.
Regards
bobbie
|
|
|
|
Post by M43322 on Oct 20, 2011 19:02:38 GMT 10
|
|