Deleted
Deleted Member
Posts: 0
|
Post by Deleted on Jun 4, 2011 21:27:54 GMT 10
OK, finally got around to getting a few more photo's. So here's my 78 Millard pop top. Have tried to photo bucket thing so hope this works OK.  The photo without the tarp was taken a little while ago,   the ones with the tarp over the van are today. The tarp is on while I do an unexpected repair (see my post in the dummy spit section) Here's a couple of the interior as well.   I've got some work to do with the interior lining in the back of the van, thinking I might just carfully take it out and replace in one section with some ply or pannelling and then repaint the van. Will be a case of waiting a bit as the kids are keen for a weekend away so will probably be doing a short run in the next couple of weeks. Should be fun, have towed trailers for ages but have little experience with a van. |
|
|
|
Post by atouchofglass on Jun 5, 2011 7:25:43 GMT 10
Nice looking van you have there Buddo Kinda reminds me of someone else's van that was done up awhile ago.... Just can't seem to remember.... Wasn't all that popular a thread from memory      ;D ;D ;D ;D Ohh is Al gunna spit at that oneBe ready for a bit more than a little repair on the roof. It always seems to be a small job until you get started and then all h#ll breaks loose. At least you have a great example to follow with Al's rebuild. Cheers Atog |
|
Deleted
Deleted Member
Posts: 0
|
Post by Deleted on Jun 5, 2011 20:36:45 GMT 10
At least it has an alloy frame so it can't ALL be rotten, lol. The rework has already started. The double bed in the back of the van used to fold up into a lounge, I decided to make it into a permanent bed and built 2 new storage pods. The new leak has destroyed the lids and we haven't used the van yet. Oh well, such is life. I am planning to take out the lining from above the bed and hopefully replace it in one sheet. If there is no rot in the frame there the van will be fully usable then and I might wait until the kids are off our hands to do the full refit for the loop when we retire. This will be a while as our youngest is only 2.
|
|
|
|
Post by drylander on Jun 5, 2011 21:22:06 GMT 10
If there is no rot in the frame there the van will be fully usable then and I might wait until the kids are off our hands to do the full refit for the loop when we retire. This will be a while as our youngest is only 2. time will fly its only 16-40years and they leave home   Pete |
|
|
|
Post by millard1399 on Jun 5, 2011 23:04:41 GMT 10
G'day buddo, Think carefully about how you fix that rear ceiling panel. I've never seen an alloy framed Millard stripped down to see how it's all put together, but if it's anything like my timber frame, the ceiling panel fits onto the top of the frame on both sides. Cut it away, and there's no framework to fix the new panel onto. This photo shows how the rear ceiling panel fitted onto my side frames... 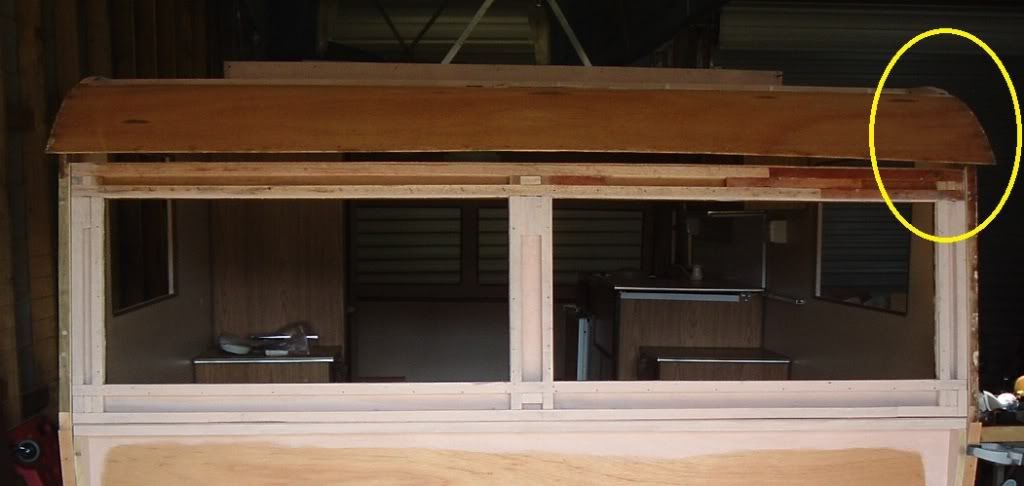 You can see in the circled area how the ceiling panel sits on the side frame, and then there's another strip of timber sitting along the side on top of the panel. So, the ceiling ply is sandwiched in between the frame and another strip of timber. This photo from the front of my van shows the sandwich effect a bit more clearly, with the edge of the ceiling panel shown by the red arrow... 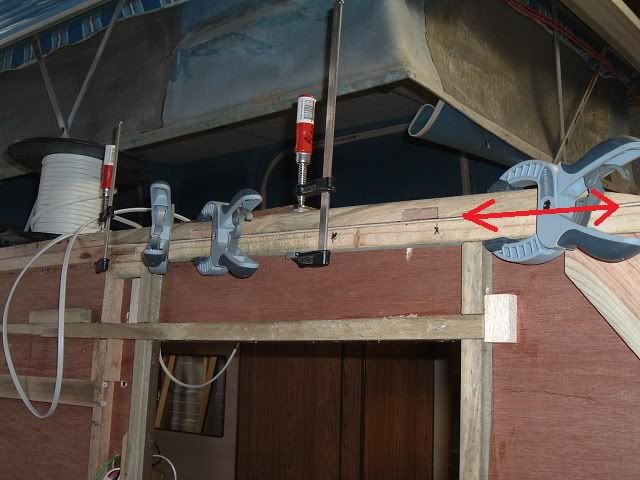 I'd be inclined to look at the job from these perspectives: 1. Do nothing. Leave it as it is, and live with it. Provided you've fixed the leak from the outside, then the inside ceiling panel will just look crappy, but won't necessarily fall down around your ears. Or, 2. Glue a new ceiling panel onto the inside face of the existing panel. Buy a sheet of plain ply from Bunnings ($13.50), and fit it over the old panel. Paint it a similar colour to the old panel. Then leave it for another 20 years until you get a hankering to do a proper resto (...which you really wouldn't do because nobody gives two hoots about Millard restos.     ) I think if you cut the old panel away, you'll be spending a fair bit of time working out how to anchor the new panel when there's nothing on either side, or the top of the rear windows, to anchor it to. Let me know if all of that sounds like a heap of gobble-de-gook and you need a clearer explanation.  cheers, Al. |
|
Deleted
Deleted Member
Posts: 0
|
Post by Deleted on Jun 6, 2011 22:15:44 GMT 10
Thanks Al, you've given me something to think about. I thought the panel would be held in place with the plastic strips down the side and across the top at the pop top section and figured there must have been a cross member in the frame for the light to attach to. Possibly not from what you've said. First job might be to take out the light and see what it is connected to and how as it is still very solidly attached even though the ply is water affected. If there is a cross member in there I might still be able to carefully prise off the plastic stripping and redo and use the cross member for extra support. Also, might be able to leave a strip of the old ply down each side and use H pattern plastic joining strip to add a new piece in as well. At least you've made me stop and think rather than my usual "rip into it and see what develops" attitude. Yes, will have to have a good look on the weekend if I get time. Will post the outcome when I have investigated.
|
|
|
|
Post by millard1399 on Jun 7, 2011 0:31:49 GMT 10
G'day again buddo, Yes there is a timber "ladder frame" on top of the rear ceiling ply, and the ceiling ply is stapled to the ladder frame. But the ladder frame only covers about a foot of the ceiling ply in length. This photo is from the front of my van, but the rear is essentially a copy of this... 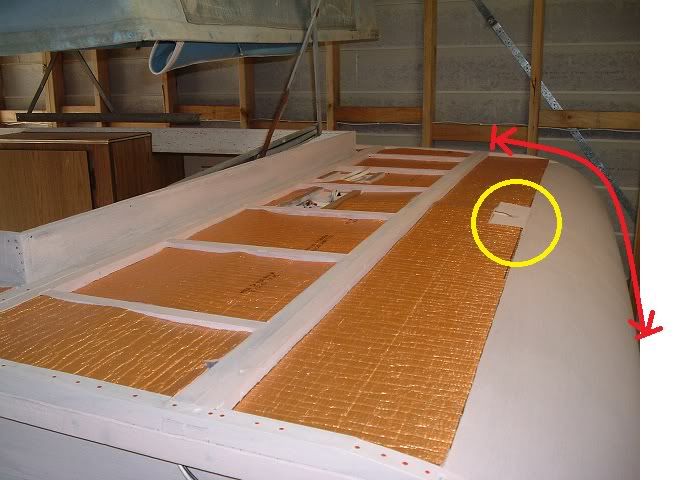 There are two things to note in the photo... 1. the light fitting (yellow circle) is just a second piece of ply glued to the ceiling ply. 2. the section of ceiling ply between the red arrows is totally supported on the side framework, and is then bent down and fixed to the outside of the top of the rear window frame (see following photo). 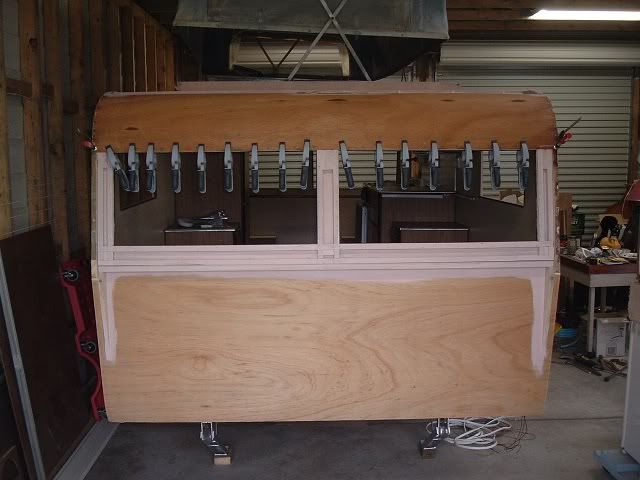 This last photo shows you what the timber framework looks like on the sides of my cabin roof... 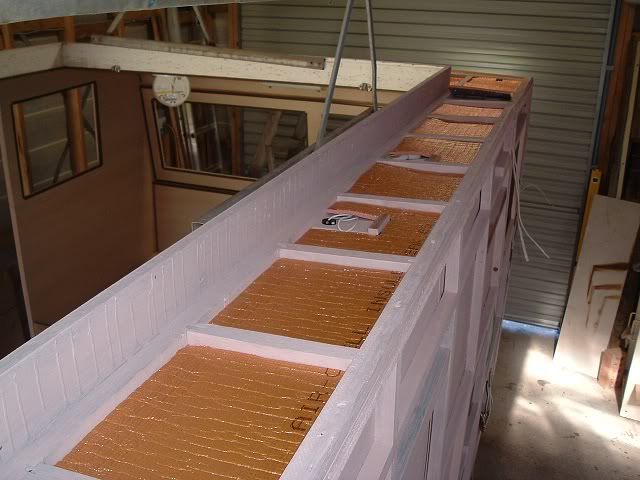 Hope this helps you to sort out the problem.   cheers, Al. |
|
Deleted
Deleted Member
Posts: 0
|
Post by Deleted on Jun 7, 2011 19:29:44 GMT 10
Thanks again Al, you are an absolute wealth of knowledge. Don't think I'll ever have the inclination, expertise, room, or patience from the missus to undertake the extensive strip down and rebuild you have done but hope I can do enough to make my van enjoyable for us and give us quite a few years of family holidays. Expect some more dumb questions from this newby though I'm afraid.
|
|