|
|
Post by millard1399 on Oct 15, 2010 17:48:01 GMT 10
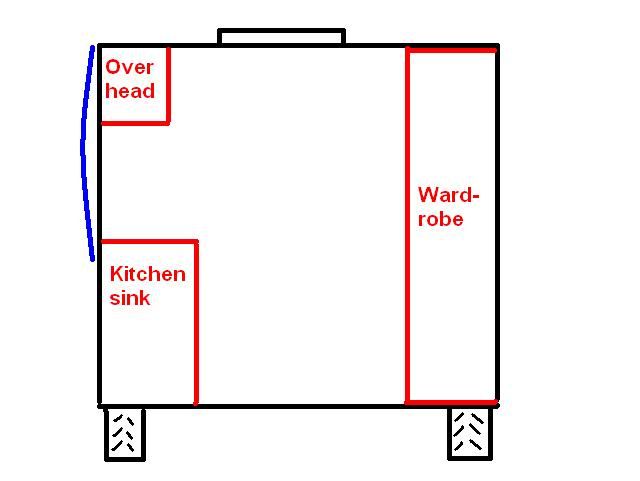
G'day T/T, I'd be interested in hearing from Denis how his hatch is held up if there's no framework in the ceiling. I'm curious about how Franklin managed to support the hatch in those days. I agree with Denis that the more internal cupboards/structures you have that go from floor to ceiling, the more structurally sound the van will be. In many vans I've seen, the wardrobe is the full height, which provides a bit of rigidity to the cabin on that side. But on the kitchen side, I've not often seen something that goes from floor to ceiling, particularly in shorter length vans. I'm aware of vans where the kitchen wall has bowed out due to the weight bearing down from the overhead cupboards along the side wall. The following diagram shows what I'm talking about, with the blue line indicating where the wall bowed...  If you do find there's timber framework in the ceiling cavity holding up the hatch, one other option to consider is using treated pine decking timber to make the frame. This decking is 90mm x 20mm, screeded on one side and flat on the other. You can put it in place with the flat side showing towards the hatch opening. 90mm cut up the guts gives you two lengths about 43mm width, after losing 3mm in the sawcut. Almost the same dimension as plain pine timber 42x19mm. The treated pine won't rot easily with any future leaks, and can be painted if required. The sketches I posted above, plus the photo with the red arrows, are all done in Microsoft Paint, a very basic graphics software program that comes with all Microsoft operating systems (...at least I think it comes with all of them). I run Windows XP, and it can be found by clicking Start > All Programs > Accessories > Paint. There are probably far better programs available for free on the internet, but I've grown up with this one and have learnt how to do all the basic stuff with it. cheers, Al. |
|
|
|
Post by tassietiger on Oct 15, 2010 18:01:30 GMT 10
Thanks for the info on the software Al. I found it where you said  Yep it is certainly going to be an interesting reno. A voyage of discovery  Cheers Wayne |
|
|
|
Post by tassietiger on Oct 16, 2010 16:06:41 GMT 10
Well a rainy, snowy, cold Saturday arvo with no AFL but a warm fire has inspired me to give some thought to how I might reconfigure the interior of the "Tiger" Hunter. First diagram shows the existing layout  Second diagram shows proposed layout  I would welcome questions, suggestions, comments etc etc. Cheers TT |
|
|
|
Post by ronaldjohn on Oct 16, 2010 17:04:18 GMT 10
Hi Wayne, You can fit a tri-fold table at the front. If you have a browse in a caravan sales yard, you'll see how they make it ;D As for the rear, one single is okay when you are on your own. If not, I's suggest a day night lounge, like my Arrow has.   Fold down tables are always good for computers etc. On your kitchen area, why not put in a sliding top over the sink. It gives more bench space.  Cheers, Ron |
|
|
|
Post by tassietiger on Oct 16, 2010 18:06:10 GMT 10
G'day Ron,
thanks for those ideas and thoughts. When I bought the Hunter she had a cover over the sink which I store in the wardrobe when not in use. Re the table I have been scanning the caravan magazines for ideas and will follow up on your suggestion of looking at some real examples to get the good oil on construction methodolgy.
I am and will be on my own so a single bed is going to be more than satisfactory just need to get the lenght right as I am over 6 foot. All good fun putting the ideas together.
Cheers
Wayne
|
|
Deleted
Deleted Member
Posts: 0
|
Post by Deleted on Oct 16, 2010 22:01:32 GMT 10
Hi TT, Proposed layout looks good, can you fit a double bed? I put this info into your post re 4 seasons hatch, shows how I fitted the hatch using the original opening. ditzygypsy.proboards.com/index.cgi?board=techno&action=display&thread=652 Hi Al, the roof of the old Caravelle's is a classic monocoque construction, Ie, the skin (read roof lining) takes all the load. because it is curved it becomes very strong and resists twisting and bending that would normally occur in a flat panel. the cupboards then act as a brace to transfer loads from the roof panel to the walls. In later vans made with framing in the roof the construction becomes semi-monocoque, the skin/ lining supplies diagonal bracing to the roof and the end walls and, if fitted, internal partitions supply bracing between the roof and the side walls. A caravan is like a cardboard box, it will twist easily unless some form of bracing is incorporated. the chassis is just there to hold the floor and give structure to mount suspension on, it cannot supply torsional rigidity to the bodywork only assist in controlling bending moments. Caravan shells are not very strong when they are stripped of all their internal structures. If you look at what the manufacturer has done when building the van you can get an idea as to how he gave the bodywork torsional rigidity and if you follow those principles you cannot go far wrong.When I rebuilt my Franklin I worked out how the body was stiffened then used the new internal structure to achieve the same result. Cheer, Denis. |
|
|
|
Post by atouchofglass on Oct 17, 2010 7:19:43 GMT 10
I am and will be on my own so a single bed is going to be more than satisfactory I just need to get the length right as I am over 6 foot. Cheers Wayne The original bed length in our Olympic was a tad over 1800mm As I am also 6'+ they are too small in length and not that good in width either. So for comfort I'd be recommending about 2mtres. When we convert our singles into a double it comes out at about 2.1m long. ;D ;D ;D ;D ;D ;D Definite overkill....... but comfortable. A Divan/lounge that converts into a bed across the back is still a very good option. Across the van seems to save space Just my thoughts Cheers Atog |
|
|
|
Post by tassietiger on Oct 17, 2010 10:59:32 GMT 10
G'day Denis and Atog, Denis - yep got your post re the installation of the hatch and printed it off and put it in my renovation folder. The 4s hatch I am bidding on on ebay at the moment looks like being mine but nothing is done till the auctions over. There is room for a double bed. When I bought her there was a double bed steel frame and mattress which someone had put in place of what I guess was the original divan/settee bed. I am basically setting her up for(hopefully) an extended working holiday and as I am single with no intentions to change that I have no need for a double bed. They take up too much room in a small van and waste a lot of space. I also want to have room for leaving the laptop setup rather than having to keep putting it away when I want to use the table. The front table area would still be able to be converted to a double bed if needed. And thanks for the information regarding maintaining the structural integrity during the renovation. Atog - I am working on a maximum length of around 1840mm. As I sleep in the foetal position I will only need the extra length for that early morning stretch we all have before leaping out of bed and I figure I can probably accommodate that by having a "semi tunnel berth" through the new full height cupboard that will replace the existing wardrobe. As to width you will see that the proposed bed is wider at the top(800mm) than at the foot what you could call the classic coffin shape(no harm in practicing  ) I have calculated that this will provide sufficient room for head and shoulders and as I am not a restless sleeper I want be tossing and turning and banging into walls etc. An interesting discussion which has started to clarify how I might proceed so thanks guys and I look forward to your continuning input. Cheers TT |
|
|
|
Post by millard1399 on Oct 17, 2010 13:22:14 GMT 10
TT, another option to consider is to rearrange the front seating area, and do away with the seat on the kitchen side. Even if you left the seating framework in position (to allow conversion back to dual seating later), you could build on top of the seat bench and extend the kitchen cupboards to the front wall. A shorter table (or a fold up one like Ron has suggested) would give you access to the additional cupboards on the kitchen side.
cheers,
Al.
|
|
|
|
Post by tassietiger on Oct 17, 2010 13:57:32 GMT 10
G'day Al,
The challenge there would be an extension of the kitchen cupboards to the front of the van at their existing bench height would clash with the windows. So as to avoid this the bench top would need to be considerabley lower. More cupboards of course means more reasons to fill them with "things".
Interesting thought though.
Cheers
Wayne
|
|
|
|
Post by tassietiger on Nov 12, 2010 10:29:54 GMT 10
Well after three weeks of waiting thanks to a stuff up by Oz Post I finally got the 4 seasons hatch I had been bidding on on ebay. A courier delivered it yesterday.  It is in very good condition. All flaps and associated mechanisms work well and all the screens are intact if a little dirty. Has some slight hail damage on the top but not visible from the inside. At $245 including postage it has saved me around $140 so I'm happy about that. The plan is to put the Hunter into a shed next March and start the reno by pulling out the back window to repair frame damage remove the roof cladding and lining to repair any damage to the frame and to install the hatch. I figure while I am at it I may as well do the rest of the reno as well that way its all done ready for next summer. Well, that's the plan anyway    Cheers TT |
|
|
|
Post by bobt on Nov 20, 2010 19:22:08 GMT 10
aaaah nothing like a happy tiger   |
|
|
|
Post by tassietiger on Dec 9, 2010 7:29:57 GMT 10
Morning all  I am at the planning stage for the big reno which I hope to start in March after a trip away. At the moment I am seeking to source materials etc etc and I am hoping someone out there might be able to assist me with some information re ally cladding. The two photos show the cladding on the rear of the Hunter around the window. This cladding also goes up over the roof and down to the front window.   I will be removing the rear window to replace the rotten sill and one option I am looking at is not to put the window back in but replace it with cladding. This gives me more wall space in side. My question relates to the profile of the cladding. I have looked in the CAMEC catalogue page 87 and I think the cladding in the photos matches the profile of CP48 (bottom left corner of catalogue page) but would welcome a second opinion.   |
|
|
|
Post by millard1399 on Dec 9, 2010 9:34:40 GMT 10
G'day t/t,
I've often looked at the aluminium cladding profiles on the caravan parts websites, and it's not easy to work out whether the drawing in their catalogue is the same as the profile on a van. From what I understand, Barnes Caravans in Sydney is the main supplier of these aluminium profiles. The old man was the original builder of vans in the '60s or 70s, and now the son and daughter have taken over the spare parts business. But they salvaged the roll forming equipment that the old man had, and can reproduce some of the old cladding profiles. Rocketrod was able to get some of the old Viscount wall profile in new cladding, and I think Barnes are the ones who can do that profile.
It's probably worth giving Barnes Caravans a call on (02) 9728 6366 to see if CP48 matches your profile, or at least if it will be compatible with it. On the CaravansPlus website (which is down for maintenance as I type), I seem to remember them recommending people get in touch with Barnes Caravans to suss out cladding requirements.
From the look of the Camec catalogue, there ain't a whole lot to choose from for the ends and roof of a van, so maybe CP48 is the only thing available these days.
Barnes don't have a website, so you can only contact them by phone, apparently. If you get in touch with them, let us know how you go.
cheers,
Al.
|
|
|
|
Post by tassietiger on Dec 9, 2010 11:10:57 GMT 10
Thanks for that information AL. I just rang them and spoke to a chap called David who was very helpful and knowledgeable about old Franklins. He gave me an email address so I will send him the photos and he will be able to confirm which profile it is and if it is still available.
I will keep you posted.
Cheers
Wayne
|
|
|
|
Post by tassietiger on Dec 9, 2010 16:26:31 GMT 10
Well David emailed me back with a very to the point reply "the profile is F3" so at least I now know what the correct profile is. I have made contact with the local Jayco agent here in Hobart who also do repairs and they have tentatively indicated that they would be willing to order some sheets for me which would come down with their normal order from CAMEC so I will pursue that a bit further next week and let you know the outcome.
|
|
|
|
Post by millard1399 on Dec 9, 2010 18:10:43 GMT 10
Ah-ha! So this means that the Camec CP48 profile is not the only one available?
Good onya for chasing that up. That's useful information for the rest of us to keep in our minds. Sounds like the people at Barnes Caravans are really helpful! ;D
Do you have to nominate how you want the long edges of the sheet rolled, so you can interlock it with the sheets already on the van? Or do you just make a flat overlap joint? Reason for asking is that I noticed on the Capricorn van I recently worked on, that the roof joints were fitted the wrong way round. Instead of water flowing over the joint, it flowed into the joint, because that was the way the interlocking joint had been designed. Stupid, if you ask me. You would think the designers would make sure the van had the best possible means of preventing water getting into the van. Same thing is on my Millard, which I spent a lot of time making sure it would stay waterproof. Dumb, dumb, dumb designers.
cheers,
Al.
|
|
|
|
Post by tassietiger on Dec 9, 2010 19:05:51 GMT 10
Well, David has not as yet confirmed one way or the other if F3 profile is still available. I have sent him an email asking that question. I will also ask the question of the people here in Hobart.
If you have a look at page 87 of the CAMEC catalogue they talk about two types of joint seams "Pittsburg" and "Lock" seaming. They also recommend lock seaming for the F3 profile.
I think what I will need to do is remove the rear window, remove the small sheets of cladding either side of it and ascertain what seam method has been used then either get CAMEC to do the seaming when they supply sheets, which apparently they can do, or see if the local repairer has the machinery to do it. A journery of discovery!!!!
Stay tuned.
|
|
|
|
Post by millard1399 on Dec 9, 2010 22:12:56 GMT 10
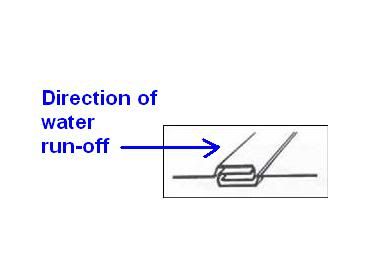
The Pittsburg seam is the one used on the side cladding, typically where the strips of cladding are about 10" wide (high) X the length of the van. You start from the top of the wall and nail the first strip into position along its bottom edge, then the next strip fits up into the Pittsburg seam and you nail that strip along the bottom edge, and so on down the wall. The lock seam is the one you have to nominate whether you want it UP or DOWN on the long edge(s). To my way of thinking, you'd want the edge that's closer to the highest part of the roof DOWN, and the other edge, that's closer to the ground, UP. That way the water run-off would be flowing OVER the join, not INTO the join, as per this diagram...  But then a lot depends on how you are going to marry the new sheet(s) into the existing roof sheeting. Gets a bit complicated, ay?!! cheers, Al. |
|
Deleted
Deleted Member
Posts: 0
|
Post by Deleted on Feb 11, 2016 20:52:21 GMT 10
hey guys, just incase anyone is looking for one, we are selling our 1974 Franklin Caravan  see details below Classic 1974 Franklin Caravan with modern twist We are selling our rare classic Franklin Caravan complete with all working features with ergo This little van comes with all the necessary features including a 60 Litre water tank, 2 burner gas stove, fridge and 9KG Gas cylinder and spare wheel. It also has modern amenities including a TV Areal, a 120AH AMG Battery Pack and Anderson plug. The caravan can be transformed into a double divan and single bed making the most of a small and versatile van, measuring 3.25m in length, not to mention its cute painted pelican on the exterior. We are located in Victor Harbor an hours drive from Adelaide SA, you are welcome to come and take a look! Rego till August $4,200 yvecamino047@gmail.com.au www.gumtree.com.au/s-ad/hayborough/caravans/classic-1974-franklin-caravan-with-modern-twist-inc-rego-till-aug/1103932466 |
|
|
|
Post by Chief110478 on Mar 26, 2017 2:31:31 GMT 10
tassietiger...tassietiger...tassietiger   You sure make like difficult for yourself, don't you?? Buying a van from NSW when you live in Tassie? Are you nuts??   No, as a matter of fact, you're not!!!! ;D ;D ;D Ya can't go wrong with a Franklin, my man! This little van is a Franklin Hunter model, first launched in 1972, and then appears to have been discontinued in 1977 when the Franklin Truline range was launched. Unfortunately, the chassis numbering system we've cracked for the 1960s is not applicable into the 1970s. Franklin sold out to an investment company in 1970 and changes were made under the new ownership. But when you get the van, tell us what the numbers are on the drawbar, and it'll help us to crack the coding for Franklins in the 1970s. Your van seems to match up with a photo I have of a 1973 Franklin Hunter advertisement, in terms of the painted stripes on the sides, so it probably is from around the 1973 period as frankidownunder says. I've never seen a tasmanian tiger, let alone one with a BIG grin ;D , but I reckon there's one down Sandford way that's showing a few bare teeth at the moment!! ;D ;D ;D   Good luck to ya! cheers, Al. |
|


 ) I have calculated that this will provide sufficient room for head and shoulders and as I am not a restless sleeper I want be tossing and turning and banging into walls etc.


