|
|
Post by kiwijim on Dec 22, 2009 21:03:12 GMT 10
Don't let it worry you Mate, At least in your own mind you know, you have done a job that will last for years. Wait until you start towing it around, that's when the pats on the back will come. ;D ;D ;D There are a lot of people out there who appreciate a well re-constructed van, believe me.  ;D cheers kiwijim  |
|
|
|
Post by millard1399 on Dec 22, 2009 21:32:15 GMT 10
Crikey kylarama, back in October you said you had a plan to get the van sorted out by Xmas, and here you are!! Congratulations on a fine job! ;D ;D Shame about the drawbar length, but gees ya didn't miss out by much, ay?!!    What's a piddlin' 75mm between friends?!   Hope the van goes well for you over the coming holidays. Will look a million dollars...and it cost you less than $2500 to make it that way! Bargain!!!! cheers, Al. |
|
|
|
Post by kylarama on Dec 23, 2009 11:38:07 GMT 10
The good news keeps coming.
Back in September the Inlaws were still going to rebuild their house after the fires. Then the council did the bushfire building assessment and rated their property as a FZ (flame zone) which is the most extreme rating. This meant they would have to adhere to strict building regulations and would not be able to rebuild their beautiful post and beam mudbrick home they built themselves in the 70's.
A good friend who lives further south in St Andrews on a 19 acre property (an area not touched by the fires) deiced to sell up. It's also a post and beam muddie that he built himself in the 80's with help from the inlaws.
A spur of the moment deal was struck with their friend and their old 20 acre property was put on the market. After a few people stiffing around a deal was done today and the property has been sold, which means they can pay off the bridging finance they took out on the new house and now start looking to the future.
|
|
Deleted
Deleted Member
Posts: 0
|
Post by Deleted on Dec 23, 2009 13:05:52 GMT 10
It's truly Christmas  |
|
|
|
Post by kezzbot on Dec 24, 2009 22:25:44 GMT 10
Congrats on the rego Kylarama.
Badluck on the back door.
Merry xmas
|
|
|
|
Post by kcountrychic on Dec 25, 2009 21:20:53 GMT 10
hope your parents are doing ok now and goodluck with your new van, enjoy the challenge of doing it up....and then enjoy the touring part, something we are yet to do ourselves....goodluck and goodluck to your folks too...
|
|
|
|
Post by kylarama on Dec 26, 2009 23:06:13 GMT 10
Seems like were never going to get away! Now leaving on the 29th as it's my Nan's birthday on the 28th. Now the little one (2 and 8 months) is not well. And can't run any gas in the caravan. After rain halted work on the 24th and something called Christmas stopped me yesterday, I managed to get back into it today. Refitted the water tank after a little hiccup. When I took the tank out the bolts that are welded to the straps were to rusty to undo, so I cut them off with an angle grinder. No dramas pulled out the trusty MIG welder, slide under the van and tack on some new bolts. Then gave them another tack weld just to be sure, then blasted the hell out of them just to make sure they never broke. Jacked the water tank into position (after a good clean with ' Tank a Clean') and pulled the straps under, only to discover the bolts are 30mm to short  Managed to find some tension nuts (like a normal nut but about 30mm long) at the local hardware store along with some extra bolts, which got me out of the poo. All plumbed up now, including new plunger rubbers in the hand pump. Most caravan accessory stores want $30-$35 for 10 metres of 12mm drinking water hose. Bunnings have Pope brand for $17.60 Wired up the 12 volt lighting to a 38amp hr jump starter pack for the time being. Want to do a full setup with fuse panel, lighter sockets, extra lights, anderson plug ect later. Got the fridge running on 240 volt nicely. Does anyone know if you can fit a 12 volt element to these? Then I reattached the gas lines under the van and hooked up the regulator the gas bottle. Turned it on, and gas everywhere. The 33 year old regulator had sprung a leak out of the pigtail. Now do you think I can get a flexible line with a 5/16 male SAE fitting on it anywhere? No luck a Bunnings, Mitre 10, Rays Outdoors or BBQ's Galore and all the caravan stores near me are closed until the new year  |
|
Deleted
Deleted Member
Posts: 0
|
Post by Deleted on Dec 27, 2009 7:01:00 GMT 10
.... Got the fridge running on 240 volt nicely. Does anyone know if you can fit a 12 volt element to these?... The answer is ... maybe ... depending on model; but they are not cheap. A better and quicker solution IMHO, is the cheap and cheerful modified sinewave 300 watt inverter trick. Jaycar/ Di_kies for around $80. The fridge element will draw something in the order of 150 - 200 watts on these old fridges. As it is purely a resistive load (heater element), the 'ruff sinewave' from the cheap inverter is perfect. The safest way (only way) is to dedicate the inverter to the fridge with either: 1. Inverter mounted within reach of the existing fridge 240v plug - legal, 2. An 'inverter GPO' adjacent (with inverter on the floor under fridge) - not legal, 3. Or simply an extension cord from the inverter (under fridge) - legal. You may need to 'beef up' the 12 volt wiring part of the way, to keep the inverter above the trip off voltage (around 10.5 volts). However once up and running; the beauty of this system is that the inverter will ensure a full 240v to the fridge despite some voltage drop on the 12 volt line, which means that the fridge is operating at maximum watts. When on 12 volts, any voltage drop reduces the fridge efficiency markedly. There's an excellent thread of a members solution in the tech section on this. ditzygypsy.proboards.com/index.cgi?board=techno&action=display&thread=284also have read of: ditzygypsy.proboards.com/index.cgi?board=techno&action=display&thread=316and ditzygypsy.proboards.com/index.cgi?board=techno&action=display&thread=418 |
|
Deleted
Deleted Member
Posts: 0
|
Post by Deleted on Dec 27, 2009 9:09:04 GMT 10
|
|
|
|
Post by kylarama on Dec 27, 2009 21:26:04 GMT 10
Thanks for the info Wahroonga.
The fridge ventilation was always on the cards. Was thinking of using 2 60 or 80mm computer fans wired up to a 5 watt solar panel permanently fixed to the roof.
Had thought of the inverter idea, problem is I was thinking of charging the van batteries via an inverter and my 17amp 3 stage charger.
Still have to set up the Pajero first with dual batteries to run my 12 volt 60 litre Evakool fridge/freezer.
|
|
Deleted
Deleted Member
Posts: 0
|
Post by Deleted on Dec 28, 2009 6:41:32 GMT 10
Perhaps two 300w inverters. They are as cheap as chips?  |
|
|
|
Post by kylarama on Dec 28, 2009 21:33:57 GMT 10
Plus another inverter (pure sine wave maybe) mounted in the van for general use when camping. The other inverter (or two if wahroonga has his way) would be powered from the car not the van batteries.
So thats three inverters, plus the 150 watt inverter already mounted in the Pajero.
The two inverters could be done but would mean using either 8 or 6 B&S cable to the caravan plus its own redarc isolator, so it does'nt affect the dual batteries in the car which is used to power the car fridge.
It's going to cost around $600 for the Pajero's dual batteries. That includes the tray, aux battery and new cranking battery.
Another $160 odd dollars to wire up the Paj with it's own seperate circuit for the caravan. Includes a Redarc isolator.
Plus 6-700 odd dollars to wire up the van with a AGM battery plus 2 inverters for the charger and fridge.
I think this is starting to get expensive and complicated.
Might leave this one on the 'maybe list'
|
|
Deleted
Deleted Member
Posts: 0
|
Post by Deleted on Dec 29, 2009 6:35:35 GMT 10
Good DC doesn't come cheap.  |
|
|
|
Post by kezzbot on Jan 3, 2010 19:51:39 GMT 10
wow Kylarama you've lost me with all those inverters. I was just going to get one of these but i haven't looked into that much as of yet so i don't know if its really what i need as of yet. |
|
|
|
Post by kylarama on Jan 3, 2010 21:52:36 GMT 10
wow Kylarama you've lost me with all those inverters. I was just going to get one of these but i haven't looked into that much as of yet so i don't know if its really what i need as of yet.   If you want to run the dishwasher, clothes dryer, microwave while boiling the kettle all at once. That will be perfect.  You did say you had 4 odd UPS batteries to use, so you have the power to run an inverter like that. I'm only going to run 1 battery so I'm going to limit the inverter power to 300 watts to conserve power when bush camping. |
|
|
|
Post by kezzbot on Jan 3, 2010 22:23:48 GMT 10
your probably right. This one should be more then enough. |
|
Deleted
Deleted Member
Posts: 0
|
Post by Deleted on Jan 4, 2010 7:33:15 GMT 10
I guess your running a small std fridge, which will will a sharp current surge at start up, but 1600W is hellishly large for free camping ... if that is the intention.  Most free campers get by with a couple of 100Ah 12 volt batteries. Given that a a max 50% battery discharge is recommended for long battery life, this provides a 100Ah capacity @ 12 volts. In Watt hours (Wh) this is 100 x 12 = 1200 Wh, which, with a gas fridge, economical lighting and tv/radio, can easily run a van for 2 or 5 nights before recharge. 100Ah can be replaced by the alternator over say a 6 hour drive or so. 200w of solar panel is often used to assist the charge. 1200Wh means that you could theoretically run a 1200 watt load for 1 hour (let's say a microwave). In reality with such a savage current drain on the batteries (100A), it would be significantly shorter. However if the load is a much more modest 30 watts or so, then 40 hours with a 2.5A drain would be achieved, (1200/30 = 40 hours @ 30/12 = 2.5A). It may be more cost effective to revisit your energy requirements; pruning or using more efficient devices as required. Batteries are heavy, so much more that 200Ah becomes a serious burden with attendant risks of overloading the van. However if it is used as an UPS, for short duration power hits, then the battery capacity requirement can be much lower. The units specifications are incomplete. I'd request further details. These units would more frequently be found in a remote dwellings with only solar, wind or generator supply. With the cost of connection to the grid well in excess of $10,000 for most rural properties, alternate energy supply may be a cost saving alternative. If this is the application, with a 'little power shed' nearby, then this is may be an excellent solution ... and the price is most certainly right.  |
|
|
|
Post by kylarama on Jan 16, 2010 17:33:12 GMT 10
Well we never ended up going away over Christmas. Were going to leave on the 29th, but by the 28th both me and Rach were so burnt out from a very busy year. Plus the mad month prior to Christmas, with working 6 days a week plus working on the van until 10pm most nights. Add the hot weather and Rach being 5 months pregnant, we pulled the pin the night before. I have to say it has been one of the most enjoyable holidays I've had in a while. Spent from the 29th to about the 4th sleeping in, watching DVDs on the couch during the day and sipping on a Corona or 10 by the inlaws swimming pool. Spent the last 2 weeks cleaning and doing repairs around the house, gardening and cleaning up the inlaws block ready for it's hand over on Monday. Today I thought it's time for abit of caravan action. Completely stripped out the interior for a major scrub down, seat cushions, cupboards emptied and flyscreens off the windows. I pulled the table out which I assume drops down level with the seats to make another double bed. Problem is I can't work it out, can anyone help? 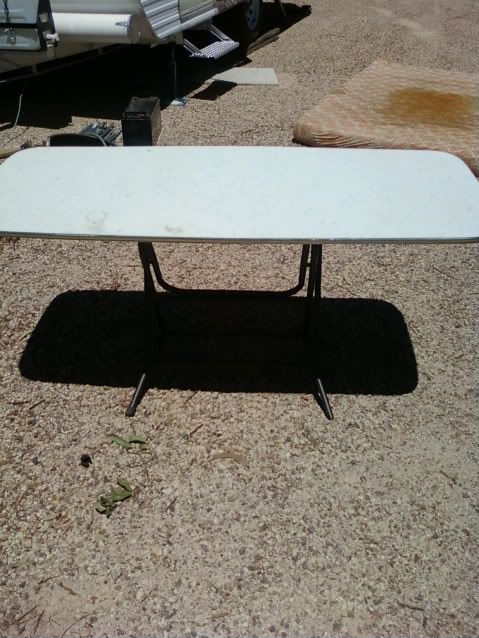 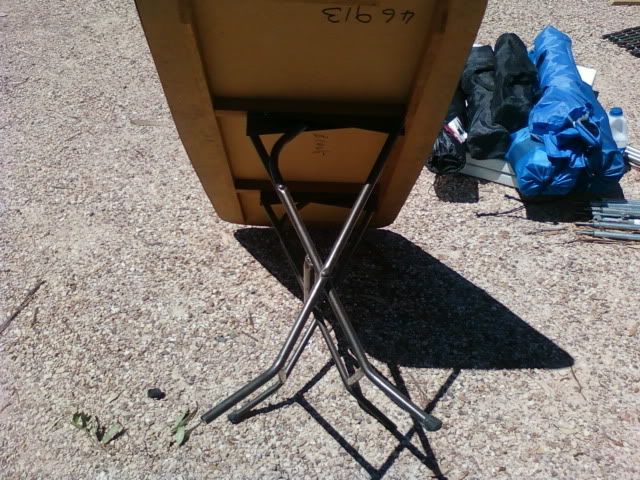 The original bed frame has a sprung base. I had hoped to remove it and make a new one to take a queen sized bed, which would involve removing the cupboard at the end of the bed to get the length (double bed is 1870mm long, queen is 2030mm long). But the full height cupboard next to the bed only allows for a double bed. Bummer! Anyhoo, I pulled the bed frame out and cut the spring base out of it, fitted a couple of pine studs as battens and will cut a piece of plywood to fit over it for the new mattress. As the springs hung a fare way down, by removing them gives us about 320mm under the bed for storage and no squeaky bed. 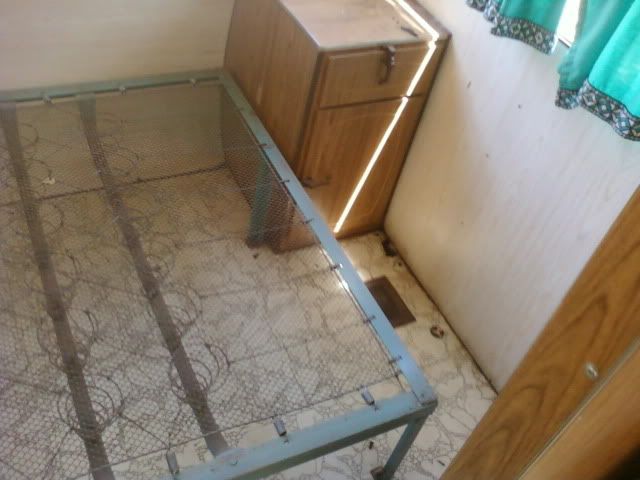 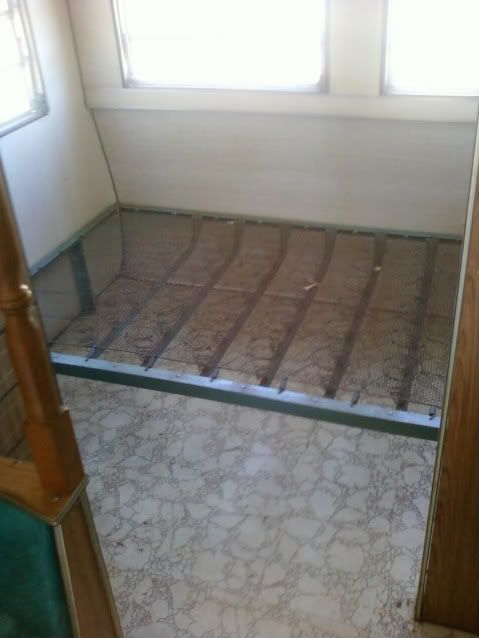 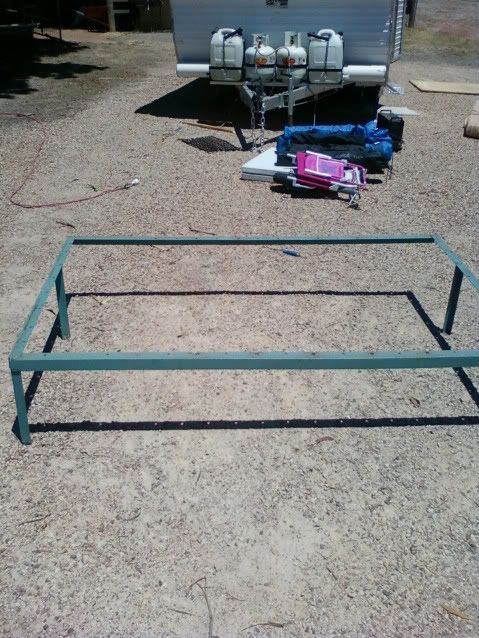 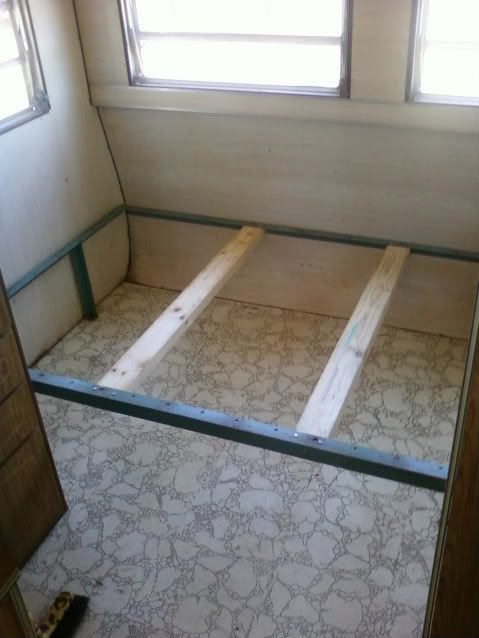 Next job was to remove the fridge panel, but the silicon monster had already visited and smeared his sticky goo everywhere, although it's nice and hard now. If you think this is bad, you should see the roof! 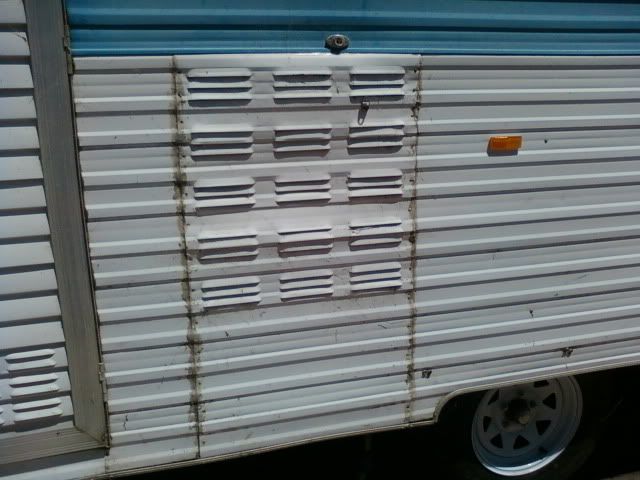 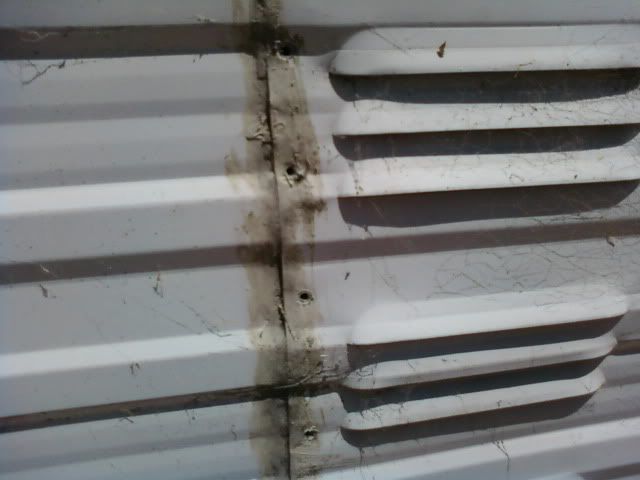 Any advice on how to remove this gunk? I tried scraping it off, but it scratches the paintwork. Also tried turps and wax and grease remover with not much luck. Would a heat gun help? With the panel off I'm going to block up around the sides and top of fridge and add some ledges in around the coils to promote an 'updraft'. Will also block up the existing Louvre's and cut some vents in top and bottom. I'm thinking of also fitting some 12 volt computer fans hooked up to a small solar panel to aid in the venting. Fans are only $5 each, but a 5watt panel is around $50. 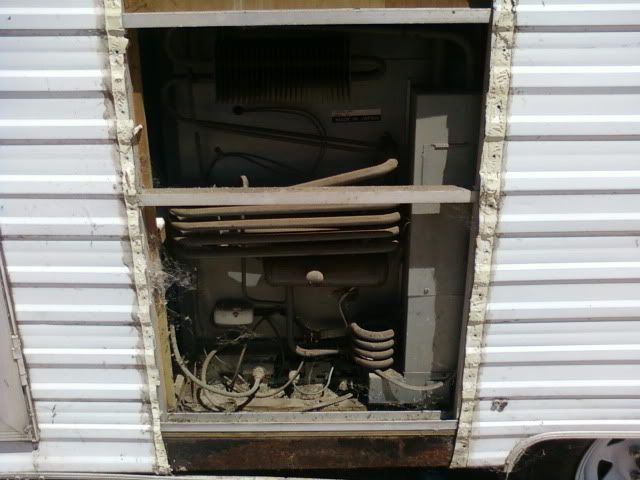 |
|
|
|
Post by mike on Jan 16, 2010 17:59:28 GMT 10
Greetings kylarama, ;D ;D ;D That table.... hmmmm   We had one of them and it did fold down level with the seats, but yours looks like the previous owners have re-oriented the folding legs 90deg and, probably FIXED them from being able to be folded from what I can see in the photos. It was a very good folding mechanism as I remember it, but that doesn't help you now.   Anyhow, this is not what you wanted to read: maybe someone else can see a solution.   Cheers mike ;D ;D ;D |
|
|
|
Post by kylarama on Jan 16, 2010 18:50:14 GMT 10
The table legs still fold up, I just can't work out how it folds down to a lower height.
I'm a pretty cluey bloke. I can nut out most things even with no instructions.
But if it has some sort of folding mechanisim I'm stuffed.
It took me almost 1/2 an hour to fold up our pram when we first got it.
It was 5 minutes being tied to the towbar and towed home!
Not to mention working out how to fold up the 2nd row of seats in our Pajero, then trying to work out how the 3rd row folded out!
I'm sure it's quite simple. It's just I'm a bit simple when it comes to these things.
|
|
|
|
Post by millard1399 on Jan 16, 2010 20:16:49 GMT 10
Hey kylarama, you tell a great story! ;D ;D I was going to ask if the table is original, but then I can see the chassis number written in texta under the table. I've looked at your photos from every angle but I'm danged if I can figure it out either. Maybe philou can shed a bit of light on the subject from his Millard. I've got a different table in my Millard, so I'm no help. Very interested in what you're doing with the bed spring. I've got the same one in my pop-top, so I'll be following closely what you do with yours, in case I need to do the same one day.   Sealant removal: Sealant removal: the worst possible job on an old caravan!! No easy way to do it, other than with a plastic scraper I found. The older the silicone, the easier it seemed to come off. Once you've jemmied up the start of the sealant, hold that end with one hand and keep stabbing at the sealant/cladding bond with the plastic scaper. A bit like peeling a band-aid off a hairy arm, and cutting the hairs with a razor blade as you peel it off (OUCH!!). The plastic won't scratch the paint coating. Any silicone residue left after scraping can be removed with a LOT of rubbing with a cloth dipped in turps or kero. Eventually it all comes off (...but you might have celebrated a couple of birthdays along the way...   ) Back in November last year, kcountrychic posted this information in my pop-top thread: "I washed our van with steel wool and truck wash and this got ride of all the flakey paint etc.....then I painted it with a roller and solaguard high gloss acyrilic paint......its come up fantastic............(will be doing more pics soon).........as for the silicone and blackjack....I found a paint scraper, razor blade, turps, all helped but the best for disolving the rest of the silicone was some stuff that was a vinyl grease remover....used before you paint vinyl...(my daughter painted the inside of her ute purple)......put this stuff on with a brush and it just disolves before your eyes....magic.................goodluck with your project...." Vinyl grease remover could become my best friend!! ;D ;D Glad to hear you had a nice relaxing Xmas-New Year period. Nothin' like kickin' back and bludging on the lounge for a few days, ay! cheers, Al. |
|
Deleted
Deleted Member
Posts: 0
|
Post by Deleted on Jan 17, 2010 8:06:23 GMT 10
Hey kylarama, TableHad one of those in some van a long time ago. Truth of the matter is ... I don't think it does! From memory, I carried an additional piece of board to use as the drop down bunk base for the seating. Maybe someone's good idea that wasn't born out in construction or perhaps they were designed as flat fold job, for storage. Yes it was a Millard.  Re the fridge and ventilation etc, Re the fridge and ventilation etc, A read of his thread may help. ditzygypsy.proboards.com/index.cgi?board=techno&action=display&thread=312and maybe this one  ditzygypsy.proboards.com/index.cgi?board=techno&action=display&thread=321Beds 'n frames ditzygypsy.proboards.com/index.cgi?board=techno&action=display&thread=321Beds 'n frames.....Very interested in what you're doing with the bed spring. I've got the same one in my pop-top, so I'll be following closely what you do with yours, in case I need to do the same one day.   .... ....
cheers,
Al. Hi Al, This is an essential modification to those old spring beds. They're noisy, they sag in the middle and you won't sleep. A solid base and good foam mattress (ior innerspring if you're wealthy  is a wise investment. I simply gutter bolted a sheet of 3/8" construction ply over the top of mine in disgust (ie over the wire, springs and all), when I first bought mine, with the best intentions of fixing it correctly. Guess what?  kylarama's mod provides excellent clearance and storage, although my plan is for a fixed base with ram assisted lift mattress for storage under. |
|
Deleted
Deleted Member
Posts: 0
|
Post by Deleted on Jan 17, 2010 10:29:13 GMT 10
Hey kylarama, I was just looking on trading post and saw this photo I dont know if it's of any help to you but it may cast some light on the subject for ya bear in mind it is out of a viscount so may be slightly different set up to millard.  Carl |
|
Deleted
Deleted Member
Posts: 0
|
Post by Deleted on Jan 17, 2010 10:45:49 GMT 10
Ah Ha. Good detective work kiwicarl.  That is the solution. Well I'll be darned. You learn something new every day! It shows that you're not the only one challenged by things that fold.  |
|
|
|
Post by kylarama on Jan 17, 2010 21:26:11 GMT 10
Thanks Kiwicarl! Looks like I had the folding part right, just the installation was wrong. Although it looks a bit of a trip hazard, with the legs lying in the middle of the walkway. New curtains are progressing well. $5 a metre for some daggy beach themed curtain fabric from spotlight, it's alot thicker than the original curtains. Alot of curtains to make. 10 windows plus a bedroom divider and some of the curtains are two piece across one window. I'm told theirs enough fabric left over for some matching seat cushions  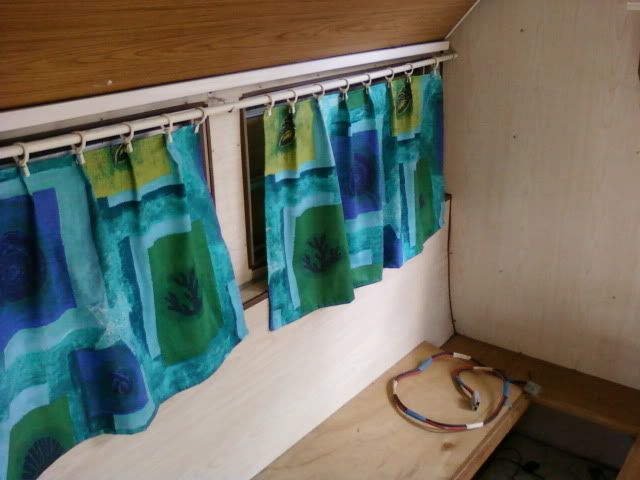  |
|