|
|
Post by pisces51 on Sept 16, 2019 21:46:12 GMT 10
G'day Shelley,
Despite what the keyboard warriors may say, there's absolutely nothing wrong with using finger-jointed pine for the cupboard framework as you've done. Meranti may give you full length timber, but there are plenty of caravans built in the last 20 years that have rotten meranti frames from water leaks, so using meranti doesn't guarantee you won't still have problems. Whatever timber works best for you is the way to go, and then you'll be problem-free when you ensure no water will ever leak into the van, by making it watertight. 
You've been doing a top class job on this van so far, so don't let any so-called keyboard experts try to tell you otherwise!
cheers, Al.
|
|
|
|
Post by bobt on Sept 16, 2019 23:16:19 GMT 10
Hey Shelley
I agree with Al, I don't see any problem with what you are using.
Its looking good.
bobt
|
|
|
|
Post by grandad on Sept 17, 2019 10:28:28 GMT 10
I haven't seen meranti for sale for a very long time. But, back in the day, as they say, it was very popular for a number of reasons.
1. It was cheap. Very cheap. Especially for a timber that had the following characteristics.
2. Straight grained with little movement.
3. light weight
4. nice colour that polished up beautifully.
5. A hardwood, if I remember correctly. (Which explains the stability and straight grain)
Downside
It was a rainforest timber and all rainforest timbers came under the spotlight back in the 80's
That was the end of meranti.
It was never deemed to be a durable timber. Not suitable for outdoor use etc.
Therefore, it's widespread use in caravans is no doubt due to its cost and stability.
Todays Crapiata, oops, sorry, Radiata Pine has come a long way since the 80's. Finger jointing not only means far less wastage at the mill but also helps to overcome the biggest hurdle it suffered from. Instability.
So, in summary, todays Radiata Pine is probably as good as meranti was way back then, but is also highly sustainable.
So, tell the keyboard warriors to take a flying jump. They know not what they speak.
Cheers
Jim
|
|
|
|
Post by twocutekelpies on Sept 17, 2019 18:21:35 GMT 10
Thank you so much Al., Bobt and Jim, you've all made my day  |
|
|
|
Post by snoops on Sept 17, 2019 20:53:04 GMT 10
Late to the party but agree 100%. Meranti isn’t readily available and is non renewable. All my mods on my Viscount and Franklin were all done with pine. It’s cheap, fairly light, and plenty strong enough for everything required. Haters will hate. Getting the trolls to come out and play is a good thing, have a laugh at their expense coz guess who’s got a great little van and is getting on building it and guess who doesn’t. 👍
|
|
|
|
Post by twocutekelpies on Sept 18, 2019 7:55:29 GMT 10
Thanks Gavin, I couldn't agree more  |
|
|
|
Post by 78466noM on Sept 19, 2019 7:30:11 GMT 10
At a guess I would think that at least 80% to 90% of vans that have been gutted and rebuilt have been done in pine . As stated it is cheap it is more than strong enough for what it is used for.
My furniture is all pine framed and even the bench top is pine. |
|
|
|
Post by lowe12 on Sept 19, 2019 11:22:10 GMT 10
Hey inlove what you have done with the ceiling. I have the same model van about to do it up but im mossing the roof hatch. Do you have any photos of the putside of the hatch? Been having trouble finding any
|
|
|
|
Post by twocutekelpies on Sept 19, 2019 16:39:01 GMT 10
Hi Lowe12, hope these photos help you  Obviously taken before I did anything with it. 

If you're missing the winding mechanisms, an alternative you can use is a pair of drop leaf supports from Bunnings at either end and an anti rattle catch or toggle latch to lock it down. |
|
|
|
Post by lowe12 on Sept 19, 2019 18:13:26 GMT 10
Hi twocutekelpies. Thanks so much for that, will make it so much easier for me. I do still have the winding mechanisms thank goodness just not the hood. Just wondering is the hood around a frame around the endge and internally is it pop rivited directly to the lifting arms through to the external roof?
|
|
|
|
Post by twocutekelpies on Sept 19, 2019 18:45:57 GMT 10
Sorry lowe12, I should have posted a photo of the underside as well. The arms were bolted to the hatch with the nuts inside and bolt heads above, I've reattached them the same way and added dome nuts inside to dress the bolts. There was a row of rivets around the edge holding the piece of vinyl in there which I've replaced with the same ply that I've used everywhere else. Cheers Shelley   |
|
|
|
Post by lowe12 on Sept 19, 2019 19:23:16 GMT 10
Thankyou so much, Such a great help this info and photos! Will be sure to keep you and this thread in mind as i go into this reno. I cant wait to have it finished and all on the road
|
|
|
|
Post by twocutekelpies on Sept 19, 2019 19:36:35 GMT 10
Glad I was able to help. I hope to see your own thread in the Hall of Fame with either your progress or finished reno  |
|
|
|
Post by twocutekelpies on Oct 22, 2019 11:07:46 GMT 10
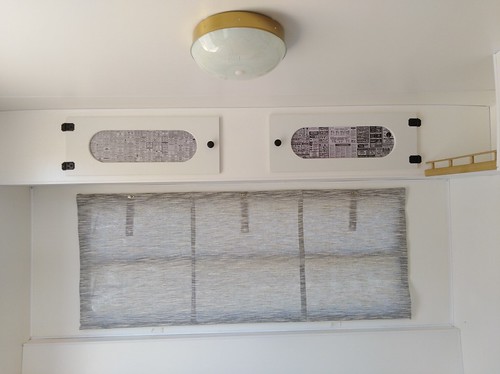
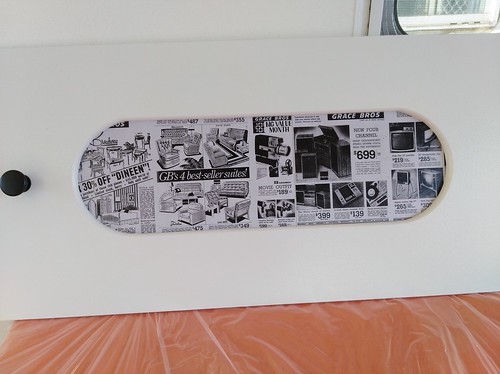
Just a little update, still plodding away  I've cut out my overhead doors and routered out the middle using the same template I used for my bedhead. I usually avoid MDF like the plague but it routers nicely and I've sealed it well with oil based primer and several top coats. A lot more coats than I planned but I kept changing my mind on the colour so they've been grey, white and now off white because the poly coated ply isn't actually white-white but rather a creamy white.  I've also reduced the weight of the 9mm MDF by removing the middle.  My original plan was to have the doors a contrasting colour with the poly coated ply in the middle but when I did it, I hated it so had to come up with something else. Hence why I've done so little since my last update. I hit a wall.  Then I had the idea of using newspaper clippings from 1972 as the insert. I'd already been scrolling through all the online archives for caravan articles for the last few years so knew what was out there, too easy, right? Not when you're overwhelmed with choice! Trying to narrow down a full year's worth of articles from The Sydney Morning Herald and The Age has been really time consuming especially because I keep reading all of the articles!  Using a 3mm ply template, I can work out what can fit in the "window" and arrange it accordingly, each door will have a different subject. HWMBO suggested the Ford/Holden/Valiant theme  I even have one on Yorks including the article for this little one.  I've cut 3mm ply backing plates a little bigger that the window, poly coated side facing out to blend in with the back of the door, then coated the bare ply with diluted bondcrete and sanded so it's smooth. Then using decoupage techniques (complete rookie here), I stuck the newspaper to the ply then overcoated it with clear glue to protect. I'll also overspray with acrylic clear coat when they're all made up. (still a work in progress) While doing that, I also cleaned up some old hinges I had out of a 60s caravan. They were pretty scungy so I cleaned them up with the wire wheel on the bench grinder, etch primed and painted them black. I think they came up pretty well.  Here's a few mockups of what the doors should look like when up.   I'm going to use magnets inside the doors so the hooks don't have to be used all the time when stationery, they'll act as a proper lock when travelling and double as the pull handle to open. For anyone interested in accessing the newspaper archives, here are some links, from there, you can access other years/months/weeks if they've been uploaded.  The Sydney Morning Herald The Age (Melbourne) The Sydney Morning Herald The Age (Melbourne) |
|
|
|
Post by Husky on Oct 22, 2019 14:58:34 GMT 10
Certainly a different approach TCK Should come up pretty neat once they are all finished, well done. Are the hinges and the eye & hook close to original design?
|
|
|
|
Post by twocutekelpies on Oct 22, 2019 15:23:57 GMT 10
No Husky, the hinges were quite plain and the latches were the push button type.  My partner isn't a fan of the hook and eye but can see the value in them after having doors pop open on us a few times while we were travelling. Not sold on them either? |
|
|
|
Post by Husky on Oct 22, 2019 16:29:35 GMT 10
They look ok and would probably grow on me, just different is all. They will definitely be effective in holding the doors shut while the van is in motion. The original does look kind of plain and boring huh?
Maybe i have just been corrupted by the sleek and streamline of modern day vans?
Have fun
|
|
|
|
Post by twocutekelpies on Nov 14, 2019 10:28:34 GMT 10
All blinds and magnetic insect screens are now in and most of my upper cupboard doors are up, except for the kitchen as I haven't fully attached the face of it yet, I'm waiting for the electrician and giving him as much space as possible to get the RCD etc in.   I got veto'd by hubby with the hooks as he hated them, so I'm using door knobs and ball catches instead, the magnets I had aren't strong enough. I re-did a few of the door inserts as I wasn't happy with how the early ones turned out once I'd got the hang of what I was doing.  Each door has a different theme, his and hers over the bed, cinema/TV guide and positions vacant over the dining, York caravan articles and appliance ads over the kitchen and one for the comics. A close up of a few - Appliances  "Hers" (his being the one above with the cars on it  ) 
I have more photos on my insta and my other build log on that "other" forum. |
|
|
|
Post by snoops on Nov 15, 2019 19:53:22 GMT 10
Looking sharp! 👍
|
|
|
|
Post by twocutekelpies on Dec 19, 2019 14:13:01 GMT 10
A few things have happened since my last post - My electrician has been, poor guy kept hitting his head on everything, definitely too tall for my little van   I fitted my gas struts. Stuffed up the first time and put too much of an angle on them so they wouldn't stay down, now they work great.   And I also finished fitting my sneaky fridge drawer  Face slides out -  To reveal drawer that will take up to a 40L car fridge (still need to cut the bench down to size, fit sink etc)  |
|
|
|
Post by snoops on Dec 23, 2019 14:07:55 GMT 10
Oooh, I like the sneaky fridge drawer! What a great idea.  It's all starting to look like you're almost done in there. |
|
|
|
Post by twocutekelpies on Dec 23, 2019 14:20:21 GMT 10
Cheers Snoops  A few more things checked off the list. Next big job is the plumbing!   |
|
|
|
Post by pisces51 on Dec 27, 2019 22:05:09 GMT 10
G'day Shelley, just catching up with your thread now that the Xmas festivities are over.
Great idea on the hidden fridge shelf! How is the shelf locked into the "shut" position so it doesn't accidentally come open when you go round a corner?? (...just curious).
If you need extra ventilation coming through to the front of the fridge, Bunnings have the "Haron 40mm Black Round Cupboard Vent", for $3.15 each. These little vents are similar to what our grandparents had in their kitchen cupboard doors, but they were usually white, yellow, or brown in the old days. Black would be perfect for your colour scheme if you need any.
Love what you've done so far!! 
cheers, Al.
|
|
|
|
Post by twocutekelpies on Dec 28, 2019 6:10:12 GMT 10
Thanks Al.  I'll be fitting a toggle latch to the front to lock the drawer in, I think that might be the most secure way. I'm not sure how much ventilation will be required hence leaving the entire old fridge vent uncovered, I figured I might be able to add a vent to the side if needed too. I read on another forum that they don't need as much as the old gas fridges but as with anything, I'll stand corrected.  |
|
|
|
Post by twocutekelpies on Jan 24, 2020 19:52:26 GMT 10
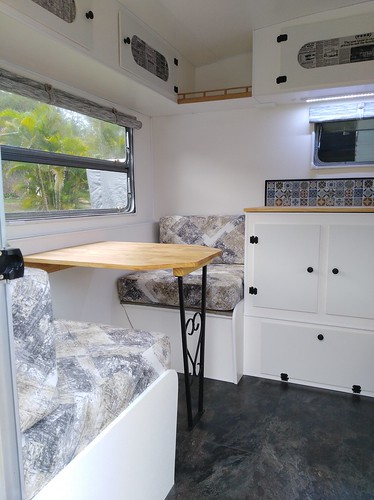
Well I still haven't got around to the plumbing but I have checked a few more things off the list. Flyscreen under the hatch done (I had to get creative to get it into place and go up on the ladder to poke it through from outside  )  Splashback done - tic tac tiles on 3mm acrylic left over from the windows, with a black border made from wet panel capping. I went with acrylic as I didn't think the tiles would last long on the textured plywood. Sink and pump are just sitting there at the moment.  I still haven't bought the fridge planned for this drawer but I better move quick as it's on special at BCF at the moment.  I did find this cool retro esky at Bunnings though.  Looking pretty complete here but looks can be deceiving, there's still a lot of things on my to-do list.   |
|