Deleted
Deleted Member
Posts: 0
|
Post by Deleted on Apr 1, 2009 15:18:25 GMT 10
Hello Everyone, Thought I should post some pictures of our new addition! She is a bit rough but nothing that can’t be gutted and remodeled. We think she has sustained some damage to the top from an extremely heavy roof hatch. This will be the first thing to be fixed. A small amount of water damage, parts of the floor etc…. 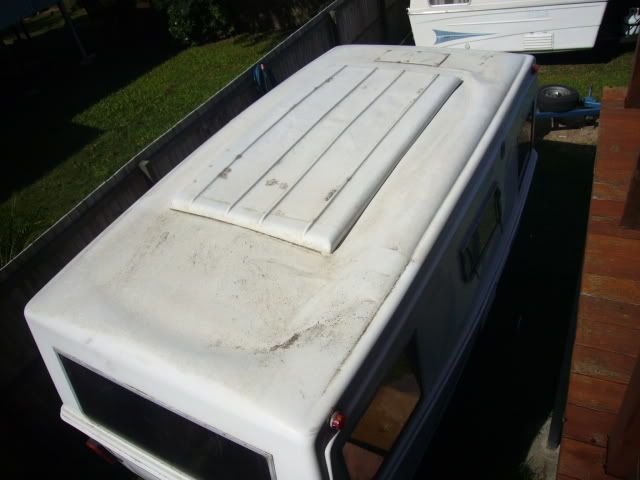 Next is a picture of an electrical certificate dated 24/07/72. Caravan no. 25113. The number under the chassis is 28121. 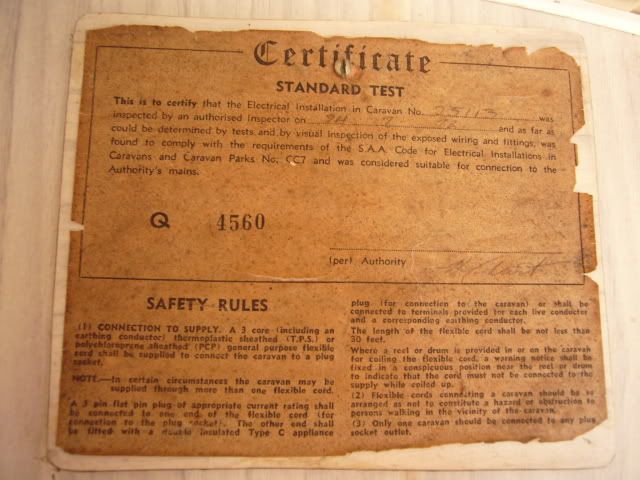 Here are some other pictures; all windows are Perspex except the kitchen one. 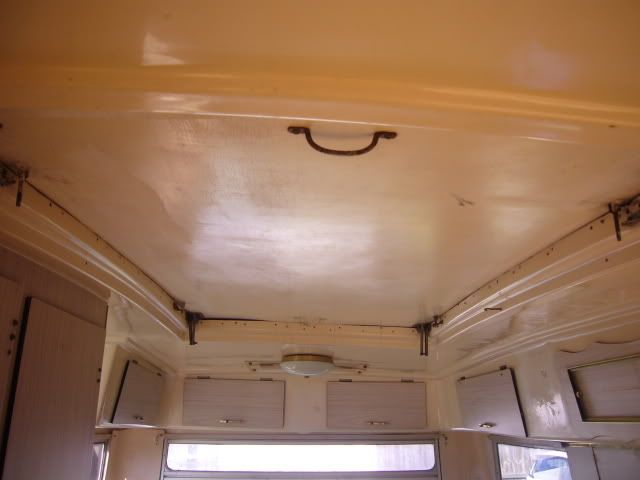 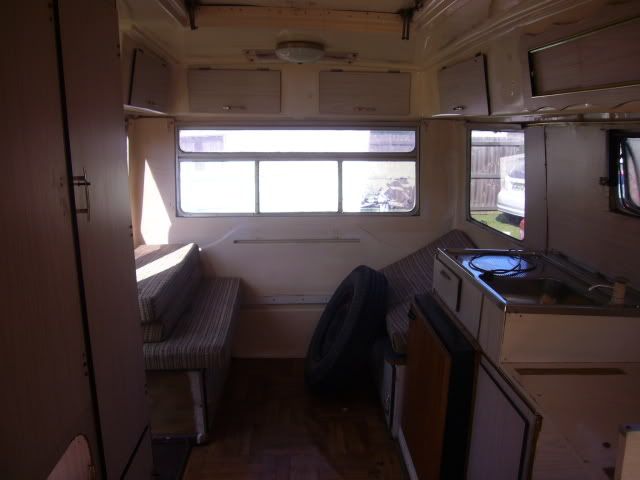 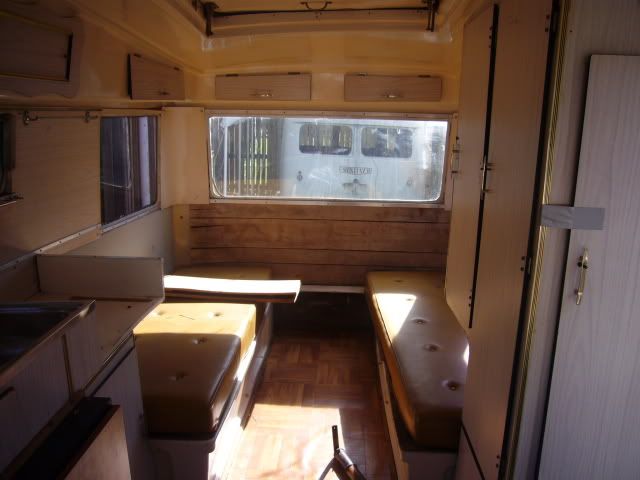 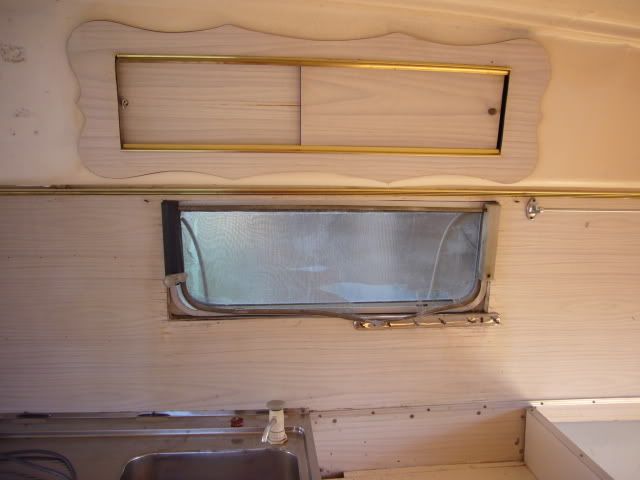 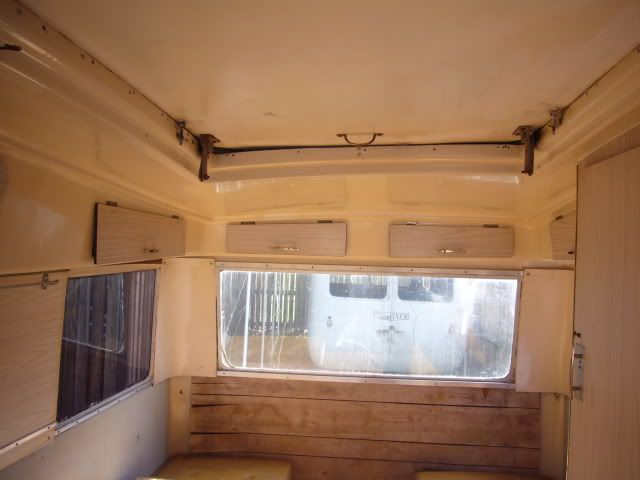 ![]() i589.photobucket.com/albums/ss332/yodie_b/P1020312.jpg[/IMG] i589.photobucket.com/albums/ss332/yodie_b/P1020312.jpg[/IMG]Happy vanning, Joey |
|
|
|
Post by atouchofglass on Apr 1, 2009 18:57:44 GMT 10
Hey Joey Looks like a bit of damage there Not sure if they have tried to add to the hatch or perhaps some other reason it is damaged (the roof) The ceiling skin is very close to the roof so it will be a difficult thing to repair from inside The good news is ....... very few people will ever see the roof outside. So repairing the roof from the outside won't be seen easily Perhaps a set of hinges like the ones in mine 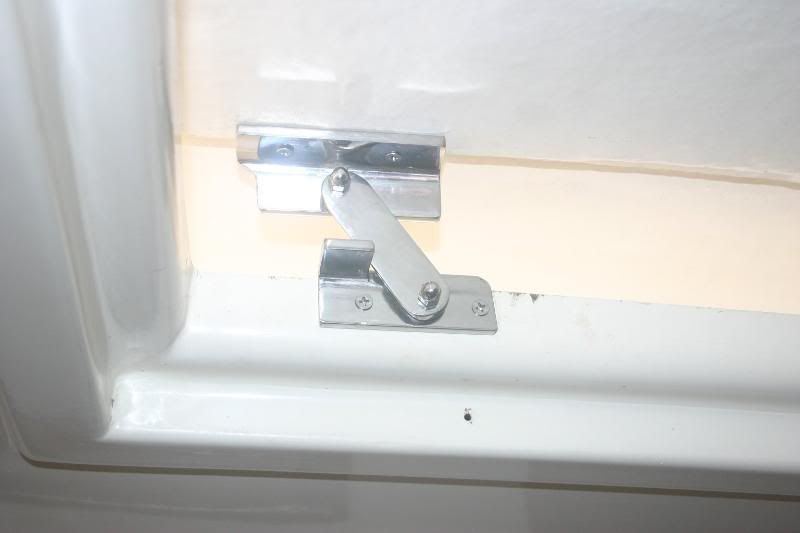 Only four bolts to remove the hatch Easier to work on the roof from the inside using a four foot ladder You could also reach the extra hatch they seem to have put in the front of the original hatch   The ribbing on the hatch is an addition after 1968 .... Has to be..... mine ís just a smooth top on the hatch Like the ribbing.... looks good All the screw holes around the hatch opening is a bit of a mystery Too high for the fly screen and used for ......   Could be patched up with resin and spray painted over.... will disappear Looking forward to your next set of photos and following the restoration Cheers Atog |
|
Deleted
Deleted Member
Posts: 0
|
Post by Deleted on Apr 1, 2009 20:46:00 GMT 10
Thanks Atog,
Any hints always welcome, we have already read all about your Olympic resto.
I can barely lift the hatch, I dread to think how much it weighs. The front one I think was meant to be a sky light, which seems to have failed miserably (probably leaked) and hence been bogged back up. A bit of fiberglass will fix that up quick smart.
Real windows are in order. New colour scheme. Now I just have to figure out where to start!
Joey
|
|
|
|
Post by atouchofglass on Apr 2, 2009 9:17:17 GMT 10
Hey Joey Before you seal up that skylight   Replace your light wiring I had issues trying to remove the old cable from mine... Eventually just cut if off short and put a new twin and earth wire in. That in itself was a real trial.... took ages and needed a wire hook to make the wire curve to the hole in the ceiling With yours it may be a way of saving you time Your roof hatch:The hinges on yours may be a bit stiff making it harder to lift as well A bit of graphite grease/dry slide may help? My hatch is heavy as the fibreglass is insulated underneath with ..... I suspect ply    But because you are just moving it forward and backward there is less need to lift a lot Yours may be heavier again... if you are working on the roof it may be an idea to reinforce the edges of the lip in the roof that the hatch sits over. From the outside You know the bits the hinges are attaching the hatch to the van  This bit Then use a plate on the outside of the hinge to spread the load Just an idea Of course if it hasn't broken/cracked in ..... nearly 40 years.... it may not be needed On a similar note The edge of the roof hatch on mine had worked through the gelcoat... That will be filled with resin before it is painted One vanner has added some type of hose to the edge Thus protecting the roof All he did was cut a line through the garden hose or whatever was used and fitted it over the edge of the hatch to stop it biting into the roof Cheers Atog |
|
|
|
Post by boblor on Apr 2, 2009 13:12:33 GMT 10
Hi banno and joey
It is nice to see the Olympic family growing, it is obvious that you recognised class and gone glass. It appears from the photos that the hatch may have had some weight placed on it at some time to cause the sagging, but would have to see it in the flesh to make a good comment.
Regarding the chasis no. and the Cert. being different we have found this on a number of occasions, -- we think they had a number of Certs. issued at a time for a number of vans ,and they have not been placed on the correct van at the time of completion / sale. The chassis would have been numbered at the time of fabrication and therefore would be correct, so in this case 2= '72, 8 = Aug. and 121 the actual no. The next no. on our register to this van is a 21' Stardust chassis no. 2 11 131 ( 10 vans in 3-4 months)
Give us a call if we can help in any way.
Cheers boblor
|
|
|
|
Post by bobt on Apr 2, 2009 20:09:17 GMT 10
Hi there Banno & Joey Congratulations on the acquisition. Great things those glass things.. .... they never get rusty. ;D Look forward to the progress reports. bobt  |
|
Deleted
Deleted Member
Posts: 0
|
Post by Deleted on Apr 2, 2009 20:32:36 GMT 10
Welcome Banno & Joey, I've always thought fibreglass a bit overrated as a primary craft building material. It'll make the resto all the more interesting.  |
|
Deleted
Deleted Member
Posts: 0
|
Post by Deleted on Apr 3, 2009 0:28:05 GMT 10
Welcome Banno and Joey to the fibreglass family,
I have the 16' Riviera and very close in many aspects to yours and yet with some differences too.
My Electrical certificate is dated 14/4/72 and the chassis no is 2105. (1972/January/ no 5) so built in the same year.
The laminate type finish on the cupboard doors and overhead cupboards are the same as yours. Even the twin sliding doors to the cupboard above the sink are the same including the gold trim.
My windows are all glass but twin hinged on wind out levers. I had always thought that the front window of mine was a special with a small air conditioner fitted through the centre bottom panel but it is the same configuration as yours.
It looks like a previous owner has added the lining to your roof hatch and that extra weight, over time, may have contributed in some part to the settling of your roof. As you know from your other Olympic, the roof has no internal structure, it is just an inner and outer layer of fibreglass with a 25mm foam core and it will move over time if it has a load applied to it.
My roof hatch has no timber or ply lining, it is just an outer skin with ribs as yours and a stretched skin of vinyl stuck to the underside. The vinyl matched the covering to the bed panels, the same as yours. The hatch is not heavy, possibly 20 lbs (10Kg) as I can quite easily lift it off and carry it around by myself.
I have now replaced the internal vinyl lining with a 'Front Runner' fabric just to update the interior but have not felt the need to add more insulation to the hatch as fibreglass is a good insulator anyway. If you need more insulation you would probably be better off coating the whole of the roof with an insulating paint. I think there is some info on this forum about it.
Atog has done a great job with his roof hinges which seem in the same style as yours so that is probably the better way to go. As my hatch is not heavy, it was factory fitted with cross linked wind up levers front and back.
A pair of full width sliding insect screens which cover the whole of the roof opening were also factory fitted. The winding system is quite neat as the insect screens fully close no matter how high you wind the hatch. I will try to post some photos shortly.
Anyway, good luck with your restoration. It is great to see another Olympic being cared for.
Cheers, techron
|
|
|
|
Post by atouchofglass on Apr 3, 2009 6:20:44 GMT 10
Hey Techron
The roof hatch of yours not having any inner fibreglass skin would make it much lighter
That would also explain the ribbing on the hatch.... added strength for very little weight gain
Now I know that perhaps Banno and Joey would be better off grinding the added on skin away and starting afresh with a vinyl inner.
Thanks for the info Techron
That was my .... learn something new each day ..... for today
;D ;D ;D ;D ;D ;D
Cheers
Atog
|
|
Deleted
Deleted Member
Posts: 0
|
Post by Deleted on Apr 3, 2009 20:15:20 GMT 10
Thanks Atog,
When I took my hatch off to glue the 'Front Runner ' fabric on, I reckon it weighed no more than about 20 lbs. I sanded the underside smooth and filled the ribs with bog so that I had a good base for the fabric lining.
We have been holidaying in 100 degree days and not felt any significant heat coming through the hatch as compared to the roof and walls. So we didn't feel the need for further insulation to the hatch.
Everything was just HOT anyway.
I noticed in the photo of your hinge that there was a screw hole just below it in the next recess before the curve of the roof lining. I have exactly the same screw hole and that is where the double plastic track for the sliding insect screens fit.
So your van must have had the insect screens fitted. Do you still have them?
Cheers, techron
PS:
On Branno and Joey's van, when you look at the roof you can see the outline of where the fibreglass/insulation sandwich construction occurs. It is only to the centre part around the hatch and stops at the line where the internal cupboard facing meets the roof. When you look inside the top cupboards you see the inner face of the outer skin. (excluding the stuck on foam lining to the cupboards)
That sandwich part of the roof is the most strong and the added weight of the heavy roof hatch has pulled that centre part of the roof down. That's why the outer skin has become depressed at that transition point.
Removing a lot of weight out of the roof hatch has got to be the first step as you suggest.
techron
|
|
Deleted
Deleted Member
Posts: 0
|
Post by Deleted on Apr 3, 2009 20:49:34 GMT 10
Thank you everyone for making us feel so welcome. It is a truly fascinating world this world of vintage vans.   Atog and Techron your knowledge and advice are very much appreciated and I can't wait to see your photos. After talking to Boblor, we are considering the need to cut the top skin off; to enable us to strengthen the inner one after pulling it back into shape, then strengthening and reshaping the outer skin before replacing it and glassing it back on.   But first projects first!!! We have an already gutted Sunliner waiting to be fixed, with lots of ideas floating around in our heads. This is Banno's first love so she gets priority--- sort of.  In saying that I have some Therma Shield being delivered on Monday that we have to apply to Bubalympic before we head off to Goulburn for the Easter Hotrod Nationals. ;D Joey |
|
|
|
Post by atouchofglass on Apr 3, 2009 22:18:22 GMT 10
I noticed in the photo of your hinge that there was a screw hole just below it in the next recess before the curve of the roof lining. I have exactly the same screw hole and that is where the double plastic track for the sliding insect screens fit. So your van must have had the insect screens fitted. Do you still have them? Cheers, techron Hey Techron Yes I still have the screens Not just the roof hatch oned but the full set I like the idea of the stainless steel surrounds..... Not sure what will be done with them yet Might use them .....might not If I do the plastic track will be replaced with..... yep.. timber   Cheers Atog |
|
|
|
Post by boblor on Apr 3, 2009 23:24:57 GMT 10
Hi techron
Your van Chassis no. is a different numbering system to Joey's, but in this instances you are very close by a fluke. On our register your van is the 2nd last with the four digit system, but was manufactured more likely in 1971 as the Certs. do not always match build date. Joey's van is the first van on our register using their new chassis numbering system, and this system was used until the late '80's when manufacturing finished for Olympics.
I hope this note is not too confusing.
Cheers boblor
|
|
|
|
Post by atouchofglass on Apr 4, 2009 7:01:51 GMT 10
After talking to Boblor, we are considering the need to cut the top skin off; to enable us to strengthen the inner one after pulling it back into shape, then strengthening and reshaping the outer skin before replacing it and glassing it back on.   If you are going to the extent of cutting the top skin off....... Are you going to put the original skin back on or make an entirely new top? The reason I ask is - before cutting anything it might be wise to clean up the existing top to a decent finish and taking a floppy mold off it That is simply a reverse copy of the roof so you can make an exact replica after the original has been cut off May save a lot of heart ache later..... It is a lot of work ..... Either way So the sunliner is first? Great Post a thead and progress photos ;D ;D ;D ;D OOhhhh but it's pre 1970     Yeahhhhhh and my 68 Olympic isn't......      Go on I dare you ;D ;D ;D ;D ;D ;D Cheers Atog the non-conformist    |
|
Deleted
Deleted Member
Posts: 0
|
Post by Deleted on Apr 4, 2009 18:35:13 GMT 10
Free Sunliner advice still available on this site! ;D ;D ;D ;D
|
|
suem
In Training
 
Posts: 46 
|
Post by suem on Oct 7, 2015 11:27:29 GMT 10
I just re-read this thread and our vans chassis (and electrical cert) number is 2108.
Going on techron & Boblor's comments that means our chassis is 1972, Jan, no 8 made. But may have been made in 1971 as it is a 4 digit system.
The cert is date 07/9/72 - so that means it was finished very much later doesn't it?
|
|