|
|
Post by snoops on Jan 14, 2014 17:55:17 GMT 10
Hi all, posted in the introductions thread, but here's a few pics. It is solid and complete, but needs a bit of TLC. Chassis is solid, but tyres, brakes, etc all need work. <<<PLEASE NOTE THAT ORIGINAL PICTURES WERE DELETED DUE TO PHOTOBUCKETS NEW POLICIES - I AM RELOADING WHAT I CAN WHEN I CAN BUT SOME POSTS MAY NOT HAVE OR GET PICTURES BACK WHERE THEY WERE BEFORE - APOLOGIES FOR THIS>>>The stove/oven and the fridge look like originals - the stove and oven are in mint - literally as new condition - not a mark on them. The PO has never used them. Fridge is icy cold and works well on 240 volts, gas unknown at this stage. plans are to get it mechanically A1 and tow it generally short distances to start with. Will be fitting up a decent 12 volt system to it - I hate generators and rarely stay in Van Parks. My towing vehicle is a bit on the rare side and it will look a bit funny as a combination - I'll post some more on that later. Fuel usage generally doesn't change while towing with it - it is horrendous with or without a load behind it...  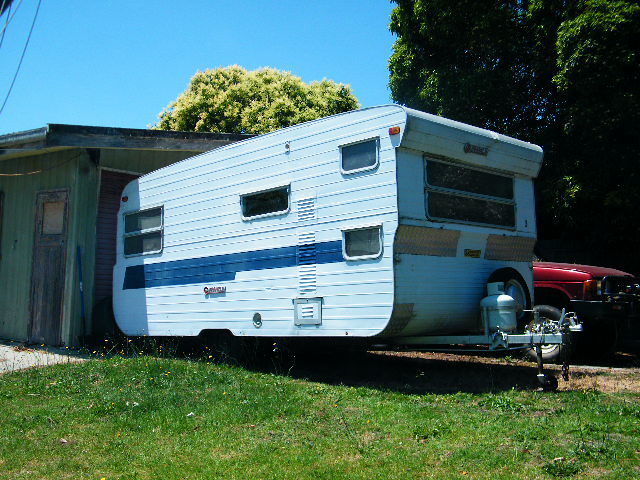 image image by Gavin Gregory, on Flickr 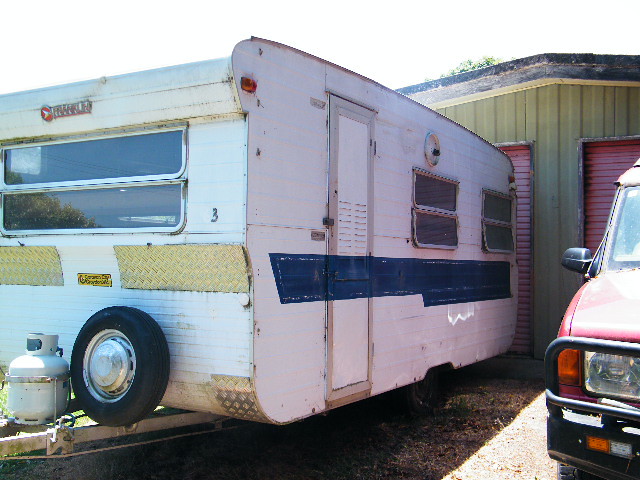 image image by Gavin Gregory, on Flickr 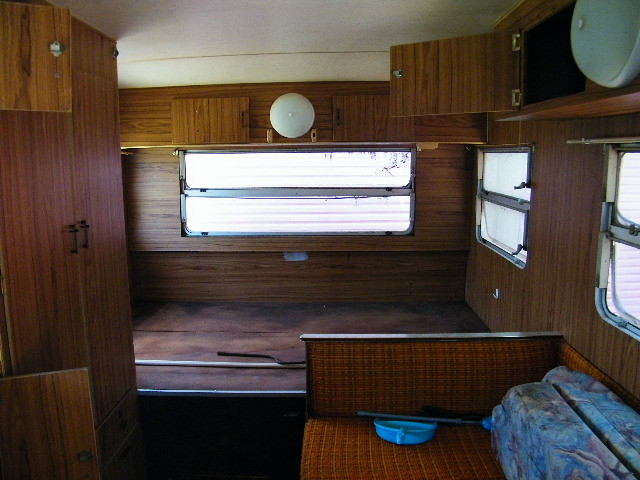 image image by Gavin Gregory, on Flickr 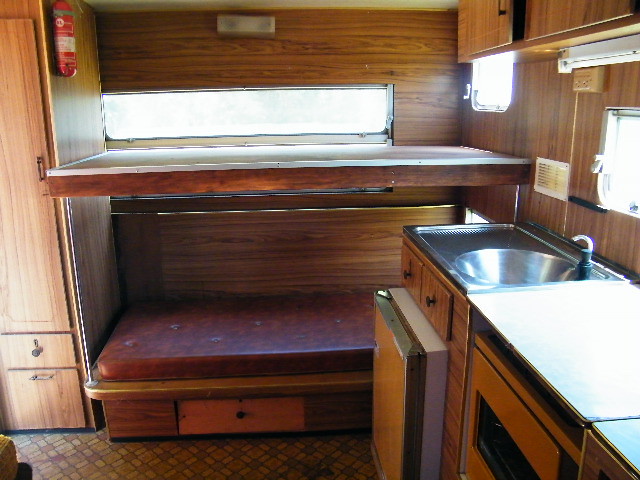 image image by Gavin Gregory, on Flickr 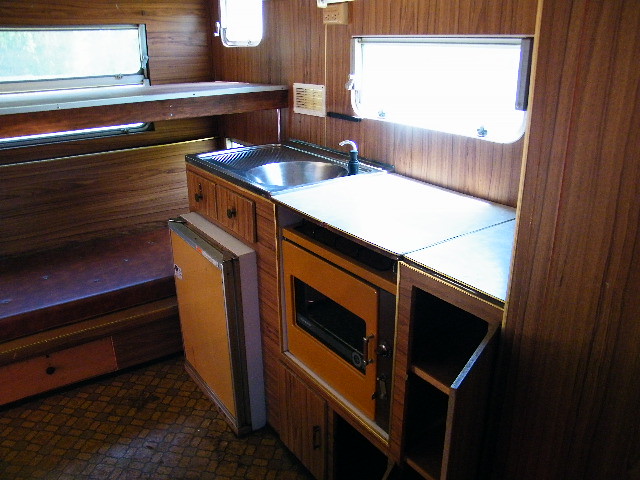 image image by Gavin Gregory, on Flickr 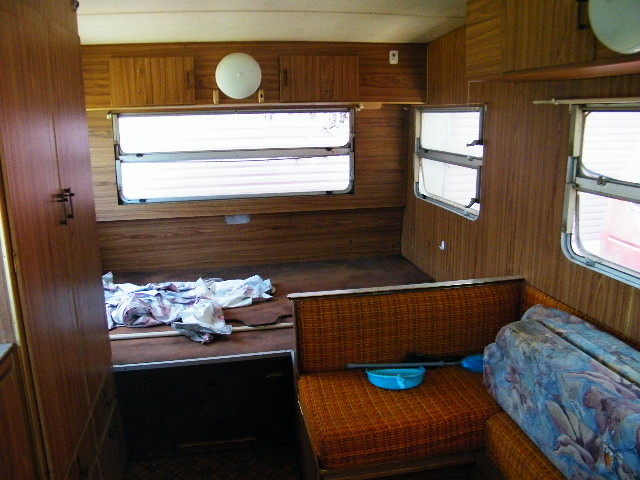 image image by Gavin Gregory, on Flickr |
|
|
|
Post by snoops on Jan 14, 2014 17:57:55 GMT 10
Oh, and can anyone tell me if this is an aluminium frame or timber frame van? With both the siding and paneling being bonded to the frame, it is hard to tell - usually, there are screws or rivets that give this away, but I'm a bit stumped on this one. Thinking it could be either being the mid 70's???
Cheers - Snoops.
|
|
|
|
Post by scotty on Jan 14, 2014 18:36:09 GMT 10
Hi Snoops,
Im guessing( going off my Franklin Hunter) there is no timber frame but foam sandwich construction, also goes for the roof.
Scotty
|
|
|
|
Post by snoops on Jan 14, 2014 19:03:57 GMT 10
Hi Scotty - thanks for that. Not knowing this type of construction method, are these vans strong and not prone to rot or corrosion? How are the walls attached to the chassis?
|
|
|
|
Post by snoops on Jan 14, 2014 19:06:51 GMT 10
Oh, and here is the tow vehicle that will cart it around - eventually - I need to build a towbar that is closer to the ground first - the pintle hitch on this is over 750mm off the ground... 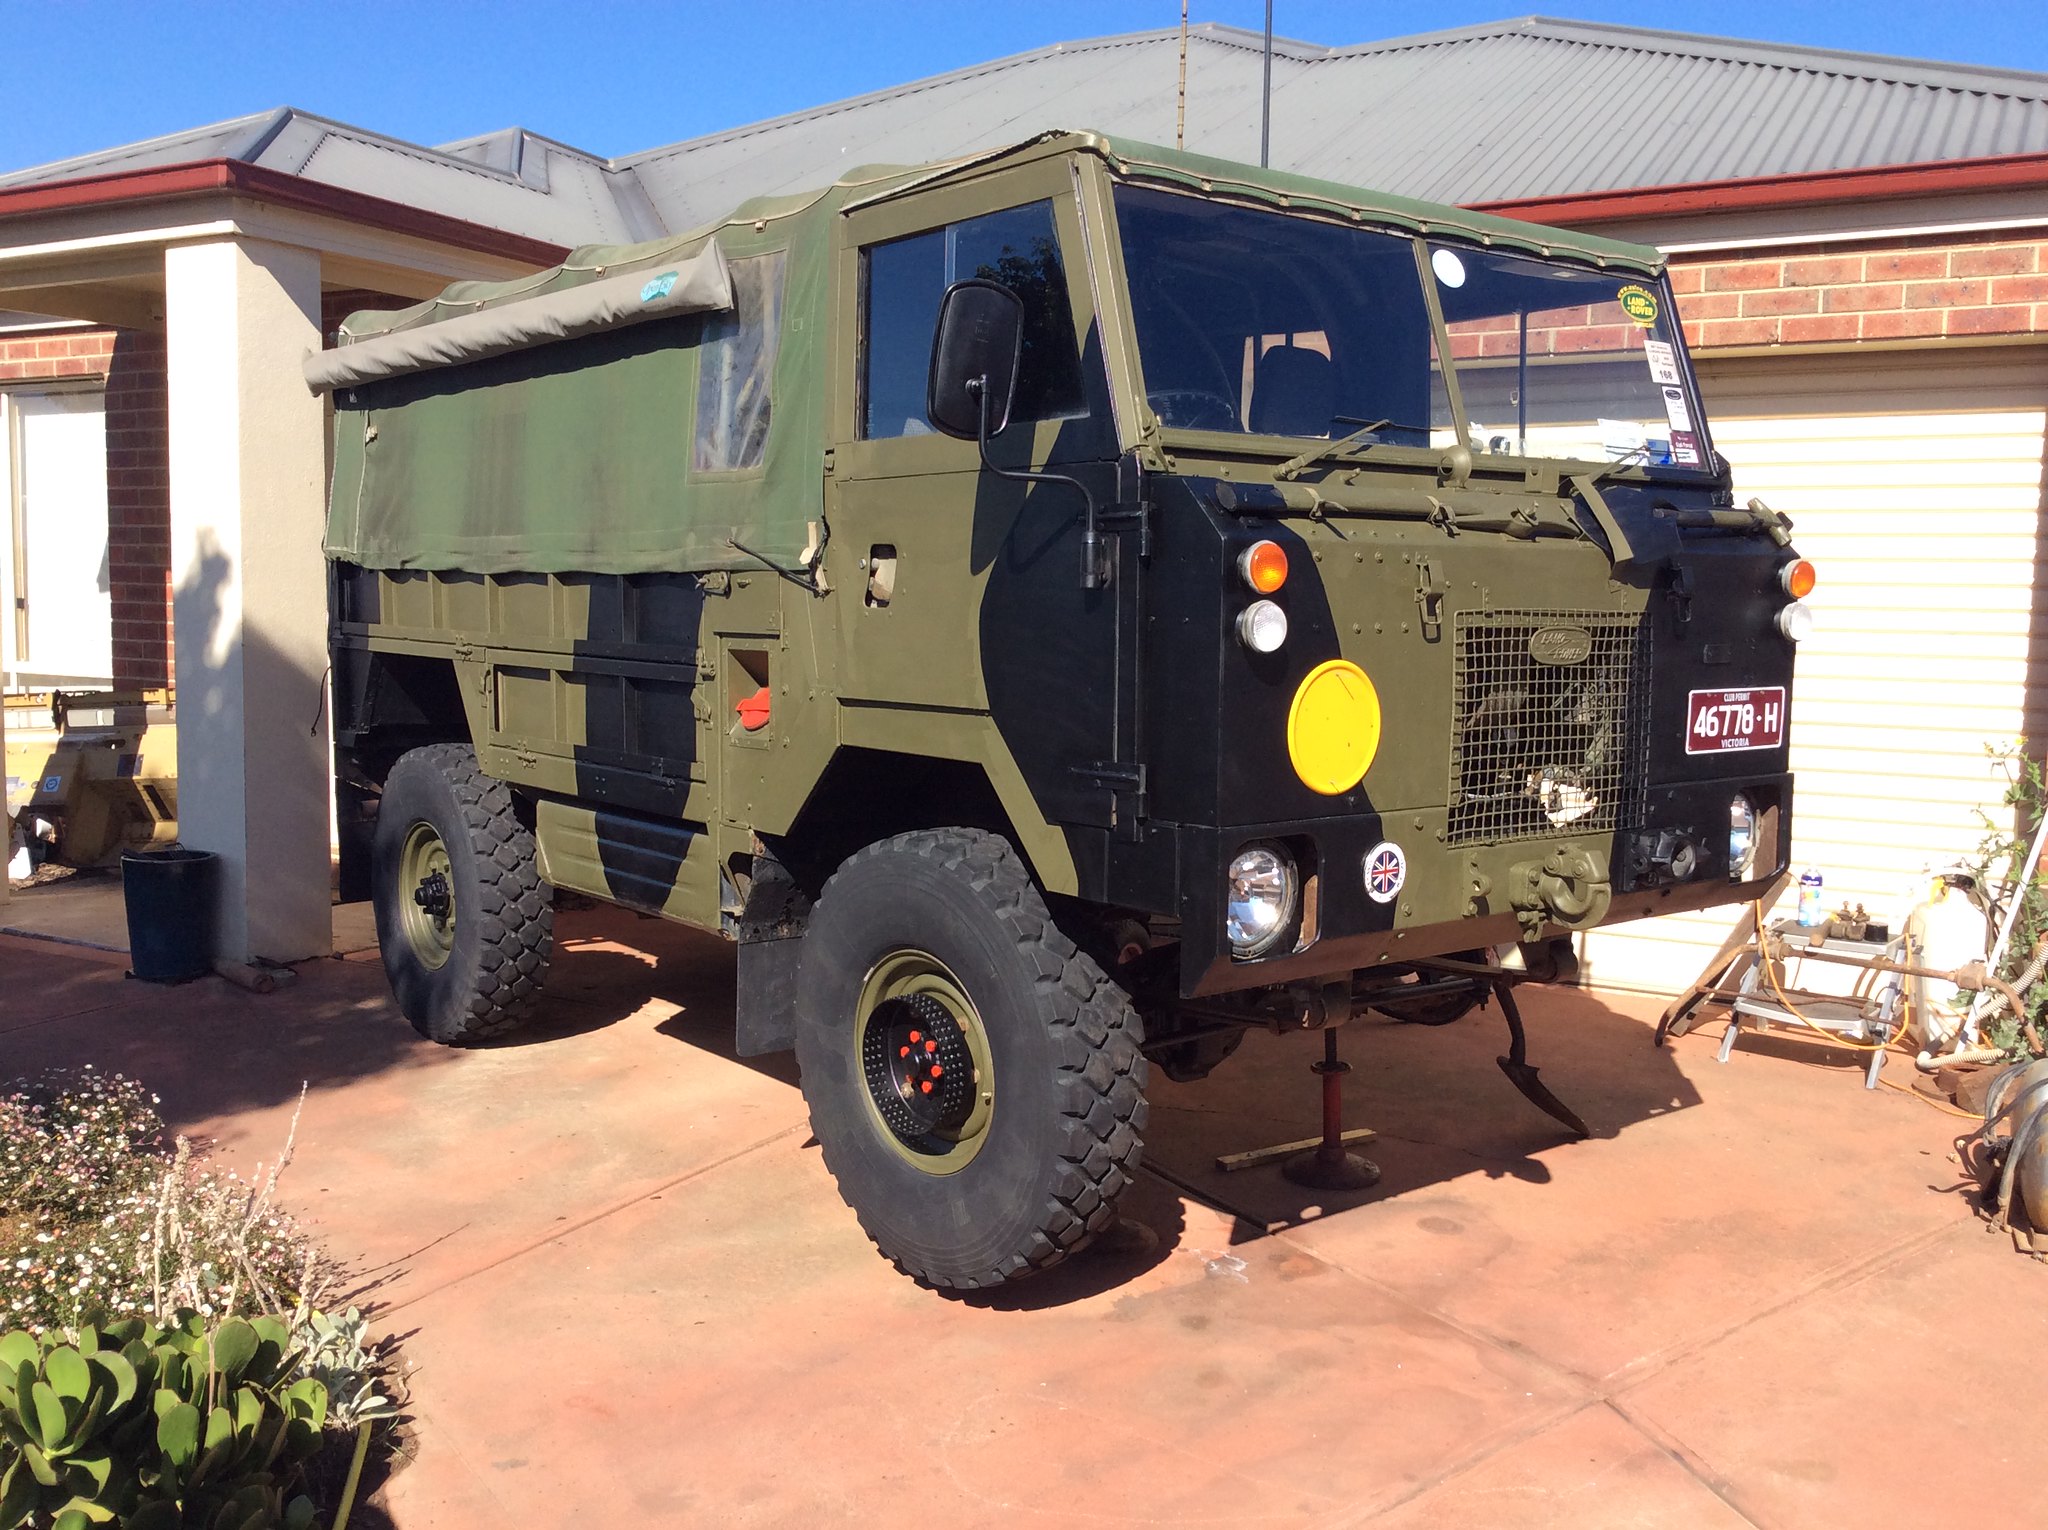 IMG_0182 IMG_0182 by Gavin Gregory, on Flickr |
|
|
|
Post by mike on Jan 14, 2014 21:03:11 GMT 10
Gday snoops,
Looks like a really good van.
That interior looks as new!!!
Looks like our van inside.
However, we've used ours thoroughly since 1974 when we bought it new.
The boxy part is attached to the chassis by slot-head bolts along the sides very low down along the walls, to an angle rail. That rail is light-weight & prone to rust. Just spray that rail with fish oil or penetrol, then after 7 days, spray with an oil based spray... up from underneath. That boxy part is also strengthened and attached to the chassis by the cupboards etc that are attached to the walls and floor which is bolted to the chassis.
The walls are foam sandwich.
I'm told the inside wall cladding is not fixed to the foam, but I haven't tested that.
There are timber frame pieces through the walls at strategic places?? But its difficult to find them, except for round the edges, where you'll find them round the doorway and windows. You'll probably not find too much of any of that timber around the lower levels of the door or parts of the walls. We haven't worried about that at all, but have bogged it up with car body filler as needed for the door hinges.
We've also re-oriented the main bed to make it an island bed, and cut back on the table and seat.
40watt solar panel on roof hatch.
Battery under table seat near door.
Inverter near fridge.
Electric brakes. ..
Anyhow, probably info overload for you for now.
Just have fun.
Cheers
mike☆☆☆
|
|
|
|
Post by snoops on Jan 14, 2014 21:11:24 GMT 10
Thanks Mike. Yes, the interior is good, really just needs a good clean. Maybe new vinyl on the floor and some curtains. Not after a flashy look, but good functionality. I'm sure there will be more to do once I get it home, but it is a good start.
It will be a few weeks before I get it back here and have a really old look over it, I'll report back with my findings.
Cheers - Snoops.
|
|
|
|
Post by snoops on Jan 16, 2014 20:26:46 GMT 10
Having another look over the van today and one of things I noticed was how low to the ground it is. Looking at pics of other vans, it is obviously the same as these and how they were out of the factory, but wondering if they have any issues on speed bumps, gutters or rough roads? Not planning on going off road or anything with it, but it may see the odd dirt road. Has anyone ever bothered improving ground clearance with some bigger wheels and tyres, or some mods to the springs? Some simple mods to the guards and chassis may be needed, but would it be worth while?
Cheers - Snoops.
|
|
|
|
Post by snoops on Feb 18, 2014 21:14:01 GMT 10
So, finally I have it back home. It was a couple of hundred k's away, so a bit of a haul for its first outing in many years. The tyres were stuffed, but on early Holden rims - which I also run on my motor bike trailer, so these made the trip down with me and were screwed on after checking bearings - good, and brakes - not good. Wheel cylinders all seized, so wound the adjusters in a bit so the shoes didn't drag. Trip home was uneventful - I pulled over and checked hub and tyre temps a couple of times with my IR thermometer - hubs sat at 39 degrees and tyres on 50 so all good. Sat on about 90 most of the way and it was happy with that. There is a public weigh bridge near home, so I ran it over that on the way. The water tank was emptied, but the half full gas bottle was left on it. Came out at 940Kg which I am pretty happy about. It has some heavy carpentry in it that someone has done for one of the bunks and the main bed which has been made bigger at some stage - with 1/2 inch chipboard every where, so it's not surprising it was a few Kg heavy. Anyway, a good look over it once home, and I'm pretty with it. It has a few small leaks, but these will be sorted once I redo all sealing of the windows and trim between the roof and walls. Windows need new rubbers on the glazing, and a bit of TLC. Curtains all around are needed - The MIL is going to do those next weekend.  Mechanically, brakes and suspension need a good going over, and I think I'll put in a new axle instead of the drop axle that is in there. That, along with some light truck tyres should see it sit up a few inches higher which will work well for the tow vehicle I will be using the most. Tested Electrics - all good, so I powered it up. All 240 volt lights and power works well. Fridge is cold. 12 volt electrics not looked at yet, and there will be major mods to all this, as when we are away, it will rarely get plugged into an outlet, and I not carry a genset. Nice, quiet 12 volt camping for me, so battery, solar panel, charger,etc all to go in as well as a couple OD bedside lamps and everything converted to LED. Gas was never used by the PO - for the fridge or the stove, so I need to check all that put before I try any of this. The gas cock on the stove is an old school brass unit, and I'm not sure how well they hold a seal after 35 years... Too dark for pics, but I'll take some in the next couple of days once I get stuck into it. Cheers - Snoops. |
|
|
|
Post by mike on Feb 20, 2014 11:26:18 GMT 10
Gday snoops, You're really getting out and about with that van. Excellent!  Axles: The original drop axle on ours produced a splayed look to the wheels on the road. A bit like the old VWs rear drive wheels. We had so many busted tyres, and cracked steel wheels. The cracked wheels were often discovered when flat tyres couldn't be re-inflated after repairing "punctures". Really what had happened was that with tubeless tyres, the wheel cracked and air leaked from the wheel. Those originals were 13" Holden wheels.  I had a new drop axle fitted with 14" Holden wheels No probs. No rubbing up under the wheel arches. The new axle didn't really fix the bowed stubs on the end. I sent the van back. They then hammered the axle up from underneath in the centre to give it a negative bow, or the wheels actually turned in at ground level (still straight ahead) when jacked up off the ground. When lowered to the ground and the weight came back on the wheels, they straightened up... nicely, and there's been no trouble since with bowed wheels, broken wheels...  When that axle was installed, with the new 14" backing plates, I also installed ones that would allow electric brakes to be fitted: they installed those as well. Very safe feeling when braking. (However, no other vehicle can tow the van unless they also have an electric brake controller installed in the vehicle.) Recently, I discovered a broken leaf spring "eye". These vans are fitted with 925mm x 56mm leaf slipper springs. They have two upper leaves 6.5mm thick, and three lower leaves that are 8mm thick. They're bolted to the axle with two U bolts: no probs. They are bolted to the chassis with ONE bolt through the front eye. That eye had cracked allowing the eye to travel forward under the chassis. The rear slipper end moved within its restricted 75mm space (they have a "hook" which prevents that spring end from moving forward).  Finding replacement springs was a serious problem. Everyone will try to sell you boat trailer springs, but they are only 760mm long. I did eventually get two 925mm x 60mm spring sets (all leaves only 6.5mm thick) at 3 times the price of the boat trailer springs, and fitted them. But they were not strong enough: there was only 40mm clearance between the axle and the chassis. So.... had to take them off...  I cannibalised one of the new springs to get the new spring eye leaf off it, then fitted it to the old spring set I'd taken off originally. I also added one extra leaf from the new spring, as well as cutting and trimming the old "eye" leaf to match the extra leaf. That enabled me to ADD one extra leaf to the old springs before putting them back on the van. Stiffen them up. Now we have two stiffer? springs giving us 80mm clearance between the axle and the chassis.  Those slipper "hooks" mean that when the van is jacked up, it really has to be tilted severely to one side because the spring has to be taken out from an almost vertical angle. That is about 925mm high!!  Also, spring makers don't make them the old way any more. The old way was to have the 5 leaves all shaped to the same curve, centred with a single bolt and metal clipped to hold the leaves straight and together. The new way is to create tension within the spring leaves, by making the top leaves have a shallower curve to the lower springs, and press-tension them together with ultra-strong metal clips. The problem that created for me was that the old metal clips on the old springs which I was compelled to re-install, were not really strong enough to tension the flatter top leaf, and it has a small gap. I'll soon get a U bolt and that will tighten it up.  This was serious engineering stuff for me, but it appears to have worked.  Tyres: we used to use truck tyres, but they rubbed up under the wheel arches. We now use 8ply rated radial tubeless, the kind used on those one tonne tradie vans. No probs.  We've also CUT the EXTERIOR SIDEWALL wheel arches UP about 80mm to enable the larger diameter wheels to be more easily removed when needed. See report in "techo stuff". Apart from the above under-carriage stuff, we've had no real problems with it on speed humps etc but we rarely go off the tar. Stove cock: Our original is still going well. Looks like you've got a real gem there with nearly everything working. Cheers mike |
|
|
|
Post by snoops on Feb 20, 2014 17:42:58 GMT 10
Thanks for the detailed reply Mike, that is great information on the suspension. I will in due course remove he springs to clean them up, when I get around to all those bits. I'm thinking of putting a straight axle under it for a bit more clearance, then use one light truck tyres - I'll see how things go there. First up is to make the interior liveable and get some curtains up as we will be using it for visitors almost straight away. Once it's comfortable, I'll sort the mechanicals out and get it registered ready for some road trips.  |
|
|
|
Post by snoops on Feb 21, 2014 20:23:22 GMT 10
Well, all cleaned out, and I found all the curtains and rods under the main bed, so they are all up - not really my taste - they are a bit 90's looking. Need to find some nice 70's paisley or something similar...  Replaced the broken outside light and stuck the spare queen size inner spring mattress in it - it fits well, apart from one corner that is just a bit too wide. Looks like it will need some surgery to fit perfectly. Found that I can still get all the spares for the windows I needs - latches, seals and a coup,e of flyscreens. I also think I may end up putting a shower/toilet cubicle in it - there is heaps of room up the front where the bunks are that we will never use - there will only ever be 2 of us in it. That will have to wait a bit though, as we have friends coming to stay who have just moved from interstate and they may be with us for a couple of months. |
|
|
|
Post by snoops on Aug 13, 2014 20:58:49 GMT 10
Well, it's been a while - nothing really to report. Within a week of getting it home, we had some friends move into it as they were relocating down to Melbourne from interstate. The idea was they could stay a couple of months while they found jobs and got sorted. Well, they're still here nearly 6 months later....
Good news is they are moving out next weekend, so I can finally get stuck into it.
I'll report back once I have it again and start to get it mobile once more.
Cheers - Snoops.
|
|
|
|
Post by doublechevron on Aug 14, 2014 14:29:58 GMT 10
Well, it's been a while - nothing really to report. Within a week of getting it home, we had some friends move into it as they were relocating down to Melbourne from interstate. The idea was they could stay a couple of months while they found jobs and got sorted. Well, they're still here nearly 6 months later.... Good news is they are moving out next weekend, so I can finally get stuck into it. I'll report back once I have it again and start to get it mobile once more. Cheers - Snoops. My father tells me those old Franklins were bagged by one and all when new. Everyone said "Don't buy them, they'll fall apart before you even get them home".......... Here we are 40years later and there still rolling along the roads. The foam sandwich caravans are still being made today by a lot of the European manufactures... There way stronger than the frail box sitting on top of a chassis caravans sold locally. ditzygypsy.proboards.com/thread/342/franklin-caravans-ballarat-vic?page=1There's some piccies here of the way they were made. Same deal today if you watch the pommy caravan factories. They pre-cut the wall and roof panels, then bolt them together to the massively thick floor (which is kind of the chassis) creating one incredibly strong "box" structure with no real separate chassis. Good to hear you getting the visitors out of the 'van. Your going to have to lift it about a meter and fit a pintle hook to it to make sure no-one else can borrow it    I'm deliberatly leaving our old caravan without windows and side trims to make sure my sister inlaw doesn't want to try live in it ..... bugger that ... I'd burn it first. The very last thing I'll do before it's ready for the road is re-seal it and fit the windows.... No-one wants to stay in a windowless caravan  seeya, Shane L. |
|
|
|
Post by snoops on Aug 14, 2014 15:46:43 GMT 10
Thanks Shane - why didn't I think of that!
Regarding the construction, it is still amazingly rigid. Needs a few things attending to, but we all do by the time we get to that age.
|
|
|
|
Post by snoops on Aug 14, 2014 18:38:27 GMT 10
Had a poke around inside this arvo - even though our guests are still using it. For a start, it looks like a tip, and stinks of smoke, although they haven't been smoking in it, but all their clothes stink of it.
Looking at the doors inside, they are all a bit ratty, so I'm thinking of painting everything. Not sure how it will look, but I was thinking of just going with a cream colour. Anyone done this before? How did it look?
ill sand everything so it's smooth and flat, spray a coat of sealer/surfacer on, then spray 2 or 3 coats of top coat - maybe just an interior satin finish?
Cheers - Snoops.
|
|
|
|
Post by snoops on Aug 26, 2014 21:29:43 GMT 10
Ok, so today marks the day the resto can begin! Guests have moved out, so it's go time! Most of the interior work will just be tidying things up and paint, but the biggest thing is going to be a toilet/shower area up front where the front bunks were. That's all come out and it looks like someone has patched the front wall up before, but until I get it full stripped I'm not sure what I'll find there. My plan is to build a wall at the end of the sink area across towards the front door, then use a light concertina door on it. I want to make it look like it was there from new, so I'll have to build it 1970's style.  I'll post some pics up if I get back from work before it gets too dark. |
|
|
|
Post by snoops on Aug 28, 2014 17:33:24 GMT 10
Ok, question for the brains trust. How do I get the fridge out?  It seems quite content to stay where it is, and I can't see any fixings anywhere - any ideas? Cheers - Snoops. |
|
|
|
Post by snoops on Aug 28, 2014 17:41:36 GMT 10
Here's a pic of the bunks gone. There's a bit of rot in the corner, I'll see how bad it is once I've got everything else out of the way. 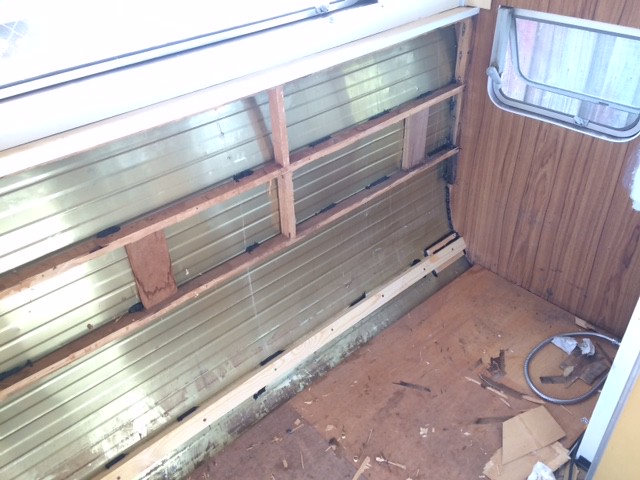 image image by Gavin Gregory, on Flickr |
|
|
|
Post by youngdazza on Aug 29, 2014 13:29:32 GMT 10
Regarding the fridge, have you checked whether its bolted down to the floor with a few bolts?
|
|
|
|
Post by snoops on Aug 29, 2014 17:18:27 GMT 10
Had a quick look yes, but I can't get under that side of the van where it is sitting at the moment. Hoping it was going to be anything but that as there are a tonne of cars and trailers in the way for me to be able to move it from the wall so I can get under there.
Oh well, looks like that sorts out Saturday morning for me.
|
|
Deleted
Deleted Member
Posts: 0
|
Post by Deleted on Aug 30, 2014 4:01:37 GMT 10
Being a Franklin,they were usually only screwed in from the front.
Take off the door,should be 2 plugs either side of the frame.Remove these to gain access to screws,remove screws and frig SHOULD slide out enough to undo gas pipe from side cupboard.
If it won't move,there is possibly 2or4 screws from under floor into base rails of frig,undo from under and then slide frig our.
Don't forget to unplug from PowerPoint though!
Good luck
hughdeani
|
|
Deleted
Deleted Member
Posts: 0
|
Post by Deleted on Aug 31, 2014 6:59:08 GMT 10
Just noticed,your van has a little door behind the frig.open this to disconnect the gas line before you slide frig out.
You might find a couple of screws through the floor from the frig rails too .
Cheers
hughdeani
|
|
|
|
Post by snoops on Aug 31, 2014 20:59:11 GMT 10
Thanks for that - haven't had time to look this weekend, I'll take a peak one day after work this week.  |
|
|
|
Post by snoops on Jan 19, 2015 19:27:15 GMT 10
Well, time flies. Been busy doing other things - you know how it goes. I now have a deadline to work to for its first outing, so I've finally got back to it. New tyres today and a new axle - complete with brakes will be here Friday. It is a straight axle, so I'll pick up about 2" clearance which it really needs - it's a real belly dragger at the moment. Tyres are also a tad bigger than standard. Hopefully I'll get it fitted on the weekend, then it technically can be registered. Most of the other stuff I need to do is in the interior. The chassis needs a clean and coat of paint, but not sure if that will happen yet - see how time goes. Lights and all interior electrics all work fine, but I'll give them all the once over.
I'll post some pics once I've got the new bits in.
|
|