jrabs
In Training
 
Posts: 18 
|
Post by jrabs on Oct 23, 2013 22:13:41 GMT 10
Hi All, I recently picked up a 20f tandem that we plan on stripping out to refit to suit a family of 6. should be an interesting project. Here's a few photos.  As I found it.    Interior before strip out.  A question I have here is: How do you remove the ceiling between the wall frame and roof frame? Got a few more questions for later on but I'm finding out heaps by reading through all of the treads here. Cheers, jrabs |
|
|
|
Post by greedy53 on Oct 24, 2013 18:55:31 GMT 10
and i though my van was a task,but it was fun doing it so happy building and keep the pics coming
|
|
|
|
Post by ForumMod on Oct 24, 2013 20:34:10 GMT 10
It surprises me to know the chassis number on this van is A2564, considering the van is from around 1970. The A2xxx numbers were being used back in 1968, so they should have been way past that series by 1970.
cheers,
Al.
|
|
jrabs
In Training
 
Posts: 18 
|
Post by jrabs on Oct 26, 2013 9:39:11 GMT 10
Here is the chassis number. See what you all think. I was debating if the chassis letter was an A or an R. R may win the day if it matches the rest of the van look.  Also the clock that was fitted.  Front window removed for refurb. Another question, is any Perspex suitable to replace the curved and straight windows? I am not sure if it is being refitted yet as I was considering sheeting the front due to a double bunk being fitted there. Not sure if that is within my capabilities yet. if anyone knows of something similar being done I am keen to see how.  Cheers for your thoughts. jrabs. |
|
|
|
Post by ForumMod on Oct 26, 2013 19:47:10 GMT 10
jrabs, I think the chassis number is what you first said it was...A2564. Occasionally we see vans on the forum that don't conform to the history as we think they should. Perhaps your chassis was taken off the production line for some reason when it was built in 1968, and then rejoined the production line after a number of months out in the yard. The earliest your van could be is mid-1969 when the white acrylic cladding started to be used, so it's possible your van is from that time period.
cheers,
Al.
|
|
jrabs
In Training
 
Posts: 18 
|
Post by jrabs on Oct 27, 2013 22:06:44 GMT 10
Had a fair day working on the van but at this stage still dismantling rather than rebuilding.
Removed the cover strip and sail track from one side of the roof and cleaned all the sealant away. The sail track profile looks different to any I have come across before so I will post up a photo to get any ideas on what it suits.
I then lifted the roof enough to get the last of the ceiling out which I am half way through on.
I also removed the rear window as a complete unit to rebuild the timber and refit later.
I think I will close up the front window and utilize the original cladding to cover the window and aly checkerplate on the lower half. this will be after I make up some framework to fit it all to.
I will post some more photos in the next couple of days.
Cheers,
Steve
|
|
jrabs
In Training
 
Posts: 18 
|
Post by jrabs on Nov 3, 2013 21:37:39 GMT 10
So I'm still taking things apart, not sure if I have gone too far or not but the roof has numerous repairs and small holes and the hatches needed a lot of work so with that in mind I am going to replace the complete roof, possibly with Alupanel if the cost isn't to ridiculous, front panel and change the back of the van to exclude the curved windows and just have the push out centre windows. It was interesting to see the way the water ran off the roof during a shower with the rear window removed. it ran straight around the corner to where the timber shelf usually is so its no wonder these areas see the most water damage. Anyway here are some more photos.     Various photos with the roof removed.   On another note, it was good to confirm the chassis number on the roof frame work. Even had my initials there as well!  I am thinking of fitting a 4 seasons hatch back in where the front one was. if anyone has any suggestions for a different type feel free to let me know. Late this afternoon I started redoing the front wall profile minus the windows and found some of the aluminium channel was corroded where it bolts to the chassis. The Z rail on the chassis was also rusted through in one area but its not a big fix so I will do that while I am in the area. I can see me replacing the majority of the rivets throughout the van as they are breaking fairly easily. The cladding rivets have some type of washer under them. Are these normally sold as a complete unit or separately? I realize this is not really a true restoration but there was just too much work involved in trying to stay original and give us the van we need. At least I should feel comfortable towing it longer distances than I first thought. Thanks in advance for any comments or help |
|
|
|
Post by ForumMod on Nov 6, 2013 17:35:30 GMT 10
G'day jrabs, If you spend some time studying the design of these old caravans, you start to see lots of possibilities for improvement. One of the things I like about the Viscount body shape is the curved roof. I personally think it's a good shape to remove water quickly during heavy downpours, etc. However, like you've discovered, I think Viscount let themselves down badly by having those roof ends that deflect water straight back towards the window. I had a similar issue at the back of my Windsor van, which I resolved by pop-riveting a strip of curved aluminium under the bend, as shown in these photos... 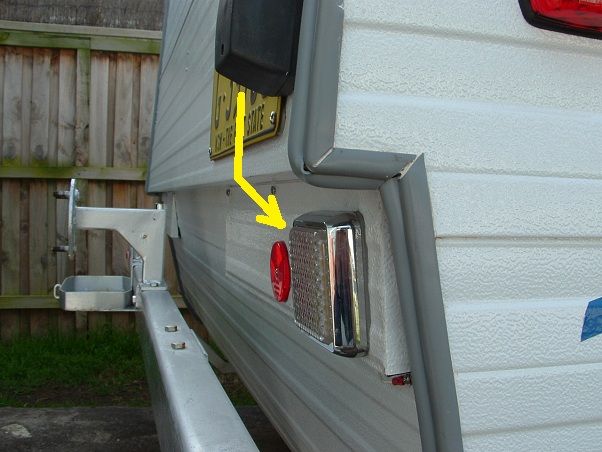 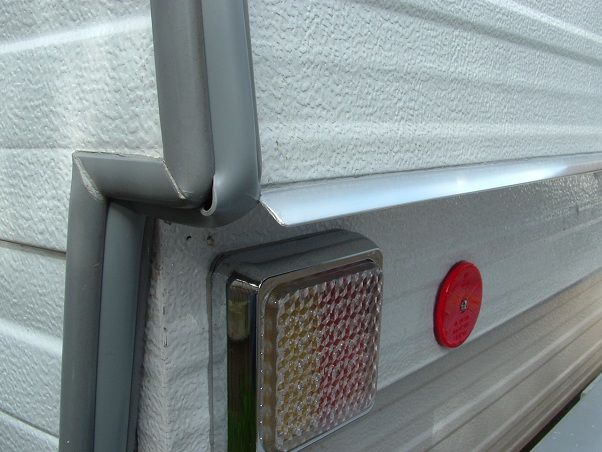 I think something like this deflector strip would be a huge advantage in deflecting the water away from the front and rear 'nose rolls' (the curved ends) on the Viscounts. The other thing I did with the Windsor was to put a strip of polyethylene flashing at the end of the rear cladding where it joins the chassis underneath the van... 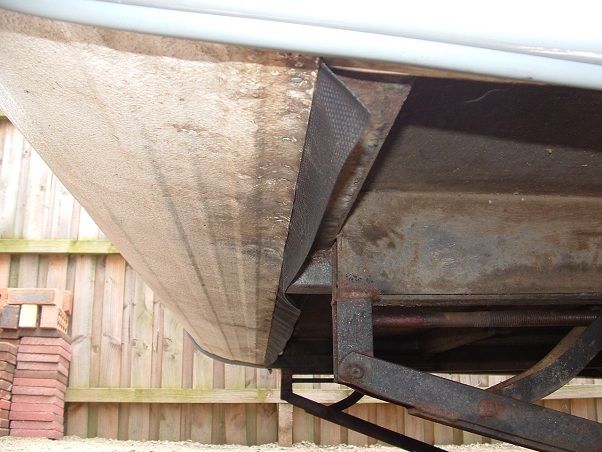 Just like the aluminium deflector strip above, this flashing also deflects water away from the van and stops it making direct contact with the chassis. I also used this flashing in the vintage caravan project I'm currently working on, to put a barrier between the edges of the chassis and the plywood walls... 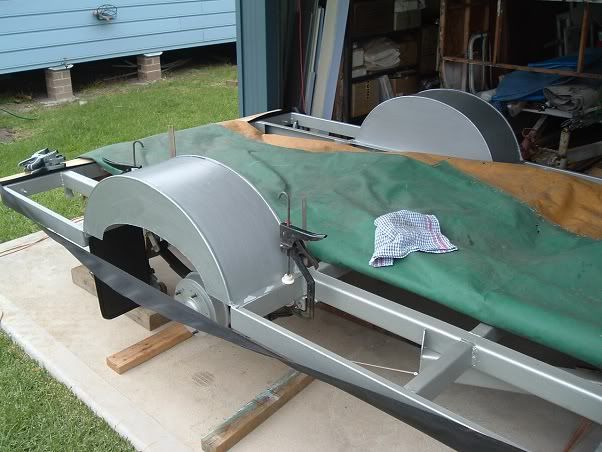 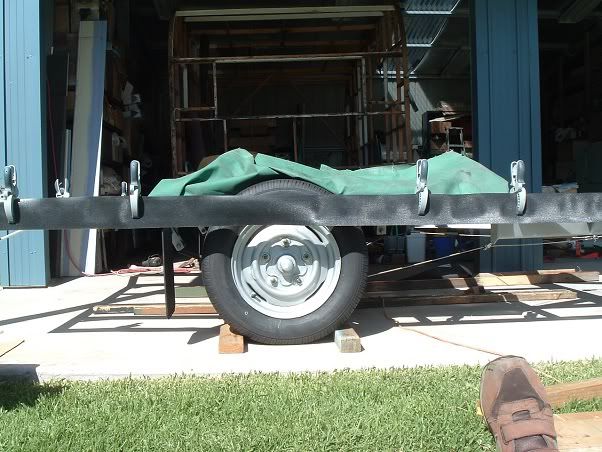 This is what the chassis of the vintage caravan looked like after water had got in between the plywood walls and the chassis over a period of fifty years... 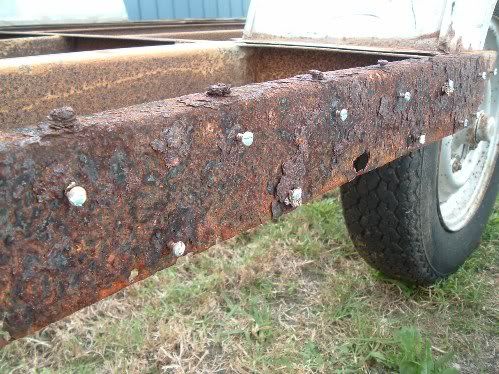 Anything you can do in a caravan to stop metal to metal contact between aluminium and steel is going to help stop corrosion between the two metals. Anything you can do to direct water away from the van is going to help stop things rotting away. You'll be spending a lot of time on this project, so add in some improvement ideas of your own to make sure your time has been well spent. ps. Nothing wrong with four seasons hatches. If you want to read how to refurbish the flap controllers on the hatch, see this thread: Four Seasons hatch - repair and maintainYou can also read this other thread that probably relates to a Viscount of the age of yours: Roof hatch optionscheers, Al. |
|
jrabs
In Training
 
Posts: 18 
|
Post by jrabs on Nov 8, 2013 13:28:30 GMT 10
Hi Al,
Thanks for the tip on the waterproofing between chassis and frame. I have a roll left over from house reno's that I thought I would never use so thats where it will go.
I have made some new roof frames out of RHS to replace the channel and timber that was there and to frame up the new hatches.
Chassis repairs this weekend as I am waiting on the right size channel to reshape the front and back walls.
I am keeping the roof and end curves but going straight from the top curve to the bottom curve to do away with the step in.
Cheers
|
|
jrabs
In Training
 
Posts: 18 
|
Post by jrabs on Apr 6, 2014 9:12:18 GMT 10
|
|
jrabs
In Training
 
Posts: 18 
|
Post by jrabs on Apr 6, 2014 9:22:40 GMT 10
Here is the old a frame by the way. The new one will be 150mm x 50mm x 4mm and around 300mm longer so a bit heavier but the air con will be mounted at the rear so balance wise should be ok. I just have to keep overall weight in check.  |
|
|
|
Post by Rattles on Apr 6, 2014 11:32:13 GMT 10
If you are extending the Draw bar why not mount th A/C on the front this would be better for stability of the van on the road.
Rattles
|
|
|
|
Post by supreme78 on Apr 6, 2014 11:37:43 GMT 10
Your taking a viscount renovation to extreme here but you will end up with a great van for use when needed. It's funny how a renovation keeps getting bigger and bigger before you can move forward. I had a viscount around 1972 and I replaced the old hatch with a large Perspex type like listed here in eBay.
Dometic SEITZ Midi Heki skylight lever Version DOM136825 for caravan motohome
The hatch is not cheep but it allows good light in and good ventilation.
I just added extra alloy to the roof frames and then filled the gaps in the roof with alloy sheeting. As I replaced the ceiling with new ply it made the van look more modern.
Good luck with the van Reno.
|
|
jrabs
In Training
 
Posts: 18 
|
Post by jrabs on Apr 7, 2014 8:50:19 GMT 10
If you are extending the Draw bar why not mount th A/C on the front this would be better for stability of the van on the road. Rattles I need to mount the head unit on the rear wall so don't really want to run the pipes and cable that far. |
|
|
|
Post by supreme78 on Apr 7, 2014 10:47:16 GMT 10
The whole air conditioner weighs around 85 kg so it should not affect the rear weight that much. If you add spare wheel that's another 40kg and it's starting to add up. My van has 2 gas bottles and a tool box on the front and a 95L water tank at the front so the ac at the rear in the future should be fine with a spare. I might use alloy wheels to reduce a few kgs on the old girl.
|
|
|
|
Post by ForumMod on Apr 7, 2014 11:41:26 GMT 10
I'm keen to see what the front and rear framework will look like once it's finished and recladded. I reckon it will give very good water protection, so that will be a good thing. Not sure if you've already read this other thread, but a similar idea was done on a 1975 Capricorn Vogue. That van ended up being quite an eye-stopper!!  cheers, Al. |
|
jrabs
In Training
 
Posts: 18 
|
Post by jrabs on Jun 8, 2014 17:27:00 GMT 10
Started reglazing the windows today after I bead blasted the frames, had the first one finished and was riveting on the window stays and then, cracked glass! Not happy but I think I will get some Perspex tomorrow and do them all in that. Other than that not to much progress. The A frame is almost complete as well as the stabiliser legs so I will get some photos and post them up. |
|
jrabs
In Training
 
Posts: 18 
|
Post by jrabs on Aug 17, 2014 20:50:41 GMT 10
It’s been slow going on the rebuild but here are some progress photos.   The new A frame.   Stabilizers.   Reshaped front minus curved windows.  Progress of rear reshape minus curved windows. The cladding is a bit rougher than I would like but I can’t justify the cost to re-clad. I guess it will be a bit of a “sleeper” van when it is all finished as it will be completely new on the inside but not so much outside. Next step after the cladding is finished is new roof, front and rear and then the windows then floor can go back in. |
|
|
|
Post by ForumMod on Aug 17, 2014 21:36:12 GMT 10
Great going, jrabs!  That new drawbar looks VERY solid, and it looks big enough to even carry a spare camper trailer on there for any emergencies!  The patchwork quilt cladding repairs should end up looking ok. A pretty good effort considering you are trying to work with the bits you've got. Nicely done.  cheers, Al. |
|
jrabs
In Training
 
Posts: 18 
|
Post by jrabs on Aug 17, 2014 21:45:36 GMT 10
Thanks Al. I had a win the other day when I happen to look in a scrap steel bin at work and found an old front window cover in there!
It gave me enough cladding to fill in the gaps.
|
|
|
|
Post by supreme78 on Aug 19, 2014 17:44:04 GMT 10
My viscount royal has joins in the cladding from new and it seems to look ok. It's a 20 footer so I guess it was tough to find paneling that long so some joins were nesasary. I see you have gone about as far backwards as you can go before starting to move forwards again. I like the idea of removing the wrap around windows as there the basis of many a headache for a viscount restoration. You might need to add a clear hatch to the roof to let some natural light in or it will be pretty dark in there. There was a guy on eBay selling roof sheets for a van new. They slot together and would suit your rebuild very nicely.
Anyway keep up the good work.
|
|
jrabs
In Training
 
Posts: 18 
|
Post by jrabs on Oct 17, 2014 11:23:53 GMT 10
Hi all, I was wondering if anyone had needed to source a new lense cover for the exterior light near the door on these vans and if anyone had made a new door. I've had a good look around the forum but no luck so far.
Cheers
|
|
Deleted
Deleted Member
Posts: 0
|
Post by Deleted on Nov 4, 2014 22:29:13 GMT 10
Hi, Sorry I don't have an exterior light, but I am super excited to see your van on here. I pass your van everyday as I drive the children to and from school. I wait and watch its progress.
|
|
jrabs
In Training
 
Posts: 18 
|
Post by jrabs on Nov 12, 2014 20:03:24 GMT 10
Thanks Clueless, You may be waiting a while but it is moving ahead slowly. I have fitted the checkerplate to the front and rear now and most of the windows are ready to go back in.
|
|
jrabs
In Training
 
Posts: 18 
|
Post by jrabs on Nov 1, 2015 20:02:46 GMT 10
So it's been a while since an update for various reasons such as work, family ect but here is the latest. As I said last post I fitted checkerplate to the front and back and have now started to resheet the front, roof and back with alupanel so here are some progress shots.     I have used sikaflex and sealed rivets to fix the panels to the frame with alupanel joining strips in between. I have tried to limit the rivits on the roof to minimise the chance of leaks but probably went overboard on the front section but you get that sometimes. In case anyone is interested the panels were 2400 x 1200 x 3 mm and were $75 +GST per sheet with the joiners around $10 form Ullrich Aluminium. The joiners only come in a mill finish so I had to paint the ones joining the panels but they seem to have come up ok. The panels cut easily with a small circular saw blade that fits my 5" grinder and I ran a router through 2/3rds depth at around 20 mm gaps to get the curve on the front. Another weekend should see the roof and back finished and then 3 more windows to be refitted and the majority of the outside is done. I am not sure yet if I am going to reuse the original corner mould or replace the lot with truline. I will give it a clean up and see. Anyway,thats it for now. Cheers, Steve |
|