|
|
Post by millard1399 on Jun 4, 2012 17:28:48 GMT 10
G'day Ben, As you can see, I've transferred all the other posts from your original thread over to this thread. Now we've got your complete story together.  And as they say in the Caravan classics: "Let the fun BEGIN!!" ;D ;D cheers, Al. |
|
Deleted
Deleted Member
Posts: 0
|
Post by Deleted on Jun 4, 2012 20:46:11 GMT 10
Cheers Al, looks good.
So I think the flooring may be aspestos based as its quite brittle when broken. Going to remove the plywood whole with he Lino tiles attached to minimize disturbing it.
|
|
|
|
Post by millard1399 on Jun 4, 2012 21:03:22 GMT 10
Yeah Ben, the floor tiles used in those days will most likely contain an amount of asbestos, so what you are proposing to do by not disturbing them is a good idea.  |
|
|
|
Post by gavo on Jun 6, 2012 18:24:50 GMT 10
If wanting to minimise the risk with possible asbestos you could also wet the area and floor down with water before removing. This will minimise dust rising into the air.
Oh yeah.... let the fun begin. Yours is starting to look like mine was, the best bit is where you start to get to put stuff back together again.
Cheers
Gav
|
|
Deleted
Deleted Member
Posts: 0
|
Post by Deleted on Jun 7, 2012 19:57:32 GMT 10
Floor removed today. Like rust much?   Heres the worst bit, front drivers side. This will of course be completely replaced.  The rest of the chassis has bits that will need replacement, but to be honest it's not as bad as I thought it might have been, considering it spent over 2 decades next to the sea. I have a few questions, please jump in and answer if you can: 1. What's the main difference between external ply and marine ply for the flooring. The price is of course a factor but I want to know if marine ply is really worth the cash. How about structural ply? 2. Standard advice on thickness seems to be 12mm. Anyone gone a bit thicker? Much weight difference? 3. Sikaflex seems to get a good wrap as a sealant but which type? The 252? 11FC or the PRO? More questions to come but this will do while I work on the chassis. |
|
|
|
Post by millard1399 on Jun 7, 2012 21:44:21 GMT 10
G'day Ben, Well, I guess that rusting is about what you'd expect considering where the van has spent a fair bit of its life. At least the chassis didn't fall apart in your hands like some of the timber frames we've seen on the forum!   To answer your questions: 1) The difference between exterior grade ply and marine ply is basically the appearance of the cut edge. When the layers of timber are bonded together to make the ply, some of the layers in the exterior grade will have splits or small gaps in the timber, whereas there are no gaps in any of the layers in marine ply. Both are bonded using an "A-bond" adhesive, so both have the same water resistance rating as far as the adhesive goes. Exterior grade will let water into the edge gaps if it's not sealed properly. For your flooring, you might want to investigate structural plywood, which is available in various face gradings. Face gradings start from "A", the best, down through B, C, and D. Both faces of the ply can be the one face grading, or you can get differing gradings between the faces. You can see in any Bunnings store what structural plywood rated as C-D looks like. I'd be inclined to check out the cost of a B-B grade structural plywood, such as this example: Structural Plywood , and compare the cost with the C-D grade from Bunnings. A lot of choices you make about the van will be governed by your wallet, so you can only go on how fat the wallet is at the time.   (2) And yes, I think 12mm would be sufficient thickness. I presume that's what was on the van originally? Going thicker just means more weight, higher cost, more petrol to tow the van...and for what?! As long as you don't make your cupboard frames out of RSJs, I don't think you need to go any thicker.   (3) I've only used the Sika 11FC stuff, which I wrote about elsewhere on the forum recently. If you use this product, you're sticking stuff together for good. I've never used the Pro version, so I can't comment on that one. cheers, Al. |
|
Deleted
Deleted Member
Posts: 0
|
Post by Deleted on Jun 7, 2012 22:35:15 GMT 10
Thanks Al, great info. As I'm going to be covering the floor I think structural ply is the go.
Sikaflex 252 I found interesting because they actually have the sealing of vehicles as a recommended application on the label.
-Ben
|
|
|
|
Post by boblor on Jun 8, 2012 15:24:14 GMT 10
Hi Ben
Sikaflex 252 is the go if you are looking for a good durable job, about $25 per tube but worth it. I have used the 11FC, which is cheaper, but not as good a product as 252. For sealing windows Sika Alastomer 511 is recommended, a non skinning sealant, allows you to remove the window later should you have to do so.
My two bobs worth.
Cheers boblor
|
|
|
|
Post by millard1399 on Jun 8, 2012 18:48:47 GMT 10
G'day Ben and boblor, I used the SikaLastomer 511 all around my Millard poptop during the restoration... 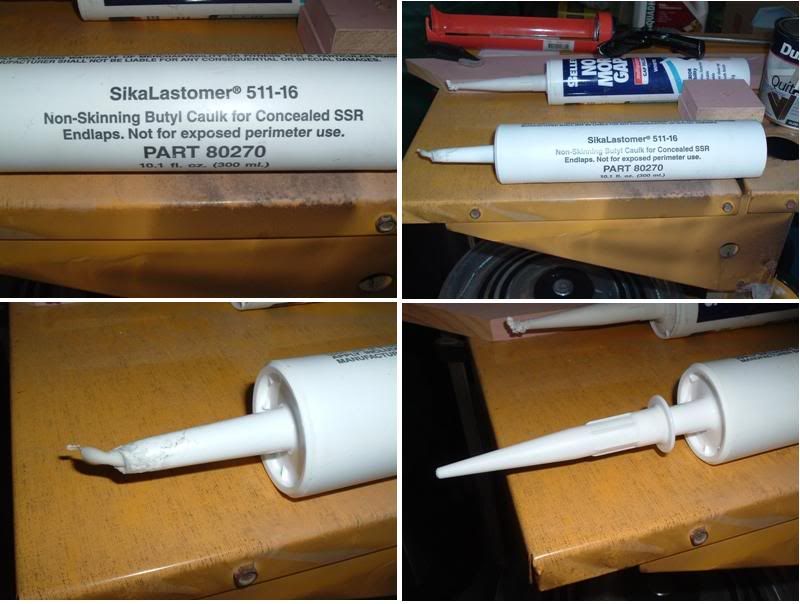 This product is designed for use as a sealant on the upright overlaps on "standing seam roofs" (that's what the SSR on the cartridge stands for). An example of a standing seam roof is shown on the right... 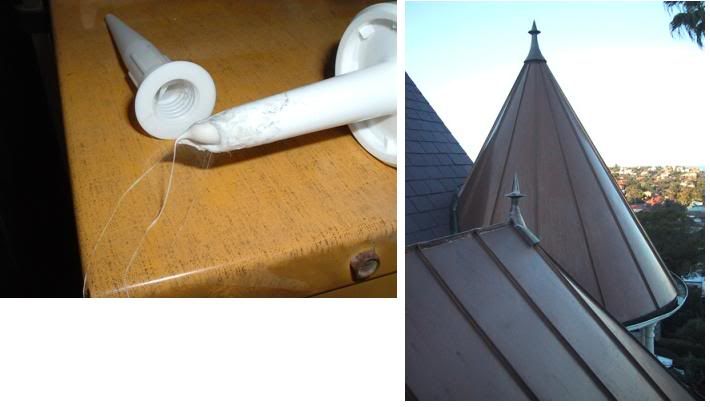 The Sika technical information for this product says they don't recommend it be used in exposed positions, but I ignored that and used it anyway because it was cheap and didn't cure. However, two years later I'm having reservations about the long term suitability of this product for caravan sealing. I'll take some photos tomorrow, and show what I mean.  cheers, Al. |
|
Deleted
Deleted Member
Posts: 0
|
Post by Deleted on Jun 8, 2012 20:31:44 GMT 10
It's true the 252 is quite expensive, but as you may point out Al, the expense may be worth it.
In other news I checked out Bunnings ply wood offerings today. Their structural 12mm ply (C/D grade) is $50 for standard 2499x 1500. The marine ply (A/A grade) is $65 for same size.
That's only $15 difference. And food for thought. I'm going to check some smaller retailers and see what hey come up with, I like the look of the Austral ply.
|
|
|
|
Post by millard1399 on Jun 10, 2012 16:04:55 GMT 10
Ben, here are the photos I said I would take, to show my concerns about the SikaLastomer 511 sealant... About six months after completing the restoration, I noticed the sealant was starting to show cracking. These two photos are typical of what has occurred in a few places around the van... 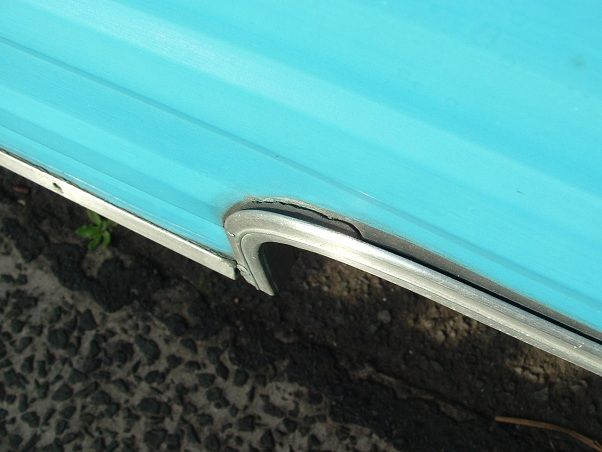 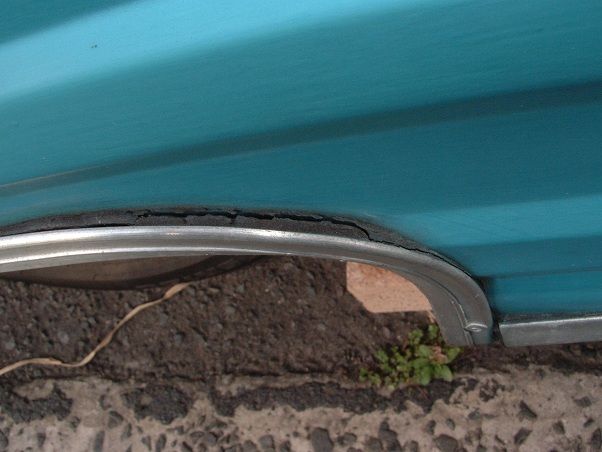 It's hard to tell by looking down into the crack whether it extends all the way through the sealant thickness (top to bottom) or whether it's just a crack in the first few millimetres of the sealant. I haven't discovered any leaks around the van that would prove the sealant has cracked all the way down, so I'm kinda hoping it really is just a surface crack. The other issue about this sealant is more a cosmetic issue, rather than a quality issue. Because the sealant doesn't cure like other sealants, the surface stays soft, which means it collects any dirt, dust, and grime that lands on it. During our travels, the sealant on the leading edge of any fixture cops all the grime, and has turned black... 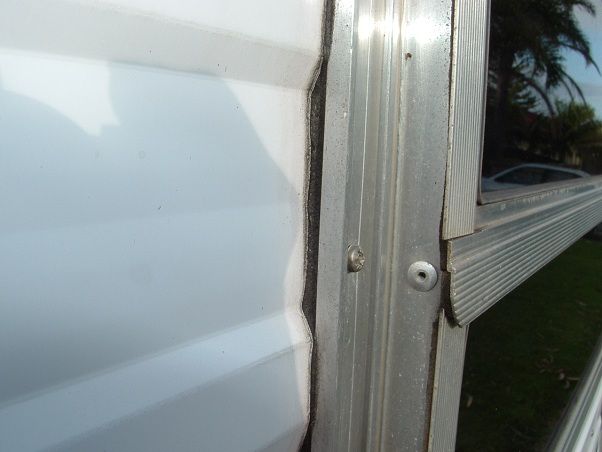 ...whereas the trailing edge is protected to some degree, and still shows up as more like the original off-white colour... 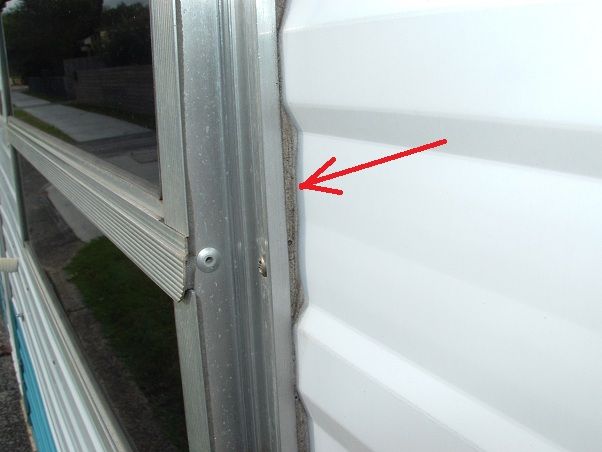 If I'd known the off-white was going to pick up all the dirt, I would have used the black colour in the first place instead.   But the real issue is not the dirt, it's the cracks that have developed in the sealant itself. cheers, Al. |
|
|
|
Post by atouchofglass on Jun 10, 2012 16:39:01 GMT 10
Hey Al It's not just the Sikaflex that can be a problem After doing my Olympic up I was informed that Matrix is not good under UV light......hmmmm So looking outside of the van I have similar problems. Will be solving them one at a time.... eventually     Moral to this story is simple.. check with the manufacturer if their product is UV Stable before applying to anything. Cheers Atog |
|
|
|
Post by millard1399 on Jun 10, 2012 18:42:37 GMT 10
Yeah, atog, the only Sika sealant that Sika recommends for sealing the exterior of caravans with, is their Sikaflex - 295 UV sealant. It comes in white or black, and is a polyurethane that cures completely. The "UV" means it is UV stable, so it'll withstand the Aussie sun. It costs around $20 per 300ml cartridge. The SikaLastomer 511 that I used was one of only two Sika sealants I could find that didn't cure completely. The other one I used on the poptop roof edge moulds was SikaLastomer 710, which was a skinning butyl compound, but only available in black. The 710 sealant has now been discontinued from the Sika range. The big dilemma with choosing a sealant is knowing whether you'll need to take the joint apart again sometime in the future. From what I understand with these sealants that cure, if you want to separate the joint at some later stage it's a heck of a job to get them apart. My Windsor van is getting the Selleys Butyl Mastic treatment, so I'll know how good that stuff is in a year or so.  cheers, Al. |
|
Deleted
Deleted Member
Posts: 0
|
Post by Deleted on Jun 10, 2012 21:02:09 GMT 10
Hi guys,
I'm using sikaflex pro on the viscount for everything....time will tell if it is any good
Cheers Ian
|
|
Deleted
Deleted Member
Posts: 0
|
Post by Deleted on Jun 20, 2012 13:27:32 GMT 10
|
|
Deleted
Deleted Member
Posts: 0
|
Post by Deleted on Jun 20, 2012 17:51:45 GMT 10
Nice work.  |
|
|
|
Post by millard1399 on Jun 20, 2012 18:27:50 GMT 10
G'day Ben, Well, the "white ants" sure made a mess of that channel!   But what a difference the replacement channel has made.   Did you end up with any severe corrosion on the bottom of the aluminium cladding as a result of the steel rusting? I ended up with a couple of pinholes where the cladding was against the chassis channel, and where some trapped mud had caused the chassis to rust severely (but nowhere near as bad as yours, thank goodness). Great job on the fix-up. ;D cheers, Al. |
|
Deleted
Deleted Member
Posts: 0
|
Post by Deleted on Jun 20, 2012 20:36:32 GMT 10
Yeah the aluminum channel has some corrosive pitting, but it's an acceptable amount. All etch primed and coated in some of that kill rust paint now.
I should have mentioned that the whole chassis has had the rust removed ( all by wire wheel) and a rust converter/ primer applied. All ready for some chassis black.
Thinking ahead what have you guys used to affix the floor to the chassis. I see the original method was glue/ pot rivet. There are a few options but what have others used?
|
|
Deleted
Deleted Member
Posts: 0
|
Post by Deleted on Jun 22, 2012 16:08:11 GMT 10
hi bricktop
we had to replace some of our channel too, and have put down an underfloor cover with the intention of putting marine ply over it, once we find two leaks which are driving us mad! We have replaced all the windows and will be putting a newly refurbished door on this weekend. Lots of photos of ours in Hall of Fame if you want to check out what we did, just click 1974 Viscount below signature.
regards
Jean
|
|
Deleted
Deleted Member
Posts: 0
|
Post by Deleted on Jun 22, 2012 16:35:51 GMT 10
Hi Jean, don't worry I checked your progress out when I first joined the site, and you have done so well, love the checker plate.
What was the underfloor covering you put on?
|
|
Deleted
Deleted Member
Posts: 0
|
Post by Deleted on Jun 22, 2012 22:16:58 GMT 10
thanks, the underfloor is di-bond, we were given a load of sheets so we used it on the roof and the underfloor, fixing it with sikaflex and rivets, it is super strong and works as insulation as well. Don't think we would have used it if we hadn't been given it as its quiet expensive. Worked great though, really pleased with it.
Glad you enjoyed looking at our reno, looking forward to seeing some more of your pictures.
Jean
|
|
Deleted
Deleted Member
Posts: 0
|
Post by Deleted on Jul 1, 2012 18:34:08 GMT 10
Progress made today. Welding is complete on the Chassis repares and the complete frame has been coated in chassis black. Started on the suspension/brake components. Going to stick with the mechanical brakes. The pic below shows a comparison and the difference a bit of grinding and chassis black can make!  |
|
Deleted
Deleted Member
Posts: 0
|
Post by Deleted on Jul 18, 2012 20:28:41 GMT 10
Bit of an update, will get some photos up soon but recently I have been working on reselling the lower half of the van.
I'm working bottom up so all the axle, brakes and suspension are reconditioned and painted. Just need some new bearings which will be one of the last jobs.
Removed all the old rivets and mastic ( or whatever it is) from the van and re sealing. They really did not use many rivets on the vans, I think I have tripped the amount used!
Next is to move to the roof. It's going to be a big job looking at water damage and the condition of the internal ceiling.
|
|
Deleted
Deleted Member
Posts: 0
|
Post by Deleted on Jul 29, 2012 15:02:47 GMT 10
Ok so front and back lower sections of the van are sealed and tow bar and chassis cleaned up and one coat of chassis black. Will do another coat when I have finished the roof, Which is next. New brake cables etc as well.   |
|
Deleted
Deleted Member
Posts: 0
|
Post by Deleted on Aug 14, 2012 12:52:15 GMT 10
New wheel arches in.   |
|