|
|
Post by atouchofglass on Nov 20, 2008 20:32:15 GMT 10
Hey All Because of being asked about how some woodwork was done.... Decided to put this thread up for all to add to and help anyone that wants to know how you do a particular woodworking job So how about starting with the basics First things firstStarted learning about woodwork about two years ago and because of a lack of confidence bought a heap of woodworking magazines that did built my desire to make something. Then bought a few hand tools and started making stuff in plywood... Bought a laminate cutter, orbital sander and cordless drill to move on to more accurate work  Then went to the library to see what books where available... eventually bought this book which is basics of woodwork  It is a concise version of a larger project book that is quite decent to start with To improve my joins and make exact cuts bought a drop saw on special  This is my first large project and I worked out a heap of ways to improve when making this. It's kwila and took three weeks to make It is a version of one of the projects in the full version of the above book  |
|
|
|
Post by atouchofglass on Nov 20, 2008 21:15:44 GMT 10
Making the overhead cupboard doors and framesWhen making any difficult or large project it is helpful to make all your mistakes and get your sizes/ depths worked out on a piece that is for the mistakes.... I call this a "mule" So the mule in this case was made from Taun a member of the Miranti family... heavy timber and less expensive than rosewood. When making the joins in the rosewood pieces there were still mistakes, but fewer than there would have been. To correct these use wood putty or wood filler.... not as good as a tight join but is better than having to redo the frame....  This is the door "mule" notice the extra hole... it was in the wrong place first time... adjusted the next hole and it fitted much better. Also had to make a cutout in the backing piece that holds the lock, so the push button would sit in the rosette at the right depth  In this photo you can see I started by screwing all the joins together as well as gluing them... It became obvious that it was not needed as the glue was strong enough to hold it all together and the screws just made a mess of the joins Also notice how bad the joint is .... made the mistakes on this rather than with the rosewood  Always have a bucket of offcuts to clamp to the pieces being routed.. that stops the timber being routed from splintering on the edges and means there aren't any clamp marks on the timber either.  All flat surfaces are sanded to remove any height differences.... And last but not least while working there is always a need to relax a little so have a small collection of restful melodies ;D ;D ;D  Cheers Atog
|
|
|
|
Post by kiwijim on Nov 20, 2008 22:24:48 GMT 10
G'day Atog, lovely set of tools you have there......must have cost a Quid or two   What's that I saw under your work-bench........."not a bottle of Gas" I hope......... Tut :oTut :oTut kiwijim  |
|
|
|
Post by atouchofglass on Nov 21, 2008 6:18:39 GMT 10
Hey Kiwijim eeeerrrrrr nnnooooo that's an optical illusion.....  Or it will be by the weekend..... Thanks for the tip Bloody fireys always on the look out to help people As to the tools they were actually reasonably priced Can't remember the price of the orbital sander perhaps 200? Laminate cutter $90 Drop saw $199 on special at Bunnings Wasn't going to buy it but a 10" Makita for under 200 was too good to pass up The worst value for money was the hole saw.... bought two sizes and the fittings for them...... $90   A kit of about 4 would have been $140 ..... but not the sizes I needed..... Clamps about $28 each Floor cramps ..... not sure, too long ago Guess what I'm trying to say is that you can do a lot of woodwork using decent tools for not a lot of money... Buy them over time and the pain is spread... Cheers Atog the firey's nightmare |
|
|
|
Post by atouchofglass on Nov 21, 2008 6:32:27 GMT 10
The routed timber ready to glue together with exterior wood glue 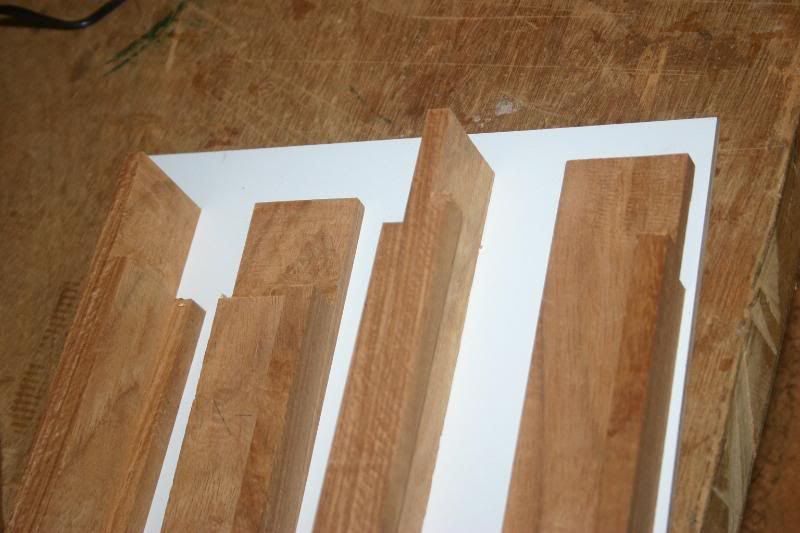 Just a photo of the clamps in use the four pieces of timber are clamped to the bench top which is flat and then cramped up using the floor cramp or clamps as shown. By using a square on the inside edges as you go it will show you that the frame is square. This is done while the clamps are a little loose and then tightened down Making sure the frame stays square as you go 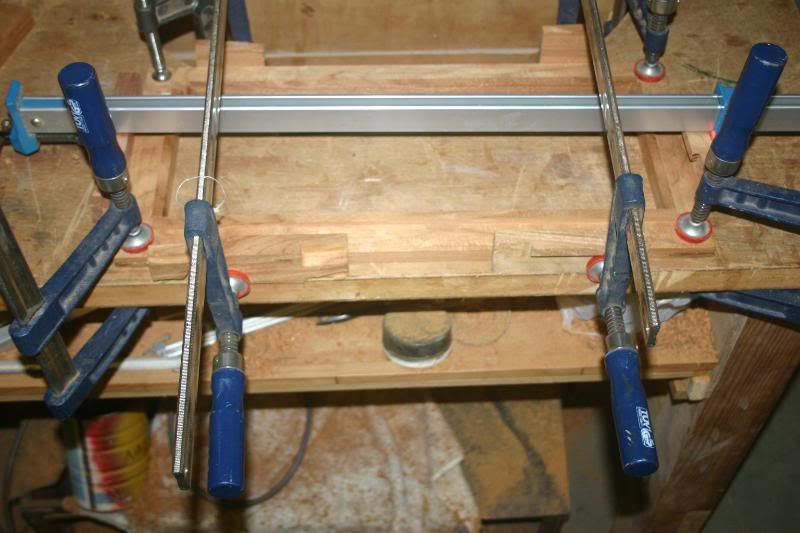 You will also notice that there are blocks of timber between the clamps and the frame This stops the frame from being damaged and gives the clamps a wider bite at the frame. The frame is left all clamped up for a few hours or overnight before releasing it. After this there was a lot of sanding shaping and cutting to size done finished the timberwork with Danish oil and then fitted the laminated plywood piece... That was matrixed in and left for about two hours 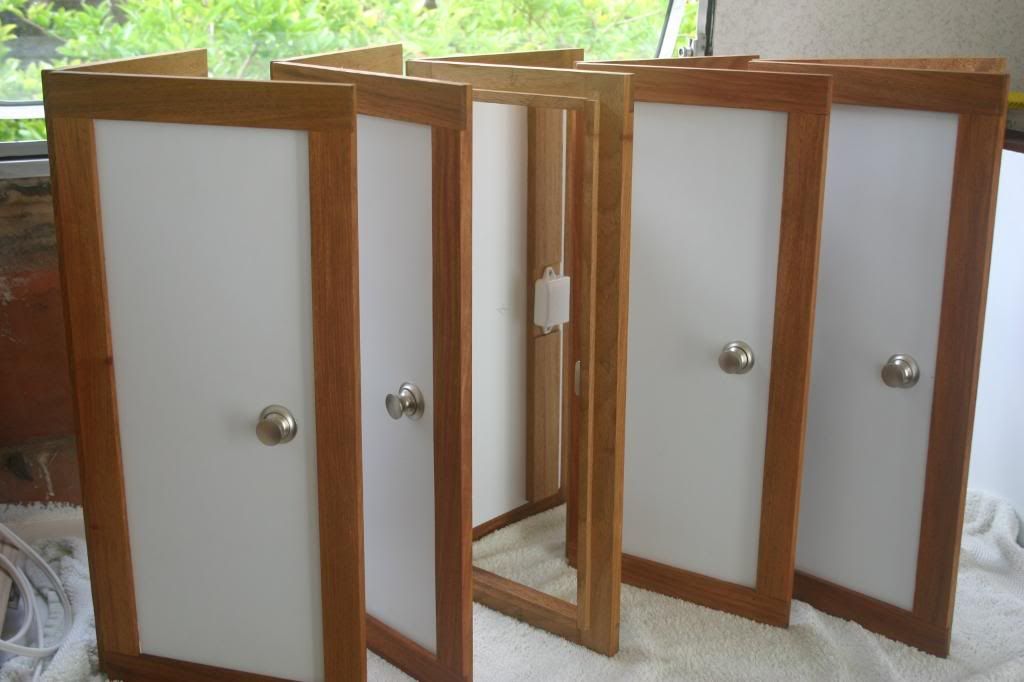 Hope this helps If you have any questions please ask Give a small project a go before going onto more difficult stuff and you will build your confidence as well as great timber work ;D ;D ;D ;D Cheers and happy experimenting Atog |
|
Deleted
Deleted Member
Posts: 0
|
Post by Deleted on Nov 22, 2008 16:30:06 GMT 10
Nice post Atog  |
|
|
|
Post by atouchofglass on Nov 23, 2008 6:40:13 GMT 10
Thanks Wahroonga
It might be a bit of preaching to the converted
But I figured some may find it interesting and useful
Just as a note anyone can post something they are doing on this thread
Infact I encourage it
If you're making any wood project for the van or otherwise the technique may come in handy for someone trying a different project for a van
Cheers
Atog
|
|
|
|
Post by bobt on Nov 23, 2008 20:58:28 GMT 10
Atog Thanks for kicking this post off. Yes it does help. I always like to see how others do it. Tools are cheap if you get good ones and look after them, particularly if you are always out doing things with wood. If you keep your eyes open every now and again Bunnings have a special on the GMC stuff and for budget gear it is rather good. You have just about convinced me that I need to look around for a drop saw. A book might be good for christmas..... Bob |
|
|
|
Post by atouchofglass on Nov 24, 2008 6:22:58 GMT 10
Greetings everyone Here's a little tip shown to me by a woodworker Should you dent timber, the dent can be lifted. The method is simple Moisten a cloth or rag (Moist, NOT wet) Using a hot iron (as in clothes iron) iron the cloth over the dent This allows the wood fibres to expand with the heat and moisture Don't iron directly on the wood, always have the cloth between the wood and the iron. Try not to use the wife's best iron they don't understand (trust me on this one)    There may be a lesser dent or no dent at all after this That makes sanding it easier and no need to remove timber you want. Cheers Atog |
|
|
|
Post by atouchofglass on Jan 26, 2009 18:07:27 GMT 10
Thought I'd add this bit for those that might try something similar. I have never done this before so there are most definitely better ways to do this job.... I just don't know them. Decided to edge the left hand side of the entrance to the caravan. Straight runs are easy Just rout out a groove for the ply to sit in and glue or matrix it on Then rout the edges.... Curves are a bit harderMade and temporary fitted the straight sections leaving the curve gap to see what measurements were needed... This told me I needed a section approx 270mm x 240mm So cut and glued several pieces of timber from the one piece together overnight. Less obvious that it is a lot of pieces joined together Used Aquahere exterior To keep it flat and not stick to the bench glued it up on a couple of sheets of newspaper clamped together and onto the bench. Next day removed clamps and sanded the newspaper off. Cut out a shape larger than needed .... just in case I made a mistake.   Also needed a small section for the very end of the capping. Used an off-cut of the glued up section. By cutting the groove before removing the small piece I needed it is safer to work with power tools. There is no way you could safely groove this timber if it was cut to size first.  Glued and matrixed the pieces to the edge Waited a couple of hours before proceeding What is not shown is the jigsawing, grinding (60 grit sanding disc) , filing and sanding to get from a rough shape to close to what is needed.  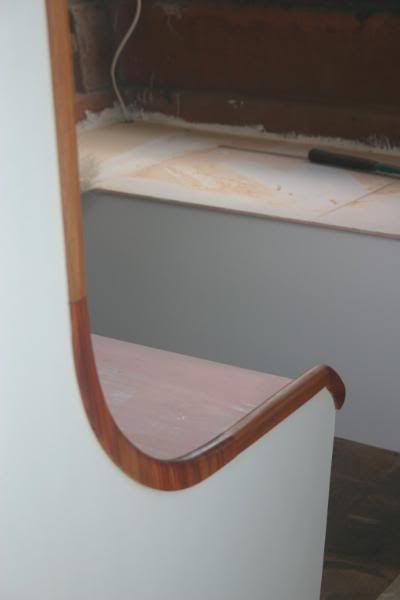 After getting the basic shape Routed the edge on the outside and sanded the inside edge to shape. Used an orbital for most of the heavy sanding and did the rest by hand. 180 grit Hand finished and then Danish oiled the wood. This post is a cheat in a way as it took me the best part of a day and a night to get it all to the finished state. Use clamps rather than your hands were you can Think ahead and do the power tool work before the piece of wood gets too small to safely work on. Hope this is useful Cheers Atog |
|
|
|
Post by mike on Jan 27, 2009 10:39:23 GMT 10
Greetings Atog,  Useful is an understatement... for me. You've given me ideas to fix some probs around our seats and table, as well as cupboards. Now I just need to find the time... like everyone. Thanks for the great photos because they make it all possible to see solutions in other places as well.  Great stuff!! Cheers Mike ;D ;D ;D |
|
|
|
Post by atouchofglass on Jul 26, 2009 11:43:04 GMT 10
Hey Gents and Ladies Just had the most fun with wood ever ...... Errrrr ok 2nd most fun....... AnywayThis week and over the past couple of weeks have been making some doors Finally got to trim them at a mates workshop on a panel saw ButWasn't quite right and needed to do a little bit more trimming Now ..... I could wait until next weekend and finish it on the panel saw again ..... OR Dust off my dear ol Dads hand planes 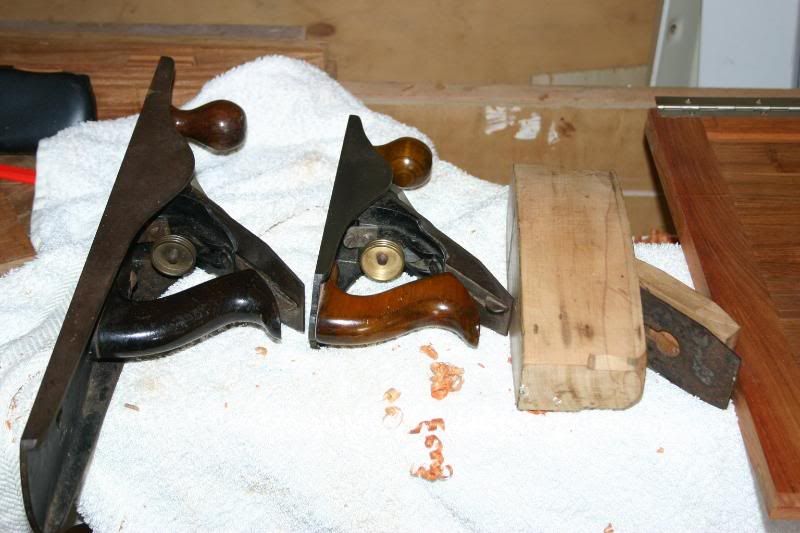 Having limited exposure to how to use them .... it was a bit of an anxious moment when dragging them out of the draw where they have sat for the past few years gathering dust and rust About 15 years ago I cleaned them up, oiled them, used them a few times and put them away ...... only to come out in emergencies Not that there is anything wrong with the tools Just the inexperienced user SoThis morning being the impatient type .... dragged them out, cleaned them up and "Tuned" the planes using a few scraps of timber  Soooooo much fun Soooooo much funIt is a strange but pleasant feeling to run a plane over a piece of timber and hear that silky smooth shhhhhh as the blade takes a super fine curl of timber off what is being planed Don't ask me why ...... it just is After a good 3/4 of an hour tuning, testing and generally having fun ...... removed the offending extra timber on one door Sadly it was all over in next to no time No need to sand the edge just planed..... it was smoooooooooth Arassed the edges (woodworkers term for beveled), rubbed a bit of Danish oil on the timber and fitted it to the kitchen So much fun ...... all over too soon  Looked up planes on Ebay today to see if there are any still about They are still available and not that badly priced either If you want a thrill and lots of fun.... buy one and use it Sadly some just leave them in draws and use the electric plane instead For small jobs like the one just done an electric plane would be like taking a sledgehammer to a walnut My planes have now been oiled and returned to the draw to plane another day Hmmm what else can I make ..... just so as to use these wonderful tools? Cheers Atog |
|
|
|
Post by bobt on Jul 27, 2009 23:15:11 GMT 10
Hi Atog Don't stop with the tips... I appreciate them... each little bit helps. I bought my first plane when I was 14.. still have it... Don't use it very often. Had a friend who was once a builder, he long ago retired and I ended up with some of his tools including the ones below..  He has since passed away. Just wish I knew how to use them properly.. They need some TLC they are as I got them bobt |
|
|
|
Post by atouchofglass on Jul 28, 2009 5:41:15 GMT 10
Veeerrrryyyy nice collection there Bobt Spend a quite afternoon in the sun one weekend with some oil and sandpaper on glass Will clean up the tools real well Am green with envy about the little block plane for bevels (2nd from top right corner) ;D ;D ;D Even if you don't use them, they are worth keeping in good order just in case and hey who knows you may just find a use for them in the rebuild of U.A.S Cheers Atog |
|
Deleted
Deleted Member
Posts: 0
|
Post by Deleted on Jul 28, 2009 8:31:25 GMT 10
Hey bobt,
That little lot you have there mate is a BEAUTIFUL collection, once you have them all cleaned up, lightly coat the metal ones and metal pieces on the wooden ones with some parrafin wax or similar to eliminate any future corrosion and then rub a little danish oil or similar on all of the uncoated wooden items.
Then wrap them in cotton rags or bags for storage in a dry place and they will last forever.
p.s Retract the blades into the plane body as well to protect fingers and the blades.
(Envious)Carl ;D ;D ;D
|
|
|
|
Post by bobt on Jul 28, 2009 21:24:30 GMT 10
arrr you are a loverly lot... Thank you for the tips. I was going to ask in this post how to go about restoring them, back to their former glory but you have already given me tips on what to do. Thank you Atog.. I assume I use a fine grade of sandpaper. Kiwicarl I have parafin wax... thank you Yep I am just a little proud of my collection. I do have an interest in collecting these sort of things. I don't have a large collection as I don't really have anywhere suitable to keep them, yet... I have extension plans for "The Shed" One needs to have an interest when they travel so when ever we are away with the caravan club we visit the 2nd Hand, Op shop, Antiquey type places and do a hunt. Mate it is fun having the wife on her hands and knees in the back corner of a shop scouring through boxes of greasey/rusty tools looking for specific types. She is often successful too.. ;D ;D We hunt down the 2 & 3 dollar bargains. You would be amazed at what we manage to pick up |
|
|
|
Post by kiwijim on Jul 28, 2009 22:38:55 GMT 10
Hey there Bobt, You sound like a bloke rather akin to kiwicarl and myself, ;D ;D Better head West and join us, that's where a lot of bargains can be found, Tools......Tools....Tools and more Toooools can be yours for a couple of bucks at the local Sunday Markets. You name it....... it will be there, ;D ;D ;D Found an original Model A Claxton horn there one day, stuck it in my car. the Boss bought it off me for ten times what I payed for it. ;D ;D Went back to the Markets the following week-end and found another horn the same, being stood on its rear with a plant in it, selling for the price of the plant....$2.00. took it home, chucked the plant in the bin, threw it on a battery, scared the hell out of the dog, still working great. ;D "AW" the thrill of scrounging around "OPP Shops" and Markets. Good luck. kiwijim |
|
|
|
Post by atouchofglass on Jul 29, 2009 5:47:50 GMT 10
Hey Bobt
Have a look on youtube they give you instructions on polishing the sole of the plane and possibly sharpening the iron
If you start with 320grit it will give you an indication of what is needed
Coarser if rust has bitten in deep or Finer if it just needs to remove surface rust
You may see from my photos that the sole on each plane are not really polished.....
So long as it is flat and smooth it should do a good job
Some go crazy and take the polishing and sharpening to an extreme.... which is fine if you have hours and days to waste
Cheers
Atog
|
|
|
|
Post by bobt on Jul 29, 2009 23:06:13 GMT 10
Hey Atog You know by the time I get to save some money and the middle of next year comes around Kiwijim will have left the west, so it would be a total waste going that far toward where the sun sets to chase some cheep tools.. As for a high grade polished look. At this moment... NO... they have some surface rust and I will tackle a couple of them on the weekend.. Think I will leave the sharpening to my son, he has a real good eye for doing that sort of thing. I just get em Blunter.. Thanks for the tips.... Much appreciated.. bobt |
|
|
|
Post by glennv on May 21, 2013 14:47:00 GMT 10
Hi all,
I know this thread is a little old ... well ... a lot old. I was reading with great interest the commentary about sharpening plane irons.
I have done a reasonable amount of wood work in my time, including wood turning, and my grandfather was a joiner by trade ... so he passed on a number of tips to my father ... and so on.
Here are some tips I have picked up.
1. Use a white wheel on your grinder. They grind cooler than the grey ones and are slightly softer and finer.
2. If possible, make an adjustable rest that swings up in front of your grinder. That way, you can set your angles consistently for the various tools. Planes and chisels (and even different types of chisels) should have different grind angles. This also helps minimise the depth of the grind, making your irons and chisels last longer. My grandfather had particular chisels with about a 40 to 45 degree bevel for the "rough stuff"... and then shallower bevels for the fine work.
3. Dress your grinder wheel with a dressing stone about every 2 or 3 jobs. Keeping the grinding wheel circular and flat achieves a better grind.
4. When sharpening plane irons on a bench grinder, I use a carpenters square and sharp pencil to make a square line parallel to the cutting edge - maybe 2 or 3mm away, so I can see the line as I grind. This helps me keep the grind as square as possible to the side of the iron.
5. Oh ... gently gently. Dont overcook the tip, or they get soft and wont hold and edge. Particularly true when you have been sharpening HSS wood turning chisels and then go back to traditional carpenters chisels or plane irons.
6. Remember - the nature of a bench grinder will leave a concave grind on the iron or chisel. This is exactely what you want. It is then the process of honing on the stone that gives you the razor sharp edge.
7. A wood turner I went to once showed me how he held the edge of his grind under a bright light - and looked for reflections ... kind of little bright spots ... which were the parts of the grind that were still dull. He would only consider the tool sharp when there were no "bright" spots. This guy (apart from being an artistic turner) was a production turner. Amazing to watch. He could take a 2 inch square block of timber about 6" long, mount it on his lathe by eye (perfectly centred mind you), rough out and turn a door stop in about 60 seconds with nothing but a skew chisel. His chisels were so sharp (and he so good) that he didnt even have to sand them.
8. Finish on an oil stone/wet stone. I found a jig in a hardware store once that has a small wheel on the bottom that clamps to the plane iron or chisel. Once mounted, you then rub the iron back and forth all at a consistent angle. Again, this jig can be set to the exact same angle each and every time you sharpen the iron, resulting in overall less work and longer life.
9. My grandfather used (and so I use) a 50/50 mix of oil and kero. He reckoned the kero had some form of cutting agent in it that gave a better edge (dunno what it is), but it certainly helps to reduce the viscosity of the oil, making the process easier.
10. Make a box for your stone. My father used to nail 4 brads on the underside of the box (leaving about half the brad exposed) and clip off the heads with side cutters. He could then "drop" the box onto a timber workbench, give it a whack with the ball of his hand, and it wouldnt move as you sharpened.
11. Once the bevel is honed, take off the jig, turn over and hone the back of the iron or chisel to remove the burr. Keep it dead flat and dont be tempted to lift it and give a bevel on both side of the iron. Thats no good at all.
12. Those that are particularly anal will use a piece of 1200 or 2400 grit wet and dry taped to a piece of glass and finish their honing that way. Havent ever tried that I must admit. Their theory is the glass is "dead flat", whereas the surface of a stone will end up concave over time.
Using the jig I mentioned earlier for honing on a stone was the best thing I ever found. I could never hold the irons at a consistent angle, and so I would tend to roll over the edge a lot causing a less than satisfactory finish, or I would hold the iron too shallow, and never get the edge ... and so would give up in disgust. Very rarely these days do I have to take chisels or irons back to the grinder. I just touch them up on the stone with my jig. The less visits to the grinder, the longer your tool lasts, and the quicker you can get on with the job.
The best reading I ever did on sharpening, and why things are as they are, was by wood turners. Let me tell you, one learns the value and reasons behind sharp edges and particular bevels, when you have a piece of timber zinging towards you at 3500rpm. A "dig in" causes one to stop work, put down the tools, drop to the knees and recite a few choice prayers ... assuming you survive unscathed or have not suffered a miocardial infarction in the process.
Oh, one final thing ... if you cant "push" the chisel through the cut with your hands, dont be tempted to use the palm or ball of your hand as a hammer. If you are pre-disposed to Dupuytrens Disease (as I am), this will only accelerate the onset.
I am a massive fan of using sharp tools. Be it knives, planes, chisels, I just find the result far more satisfactory, and the process far more enjoyable rather than frustrating.
Glenn.
|
|
|
|
Post by bobt on May 21, 2013 21:57:59 GMT 10
gidday glennv
Some of these not so recent threads make for a good read, some contain really go info, particularly when it helps you working on a hobby project or some.
Thanks for your tips, I have taken a bit of a step back when it comes to sharpening things, dressing grinders and the like. I have a son that is a fitter & turner, he sharpens my drill bits by hand and does a really good job if I may so myself. He regularly dresses one of my grinders and has banned me from using it. (He moved out several years ago) In his work he operates with tolerances that are in the "thou". so his is rather particular about some things..
bobt
|
|
|
|
Post by glennv on May 22, 2013 9:59:43 GMT 10
Hey Bobt ... having someone else do it for you at family rates is even better !!
Cheers ...
|
|