|
|
Post by andycam on Feb 26, 2012 7:16:06 GMT 10
Hi guys, I've been hanging around this forum for a little while, but having had no caravan to speak of, have until now just been looking, learning and getting a fair bit of inspiration. However, I have had my eye on an old van down the road for a few months and after reading some of the stories everyone has posted about renovating their caravans and what not, I bit the bullet, knocked on the door and offered to "take it off their hands" I was sort of hoping the owners would say "Sure, take it! We are sick of the damn thing sitting out the back....!" But, no, they wanted money..... and they strongly recommended that I take a look before getting too carried away. Seeing that the asking price was $250..... I thought I would take a look and after a few more nights stalking you guys and your caravan stories, drove round, hitched it up and brought it home. I am, at the moment, guessing that it is a 70's van, so here are a few photos. It is a Newlands "Deluxe". 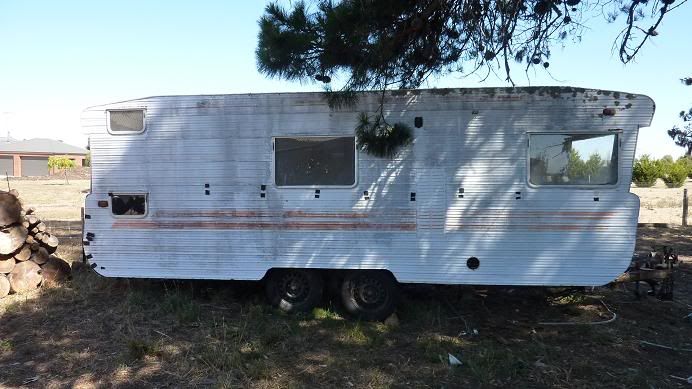 Got the tape measure out and she is exactly 6mtrs long or 19.7ft. Didn't seem too heavy to tow home, but that may be explained by some photos further down the track. (There doesn't seem to be much wood left in the frame.... Yes, wood, no alloy here,apart from the cladding....) 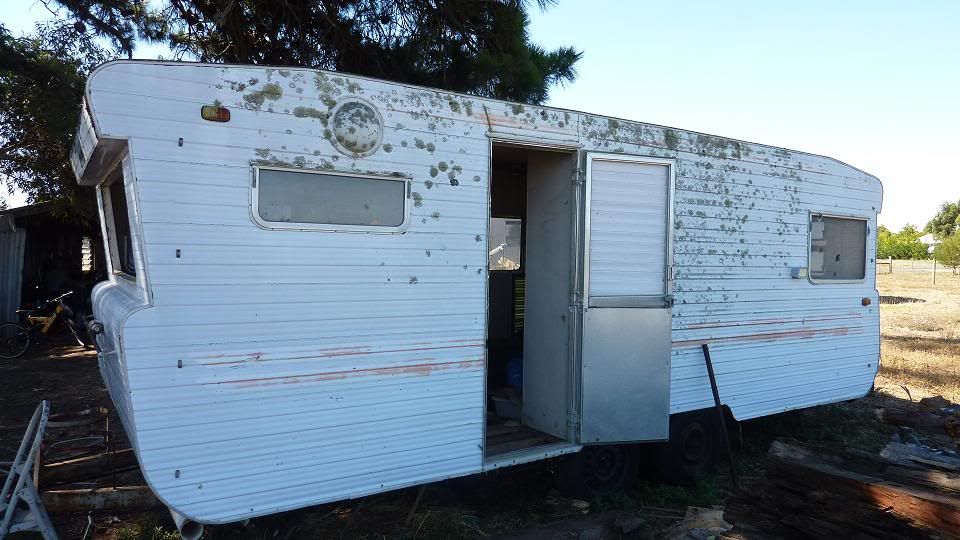 If anyone does have any info on Newlands vans it would be great to find out the approximate age or really anything useful. 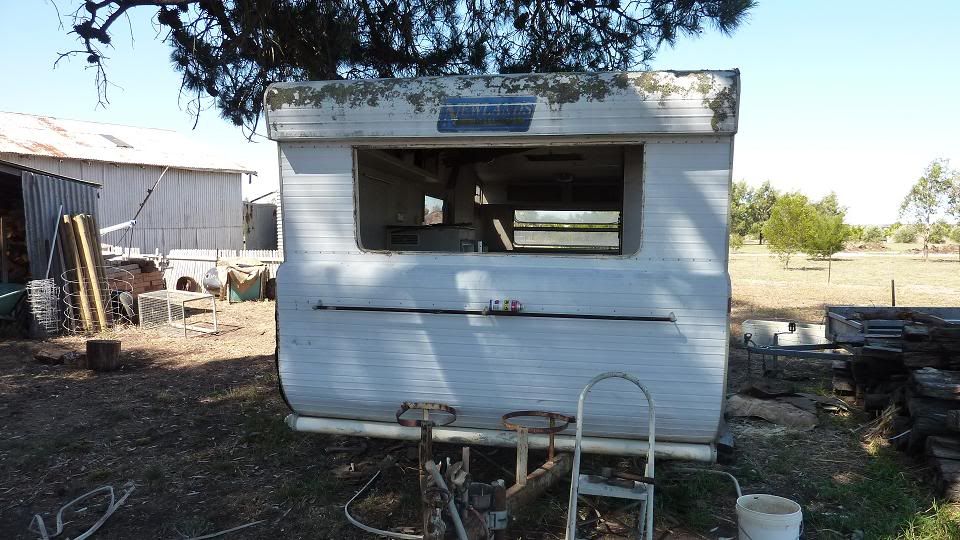 I have already started to strip it down, removing the front window, so as to get the internal ply off. Thought, however, that I should get some photos to document the progress (or regress??) before I got too carried away. Got some more photos here, but I will put them in another post, as I need to tweak them and post them on photobucket. If I am posting in the wrong section here, please let me know and if it's best moved to another section of the forum, go for it! Andy |
|
|
|
Post by atouchofglass on Feb 26, 2012 7:29:00 GMT 10
Hey Andy That's a big bite you've taken for a first renovation. ;D ;D The exterior actually looks pretty good. What's the interior like? Oh and Welcome to the forum  Cheers Atog |
|
|
|
Post by andycam on Feb 26, 2012 7:32:41 GMT 10
Here is the rear view, 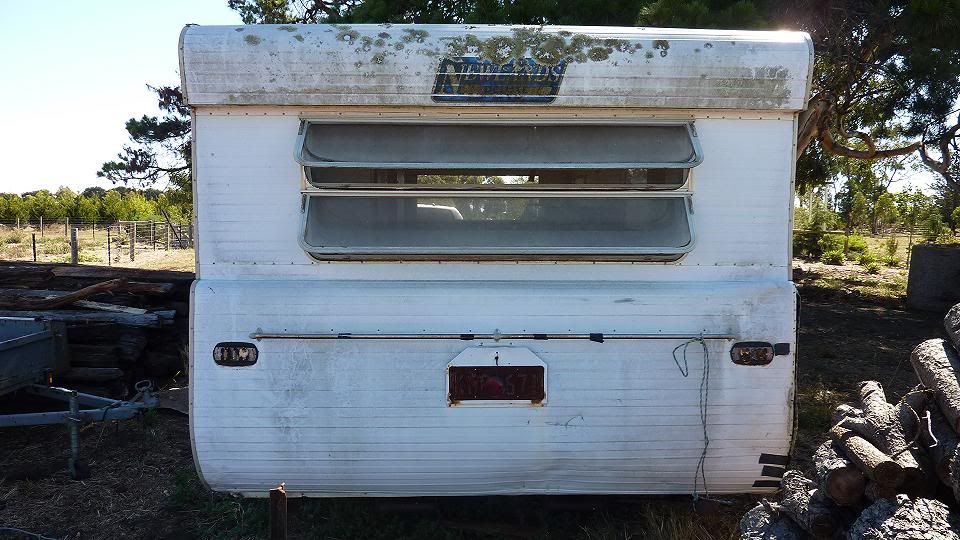 Still has the original numberplate attached, although she's obviously not registered....  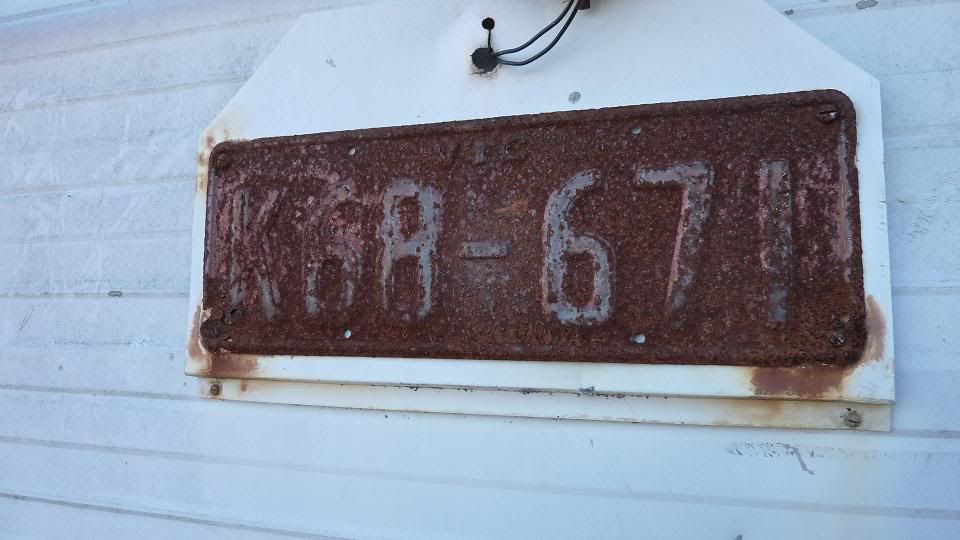 A close up of the branding sticker at the front of the van 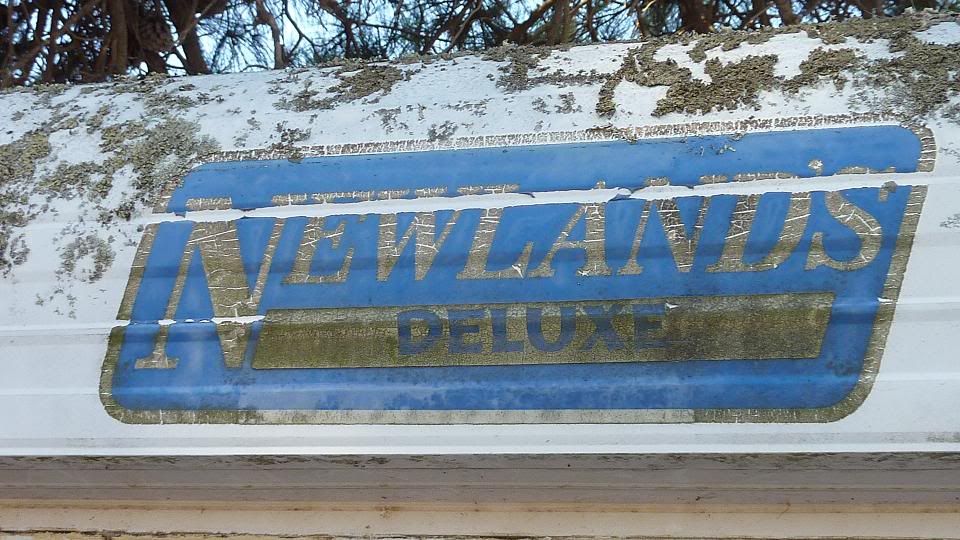 The draw bar is a bit rusty, but it appears to be only surface rust as is seen in the close up of the chassis number. 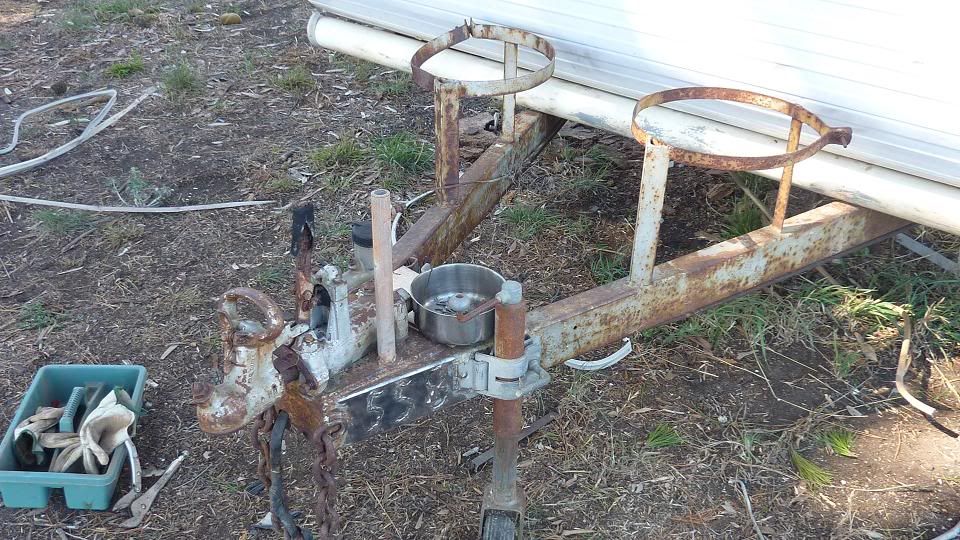 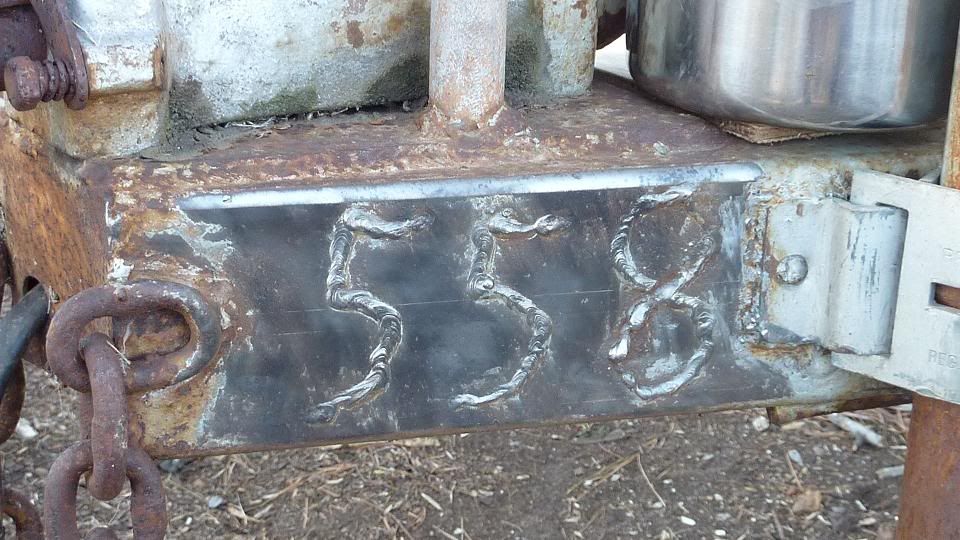 It appears to have only three numbers, but having read some posts in the "museum" bit about Newlands vans, it sounds like there should be four numbers....? Could it be that the jockey wheel has been welded over the top of the last digit? I'll have to go out and check later. But does this give enough info to perhaps estimate the age of the van? Will put up some pics of the inside (the bad part.....) in the next post. Andy |
|
|
|
Post by andycam on Feb 26, 2012 8:06:11 GMT 10
Oh Hi ATOG, I posted that last post without realising you had replied. Thanks for the welcome! The inside is pretty bad, my wife and kids think I'm crazy, as do the people I bought it off and the rest of the population who have had a look...... I think I'm up for it though, we'll just have to see..... Okay.......Looking towards the front of the van.... 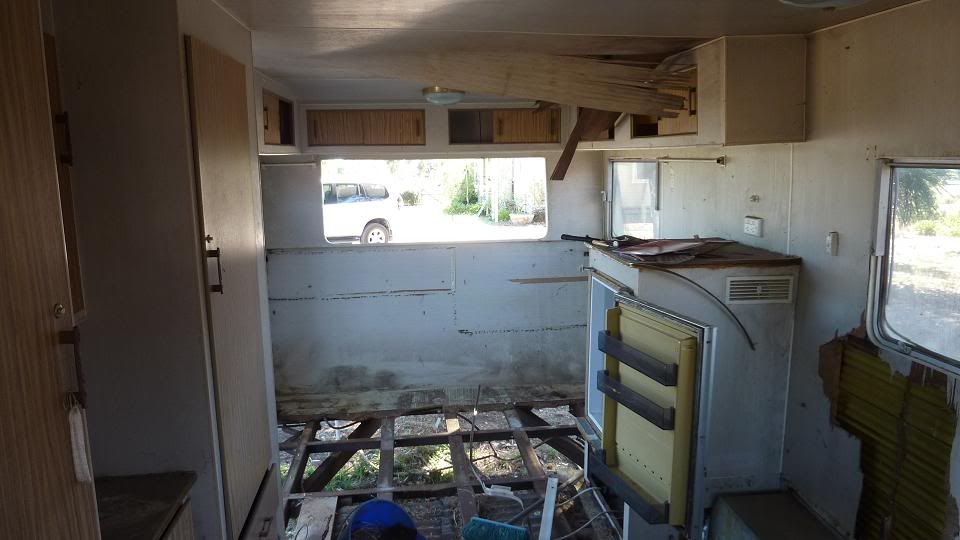 I think the floor will be the least of my problems... This time towards the rear, lots of daylight there, hey? 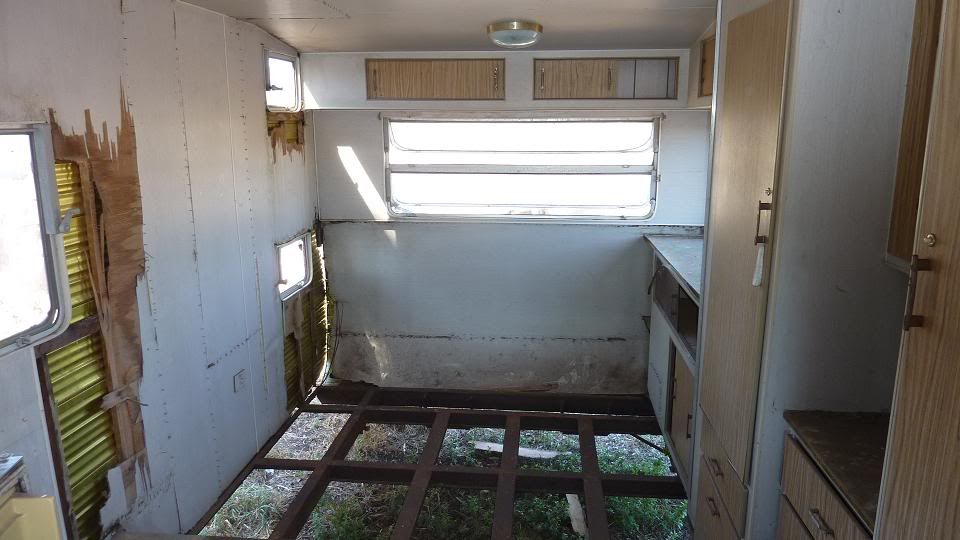 These two shots are slight close ups (really don't need to get very close .... :  of the rot problems, internal Rt rear and external Rt front. It is probably just as bad on the left side, it's just someone has removed the edging, allowing the cladding to come away from the frame. 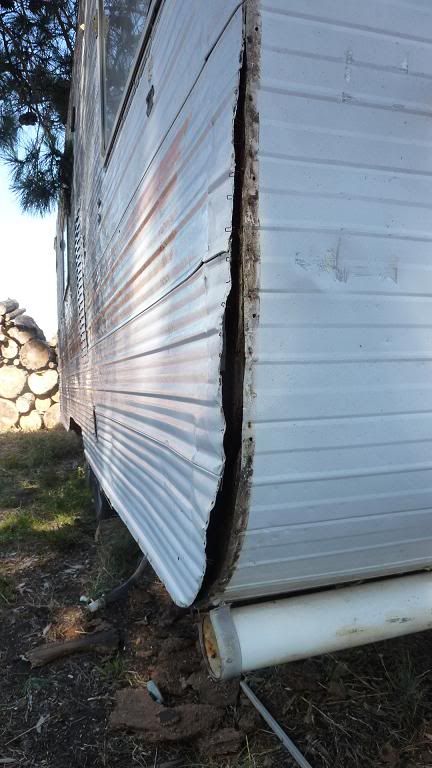 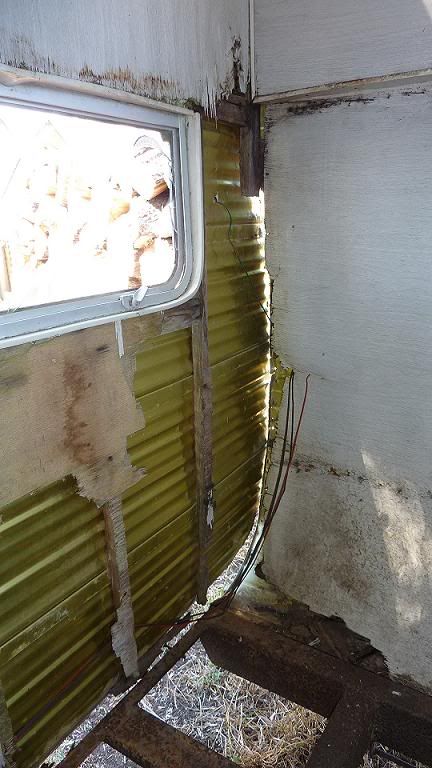 The fridge, which I haven't been game to plug in yet.... and one of the roof hatches, with the obligatory rot around it.. 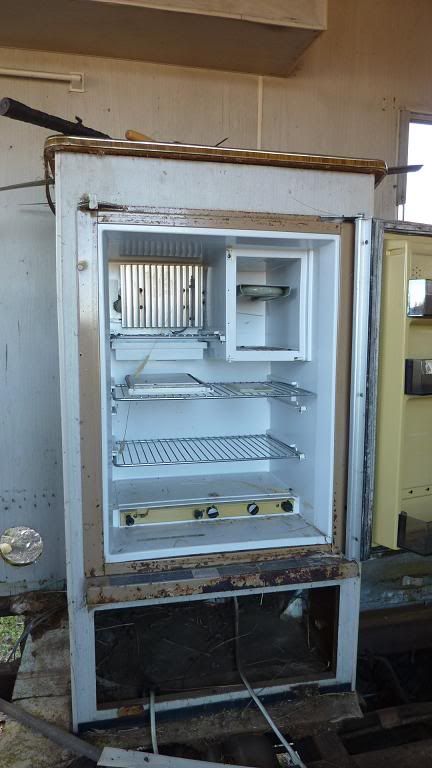 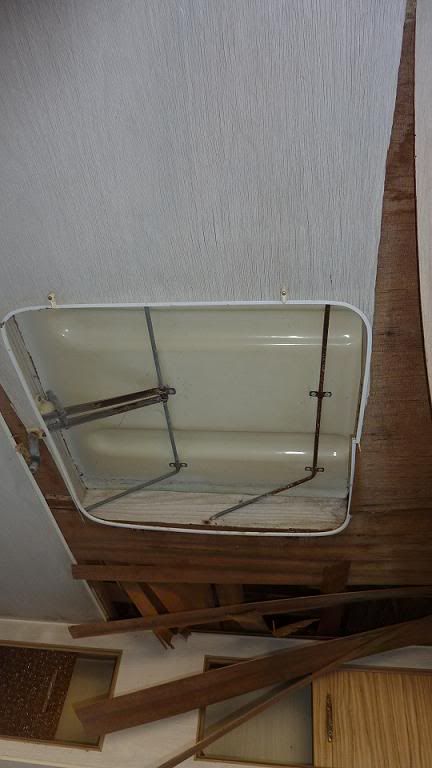 So, the chassis seems to be pretty solid and the z mouldings the the side frame sits in appear to be okay, but I will crawl under the van later today and have closer look. There appear to be few spots on the chassis where the cross pieces have been riveted (?!) not welded, that will be sorted before too long. And the rust is all surface rust, so hopefully I have a good base to start from.... Will keep you all posted. Andy |
|
|
|
Post by millard1399 on Feb 26, 2012 10:53:54 GMT 10
G'day Andy, As you can see, I've shifted all the info about your van into its own thread here in the Hall Of Fame section. Just keep adding to this thread as you work your way through sorting out the van. At this stage, I've called it a 1973 model, only because the wind-out windows became available in '73. We may have to change the year once we find out further information about the Newlands. I'll have a look through my collection of Newlands information, and see if we can shed any more light on the Newlands brand. I know from info I've collected that Newlands were taken over by Coronet in late 1977, but I don't know if that means the Newlands brand continued in its own right, or whether Coronet closed that brand down and used the production lines for Coronet vans. Anyway, let me see what I can find out for you.  I reckon you've done very well to get it for $250. I looked at a 1979 16ft Viscount yesterday that was in similar condition to yours, and the asking price was $3800!!  Sounds like you've got a nice "little" project to keep you out of trouble. ;D ;D cheers, Al. |
|
Deleted
Deleted Member
Posts: 0
|
Post by Deleted on Feb 26, 2012 16:23:36 GMT 10
my franklin was in sad shape as well. if you look down about 5 posts in this heading you will see how far we have come. anything is possible if you are stubborn enough. kel
|
|
|
|
Post by andycam on Feb 27, 2012 18:45:26 GMT 10
Hi Guys, Well had a bit more of a look/ demolish over Sunday and the more I see, the more I scratch my head about the way these caravans were built..... But seeing the back of some of the panelling has narrowed down the age of her... 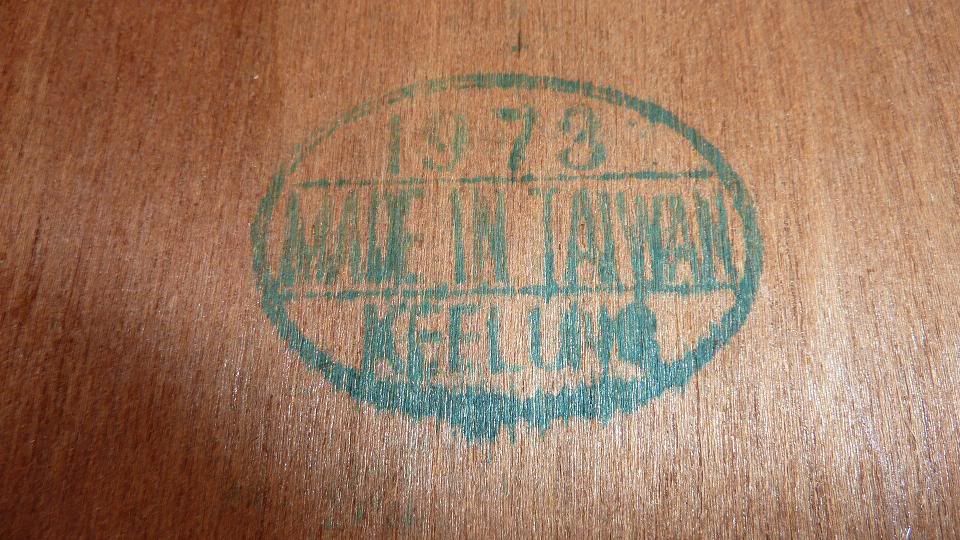 I can only assume that if the plywood was manufactured in 1973 then she has to be younger than this, pretty close to what Al (millard 1399) suggested. Had a look along the bottom rail determine the condition of the "Z" section (where the bottom of the frame sits). The following pic is a bit hard to interpret but it shows the bottom of the z (red arrow) to be quite sound, bit of surface rust, but nothing major. The blue arrow is pointing to what's left of the meranti bottom plate (frame) and the yellow arrow is indicating the cladding to put it (sort of) into perspective.....  There was some sort of moulding along the bottom of the cladding that, I assume, would have covered the exposed edge of the timber, but didn't do a great job of keeping the moisture out, obviously....  The other thing I noticed, which didn't show up at all well in the photos was that the internal ply cladding carried down below the wheel arches (gal steel sheet), completely exposed to the elements. This was quite a surprise to say the least...lol. So the complete bottom part of the frame on both sides is pretty much cactus and will certainly need to be replaced. Keeping this in mind, I have quite a few questions that you more experienced members may be able help with. Should I just post them here, as part of this thread? Or should I post them separately with topics of their own? More to come. Andy |
|
|
|
Post by millard1399 on Feb 27, 2012 20:34:41 GMT 10
G'day Andy, No, just post any questions relating to your van here. There are no hard and fast rules, but I personally think it's good to have the whole story about a caravan in the one thread. In a year's time, other readers can follow what you've done, and hopefully pick up some hints that might be useful to them. It's good that you found the date stamp on the plywood. Looks like we might have guessed pretty close to the actual year. I guess it depends on how long it took for the plywood to come from Taiwan, and how quickly it was used when it got here. I think we could be confident your van was not later than 1974, eh? From your photos, it looks like you've come across a common situation with the bottom framing timber. Any leaks in a van mean the water has to end up somewhere, and it's usually down at floor level at the sides. You're lucky the steel chassis rail hasn't perished as well as the timber, so you're ahead in that respect at least. Go ahead...Hit us with some questions...But make 'em easy so we've got a shot at answering them...  cheers, Al. |
|
Deleted
Deleted Member
Posts: 0
|
Post by Deleted on Feb 27, 2012 20:38:15 GMT 10
ouch that rot is just nasty, glad my viscount has an aluminium frame. Being the main bottom plate of the frame makes it a bit tricky to cut out and replace. And I thought I had my hands full.
|
|
|
|
Post by andycam on Feb 27, 2012 20:50:43 GMT 10
This is a sketch of what I think the bottom rail/plate would have looked like back in 1974. You can see that if the sealant along the moulding failed (if.....lol!) water would have just run down the cladding, between the moulding and cladding coming into direct contact with the wooden frame.. Assume the sealant didn't fail along the base then of course the water would just sit there.....  If I were to keep to the same configuration, which I think would be the simplest option at this stage, I would think about adding another section of angle/moulding between the cladding and the timber, as below. 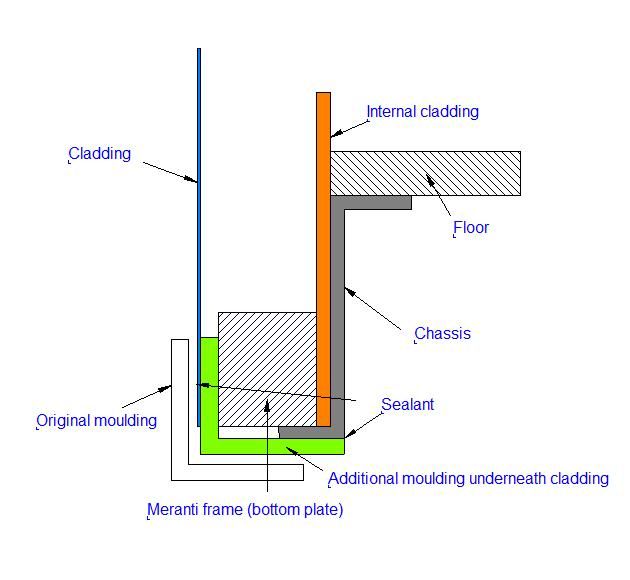 Hopefully this would increase the water resistance a fair bit. The original moulding still in place to "finish" the bottom edge. Even better, from a moisture perspective anyway, would be having the frame sitting directly on the floor, rather than down in the "channel" 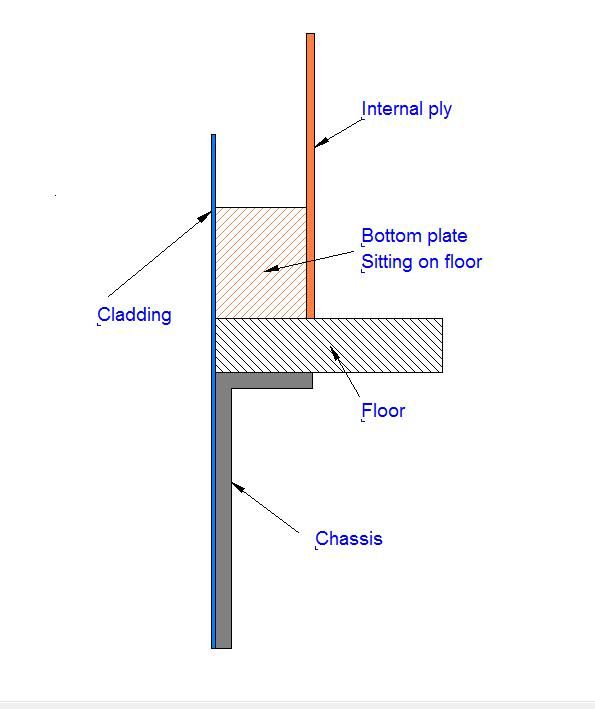 However, this would be a fair bit of mucking around I feel, and maybe more trouble than it's worth. Raises a couple of questions. 1. I would lose internal width, by probably a couple of inches. Not a huge amount, but..... 2. This would mean having to trim down the cladding for the roof and front and rear by the same amount. And redesigning the roof frame. This sounds like a bit of work, as if I don't have enough to tackle anyway 3. Not sure whether it would be as structurally sound as there is not as much vertical stability in having the frame bolted down to the floor as opposed to bolting it to the side walls of the chassis. Does this make sense?! I'd love to hear any advice or thoughts on this, I know it's only a small part of the whole job, but I really like to have things thought out before I start cutting up timber etc. Cheers Andy |
|
|
|
Post by andycam on Feb 27, 2012 21:40:44 GMT 10
Lol, just realised I posted the wrong pic of the bottom of the van, now has the right photo with the coloured arrows.....  Al, I do have a couple of questions........ 1. When you were rebuilding the frame on your poptop, how did you (or anyone else who has done the same for that matter!) remove the external cladding from the frame?? I'm pretty sure mine is stapled and glued on. The staples are hidden (I think) under the joins in the cladding and the glue looks like stud cement, a red colour and plasticky... The original plan (in consultation with my chippy brother) was to remove the rotten bits of frame from the inside after removing the ply panelling, whilst keeping the cladding in place, doing sections at at time. Having had a good look at how the whole thing goes together, I'm just not sure that this is feasible and am thinking that I might have to follow in your footsteps, Al, and redo the frame completely.... Which means removing the cladding.... Which I'd like to use again... From the photos in your thread, Al, it appears that you removed each side/end in one piece. This is a dumb question, I know, but was it easy...? 2. Did you put it back on in one piece, or did you "slide" the panels apart and glue/staple them back on individually...? I just can't see myself (even with a few extra hands!) manhandling a 6mtr by 2mtr piece of alloy sheeting whilst trying to glue it / staple it back on to a vertical frame.......  Or is this how it is done? lol 3. I noticed you used a bit of treated pine in the reno of your poptop. What I couldn't tell, was it the whole thing or just where water damage may be a problem? I would be keen to use treated pine, certainly along the bottom of the frame, but my brother has suggested that it needs to be shielded from contact with both alloy and steel as it can cause them to corrode... This may depend, I think, on the type of treated pine, but do you think this something I need to be worried about? I will do a bit more trolling in the hall of fame to see if there are some tips regarding the cladding etc, but would love to hear of any advice. Andy |
|
|
|
Post by millard1399 on Feb 27, 2012 23:21:59 GMT 10
G'day Andy, If we step back and look at the bigger picture with the restoration of these vans, there are a couple of things to keep in mind: 1) 99% of problems found in these old vans has been caused by water leaking into the van. It follows that we should spend 99% of our time in making sure the van won't leak after we've completed our restorations. Sealing the van correctly is our first line of defence. 2) Our second line of defence is adding bits and pieces into the van that will help delay any damage if the van happens to spring a leak at some time in the future. (Which means our first line of defence has failed us.) With the above two points in mind, it doesn't matter whether you have the wall butted to the side of the chassis, or have it sitting on the floor. Both methods have been used by different manufacturers, and I don't think anyone could argue for one way or the other. The only question that matters is: "What's easiest for me to do?", and then follow the answer. I think you'll find the side cladding consists of strips of aluminium interlocked together. I can see in one of your photos above that there are joints about every 10 inches up the wall. If you look carefully at the ends of the cladding, you might see a joint that looks like this... 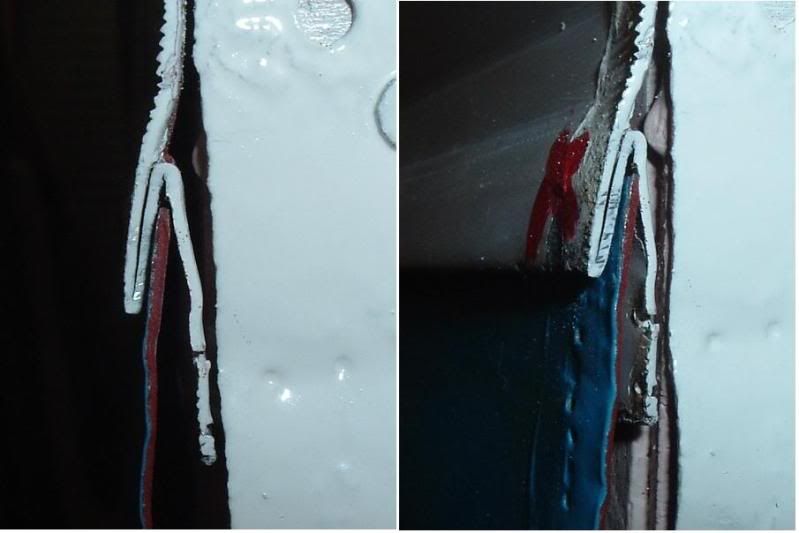 Check along the wall and see if there are screws in line with where the timber wall studs are located. Maybe your cladding was fixed with only stud adhesive and no screws, in which case a carefully applied chisel should be able to break the adhesive bond without damaging the cladding itself. There will be staples at either end of the strip of cladding (I can see them in your photos), and there will be a staple at each stud on the bottom of each cladding strip. You need to make up a "staple remover" by getting an old flat bladed screwdriver and grinding the blade down so it fits just inside the width of the staple. Then you can hammer the 'staple remover' in under the head of the staple, and lever it out like you would with a set of tyre levers. If the staples are water damaged, many of them will snap, and so you also need a pair of parrot-beak pliers to pull the snapped prongs out. You will curse and swear at whoever invented staples, but eventually you get there. You might only have to take the bottom strip of cladding off to manage the repairs to the frame, but that will depend on how extensive the damage is. Check the cladding out, and let us know what you find, and I'll post some other helpful info about the repairs in another Reply. Time for bed for me. cheers, Al. |
|
Deleted
Deleted Member
Posts: 0
|
Post by Deleted on Feb 28, 2012 9:25:56 GMT 10
Hi Andy, welcome to the forum.
What a great project you have taken on, trust me it will be worth it in the end. We knew nothing about caravans when we bought ours and thought we would just do some basic tidying up of our Viscount - cleaning, refitting the inside, bit of painting.
Six months later we have completely gutted the van, redone the chassis, drawbar, floor, windows, and so it goes on!!!!!
BUT we are having fun doing it. (click link under our name if you want to have a look)
Have fun doing yours and keep asking questions, these guys are amazing with the amount of knowledge they have.
cheers
Jean
|
|
|
|
Post by andycam on Feb 28, 2012 20:40:27 GMT 10
Hi Jean, and thanks for the welcome!  I certainly hope it will be worthwhile! I can see the potential in the old girl and I've still got the vision! But I think I might be alone in this regard, certainly with respect to rest of the family! No doubt though, they'll be eating their words when we pull up next to a river somewhere with our newly refurbished classic van....! (They might have all left home by then though and it will probably be to big for just my wife and me lol!) So Al, you were spot on about the cladding. ;D (And the staples too  ) It does slot together just like in the photos you added. There are no screws or other fixings, apart from hidden staples, just the stud cement. 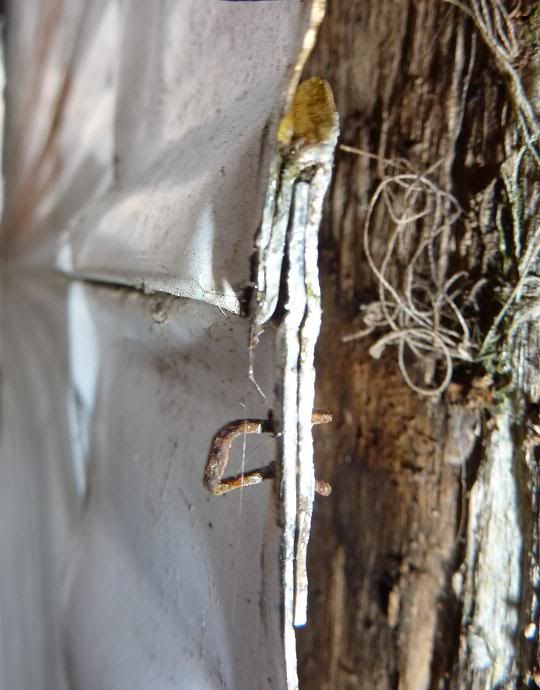 This shows basically the same profile as the one you had, slotting into the panel above it. I was able to remove the bottom sheet of cladding relatively easily as all the staples along the bottom had either rusted out or the timber they were attached too had mysteriously disappeared.... It would seem that the original manufacturers would have started the cladding at the top of the caravan, stapled and glued the first piece on, then slotted the next sheet into the bottom of the top sheet, glued and stapled and on from there. So it was just a matter of running a chisel up between each stud and the cladding. Once I got it started, I had no problem with the edge of the chisel catching the aluminium at all. And voila, off it came! Just a hint for anyone attempting to do this at home....... Don't try to lift a 6 mtr length of aluminium cladding in the middle....... Get someone on the other end or drag the sucker along the ground...... And, no, it isn't the weight of it that is the problem! Having removed the bottom sheet and cursed myself for the fresh kink in the middle of it.... it became obvious just how extensive the damage is along the bottom rail, not that I was expecting anything less though... 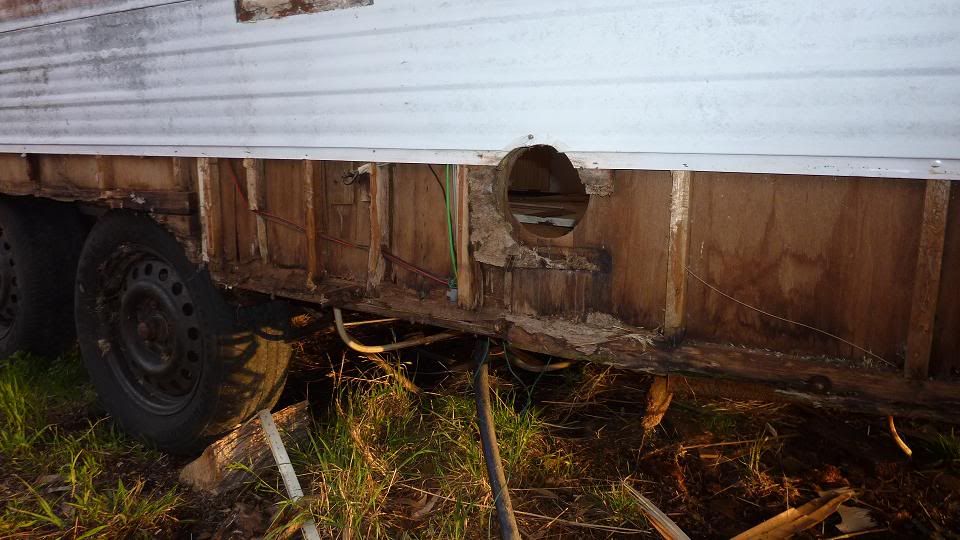 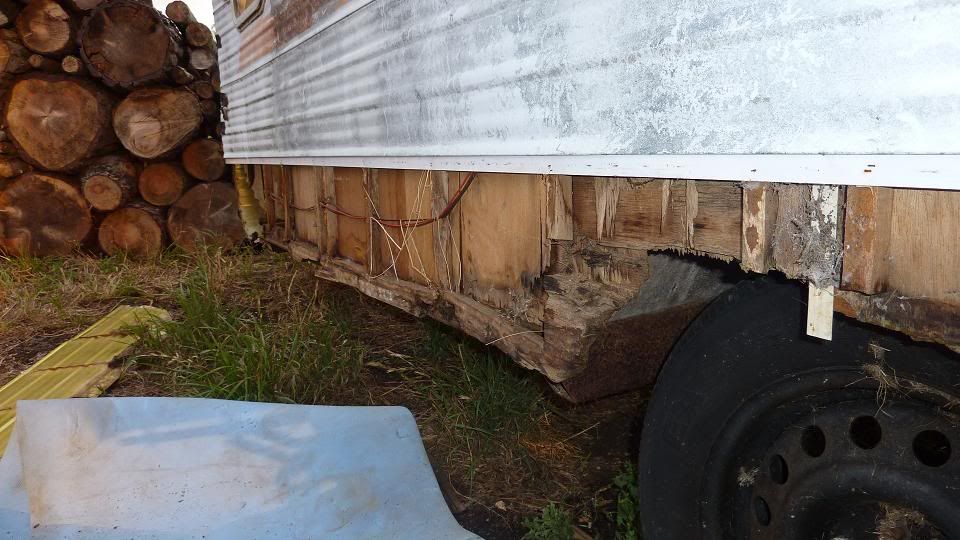 Ah well, having been able to get the sheeting off pretty easily has brightened my evening anyway. Now for the next sheet. So I did what Al (Millard1399) suggested and made up a tiny chisel from an old screwdriver to remove the staples along the bottom edge that were hidden under the lip of the preceding panel. 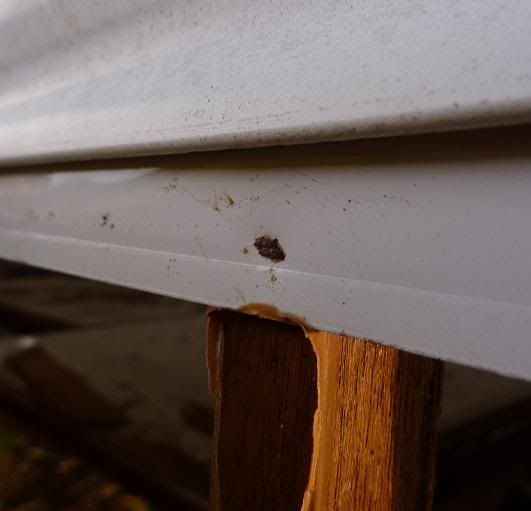 And promptly came to understand just why everyone hates these little pieces of metal so much..... So very fiddly I managed to remove the staples along the bottom of one panel over the span of about an hour. Well it possibly wasn't that long, but it sure seemed like it and by the time I had finished it had become too dark to see what I was doing. Contrary to what I had thought, the rusty staples (into possibly rotten timber), are the hardest to remove and the clean ones that are in good timber did seem to come out a lot easier. So I am hoping that as I work my way up the wall, it won't be quite as difficult ..... The more I get into it, the less daunting it all seems I have to admit though, having had more of look through the Hall of Fame and looking at all the great photos of those aluminium framed vans......... Ah well, I do enjoy working with timber Until next time.. Andy |
|
|
|
Post by millard1399 on Feb 28, 2012 22:42:38 GMT 10
Ha ha ha, Andy, and welcome to the "Staple Removers Club"! Your membership badge is in the mail!! ;D ;D And yep, the corroded ones are the worst to remove. Those pesky steel prongs double in diameter when they corrode, so they lock inside the timber like a screw. The prong on some of mine just kept snapping as I tried to coax them out. For the really stubborn ones, I ended up giving up and just belting them back below the surface of the timber with a hammer and small nail punch. Pity about the unfortunate kink in the cladding strip. No doubt you would have now realised that the best way to carry these strips is to have them hanging down vertically while you grip the top edge. Then you have to walk like a crab sideways to get the strip from A to B.  The other trick is to clamp a length of something rigid along most of the top edge of the cladding strip. Something about 3 metres or longer is good, as long as it's made of stuff that doesn't flex too much. Put it in the middle along the cladding length, and put three clamps end-centre-end along the rigid "splint" to stop the cladding from flexing. This method is really useful if there's a bit of wind around and you are trying to manoeuvre 6 metre lengths of cladding from one place to another. I can see you've got a slight case of "timberus rotterus" along the bottom of the frame. Nothing that a stick of dynamite wouldn't fix, though. (...I was often tempted to try that option on mine! ) I'd encourage you to explore the option of using treated pine timber when you replace whatever needs replacing along the bottom. A lot depends on whether you can source the right size timber, or otherwise have to ability to cut-to-size on the job. It's a good timber to use as a second line of defence, which I noted in my post above. You can cut the rotted studs away at the bottom as well, at say a foot above the bottom timber 'plate' (the timber alongside the chassis rail). Then you make replacement one foot lengths of treated pine and put them into the stud positions. Where the treated pine butts up to the bottom end of the remaining stud, a splint is glued and screwed to the side to lock the two pieces together. Saves you having to replace the whole stud. The repaired stud would sort of look something like the photo in the top right corner of this group. You can also see in that same photo how I used treated pine to replace the rotted timber across the wheel arch. I have a bench saw that allows me to cut timber to the size I need, so I was able to buy larger sized timber and cut it down to match the existing frame size (which was a really odd size of 23mm wide)... 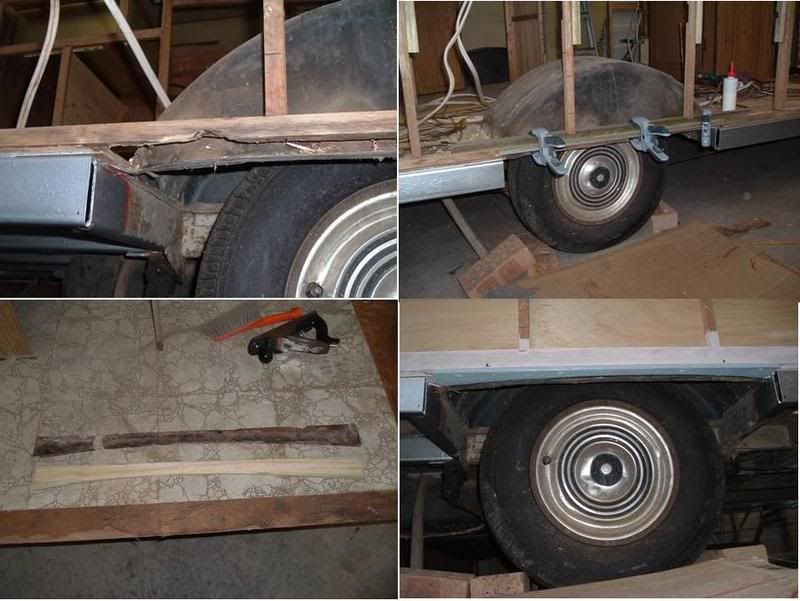 One caution I need to give you at this time is to not take all the side cladding off if you have to repair any of the end frame(s). You need the side cladding in position so you can build the new framework to match the curves at the front and rear ends. A big mistake I made in my job was to remove the side cladding and then build the replacement framework in situ. I never really knew whether the curved timber I cut was an exact match to the curve at the end of the cladding. Luckily when I put the cladding back on (unlike you I only had two pieces - top white, and bottom blue), they matched up fairly well, but I still had to do a bit of trimming to get them to match perfectly. My preferred way of doing the same job in the future would be to take the cladding off the end of the van and build the replacement framework against the inside of the side cladding. Much easier to make sure they match together. Let me know if any of what I written above doesn't make sense to you, or needs further explanation. cheers, Al. |
|
|
|
Post by Caprinut on Feb 28, 2012 23:04:12 GMT 10
Andycam, Ive, as most others have gone thru your learning curve and found the bottom of all the timber in a similar state as yours. Rather than rebuild everything from the base up, what I did was to scrub up the base channel with a wire wheel on a grinder, also use flap discs they work a treat until I was to reasonable metal, even tho in some places the bottom section was rusted away. Then a good paint with rustconverter and metal primers etc. What I now had was a angle that could hold in place a square section of 40 x 22 galv fencing strip which I glued and clamped until dry with Sikaflex premium adhesive silicon. This produced a robust bottom rail that is good to go for the next 20 years. My walls were then repaired by means of plicing sections of timber and ply frame to rest onto this rebuilt section. Saves a complete cut and weld job and is a sturdy brace for the walls to rest on. Generally the interior beds and cupboards are what brace and hold the walls square, not the base rail.  Hopefully you can see what I did from this pic. Some walls were so bad that I made up complete new sections and overlapped and glue them over the old stained ply.  The end result from the inside looks beaut.  |
|
|
|
Post by Caprinut on Feb 28, 2012 23:15:46 GMT 10
One word of caution re treated pine. It is vacuum treate with arsenic and the wood dust is dangerous if inhaled. Even handling it allows arsenic to penetrate your body, hence it is now banned in playgrounds and schools. Arsenic has a slow degenerative effect and accumulates in the body.
It is also highly corrosive and ordinary staples and screws will dissappear in no time. Even big bolts corrode thru in a couple of years. You have to end up using stainless steel if you want it to last for the next generation. Better to do what Millard1399 said and concentrate on water proofing rather than overbuilding.
|
|
|
|
Post by andycam on Feb 29, 2012 6:07:08 GMT 10
Well, I think the one thing that both Al and Caprinut are strongly recommending is adhering to the KISS principle. Keep it simple, stupid.... And I have to agree as well. I do have a tendency, if something is damaged or needs repair, to leap in and redesign, re-engineer and completely rebuild something that could probably have been glued back together....lol.
I think if the majority of the frame, as I expose the higher sections, is actually okay, I will try and do what you guys have suggested and repair the bad bits, rather than rip it all out....
Thanks for your input, it really helps to clarify things as I go.
Cheers
Andy
|
|


 of the rot problems, internal Rt rear and external Rt front. It is probably just as bad on the left side, it's just someone has removed the edging, allowing the cladding to come away from the frame.


 )
)

